Libtorch:pytorch分类和语义分割模型在C++工程上的应用
1. 模型的转换
pytorch生成的模型参数格式为.pth,需要转化为.pt应用到C++工程中。转化代码为
import torch
from model1 import FastModel
model = FastModel(1)#搭建的网络模型
model_weight_path = "./model.pth"
model.load_state_dict(torch.load(model_weight_path))
model.eval()
example = torch.rand(1, 1, 1029, 1228)
traced_script_module = torch.jit.trace(model, example)
traced_script_module.save("model_trace.pt")
2. libtorch的安装及配置
在pytorch官网下载相应版本libtorch,工程部署选择Release版本,使用GPU选择相应CDUA。Libtorch的官方手册中可以查阅相关函数的使用方法。

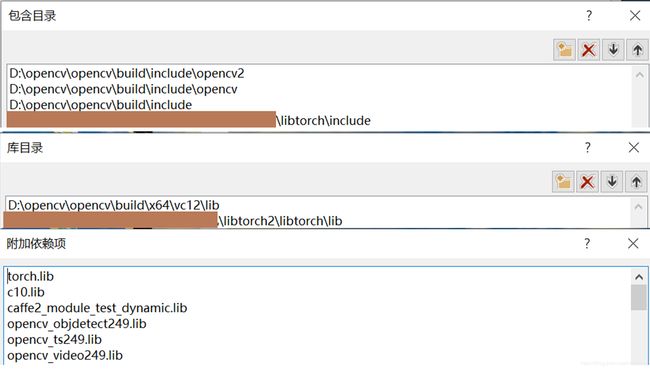
平台编译环境选择X64 release,在VS项目属性中添加包含目录、库目录和附加依赖项,配置好OpenCV。

找不到相应dll的解决方法。

3.在C++中调用模型进行预测
分类模型,输入图像为灰度图像,输出类别为两类。
#include "stdafx.h"
#include 分割模型,输入图像为灰度图像,输出类别为两类。
/**************************************图像分割********************************************/
using namespace std;
//对图片首先进行处理,返回张量
torch::Tensor process(cv::Mat& image, torch::Device device, int img_hegiht,int img_width)
{
	cv::namedWindow("test1", 0);
	//首先对输入的图片进行处理
	cv::cvtColor(image, image, CV_BGR2GRAY);// bgr -> gray
	cv::Mat img_float;
	cv::resize(image, img_float, cv::Size(img_width, img_hegiht));
	cv::imshow("test1", img_float);
	std::vector<int64_t> dims = { 1, img_hegiht, img_width, 1 };//[B,H,W,C]
	torch::Tensor img_var = torch::from_blob(img_float.data, dims, torch::kByte).to(device);//将图像转化成张量
	img_var = img_var.permute({ 0,3,1,2 });//将张量的参数顺序转化为torch输入的格式[B,C,H,W]
	img_var = img_var.toType(torch::kFloat);
	img_var[0][0] = img_var[0][0].div(255).sub_(0.5).div_(0.5);//调整为[-1,1]
	return img_var;
}
int main() {
	////////////////////////////// 读取图片////////////////////////////////
	std::string file_name = "测试图片";
	cv::Mat image = cv::imread(file_name, cv::IMREAD_COLOR);
	int img_height = ***;
	int img_width = ***;
	///////////////////////////设置device类型//////////////////////////
	torch::DeviceType device_type;
	device_type = torch::kCPU;
	torch::Device device(device_type);
	//////////////////////////////读取模型////////////////////////////
	torch::NoGradGuard no_grad;
	torch::jit::script::Module module = torch::jit::load("model_trace_FastSCNN.pt");
	module.to(device);
	module.eval();
	/////////////////////对图片进行处理,得到张量///////////////////////////
	torch::Tensor img_var = process(image, device, img_height,img_width);
	/////////////////////////////进行预测////////////////////////////////////
	std::chrono::steady_clock::time_point t1 = std::chrono::steady_clock::now();//记录时间
	torch::Tensor result = module.forward({ img_var }).toTensor();
	std::chrono::steady_clock::time_point t2 = std::chrono::steady_clock::now();
	std::cout << "Processing time = " << (std::chrono::duration_cast<std::chrono::microseconds>(t2 - t1).count()) / 1000000.0 << " sec" << std::endl;
	//////////////////////////////////////////////////////////////////////////
	result = result.sigmoid();
	result = result.squeeze();//删除一个维度,默认是squeeze(0)第1维
	result = result.mul(255).to(torch::kU8);
	result = result.to(torch::kCPU);
	cv::Mat pts_mat(cv::Size(1228, 1029), CV_8U, result.data_ptr());
	cv::namedWindow("test", 0);
	cv::imshow("test",pts_mat);//二值化图像
	cv::waitKey(0);
	return 0;
}
4.注意事项
1、调用torch::NoGradGuard no_grad停止autograd模块的工作,以起到加速和节省显存的作用,否则预测速度慢使用GPU时显存不足。
2、OpenCV中的图像尺寸顺序是先Width后Height,pytorch中先Height后Width。
3、调试过程中使用std::cout << input_tensor << std::endl查看tensor中的数值是否正确