git小白学习日记|笔记(2018-09-09更新)| 四次更新
一、博主学习git 看过的博客、文档,推荐推荐
1、git 官方文档中文的哦,必读必读
2、廖雪峰前辈的git 教程,非常的详细,五星推荐
二、说明
三、具体笔记
1、git 的简介
2、git 的安装
(1)wingows下git 的安装
(2)linux下git 的安装
3、git 基本指令的使用(ubuntu上)
(1)配置自己的用户名,和邮箱
(2)git init 创建版本库repository
(3)notepad++ 配置utf-8(无bom)
(4)新建一个hello.c,并用git add、git commit指令添入库中
(5)使用git status命令查看状态,git diff file_name查看修改
(6)git log查看日志
(7)git reset –hard HEAD^版本回退
(8)git checkout – file撤销修改、工作区回退到刚add的样子
(9) 使用git rm file删除仓库的文件
(10)新建一个github账号,使用github免费的git远程托管仓库
(11)新建远程仓库连接(不使用ssh),git pull、git push指令的使用
(12)使用clone指令克隆github上的仓库到本地仓库
(13)解决这两天使用ubnutu进行远程git操作报错的问题
说明
楼主是一个小白,在学习过程中分享我的笔记希望能帮到大家,hhh。学习的内容比较具体,参考了非常多的博客和问答,算是比较详细的了,而且博主还会随时的更新保证内容的充实,大家如果发现了有错误的地方,请留言告诉博主,感谢。——2018-09-07 09:23初次编辑留
今天完成了这篇博客的大概的框架内容:1、git 的简介(还未写)2、git 的安装(只是极简的介绍了下)3、git的使用是大头(今天的时间基本都花在这了,写了第1小点git指令的(1)-(10),git 最基础的指令操作今天都差不多学习了。博客主要看的是廖雪峰前辈的还有官方的git教程,还有其他的一些疑难解答的博客。)——2018-09-07 23:11留
修缮了一下目录的链接。——2018-09-08 12:30留
解决这两天使用ubnutu进行远程git操作报错的问题。——2018-09-09 12:20留
- git 的简介
git的安装
(1) wingows下git 的安装
从官网直接下载git:https://git-scm.com/downloads
安装好之后可以在开始菜单里找到Git->Git Bash,Git Bash既是git的命令行工具了(2) linux下git 的安装
$ sudo apt-get install gitgit 基本指令的使用(ubuntu上)
(1) 配置自己的用户名,和邮箱:
//--global 表示你这台机器上所有的Git仓库都会使用这个配置,在安装好的时候就要配置
//windows打开cmd或者git bush,linux可以直接在终端输入命令
$ git config --global user.name "Your Name"        // 你的用户名
$ git config --global user.email "[email protected]"   // 你的邮箱
(2) git init 创建版本库repository://使用的是git bush,或者linux终端,先跳转到自己要建立仓库的地方 $ mkdir dir_name //创建一个文件夹 $ cd dir_name //进入新创建的文件夹下 $ pwd //显示当前的路径 /Users/michael/learngit $ git init //这个命令就是新建仓库的核心命令了 //ubuntu的话要加sudo哦,否则会提示没权限 //其实只要先进入你要建立仓库的项目下,再输入git init就能完成新建了 //它会自动生成一个.git文件,这个就是git用来控制版本的核心文件了 //如果没有看到.git,那是因为这个文件默认是隐藏的,用ls -ah命令就可以看见 Initialized empty Git repository in /Users/michael/learngit/.git/
(3) notepad++ 配置utf-8(无bom):菜单栏->设置(T)->首选项..->新建->格式->UTF-8(无BOM) 这是为了防止中文被当做乱码显示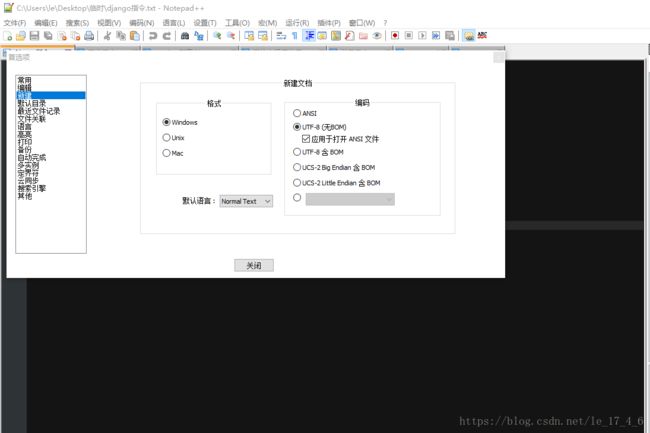
(4) 新建一个hello.c,并用git add、git commit指令添入库中// hello.c #includeint main(void){ printf("HELLO WORLD !"); retuen 0; } //之后在命令行: $ git add hello.c //将该文件加入git中,ubutu记得加sudo $ git commit -m "First edit hello.c" //-m 表示输入简要的说明:这次修改、新增了什么东西 [master (root-commit) 8aeca4f] First edit hello.c 1 file changed, 5 insertions(+)//一个文件改动,五行新建 create mode 100644 hello.c
(5) 使用git status命令查看状态,git diff file_name查看修改ubuntu@VM-0-3-ubuntu:~/cc++/mytest$ git status //git status On branch master Untracked files: //a.out是g++编译hello.c之后生成的文件,git提示我们还没有把它加入仓库 (use "git add..." to include in what will be committed) a.out nothing added to commit but untracked files present (use "git add" to track) ubuntu@VM-0-3-ubuntu:~/cc++/mytest$ sudo git add a.out //把a.out一起添加到仓库里面 ubuntu@VM-0-3-ubuntu:~/cc++/mytest$ git status On branch master Changes to be committed: (use "git reset HEAD..." to unstage) new file: a.out //提示我们仓库多了个文件叫a.out,但是还没有commit ubuntu@VM-0-3-ubuntu:~/cc++/mytest$ sudo git commit -m"hello.c - > a.out" //commit一下 [master f295471] hello.c - > a.out 1 file changed, 0 insertions(+), 0 deletions(-) create mode 100755 a.out ubuntu@VM-0-3-ubuntu:~/cc++/mytest$ git status //再查看一下状态 On branch master //主分支提示没有什么改动了 nothing to commit, working directory clean ubuntu@VM-0-3-ubuntu:~/cc++/mytest$ ubuntu@VM-0-3-ubuntu:~/cc++/mytest$ sudo vim hello.c //将hello.c改动一下: //hello.c: #includeint main(void){ printf("Year, it is GIT!\n"); //新添的一行 printf("HELLO WORLD!"); return 0; } ubuntu@VM-0-3-ubuntu:~/cc++/mytest$ git status On branch master Changes not staged for commit: (use "git add ..." to update what will be committed) (use "git checkout --..." to discard changes in working directory) modified: hello.c //git提示我们有一个文件,hello.c改动了 no changes added to commit (use "git add" and/or "git commit -a") //改动在哪里了呢? //这时候就可以用git diff 文件名,查看改动了 ubuntu@VM-0-3-ubuntu:~/cc++/mytest$ git diff hello.c //查看hello.c的变化 diff --git a/hello.c b/hello.c index 6e0c0ed..13bb2db 100644 --- a/hello.c +++ b/hello.c @@ -1,5 +1,6 @@ #includeint main(void){ + printf("Year, it is GIT!\n"); //+ 代表新建的行 printf("HELLO WORLD!"); return 0; } //添加的命令和新建是一样的,都是先add再commit ubuntu@VM-0-3-ubuntu:~/cc++/mytest$ sudo git add hello.c ubuntu@VM-0-3-ubuntu:~/cc++/mytest$ sudo git commit -m"add a line" [master 4402288] add a line 1 file changed, 1 insertion(+) ubuntu@VM-0-3-ubuntu:~/cc++/mytest$ // 再看git status: ubuntu@VM-0-3-ubuntu:~/cc++/mytest$ git status On branch master nothing to commit, working directory clean
(6) git log查看日志ubuntu@VM-0-3-ubuntu:~/cc++/mytest$ git log /所有的新增和修改的操作都被列了出来 commit 4402288cc241a4a5fb55140d6603ed8c40d03dee Author: numb-men
(7) git reset –hard HEAD^版本回退://在Git中,用HEAD表示当前版本,也就是最新的提交4402288cc241a4a5fb55140d6603ed8c40d03dee //上一个版本就是HEAD^,上上一个版本就是HEAD^^,也就是f295471c23f16794a328d058c8a8b388a421b45f //还可以写成HEAD~100 ubuntu@VM-0-3-ubuntu:~/cc++/mytest$ sudo git reset --hard HEAD^ HEAD is now at 8aeca4f First edit hello.c ubuntu@VM-0-3-ubuntu:~/cc++/mytest$ more hello.c #includeint main(void){ printf("HELLO WORLD!"); //可以看到上次新添的那行不见了 return 0; } //返回,使用版本号(不用全输,git会自动匹配) ubuntu@VM-0-3-ubuntu:~/cc++/mytest$ sudo git reset --hard 8aeca4 //最初的版本号: 8aeca4fb6f3ba6014f3540212cdb26343b2b9760,只用大概输前几个就好了 HEAD is now at 8aeca4f First edit hello.c //回到了最初始的版本 //又想退到后面的版本怎么办,还是输入版本号: ubuntu@VM-0-3-ubuntu:~/cc++/mytest$ sudo git reset --hard 4402288 HEAD is now at 4402288 add a line //又回到了最后编辑的版本了 ubuntu@VM-0-3-ubuntu:~/cc++/mytest$ more hello.c #include int main(void){ printf("Year, it is GIT!\n"); printf("HELLO WORLD!"); return 0; } //不知道版本号怎么办? //使用git reflog查看历史操作: ubuntu@VM-0-3-ubuntu:~/cc++/mytest$ git reflog 4402288 HEAD@{0}: reset: moving to 4402288 8aeca4f HEAD@{1}: reset: moving to HEAD^ f295471 HEAD@{2}: reset: moving to HEAD^ 4402288 HEAD@{3}: commit: add a line f295471 HEAD@{4}: commit: hello.c - > a.out 8aeca4f HEAD@{5}: commit (initial): First edit hello.c //所有的操作都被列了出来 //之后就可以对着左边的版本号任意跳转到想跳转的版本了 ubuntu@VM-0-3-ubuntu:~/cc++/mytest$ sudo git reset --hard 8aeca4f HEAD is now at 8aeca4f First edit hello.c ubuntu@VM-0-3-ubuntu:~/cc++/mytest$ more hello.c #include int main(void){ printf("HELLO WORLD!"); //又跳转到了最早的版本了 return 0; } 廖雪峰前辈的工作区和版本库演示图:

//git add就是把文件从工作区存到版本库的暂存区(stage)
//而git commit把文件从暂存区stage保存到master分支中
//而实际上,文件都只有一份,git保存的是修改而不是文件,这也是git之所以强大的原因
(8) git checkout – file撤销修改、工作区回退到刚add的样子//在工作区进行修改,但是没有添加到暂存区中: ubuntu@VM-0-3-ubuntu:~/cc++/mytest$ more hello.c #includeint main(void){ printf("what ?\n"); printf("HELLO WORLD!"); return 0; } ubuntu@VM-0-3-ubuntu:~/cc++/mytest$ git status On branch master Changes not staged for commit: (use "git add ..." to update what will be committed) (use "git checkout --..." to discard changes in working directory) modified: hello.c no changes added to commit (use "git add" and/or "git commit -a") //使用git checkout -- file 退回到原版本 ubuntu@VM-0-3-ubuntu:~/cc++/mytest$ git checkout -- hello.c fatal: Unable to create '/home/ubuntu/cc++/mytest/.git/index.lock': Permission denied ubuntu@VM-0-3-ubuntu:~/cc++/mytest$ sudo git checkout -- hello.c ubuntu@VM-0-3-ubuntu:~/cc++/mytest$ more hello.c #includeint main(void){ printf("HELLO WORLD!"); return 0; } //如果已经add进了暂存区,使用git reset HEAD file命令将该文件返回给工作区 ubuntu@VM-0-3-ubuntu:~/cc++/mytest$ sudo git checkout -- hello.c ubuntu@VM-0-3-ubuntu:~/cc++/mytest$ sudo vim hello.c ubuntu@VM-0-3-ubuntu:~/cc++/mytest$ more hello.c #include int main(void){ printf("numb men!\n"); printf("HELLO WORLD!"); return 0; } ubuntu@VM-0-3-ubuntu:~/cc++/mytest$ sudo git add hello.c ubuntu@VM-0-3-ubuntu:~/cc++/mytest$ git status On branch master Changes to be committed: (use "git reset HEAD ..." to unstage) modified: hello.c ubuntu@VM-0-3-ubuntu:~/cc++/mytest$ sudo git reset HEAD hello.c // 使用reset命令,进行回退,可以看到,这时候工作区又变成空的了 ubuntu@VM-0-3-ubuntu:~/cc++/mytest$ git status On branch master nothing to commit, working directory clean Unstaged changes after reset: M hello.c ubuntu@VM-0-3-ubuntu:~/cc++/mytest$ more hello.c #includeint main(void){ printf("numb men!\n"); printf("HELLO WORLD!"); return 0; } ubuntu@VM-0-3-ubuntu:~/cc++/mytest$ sudo git checkout -- hello.c //再使用checkout将工作区的内容回退到修改之前 ubuntu@VM-0-3-ubuntu:~/cc++/mytest$ more hello.c #include int main(void){ printf("HELLO WORLD!"); return 0; } //如果已经commit到仓库中了,只能使用版本回退了 sudo git reset --hard HEAD^ //如果不小心删除了文件,也可以用checkout回退: ubuntu@VM-0-3-ubuntu:~/cc++/mytest$ sudo rm hello.c ubuntu@VM-0-3-ubuntu:~/cc++/mytest$ ls ubuntu@VM-0-3-ubuntu:~/cc++/mytest$ sudo git checkout -- hello.c ubuntu@VM-0-3-ubuntu:~/cc++/mytest$ ls hello.c
(9) 使用git rm file删除仓库的文件//删除版本库上的文件 ubuntu@VM-0-3-ubuntu:~/cc++/mytest$ sudo git rm hello.c rm 'hello.c' ubuntu@VM-0-3-ubuntu:~/cc++/mytest$ git status On branch master Changes to be committed: (use "git reset HEAD..." to unstage) deleted: hello.c ubuntu@VM-0-3-ubuntu:~/cc++/mytest$ sudo git commit -m"dele hello.c" //记得commit [master 2efd29d] dele hello.c 1 file changed, 5 deletions(-) delete mode 100644 hello.c ubuntu@VM-0-3-ubuntu:~/cc++/mytest$ git log //看一下日志 commit 2efd29d2ccda2ad797a716c7105e3b7e0acb0e67 Author: numb-men
(10) 新建一个github账号,使用github免费的git远程托管仓库//.........................省略建立账号的过程 //第一步,配置ssh,因为git和github是通过ssh连接的 //SSH 公钥默认储存在账户的主目录下的 ~/.ssh 目录。 //ubuntu@VM-0-3-ubuntu:/$ cd ~/.ssh ubuntu@VM-0-3-ubuntu:~/.ssh$ ls authorized_keys //这个不是,是长这样的:id_dsa id_dsa.pub一对,id_dsa是公钥,id_dsa.pub是密钥 ubuntu@VM-0-3-ubuntu:~/.ssh$ //如果没有就自己新建一个: ubuntu@VM-0-3-ubuntu:~/.ssh$ ssh-keygen -t rsa -C "[email protected]" //邮箱 Generating public/private rsa key pair. Enter file in which to save the key (/home/ubuntu/.ssh/id_rsa): Enter passphrase (empty for no passphrase): Enter same passphrase again: Your identification has been saved in /home/ubuntu/.ssh/id_rsa. Your public key has been saved in /home/ubuntu/.ssh/id_rsa.pub. The key fingerprint is: SHA256:cDSD1tpfNoaeYZZ/AS0qGcuN1bsHWGAiiXte/nE/gT4 le@hengyumo.cn The key's randomart image is: +---[RSA 2048]----+ | | | | | xxxx | | | | | +----[SHA256]-----+ ' //相比超长字符串,人们更容易接受图形。让我们对比两幅图片的差异比对比两个超长字符串也要容易的多。 //这就是为什么现在大家使用二维码,而不是复制粘贴 URL 的原因。 //Randomart image 通过将 Key 转换成有规律的图片,让人可以更加容易的、快速的对比 Key 的异同。 //Randomart image 具体看这里(https://www.jianshu.com/p/c6a7ffe01ac3) ubuntu@VM-0-3-ubuntu:~/.ssh$ more id_rsa.pub ssh-rsa ... 省略 //把公钥拷贝一下 ... ubuntu@VM-0-3-ubuntu:~/.ssh$ vim id_rsa.pub登录github,在右上角点击头像,有一个下拉列表
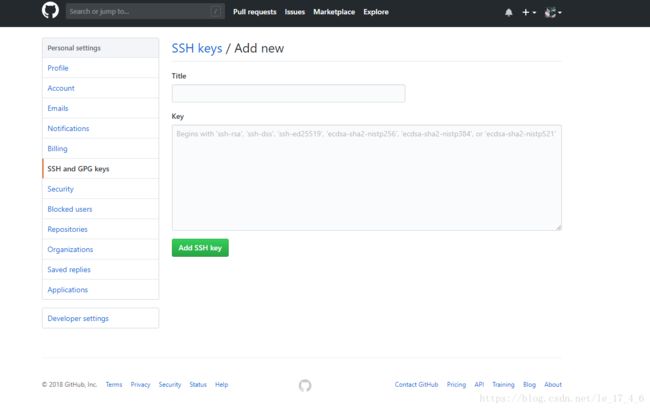
选择setting->SSH and GPG keys->new SSH key

输入一个title,然后把刚才拷贝的id_rsa.pub下的东西都输入进去
然后在右上角点击头像,有一个下拉列表,选择your repositories
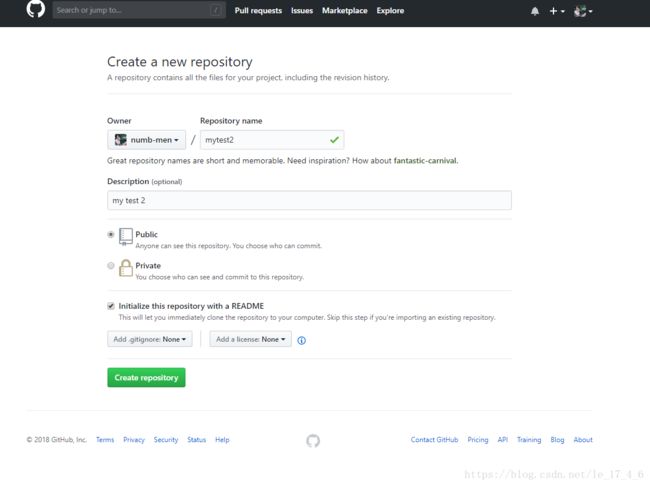
然后选择绿色的new新建一个仓库,以这个仓库来保存我们的本地仓库上传的代码

在Repository name输入仓库名,
在Description输入仓库的描述,
选择是公开仓库还是私有仓库(私有仓库是收费的)
Initalize this repository with a README是设置是否要新建一个README文件,
.gitignore,就是告诉Git哪些文件不需要添加到版本管理中,
详细可以看:https://baijiahao.baidu.com/s?id=1607616924306765100&wfr=spider&for=pc
license,许可证,你可以选择一个开源许可证,
点击Create repository完成创建
(11) 新建远程仓库连接(不使用ssh),git pull, push, clone:ubuntu@VM-0-3-ubuntu:~/cc++/mytest$ sudo git remote add origin https://github.com/numb-men/mytest.git //和远程仓库建立连接,这种连接需要在使用时输入github的账号密码, //但是可以不在github上配置ssh ubuntu@VM-0-3-ubuntu:~/cc++/mytest$ sudo git pull origin master warning: no common commits remote: Counting objects: 3, done. remote: Total 3 (delta 0), reused 3 (delta 0), pack-reused 0 Unpacking objects: 100% (3/3), done. From https://github.com/numb-men/mytest * branch master -> FETCH_HEAD * [new branch] master -> origin/master Merge made by the 'recursive' strategy. hello_world.txt | 1 + 1 file changed, 1 insertion(+) create mode 100644 hello_world.txt //pull 好了 ubuntu@VM-0-3-ubuntu:~/cc++/mytest$ sudo git push origin master Username for 'https://github.com': numb-men //需要输入github的账号密码 Password for 'https://[email protected]': Counting objects: 5, done. Compressing objects: 100% (3/3), done. Writing objects: 100% (5/5), 522 bytes | 0 bytes/s, done. Total 5 (delta 0), reused 0 (delta 0) To https://github.com/numb-men/mytest.git e8064b2..c2bab39 master -> master //push 好了 ubuntu@VM-0-3-ubuntu:~/cc++/mytest$ ls hello_world.txt README.md ubuntu@VM-0-3-ubuntu:~/cc++/mytest$ more hello_world.txt Hello world! ubuntu@VM-0-3-ubuntu:~/cc++/mytest$ sudo vim hello_world.txt ubuntu@VM-0-3-ubuntu:~/cc++/mytest$ sudo git add . ubuntu@VM-0-3-ubuntu:~/cc++/mytest$ ls //pull后多了一个hello_world.txt hello_world.txt README.md ubuntu@VM-0-3-ubuntu:~/cc++/mytest$ git status On branch master Changes to be committed: (use "git reset HEAD..." to unstage) modified: hello_world.txt //修改一下hello_world.txt,再add commit一下 ubuntu@VM-0-3-ubuntu:~/cc++/mytest$ sudo git commit -m"new a line" [master e7ff80a] new a line 1 file changed, 2 insertions(+), 1 deletion(-) ubuntu@VM-0-3-ubuntu:~/cc++/mytest$ sudo git push origin master Username for 'https://github.com': numb-men Password for 'https://[email protected]': Counting objects: 3, done. //再次push Compressing objects: 100% (2/2), done. Writing objects: 100% (3/3), 299 bytes | 0 bytes/s, done. Total 3 (delta 0), reused 0 (delta 0) To https://github.com/numb-men/mytest.git c2bab39..e7ff80a master -> master //这时候登录github可以看到新的改变了
(12) 使用clone指令克隆github上的仓库到本地仓库ubuntu@VM-0-3-ubuntu:~/cc++$ sudo git clone git://github.com/numb-men/mytest2.git //sudo git clone git://github.com/numb-men/mytest2.git //后面不加东西的话就默认克隆到mytext2了 //也可以再后面添加自定义的文件名:如mytext3,项目就会自动克隆到mytext3目录下了 Cloning into 'mytest2'... remote: Counting objects: 3, done. remote: Total 3 (delta 0), reused 0 (delta 0), pack-reused 0 Receiving objects: 100% (3/3), done. Checking connectivity... done.(13) 解决这两天使用ubuntu进行远程git操作报错的问题
1、fatal: remote origin already exists.

    此时只需要将远程配置删除,重新添加即可;

    $ sudo git remote rm origin
    $ sudo git remote add origin https://github.com/numb-men/mytest.git

 2、 ! [rejected]        master -> master (non-fast-forward)
    error: failed to push some refs to 'https://github.com/numb-men/mytest.git'
    hint: Updates were rejected because the tip of your current branch is behind
    hint: its remote counterpart. Integrate the remote changes (e.g.
    hint: 'git pull ...') before pushing again.
    hint: See the 'Note about fast-forwards' in 'git push --help' for details.

    这是因为git本地的进度和远程的不一样,进行一次pull同步一下再进行push就好了:

    $git pull origin master
    $git push origin master

3、ubuntu@VM-0-3-ubuntu:~/cc++/mytest2$ sudo git pull origin master
    remote: Counting objects: 3, done.
    remote: Total 3 (delta 0), reused 0 (delta 0), pack-reused 0
    Unpacking objects: 100% (3/3), done.
    From github.com:numb-men/mytest2
     * branch            master     -> FETCH_HEAD
     * [new branch]      master     -> origin/master
    error: The following untracked working tree files would be overwritten by merge:
            README.md
    Please move or remove them before you can merge.
    Aborting

    这个的意思是说有一个文件(README.md)造成两个仓库不匹配,产生了冲突,解决:
    $ git clean -d -fx
    git clean -d -fx表示:删除 一些 没有 git add 的 文件;

    git clean 参数

    -n 显示将要删除的文件和目录;

    -x -----删除忽略文件已经对git来说不识别的文件

    -d -----删除未被添加到git的路径中的文件

    -f -----强制运行

    git clean -n

    git clean -df

    git clean -f
4、error: src refspec master does not match any.
    error: failed to push some refs to '[email protected]:numb-men/mytest2.git'
    原因是我在配置我的云服务器时修改了ssh的默认端口,而git的默认端口shh是22
    为了系统安全,有时候会把ssh端口进行修改,这时候,在git clone的时候,就需要指定端口信息
    可以使用以下命令
    git clone ssh://git@127.0.0.1:xx/yy.git 本地文件路径
    其中 git@127.0.0.1:xx 为 用户@ip:端口号
    yy.git 为仓库名字

    如git clone ssh://[email protected]:12345/mytest.git  ///假设端口为12345