微信小程序自定义封装顶部导航栏
微信小程序自定义封装顶部导航栏(自定义返回界面、动态设置标题)
微信小程序官方的navigationBar只能设置颜色,字体大小,但是实际开发中多层页面嵌套则需要我们有返回上一级页面或者返回指定页面的功能,这个时候官方提供的就不能满足我们的需求了,但是官方也为我们提供了解决的方法
Navigation
Navigation是小程序的顶部导航组件,当页面配置navigationStyle设置为custom的时候可以使用此组件替代原生导航栏。
截图

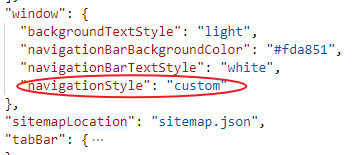
1、首先需要在app.json中将navigationStyle设置为custom:

2、在项目中一旦使用自定义导航栏,那么每个页面都需要进行配置,将其封装成为一个组件,在每个页面中使用起来也就更加方便。
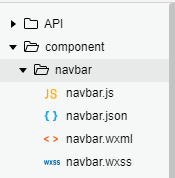
组件目录:

navbar.wxml文件
<cover-view class='nav-wrap' style='height: {{(height*2 + 25)*2}}rpx;'>

  <cover-view class='nav-title' style='line-height: {{(height*2 + 35)*2}}rpx;'>
    {{navbarData.title}}
  cover-view>


  <cover-view class='nav-capsule'  wx:if='{{navbarData.showCapsule}}'>


    <cover-view bindtap='_navback' wx:if='{{!share}}'>
      <cover-image src='../../img/left.png' mode='aspectFit' class='back-pre'>cover-image>
    cover-view>

  cover-view>
cover-view>
navbar.wxss文件
/* component/navbar/navbar.wxss */
/* 顶部要固定定位   标题要居中   自定义按钮和标题要和右边微信原生的胶囊上下对齐 */
.nav-wrap {
  position: fixed;
  width: 100%;
  top: 0;
  background: #fda851;
  color: #fff;
  z-index: 9999999;
  display: flex;
  align-items: center;
  box-sizing: border-box;
}
/* 标题要居中 */
.nav-title {
  position: absolute;
  text-align: center;
  max-width: 350rpx;
  overflow: hidden;
  text-overflow: ellipsis;
  white-space: nowrap;
  top: 0;
  left: 0;
  right: 0;
  bottom: 0;
  margin: auto;
  font-size: 42rpx;
  color: #fff;
  font-weight: 500;
}

.nav-capsule {
  display: flex;
  align-items: center;
  margin-left: 30rpx;
  width: 200rpx;
  justify-content: space-between;
  height: 100%;
}

.navbar-v-line {
  width: 1px;
  height: 32rpx;
  background-color: #e5e5e5;
}

.back-pre {
  width: 36rpx;
  height: 36rpx;
  margin-top: 18rpx;
  padding: 10rpx;
}
navbar.json文件
{
  "component": true,
  "usingComponents": {}
}
navbar.js文件
const app = getApp()
Component({
  properties: {
    navbarData: {   //navbarData   由父页面传递的数据,变量名字自命名
      type: Object,
      value: {},
      observer: function (newVal, oldVal) {}
    }
  },
  data: {
    height: '',
    //默认值  默认显示左上角
    navbarData: {
      showCapsule: 1
    }
  },
  attached: function () {
    // 获取是否是通过分享进入的小程序
    this.setData({
      share: app.globalData.share
    })
    // 定义导航栏的高度   方便对齐
    this.setData({
      height: app.globalData.height
    })
  },
  methods: {
    // 返回上一页面
    _navback(event) {
      // 当前页面为“成长记录”时,对返回按钮进行劫持,直接跳转到首页
      if(this.data.navbarData.title === '成长记录'){
        console.log(this.data.navbarData.title);
        wx.switchTab({
          url: `../index`,
          success: function (e) {
            var page = getCurrentPages().pop();
            if (page == undefined || page == null) return;
            page.onLoad();
          }
        })
        return ;
      }
      wx.navigateBack()
    },
  }
})
app.js文件
//app.js
App({
  onLaunch: function (options) {
    // 判断是否由分享进入小程序
    if (options.scene == 1007 || options.scene == 1008) {
      this.globalData.share = true
    } else {
      this.globalData.share = false
    };
    //获取设备顶部窗口的高度(不同设备窗口高度不一样,根据这个来设置自定义导航栏的高度)
    wx.getSystemInfo({
      success: (res) => {
        this.globalData.height = res.statusBarHeight
      }
    })
  },

  globalData: {
    share: false,  // 分享默认为false
    height: 0,
  }
})
3、在页面中使用
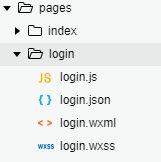
pages文件夹中的页面

login.wxml文件
// 'navbar-data'中navbar是自定义导航栏标题
<nav-bar navbar-data='{{nvabarData}}'>nav-bar>
<view class="login" style='margin-top: {{height}}px'>

view>
login.js文件
 const app = getApp()
  Page({
    /**
     * 页面的初始数据
     */
    data: {
      // 组件所需的参数
      nvabarData: {
        showCapsule: 0, //是否显示左上角图标   1表示显示    0表示不显示
        title: '奉贤区早教', //导航栏 中间的标题
      },
      height: app.globalData.height * 2 + 20 , // 此页面 页面内容距最顶部的距离
   }
 })
login.json文件
{
  "usingComponents": {
    "nav-bar": "../../../component/navbar/navbar"
  }
}
补充
组件中view和image标签使用cover-view 、cover-image代替,是要保证导航栏在使用时,层级保持最高,因为在之前开发过程中其中一个页面使用到了Echarts,当页面过长向上滚动时,会出现图表覆盖在导航栏上面,使用cover-view 、cover-image标签可以解决这个问题。
总结
对于小程序开发本人也在摸索阶段,上面代码若有错误之处还望大家能够多多指正。