java 搭建基于springboot的ssh(spring + springmvc + hibernate)的gradle项目(基础篇)
之前本人有写过一篇 java 搭建基于springboot的ssm(spring + springmvc + mybatis)的maven项目,从需求量上来看还是很多同学对springboot感兴趣的,所以今天给各位同学带来的是基于springboot的ssh(spring + springmvc + hibernate)的gradle项目,并且会由浅至深加入各种开发中会用到的实用功能。那么今天我们就从基础篇开始搭建我们的springboot项目吧。
1.项目环境
开发工具: idea
jdk: 1.8
框架: spring + springmvc + hibernate
项目管理: gradle
数据库: mysql
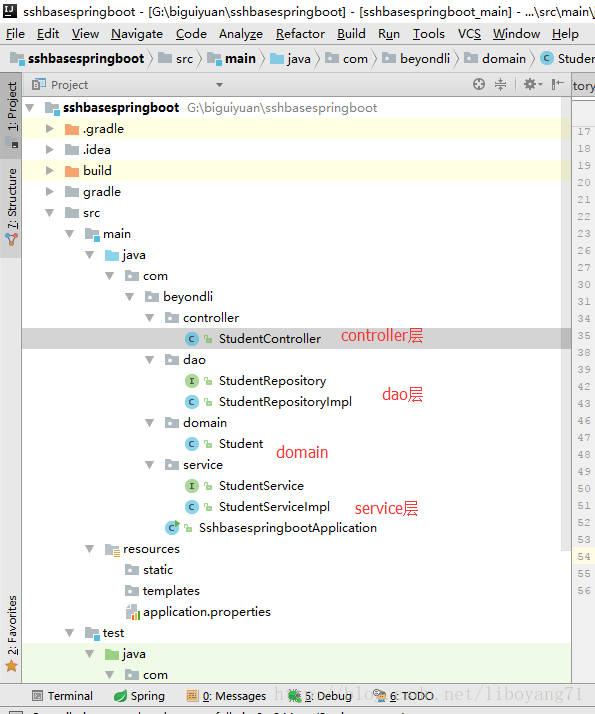
2.最终目录结构
3.需求
搭建好环境,并进行简单的数据查询。
4.创建过程
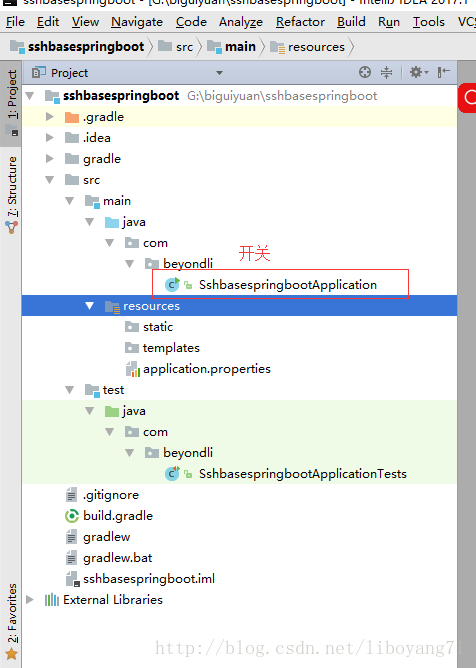
创建开关SpringBootApplication
为了创建快速。我们使用idea自带的创建springboot来创建结构,当然创建普通的web项目也是可以的。(使用eclipse的同学可以按照一会的图来自己创建目录结构)
4.1 创建项目 按照图示进行选择(此步骤点击next是需要在联网的环境下才可以)
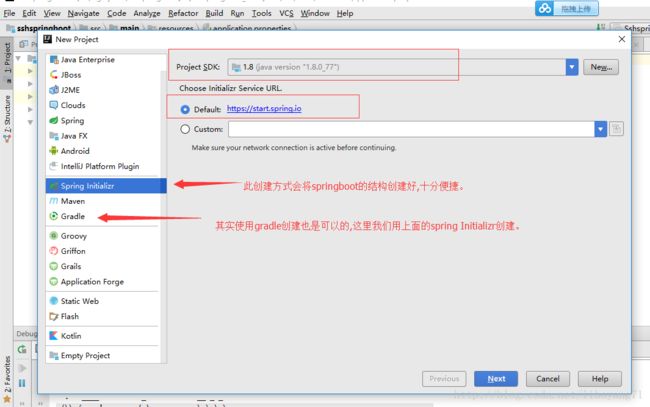
4.2

4.3 因为是基础篇,所以我们只选用最基本可以保证项目跑起来的依赖。勾选这三个即可。


4.4 直接下一步
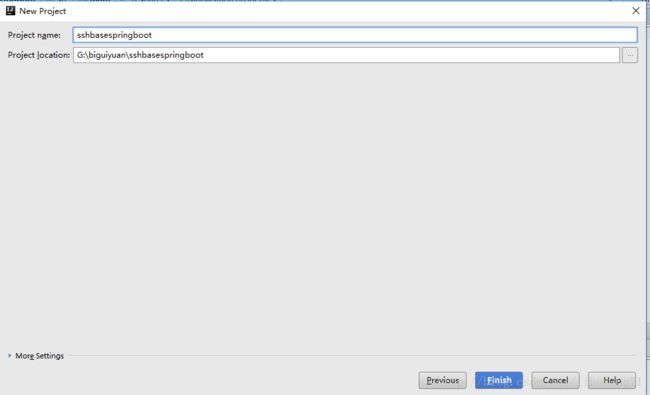
4.5 最后的配置
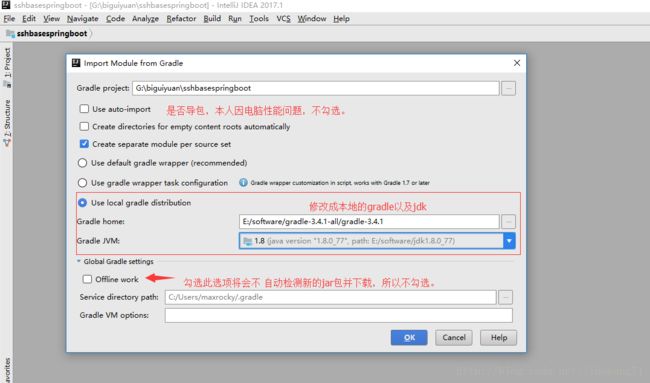
好了 前期的准备工作基本ok,静静的等待项目build完成。
基本的项目结构已经搭建完成,build完成后会如下图所示
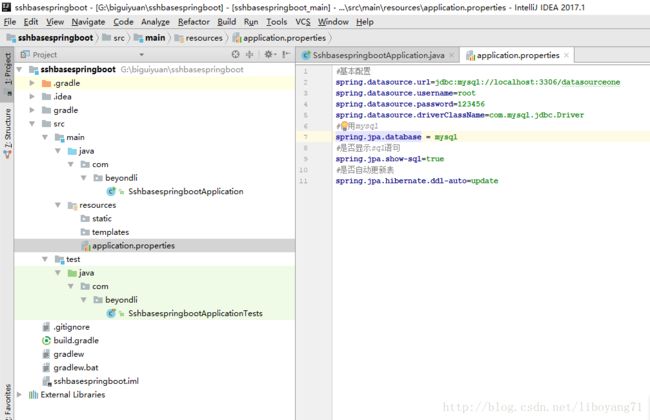
其实现在一个最简单的springboot项目我们已经搭建完成了。什么?不相信?,你可以运行一下SshbasespringbootApplication这个文件呀。会报你未配置dataSource,我们如下图所示进行一下配置即可完成一个最简单的springboot项目进行跑通
#基本配置
spring.datasource.url=jdbc:mysql://localhost:3306/datasourceone
spring.datasource.username=root
spring.datasource.password=123456
spring.datasource.driverClassName=com.mysql.jdbc.Driver
#使用mysql
spring.jpa.database = mysql
#是否显示sql语句
spring.jpa.show-sql=true
#是否自动更新表
spring.jpa.hibernate.ddl-auto=update
账号密码当然你要配置成你自己的。OK 项目跑起来了。最简单的springboot项目搭建完成。现在我们要开始与ssh进行融合。
5.目录结构简单介绍
在给同学们演示如何将ssm融入到项目中之前。先和各位同学讲一下目录结构方便各位同学理解。
5.1 java
这个就不用多说了。放我们写的java文件的
5.2 resources
springboot主张无xml配置,但是还是需要一些最基础的信息配置的,例如sql账号密码的设置,在简洁你的账号密码还是需要你自己配置滴,它是没办法帮你自动生成的。所以一般配置文件都是放到resources下的。具体默认生成的文件都是做什么的以及什么资源放到什么文件下可以看我之前写过的一片关于各文件夹作用的文章springboot目录结构详解
5.3 开关文件
SshbasespringbootApplication文件就是springboot的核心开关了。
6.整合
开始整合,还是基于基本的三层架构进行开发,虽然本人近期开发使用了领域驱动,但是理解不够透彻。就不献丑了。OK 具体的解释本人都会在代码中进行注释,希望同学们可以细心阅读。
buildscript {
    ext {
        springBootVersion = '1.5.4.RELEASE'
    }
    repositories {
        mavenCentral()
    }
    dependencies {
        classpath("org.springframework.boot:spring-boot-gradle-plugin:${springBootVersion}")
    }
}

apply plugin: 'java'
apply plugin: 'eclipse'
apply plugin: 'org.springframework.boot'

version = '0.0.1-SNAPSHOT'
sourceCompatibility = 1.8

repositories {
    mavenCentral()
}


dependencies {
    compile('org.springframework.boot:spring-boot-starter-data-jpa')
    compile('org.springframework.boot:spring-boot-starter-web')
    runtime('mysql:mysql-connector-java')
    testCompile('org.springframework.boot:spring-boot-starter-test')
}
StudentController
package com.beyondli.controller;

import com.beyondli.domain.Student;
import com.beyondli.service.StudentService;
import org.springframework.web.bind.annotation.RequestMapping;
import org.springframework.web.bind.annotation.RestController;

import javax.annotation.Resource;

/**
 * Created by beyondLi on 2017/7/25.
 */
@RestController
@RequestMapping(value = "/Student")
public class StudentController {
    @Resource
    StudentService studentService;
    @RequestMapping(value = "/GetInfo")
    public Student getInfo() {
        return studentService.getStudent();
    }
}
StudentService
package com.beyondli.service;


import com.beyondli.domain.Student;

/**
 * Created by beyondLi on 2017/7/25.
 */
public interface StudentService {
    /**
     * 获取student
     * @return
     */
    Student getStudent();
}
StudentServiceImpl
package com.beyondli.service;

import com.beyondli.dao.StudentRepository;
import com.beyondli.domain.Student;
import org.springframework.beans.factory.annotation.Autowired;
import org.springframework.stereotype.Service;
import org.springframework.transaction.annotation.Transactional;

/**
 * Created by beyondLi on 2017/7/25.
 */
@Service
public class StudentServiceImpl implements StudentService {
    @Autowired
    StudentRepository studentRepository;
    /**
     *
     * @return
     */
    @Override
    @Transactional
    public Student getStudent() {
        return studentRepository.getStudent();
    }
}
StudentRepository
package com.beyondli.dao;

import com.beyondli.domain.Student;

/**
 * Created by beyondLi on 2017/7/25.
 */
public interface StudentRepository {
    /**
     * 获取一个同学的信息
     * @return
     */
    Student getStudent();
}
StudentRepositoryImpl
package com.beyondli.dao;

import com.beyondli.domain.Student;
import org.springframework.boot.autoconfigure.orm.jpa.JpaProperties;
import org.springframework.stereotype.Repository;

import javax.annotation.Resource;
import javax.persistence.EntityManager;
import javax.persistence.PersistenceContext;
import java.util.List;

/**
 * Created by beyondLi on 2017/7/25.
 */
@Repository
public class StudentRepositoryImpl implements StudentRepository {
    //springboot会默认自动将数据源中的配置注入,用法与hibernate中sessionFactory生成的session类似。以后使用多数据源时会详细解释
    @PersistenceContext
    EntityManager entityManager;

    /**
     *
     * @return
     */
    @Override
    public Student getStudent() {
        //编写jpql语句,进行执行回去所需数据
        List resultList = entityManager.createQuery("FROM Student")
                .setFirstResult(0)
                .setMaxResults(1)
                .getResultList();
        if (resultList.size() == 0) {
            return null;
        }
        return resultList.get(0);
    }
}
domain
package com.beyondli.domain;


import javax.persistence.*;

/**
 * Created by beyondLi on 2017/7/25.
 */
@Entity
@Table(name = "student")
public class Student {
    @Id
    @GeneratedValue(strategy = GenerationType.IDENTITY)
    @Column(name = "id")
    private Integer id;

    @Column(name = "name")
    private String name;

    @Column(name = "age")
    private Integer age;

    public Integer getId() {
        return id;
    }

    public void setId(Integer id) {
        this.id = id;
    }

    public String getName() {
        return name;
    }

    public void setName(String name) {
        this.name = name;
    }

    public Integer getAge() {
        return age;
    }

    public void setAge(Integer age) {
        this.age = age;
    }

    public Student() {
    }

    public Student(String name, Integer age) {
        this.name = name;
        this.age = age;
    }

}
OK,大功告成。启动项目你会发现你的Student表建好了(hibernate真方便),对了这里啰嗦一句。记得把application.properties中的数据改成你自己数据库的数据,不要直接粘贴不改。还有库是需要你自己提前创建好的,hibernate只能帮你自动创建表。好了,自己手动往数据库里插入一条数据然后试试看调用你的接口吧。
以上观点均为本人个人理解,如有不足或错误,望指出,共同成长

