冬日魔幻之旅-seata+dubbo+nacos+springboot解决分布式事务的全网段唯一实践之作(上)
开篇
阿里把FESCAR开源了,开源后的名称叫SEATA。目前GIT上已经超1万3的星了。
可是笔者遍历全网段,无一篇是生产实用级说明同时GIT官网上的相关文档缺失以及Sample都太HelloWorld了,无法应用在真正的生产环境上。
于是笔者结合了在6,7年前那时在那个MQ年代来解决分布式事务的经验,结合这次的SEATA(最新一次COMMIT在2019年12月底)来讲一下最最新的也是目前最最潮的如何解决分布式事物中又要考虑数据的最终一致性同时还要兼顾性能及高效、吐吞率时,作为阿里的这一套开源组合是怎么把它们做到极致的。
笔者在这边并不想作太多长篇大论或者像网上所有的关于SEATA方面的文章那样直接COPY PASTER一堆的所谓源码来凑字数。笔者在这边先讲一下分布式事务的几个重要概念然后上生产上的实战级代码、应用和剖析。
简述分布式事务
在大型网站、并发流量高的网站,其实也不用太高,高到什么样的一个层级需要考虑分布式事务呢。看一下下面这样的一个描述:
当你的生产环境的DB中假设有100个表,每个表数据量超过1亿。这时已经不是集群、主备、读写分离这么简单的一件事就可以搞定了。
或者你可以通过集群、主备、读写分离来提高网站前端的响应速度、吞吐量,可是你知道吗?如果你真的是在这样的一个量级的环境下呆过,你一定会对有一种情况不陌生!那就是当每个或者说主要单表超1亿数据的就算你有再多的主或者从或者分离,只要你在“主数据库”上作一条修改(删除或者是更新),它就会有一个动作叫作“主从同步”。
然后你会发现,这个主从同步会造成你的生产数据库频繁的“主从延迟”,我这边指的是6主6从每个固态硬盘、64C CPU, 128GB这样的配置的mySQL哦,如果你说“你们家狂有钱,都是512GB,128C的小型机”我也说这种情况最多是晚几天会出现但迟早还会出现的。
当主从延迟出现后会发生什么呢?比如说你要删一条数据,主删了然后开始去试图同步从数据库时,它会锁库、锁表。假设你有1000个表(一个系统子模块就有1000个表,一个大型网站有个30-40个子模块对于大型网站来说很正常),每个表是上亿数据,任何一笔业务造成的JOIN操作时同时这个数据库还在同步主从库此时这个同步付出的代价是“6-8小时甚至更多”,同步失败,嘿嘿。。。这个数据的一致性就会越来越糟糕,再说白了,你的经营数据就会受到严重影响。
严重到后来你数据库的磁盘快不够了、你要删一点历史数据,你都不敢去操作了,因为你一操作,从凌晨到早上8:00左右你的主从同步同步不完,库还锁着此时就会影响到了你的线上、线下的业务了。这都是因为数据库太大太重造成了连你要删点历史记录、日志都不敢动的情况。这时IT会相当的被动。
因此我们按照最优的设计会保证单表数据不要超过2000万条,此时我们就会去做表的业务垂直折分,于是就有了微服务,它就会折成这样的架构。我们可以看到每一个数据库与服务都会折开甚至同一个会员也会折成每1000万数据一个库对应着一个微服务实例。
折完了情况当然得到了很大程度的改善,性能、实时性、吞吐量都得到了提高。然后碰到了下面类似的场景了,此时分布式事务的问题就出现了:
场景一、
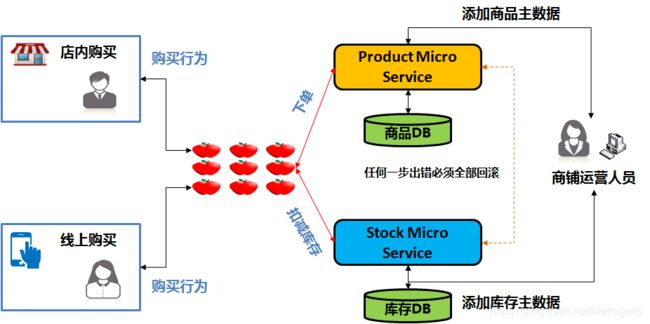
从上例我们可以看到,当商品主数据与库存主数据被折开来后,就会发生一个数据一致性的问题。假设你在后台对商品主数据做了一个添加或者是更新的动作那么整个系统也要求相应的库存数据与主数据必须一致,而一旦你拆成了微服务后主数据与库存说白了其实已经变成了两个不同的系统,每个系统都有自己的独立DB。这时要解决的就是这2个系统间任何的一个更新操作失败后为了维护数据的一致性那么这两个相关的“服务”都需要回滚之前的操作。
场景二、
银行跨行转款,假设帐户A是工行,它通过工行向B的招商银行帐户转帐过去。这个转帐可是一个分布式事务,要么成功要么失败,不可能会有“部分成功”,这也是要求数据最终一致性的一个分布式事务的场景。
无论是场景一还是场景二,它就讲究数据的最终一致性。对于这个问题的讨论20多年前就已经产生了,解决方案也早有了。
从最早的使用MQ的acknowledge模式在事务发起时先通知一下相关参与方,当所有相关参与方commit(成功)后主发起事务再显示成功,如果有一方失败,每一个参与方都会被通知到,此时再逐级回滚事务。到现代的分布式事务、跨表事务都是为了解决类似问题而诞生。
但是,传统的做法在面对大流量大并的场景下,如果是类似最早的MQ的这种逐级通知方式它就会严重影响系统的交易时的性能,它的吞吐量就会受到制约。
但是在使用分布式事务的场景中,我们要求的是数据的最终一致性,它势必会涉及到锁库、锁表、锁业务段,因此我们近20年来一直也都在数据的一致性和性能间试图达到一个平衡。
这于是就诞生了几大核心的解决方案,即:2PC(二阶段)提交、3PC(三阶段-在二阶段上加了一个准备阶段)与TCC(事务补偿)机制。
对于这几大核心解决方案的原理涉及到的CAP和PAXOS理论本文不做探讨,网上太多相关论文了,如果你要应付PPT架构师面试可以去死记硬背,如果你要上生产代码,那么我们接下去继续说。
这边只做简单叙述2PC与TCC的核心机制。
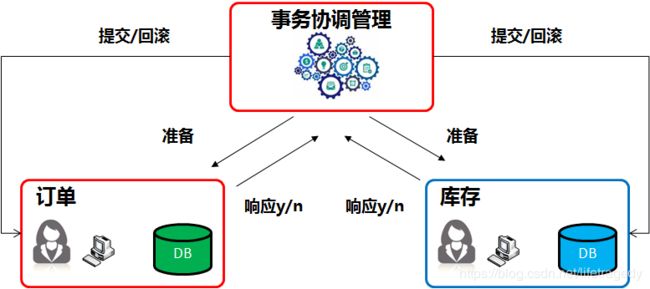
2PC(二阶段)提交
1)第一阶段:准备阶段(prepare)
协调者通知参与者准备提交订单,参与者开始投票。
协调者完成准备工作向协调者回应Yes。
2)第二阶段:提交(commit)/回滚(rollback)阶段
协调者根据参与者的投票结果发起最终的提交指令。
如果有参与者没有准备好则发起回滚指令。
- 应用程序通过事务协调器向两个库发起prepare,两个数据库收到消息分别执行本地事务(记录日志),但不提交,如果执行成功则回复yes,否则回复no。
- 事务协调器收到回复,只要有一方回复no则分别向参与者发起回滚事务,参与者开始回滚事务。
- 事务协调器收到回复,全部回复yes,此时向参与者发起提交事务。如果参与者有一方提交事务失败则由事务协调器发起回滚事务。
TCC事务补偿式提交
TCC事务补偿是基于2PC实现的业务层事务控制方案,它是Try(准备)、Confirm(提交)和Cancel(回滚)三个单词的首字母,含义如下:
1、Try 检查及预留业务资源完成提交事务前的检查,并预留好资源。
2、Confirm 确定执行业务操作,对try阶段预留的资源正式执行。
3、Cancel 取消执行业务操作,对try阶段预留的资源释放。
1. Try
转帐时,from库和to库分别进行帐户号信息、余额信息、冻洁转帐款项的操作,并锁定资源。
2. Confirm
from帐户把转帐金额变成冻结金额,然后from帐户扣除转帐金额同时在操作时进行记录锁定。to帐户把转帐金额变成冻结金额,然后to帐户余额+转帐金额=剩余金额同时在操作时进行记录锁定。
3. Cancel阶段
如果在from和to的各自业务中有任何一步抛错或者说失败,那么from和to的所有操作都要取消各自的操作;
于是
1)from操作把余额+被冻结的金额=原有from余额;原有冻结金额归0;
2)to操作把冻结的金额-转帐金额=原冻结金额,to操作把余额-转帐=原有余额;
以上所有步骤必须实现“业务幂等”,什么叫“业务幂等”?
业务幂等
就是无论以上各自步骤如何操作,它们的业务关联性必须相等,比如说:
from帐户原有100,冻结字段为0元,欲转出10元;
to帐户原有100,冻结字段为0元,欲从from转入10元;
那么以上一圈步骤轮下来有一步操作了,必须回到这个起始原点的状态。这就需要我们的应用程序做中间状态的保留以及在程序代码里预埋“业务补偿”或者我们也把它称为“反交易”逻辑 。
好了,以上就是核心逻辑,不再展开更深入的原理,再展开就涉及到算法和理论了,我们这边不是为了帮大家应对面试而是帮大家真正的走上“生产环境”。因此下面就要开始show me the code了,我上面画图时其实已经预留了整体的“架构设计”了,因此下面就围绕着以上的2个场景我们来使用springboot+dubbo+nacos+seata(吼吼。。。这么多。。。东西)来实现它们。
seata+nacos的组合
这边需要介绍一下seata和nacos。
Seata是什么?
Seata的前身就是阿里蚂蚁金服的:FESCAR,它就是为了解决又要实现事务的最终一致性,又要保证整体系统的高性能、高吞吐还要解决为了实现以上的事务2PC或者是TCC时不对已经写好的业务代码进行太多的“侵入式破坏”来设计的。
写本文时它的最高版本为1.0.0GA版,最后一次GIT提交时间在2天前即1月19号还在不断有人提交Patch和fix bug。目前网上所有的sample要么跑不起来、要么不可用全部都是helloworld级别的东西,只可以单机玩无法跑生产,而且都不是结合nacos的应用的根本没法实用,文档又不全,因此我是把我实际生产中的经验直接分享给到各位的。
Nacos是什么?
这是一个相当成熟了的服务注册发现+资源管理器,目前最新版为1.1.4。它是作为取代Zookeeper的地位的,而事实上它也正在取代Zookeeper,它相当的成熟,比Seata成熟,必竟它比Seata出现的早吗。
我们都知道SpringCloud和Dubbo都有自己的基于ZK的服务管理中心对吧?那玩意过时了,简陋、又不易操作、不易运维,dubbo从2.6版开始已经内含nacos-registry了,因此越来越多的远程服务注册、服务自发现开始使用nacos了。
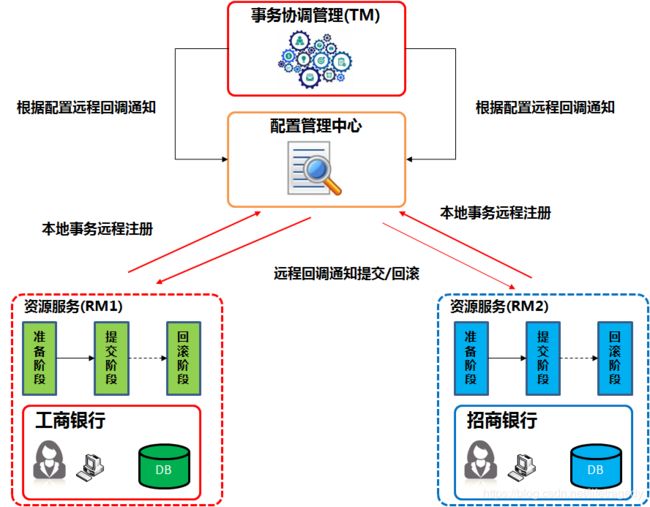
我们注意到了我在画TCC事务时放置了一个“配置管理中心”,这是我故意放置的,此处使用的正是Nacos。
Seata+Nacos是如何协调工作的?
Seata就是事务管理中心,Transaction Management,简称TM。
各个Dubbo微服务会被当成一种Resource被注册进Seata的“资源管理器”,我们简称RM。
那有Nacos什么事?嘿嘿!别急!
大家想一下我上面说过的话,要解决的是“又要实现事务的最终一致性,又要保证整体系统的高性能、高吞吐还要解决为了实现以上的事务2PC或者是TCC时不对已经写好的业务代码进行太多的“侵入式破坏”。注意此处的“不对写好的业务代码进行太多的侵入式破坏”这几个字眼。
如何不侵入式破坏?类反射+回调->Spring+回调,Yeah!
同时,各个微服务就是一套独立的系统,怎么让远程的2个系统或者是多个系统互相类反射?
那么我们的做法起源于最最最最古老的J2EE v1.2规范中的EJB的Session Bean的设计理念。
它的原理其实就是各个EJB(微服务,那时叫SOA)把自己的接口名的全路径以JNDI的寻址方式注册进J2EE容器(要玩J2EE可不能用Tomcat哦,Tomcat永远只是一个web container,要玩J2EE必须使用Websphere, Weblogic或者是开源的JBOSS,spring+mybatis=This is not a J2EE)。然后不同参于的“服务组件”都通过这个JNDI来进行寻址并互相通知(调用)。
Dubbo的作者(包括他的开发团队)曾提出过这么一个思想:我觉得事务的管理不应该属于Dubbo框架,Dubbo只需实现可被事务管理即可,像JDBC和JMS都是可被事务管理的分布式资源,Dubbo只要实现相同的可被事务管理的行为,比如可以回滚, 其它事务的调度,都应该由专门的事务管理器实现。 FESCAR就是在这么一个前提下在被架构出来的。
Seata, Nacos, Dubbo三者间就正是这么一种羁绊。
Dubbo是微服务核心服务提供者;
Dubbo与Dubbo间的通信用的是远程接口,它需要一个远程的自动服务发现、注册管理中心,于是就有了Nacos;
而Seata是一种TM,它通过的是通过去注册管理中心里寻找相应的RM的注册地址,然后通过远程消息+异步回调机制来完成RM内的相关事务的统一协调与管理;
知道了这三者的关系后我们下面开始就用实例来实现这一次魔幻之旅吧!
Seata使用讲解
所有工程源码位于我的git上,各位可以下载了后学习用:https://github.com/mkyuangithub/mkyuangithub
Seata Server端与Seata Client端的选择
首先我们使用seata-server v0.9.0版本,它是一个中间件,启动在那边就可以了。但是对于它的客户端我们必须要注意使用seata-all version 1.0.0。
没错,server端和client端版本不一致,你没看错。
Server版我们还不能完全使用seata-server 1.0GA,如前文所提,它还不是一个稳定版本,而且还在不断的修相应的bug,0.9.0是一个比较稳定的版本也支持HA机制,是可以用来上生产的。
Client版我们坚持使用v1.0.0,那是因为0.8.0~0.9.0间的client版有Bug,这个Bug如果你不是真正的生产级别应用是发现不了的,因为如果你直接跑它的官方Sample那是没有任何问题,如果你要把多个微服务分开来布署,并且每个微服务还要有自己的DB(这才是生产级应用),然后通过nacos靠seata来协调不同微服务间的事务,它会造成你一个微服务提交事务后整个后台事务“死锁”,这也在git上被seata相关贡献者给证明了,这个bug相关的0.8.1~0.9.0的client端还在待修复中,而v1.0.0目前没有这个问题。
Seata Server的配置与启动详解
目前网上,全网。。。没错,所有的讲解Seata的例子均出于两篇文章,这两篇一篇是阿里内部开发人员通过Seata中相应的源码来说明这对搞原理的人来说可以做做相应的学术研究,另一篇是等于把git上的sample原份不动的抄了一下也没有太多实际的生产价值,并且会误导真正要去关注其技术的读者。
我们这边就拿Seata-Server0.9.0+Nacos1.1.4来做我们实例的讲解。
两个者的部署运行包请去它们各自的官方git上下载,我这边也给出了这两者的官网下载地址:
https://github.com/seata/seata/releases/download/v0.9.0/seata-server-0.9.0.zip
https://github.com/alibaba/nacos/releases/download/1.1.4/nacos-server-1.1.4.zip
要下载tar包的读者们可直行去下面这两个网址下载:
https://github.com/seata/seata/releases
https://github.com/alibaba/nacos/releases
nacos怎么用我已经在上一篇阿里的nacos+springboot+dubbo2.7.3集成以及统一处理异常的两种方式看详细有讲述了。因此我们主要就来看seata的用法。我要强调的是本示例是推荐大家把nacos和seata全部部署在linux上进行使用的,为什么后面你就会知道了。
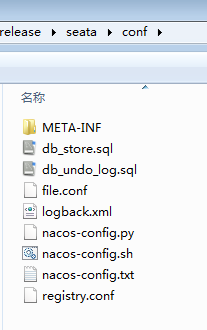
Seata-Server0.9.0下载后打开它是这么样的一个目录结构
你可以直接跑到bin目录下运行./seata-server.sh,但是我请你先不要这么干,我们进conf目录中进行一个简单的不超过5分钟的配置。如果你不看这章直接只管运行你会变成网上那些根本无法把它运用到实战的人群之一。
我们进入conf目录
seata支持两种运行模式,我们要使用nacos运行模式而不是file
Seata有两种运行模式:
1)它可以依赖于nacos或者是zk、redis、springcloud的eureka的方式
2)它也可以不依赖于任何第三方,仅靠client端与seata间进行通讯,它使用的就是这个conf目录内的file.conf了
因此,如果你要使用nacos来做seata的“托载”,就请把这个file.conf删了,而网上所有的教程竟然。。。都是保留着它。
剁了它吧!
我们用的是seata+nacos的这种模式来跑我们的实例的。
至于为什么使用file模式?它和其它模式有什么不一样的地方呢?
我们打开conf目录下的registry.conf目录来一窥究竟吧,下面是registry.conf的内容:
registry {
  # file 、nacos 、eureka、redis、zk、consul、etcd3、sofa
  type = "file"

  nacos {
    serverAddr = "localhost"
    namespace = ""
    cluster = "default"
  }
  eureka {
    serviceUrl = "http://localhost:8761/eureka"
    application = "default"
    weight = "1"
  }
  redis {
    serverAddr = "localhost:6379"
    db = "0"
  }
  zk {
    cluster = "default"
    serverAddr = "127.0.0.1:2181"
    session.timeout = 6000
    connect.timeout = 2000
  }
  consul {
    cluster = "default"
    serverAddr = "127.0.0.1:8500"
  }
  etcd3 {
    cluster = "default"
    serverAddr = "http://localhost:2379"
  }
  sofa {
    serverAddr = "127.0.0.1:9603"
    application = "default"
    region = "DEFAULT_ZONE"
    datacenter = "DefaultDataCenter"
    cluster = "default"
    group = "SEATA_GROUP"
    addressWaitTime = "3000"
  }
  file {
    name = "file.conf"
  }
}

config {
  # file、nacos 、apollo、zk、consul、etcd3
  type = "file"

  nacos {
    serverAddr = "localhost"
    namespace = ""
  }
  consul {
    serverAddr = "127.0.0.1:8500"
  }
  apollo {
    app.id = "seata-server"
    apollo.meta = "http://192.168.1.204:8801"
  }
  zk {
    serverAddr = "127.0.0.1:2181"
    session.timeout = 6000
    connect.timeout = 2000
  }
  etcd3 {
    serverAddr = "http://localhost:2379"
  }
  file {
    name = "file.conf"
  }
}
大家要注意的就是两个段:
Registry{}段与Config{}段。
这么一陀都要么?可能么?肯定我们只选用其中一种配置,这边我们用的就是nacos模式,于是我们把这个registry.conf设置成我下面这样即可,看到了吧,registry里的type设成nacos,config里也设成nacos,并指定nacos运行的地址,因此你的nacos一定先要运行起来。
这边再多插一个番外,nacos在windows下你直接使用startup.cmd启动是没问题的,它默认会在windows下使用standalone模式启动,而在linux下你不能直接startup.sh,因为在linux下它会默认使用cluster模式启动,因此在linux下你需要使用如下启动命令来启动你的nacos:
./startup.sh -m standaloneregistry {
type = "nacos"
nacos {
serverAddr = "192.168.56.101"
namespace = "public"
cluster = "default"
}
}
config {
type = "nacos"
nacos {
serverAddr = "192.168.56.101"
namespace = "public"
cluster = "default"
}
}为什么这边的nacos的serverAddr不要写成:192.168.56.101:8848呢?因为。。。唉。。。seata目前写死掉如果是nacos那么代码取端口“写死8848”,嘿嘿嘿,相应后期1.0.0GA版本后一定会做成端口动态设置的,不过这不影响我们使用的。
因此一旦设置了type=nacos后就请把file.conf文件删除了即可,不要用file了。
因为seata如果通过的是file模式运行,客户端与seata server端不是通过注册中心去做服务连接和自动发现的,它是让拥有seata-client端的jar代码与seata server端直接通过tcp直连的模式的。
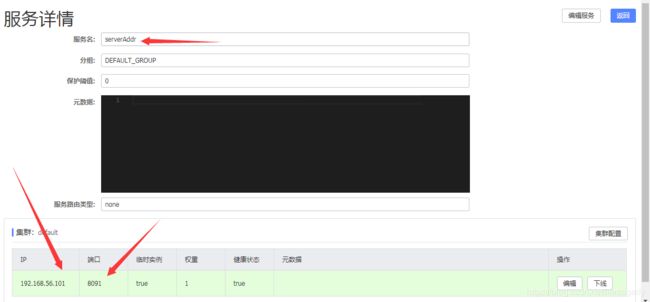
因为我们使用的是type=nacos,因此我们需要把seata的相关服务给注册到nacos中。
请使用纯文本编辑工具(一定是纯文本编辑工具哦)在seata/conf目录下建立一个叫“nacos.config.txt”的文件。。。对,你没看错文件名就是“nacos-config.txt”文件,而且一个字不能错
内容如下,注意前方一陀参数预警,不过我会把重要的参数都给说一遍的。
transport.type=TCP
transport.server=NIO
transport.heartbeat=true
transport.thread-factory.boss-thread-prefix=NettyBoss
transport.thread-factory.worker-thread-prefix=NettyServerNIOWorker
transport.thread-factory.server-executor-thread-prefix=NettyServerBizHandler
transport.thread-factory.share-boss-worker=false
transport.thread-factory.client-selector-thread-prefix=NettyClientSelector
transport.thread-factory.client-selector-thread-size=1
transport.thread-factory.client-worker-thread-prefix=NettyClientWorkerThread
transport.thread-factory.boss-thread-size=1
transport.thread-factory.worker-thread-size=8
transport.shutdown.wait=3
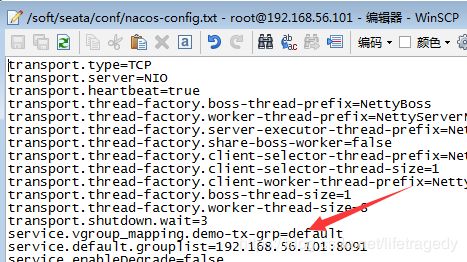
service.vgroup_mapping.demo-tx-grp=default
service.default.grouplist=192.168.56.101:8091
service.enableDegrade=false
service.disable=false
service.max.commit.retry.timeout=-1
service.max.rollback.retry.timeout=-1
client.async.commit.buffer.limit=10000
client.lock.retry.internal=10
client.lock.retry.times=30
client.lock.retry.policy.branch-rollback-on-conflict=true
client.table.meta.check.enable=true
client.report.retry.count=5
client.tm.commit.retry.count=1
client.tm.rollback.retry.count=1
store.mode=db
store.file.dir=file_store/data
store.file.max-branch-session-size=16384
store.file.max-global-session-size=512
store.file.file-write-buffer-cache-size=16384
store.file.flush-disk-mode=async
store.file.session.reload.read_size=100
store.db.datasource=druid
store.db.db-type=mysql
store.db.driver-class-name=com.mysql.jdbc.Driver
store.db.url=jdbc:mysql://192.168.56.101:3306/seata?useUnicode=true
store.db.user=seata
store.db.password=111111
store.db.min-conn=1
store.db.max-conn=3
store.db.global.table=global_table
store.db.branch.table=branch_table
store.db.query-limit=100
store.db.lock-table=lock_table
recovery.committing-retry-period=1000
recovery.asyn-committing-retry-period=1000
recovery.rollbacking-retry-period=1000
recovery.timeout-retry-period=1000
transaction.undo.data.validation=true
transaction.undo.log.serialization=jackson
transaction.undo.log.save.days=7
transaction.undo.log.delete.period=86400000
transaction.undo.log.table=undo_log
transport.serialization=seata
transport.compressor=none
metrics.enabled=false
metrics.registry-type=compact
metrics.exporter-list=prometheus
metrics.exporter-prometheus-port=9898
support.spring.datasource.autoproxy=false
妈妈呀,这么长一陀,不难理解,它其实也分几个段来理解的。
Seata连接DB
seata一旦配置了nacos后它会在nacos中生成一个配置管理的服务,这个服务是需要依托于DB来做持久的,这时你需要把它的store.mode改成db。
此处你看到了,对于db你可以直接使用druid来作你的datasource,它自带druid客户端了:
store.db.datasource=druid
store.db.db-type=mysql
store.db.driver-class-name=com.mysql.jdbc.Driver
store.db.url=jdbc:mysql://192.168.56.101:3306/seata?useUnicode=true
store.db.user=seata
store.db.password=111111
store.db.min-conn=1
store.db.max-conn=3
配完了db不要忘记在db中手动运行conf/目录下的一个叫db_store.sql的文件,它会生成seata所需运行的3个表。
-- the table to store GlobalSession data
drop table if exists `global_table`;
create table `global_table` (
  `xid` varchar(128)  not null,
  `transaction_id` bigint,
  `status` tinyint not null,
  `application_id` varchar(32),
  `transaction_service_group` varchar(32),
  `transaction_name` varchar(128),
  `timeout` int,
  `begin_time` bigint,
  `application_data` varchar(2000),
  `gmt_create` datetime,
  `gmt_modified` datetime,
  primary key (`xid`),
  key `idx_gmt_modified_status` (`gmt_modified`, `status`),
  key `idx_transaction_id` (`transaction_id`)
);

-- the table to store BranchSession data
drop table if exists `branch_table`;
create table `branch_table` (
  `branch_id` bigint not null,
  `xid` varchar(128) not null,
  `transaction_id` bigint ,
  `resource_group_id` varchar(32),
  `resource_id` varchar(256) ,
  `lock_key` varchar(128) ,
  `branch_type` varchar(8) ,
  `status` tinyint,
  `client_id` varchar(64),
  `application_data` varchar(2000),
  `gmt_create` datetime,
  `gmt_modified` datetime,
  primary key (`branch_id`),
  key `idx_xid` (`xid`)
);

-- the table to store lock data
drop table if exists `lock_table`;
create table `lock_table` (
  `row_key` varchar(128) not null,
  `xid` varchar(96),
  `transaction_id` long ,
  `branch_id` long,
  `resource_id` varchar(256) ,
  `table_name` varchar(32) ,
  `pk` varchar(36) ,
  `gmt_create` datetime ,
  `gmt_modified` datetime,
  primary key(`row_key`)
);
接着我们理解nacos-config.txt文件中的内容
service.vgroup_mapping.demo-tx-grp=default
service.default.grouplist=192.168.56.101:8091
这边的server.vgroup_mapping指的就是分布式事务生效的那个“范围”,看下图就懂了:
这边的事务作用group就是我们的service.vgroup_mappiing然后“小点点”后面的这个名字了,这个名字你必须和你在seata client端带的事务group名一致。
什么是seata客户端 ,喏,上图中的2个dubbo和那个消费者(consumer)就是seata的客户端,seata-server0.9.0就是server端。
service.default.grouplist=192.168.56.101:8091是什么意思?
很简单,就是为这个事务范围它会开启一个基于netty的远程服务,它是一个远程消息服务。当任何一段抛出Exception,这个消息服务就会触发它的onMessage方法中的相应的逻辑,它要做的事就是去nacos中寻找注册进去的provider端和consumer端,然后通过回调接口来通知各个事务参与者要么提交,要么回滚用的。
因此这边的ip或者是hostname就是指向seata server端自身的ip即可。
其实这么长一陀参数,我们只要讲这几个核心参数即可,其它的参数?你们自己去看看,那都是用来调解性能阀值的,你配过druid的相关阀值参数就会配那余下的几个参数,这个可以留给大家根据自身部署环境去做调整,没有一个绝对的答案。
全配置完后我们要开始启动seata server了,等等等等!还有一个步骤!
你配完这个nacos-config.txt后不代表seata启动时就会加载它,不会的哦,这个文件是要倒过来先“注入nacos”的,而且是在seata启动前先注入给到nacos的,因此你的nacos必须在第1步骤中就启动起来。
我们在seata的conf目录下看到有这么两个文件,一个叫nacos-config.sh一个叫nacos-config.py。它们的作用就是:
nacos-config.sh 192.168.56.101此时seata会自动找到命令后的ip加上:8848端口号,然后找到conf目录下的nacos-config.txt文件,然后把nacos-config.txt文件里的那一陀内容全部注入到nacos中去的。
此处千万记得,在nacos-config.txt文件最后不要留空行啊,因为nacos-config.sh也会把空行当成null值给set进nacos的。
这边重提一下上面说的为什么我推荐大家要在linux下用nacos和seata,你们看到了,它没有nacos-config.bat哈,你要在windows下用要么你装个cygwin要么装一个python for windows环境 。
或者。。。你在linux下完成了我上述这些步骤后,再把个seata copy回到windows下,然后通过 seata/bin下的seata-server.bat运行哈?这不折腾吗?
启动前最后要配一个东西,什么?logback.xml文件。
它里面指定了seata的log生成在哪儿,要不,它会生成在这些地方 :
- windows下默认的seata log生成在c盘的user目录下;
- linux就生成在/home/登录用户下的logs/seata了;
全设完了,我们就可以通过以下命令来启动seata了。
./seata-server.shSEATA基于2PC的AT模式的生产实例
所有代码我已经放置在了我的git上了,地址在这:https://github.com/mkyuangithub/mkyuangithub
我们在这个例子中会设计2个dubbo service:
- seata-product-service
- seata-stock-service
设计一个controller,seata-demo-consumer,它会通过这两个dubbo service分别在product库和stock库同时插入一条记录,如:
{
	"productname" : "tea",
	"stock" : 10000
}
这两个dubbo service可是分别连着自己的物理数据库,连链接都不同的数据库的,并且这两个dubbo service启动在两个不同的jvm实例中,以此来完成 :
- 要么成功全部提交事务;
- 要么在操作过程中有任何Exception抛出那么两个Dubbo Service全部回滚各自的业务以保持分布式事务的最终数据一致性;
先不急着分析代码, 们在做代码前笔者要把seata结合spring boot和nacos的坑好好的给各位快速撸一把。
我们做1个consumer来沟通这两个dubbo service的架构入手!
工程整体介绍
我们一共会分成三个工程:
- seata-product-service,连接着productDB
- seata-stock-service,连接着stockDB
- seata-demo-consumer,它是一个springboot controller,在一个service方法内同时调用product与stock的dubbo service来完成t_product和t_stock表的插入动作
工程搭建时的通用配置注意事项
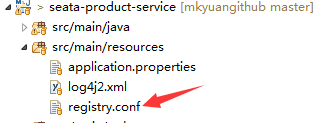
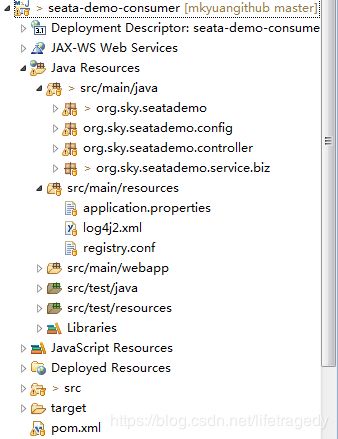
每一个工程记得要在它们的src/main/resources目录下放置一个registry.conf,它用来让每个工程内的seata-all的客户端可以访问到seata。三个工程都要放。
每个工程要有registry.conf文件
seata-product-service与seata-stock-service工程内的registry.conf会调用工程的maven中的:
			io.seata
			seata-all
把自身注册进RM(Resource Manager)里。如果你的type选用的是file那么你还要在每个工程的src/main/resources内放置一个file.conf的文件。文件内容必须和seata-server端的conf/file.conf文件内容一致。目前网上的所谓例子都是基于file来做的,它不会使用到注册中心的概念只会在seata所属的客户端和seata-server端使用本地开启netty然后通过8091端口来互传,因此我才说这不是生产级的应用。
registry.conf文件内容如下
registry {
  type = "nacos"

  nacos {
    serverAddr = "192.168.56.101"
    namespace = "public"
    cluster = "default"
  }

}

config {
  type = "nacos"

  nacos {
    serverAddr = "192.168.56.101"
    namespace = ""
  }
}
而seata-demo-consumer里有一个普通的service方法,它是一个dubbo consumer,在它的方法内会有一个这样的标记
这个@GlobalTransactional用来通过nacos寻址返向找到product和stock内的dubbo provider然后再回调相应的provider service中的涉及到db的transaction来执行回滚或提交。它只安置于调用若干个dubbo service的业务service这一层,各dubbo service内不需要加这个参数(除非你有事嵌套和传播的需求)。
为此,我们还需要多做一步,那就是把seata的transaction注入到有DB涉及到的dubbo provider工程内,见下文。
使用seata datasource proxy来代理每个dubbo的事务
在dubbo工程内,有涉及到操作DB的,都需要在连接dataSource时这样进行配置,此处我们使用spring boot全注解方式来连接DB
package org.sky.product.config;


import org.springframework.boot.context.properties.ConfigurationProperties;
import org.springframework.context.annotation.Bean;
import org.springframework.context.annotation.Configuration;
import org.springframework.context.annotation.Primary;
import org.springframework.jdbc.core.JdbcTemplate;
import org.springframework.jdbc.datasource.DataSourceTransactionManager;
import com.alibaba.druid.pool.DruidDataSource;
import io.seata.rm.datasource.DataSourceProxy;
import io.seata.spring.annotation.GlobalTransactionScanner;

@Configuration
public class DruidConfig {
	@Bean
	@ConfigurationProperties(prefix = "spring.datasource")
	public DruidDataSource druidDataSource() {
		return new DruidDataSource();

	}

	/**
	 * init datasource proxy
	 *
	 * @Param: druidDataSource datasource bean instance
	 * @Return: DataSourceProxy datasource proxy
	 */
	@Bean
	public DataSourceProxy dataSourceProxy(DruidDataSource druidDataSource) {
		return new DataSourceProxy(druidDataSource);
	}

	@Bean
	public DataSourceTransactionManager transactionManager(DataSourceProxy dataSourceProxy) {
		return new DataSourceTransactionManager(dataSourceProxy);
	}

	/**
	 * init jdbc template by using the dataSourceProxy
	 *
	 * @Return: JdbcTemplate
	 */
	@Primary
	@Bean
	public JdbcTemplate dataSource(DataSourceProxy dataSourceProxy) {
		return new JdbcTemplate(dataSourceProxy);
	}

	/**
	 * init global transaction scanner
	 *
	 * @Return: GlobalTransactionScanner
	 */
	@Bean
	public GlobalTransactionScanner globalTransactionScanner() {
		return new GlobalTransactionScanner("seata-product-service", "demo-tx-grp");
	}

}
每个GlobalTransactionScanner中相应参数讲解
以上代码中最后一个@Bean配置内有这么一句:
return new GlobalTransactionScanner("seata-product-service", "demo-tx-grp");
此处的第一个参数是你的dubbo-application-name,它对应于你的application.properties文件内的如下这么一块内容 。每个dubbo provider的name都不一样的的。
dubbo.protocol.id=dubbo
dubbo.protocol.name=dubbo
dubbo.application.name=seata-product-service
dubbo.application.id=seata-product-service
此处的第二个参数就是“全局事务的范围”,它也对应着我们在seata的nacos-config.txt文件内配置的这一行,要是这个名字对不起来那么各seata client端无法通过seata-server:8091的netty端口连上seata的service group,客户端也会频繁抛 can not connect to server的出错信息的:
各seata客户端对于回滚的设置
每个seata客户端连接着的DB库内要有一个undo_log表,这个表是供seata客户端自己调用的,它的建表语句就位于seata/conf目录内的db_undo_log.sql。
有参于事务的客户端的业务DB库内就必须要有一个这样的表,seata在回调dubbo provider时在提交和回滚时是会自动用到这张表的。
CREATE TABLE `undo_log` (
  `id` bigint(20) NOT NULL AUTO_INCREMENT,
  `branch_id` bigint(20) NOT NULL,
  `xid` varchar(100) NOT NULL,
  `context` varchar(128) NOT NULL,
  `rollback_info` longblob NOT NULL,
  `log_status` int(11) NOT NULL,
  `log_created` datetime NOT NULL,
  `log_modified` datetime NOT NULL,
  `ext` varchar(100) DEFAULT NULL,
  PRIMARY KEY (`id`),
  UNIQUE KEY `ux_undo_log` (`xid`,`branch_id`)
) ENGINE=InnoDB AUTO_INCREMENT=1 DEFAULT CHARSET=utf8;
seata-product-service工程全代码
和之前的工程一样,它们共用一个parent即nacos-parent,这边给出seata-product-service工程的pom.xml文件。这边要记的就是seata的客户端一定要用1.0.0,这些版本号的工作都是在我的parent工程内制定的。
		1.8
		1.5.15.RELEASE
		2.7.3
		4.0.1
		2.8.0
		1.1.20
		27.0.1-jre
		1.2.59
		2.7.3
		1.1.4
		5.1.46
		3.4.2
		1.8.13
		1.8.14-RELEASE
		0.0.1-SNAPSHOT
		1.0.0
		4.1.42.Final
		0.1.4
		1.16.22
		3.1.0
		3.4.5
		1.3.1
		${java.version}
		${java.version}
		3.8.1
		3.2.3
		3.1.2
		UTF-8
		UTF-8
下面是seata-product-service的pom.xml全内容
	4.0.0
	org.sky.demo
	seata-product-service
	0.0.1-SNAPSHOT
	jar
	seata-product-service
	Demo project Dubbo+Nacos+Seata

		org.sky.demo
		nacos-parent
		0.0.1-SNAPSHOT


		UTF-8


			org.springframework.boot
			spring-boot-starter-jdbc


					org.springframework.boot
					spring-boot-starter-logging


			org.apache.dubbo
			dubbo


			org.apache.curator
			curator-framework


			org.apache.curator
			curator-recipes


			mysql
			mysql-connector-java


			com.alibaba
			druid


			org.springframework.boot
			spring-boot-starter-test
			test


			org.spockframework
			spock-core
			test


			org.spockframework
			spock-spring


			org.springframework.boot
			spring-boot-configuration-processor
			true


			org.springframework.boot
			spring-boot-starter-log4j2


			org.springframework.boot
			spring-boot-starter-web


					org.springframework.boot
					spring-boot-starter-logging


					org.springframework.boot
					spring-boot-starter-tomcat


			org.aspectj
			aspectjweaver


			com.lmax
			disruptor


			redis.clients
			jedis


			com.google.guava
			guava


			com.alibaba
			fastjson


			org.apache.dubbo
			dubbo-registry-nacos


			com.alibaba.nacos
			nacos-client


			org.sky.demo
			skycommon
			${skycommon.version}


			io.seata
			seata-all


			com.alibaba.boot
			nacos-config-spring-boot-starter


					nacos-client
					com.alibaba.nacos


			io.netty
			netty-all


			org.projectlombok
			lombok


		${project.artifactId}
		src/main/java
		src/test/java


				org.apache.maven.plugins
				maven-compiler-plugin


				org.springframework.boot
				spring-boot-maven-plugin

					-Dfile.encoding=UTF-8


							repackage


				org.apache.maven.plugins
				maven-war-plugin
				2.6

					false


				src/main/resources

					application*.properties


				src/main/webapp
				META-INF/resources

					**/**


				src/main/resources
				true

					application.properties
相应的t_product建表语句如下:
CREATE TABLE `t_product` (
  `product_id` int(16) NOT NULL AUTO_INCREMENT,
  `product_name` varchar(45) COLLATE utf8_bin DEFAULT NULL,
  PRIMARY KEY (`product_id`)
) ;
项目使用springboot全注解,来看看项目的application.properties文件的内容吧。
application.properties
spring.datasource.type=com.alibaba.druid.pool.DruidDataSource
spring.datasource.driverClassName=com.mysql.jdbc.Driver
spring.datasource.url=jdbc:mysql://192.168.56.101:3306/product?useUnicode=true&characterEncoding=utf-8&useSSL=false
spring.datasource.username=product
spring.datasource.password=111111
spring.datasource.initialize=false


spring.redis.database=0
spring.redis.host=192.168.56.101
spring.redis.port=6379
spring.redis.password=111111
spring.redis.pool.max-active=10
spring.redis.pool.max-wait=-1
spring.redis.pool.max-idle=10
spring.redis.pool.min-idle=0
spring.redis.timeout=1000
#tomcat settings
server.port=8080
server.tomcat.maxConnections=300
server.tomcat.maxThreads=300
server.tomcat.uriEncoding=UTF-8
server.tomcat.maxThreads=300
server.tomcat.minSpareThreads=150
server.connectionTimeout=20000
server.tomcat.maxHttpPostSize=0
server.tomcat.acceptCount=300

#Dubbo provider configuration

dubbo.protocol.id=dubbo
dubbo.protocol.name=dubbo
dubbo.application.name=seata-product-service
dubbo.application.id=seata-product-service
dubbo.registry.protocol=dubbo
dubbo.registry.address=nacos://192.168.56.101:8848
dubbo.protocol.name=dubbo
dubbo.protocol.port=20880
dubbo.protocol.threads=2000
dubbo.protocol.queues=1000
dubbo.protocol.threadpool=cached
dubbo.provider.retries=3
dubbo.provider.threadpool=cached
dubbo.provider.threads=2000
dubbo.provider.connections=2000
dubbo.provider.acceptes=0
dubbo.provider.executes=0
dubbo.consumer.actives=0

dubbo.scan.base-packages=org.sky.product.service.dubbo
logging.config=classpath:log4j2.xml
可以看到它开了一个dubbo provider service,dubbo.application.name申明了该dubbo服务的名称 。并且这个dubbo provider service会运行在20880端口。
以下是项目的自动注入相关资源到pring用的DruidConfig.java文件
package org.sky.product.config;

import org.springframework.boot.context.properties.ConfigurationProperties;
import org.springframework.context.annotation.Bean;
import org.springframework.context.annotation.Configuration;
import org.springframework.context.annotation.Primary;
import org.springframework.jdbc.core.JdbcTemplate;
import org.springframework.jdbc.datasource.DataSourceTransactionManager;
import com.alibaba.druid.pool.DruidDataSource;
import io.seata.rm.datasource.DataSourceProxy;
import io.seata.spring.annotation.GlobalTransactionScanner;

@Configuration
public class DruidConfig {
	@Bean
	@ConfigurationProperties(prefix = "spring.datasource")
	public DruidDataSource druidDataSource() {
		return new DruidDataSource();

	}

	/**
	 * init datasource proxy
	 *
	 * @Param: druidDataSource datasource bean instance
	 * @Return: DataSourceProxy datasource proxy
	 */
	@Bean
	public DataSourceProxy dataSourceProxy(DruidDataSource druidDataSource) {
		return new DataSourceProxy(druidDataSource);
	}

	@Bean
	public DataSourceTransactionManager transactionManager(DataSourceProxy dataSourceProxy) {
		return new DataSourceTransactionManager(dataSourceProxy);
	}

	/**
	 * init jdbc template by using the dataSourceProxy
	 *
	 * @Return: JdbcTemplate
	 */
	@Primary
	@Bean
	public JdbcTemplate dataSource(DataSourceProxy dataSourceProxy) {
		return new JdbcTemplate(dataSourceProxy);
	}

	/**
	 * init global transaction scanner
	 *
	 * @Return: GlobalTransactionScanner
	 */
	@Bean
	public GlobalTransactionScanner globalTransactionScanner() {
		return new GlobalTransactionScanner("seata-product-service", "demo-tx-grp");
	}

}
大家可以看到它使用了seata带的DatasourceProxy代理了DruiDatasource,然后再用GlobalTransationScanner来代理Spring的TransactionManager。
此处我们使用jdbcTemplate来做全工程的SQL访问。
ProductDAO.java
package org.sky.product.dao;

import org.sky.exception.DemoRpcRunTimeException;

public interface ProductDAO {

	public long addNewProduct(String productName) throws DemoRpcRunTimeException;
}
ProductDAOImpl
package org.sky.product.dao;

import java.sql.Connection;
import java.sql.PreparedStatement;
import java.sql.SQLException;

import javax.annotation.Resource;

import org.sky.dao.BaseDAO;
import org.sky.exception.DemoRpcRunTimeException;
import org.springframework.jdbc.core.JdbcTemplate;
import org.springframework.jdbc.core.PreparedStatementCreator;
import org.springframework.jdbc.support.GeneratedKeyHolder;
import org.springframework.jdbc.support.KeyHolder;
import org.springframework.stereotype.Component;

@Component
public class ProductDAOImpl extends BaseDAO implements ProductDAO {
	@Resource
	private JdbcTemplate jdbcTemplate;

	@Override
	public long addNewProduct(String productName) throws DemoRpcRunTimeException {
		String prodSql = "insert into t_product(product_name)values(?)";
		long newProdId = 0;
		try {

			KeyHolder keyHolder = new GeneratedKeyHolder();
			jdbcTemplate.update(new PreparedStatementCreator() {
				@Override
				public PreparedStatement createPreparedStatement(Connection connection) throws SQLException {
					PreparedStatement ps = connection.prepareStatement(prodSql, new String[] { "id" });
					ps.setString(1, productName);
					return ps;
				}
			}, keyHolder);
			newProdId = keyHolder.getKey().longValue();
		} catch (Exception e) {
			throw new DemoRpcRunTimeException(
					"error occured on insert product with: product_id->\" + newProdId + \" and productname->\"\r\n"
							+ "					+ productName" + e.getMessage(),
					e);
		}
		return newProdId;
	}

}
然后我们给出ProductBizService,这个BizService只是一个普通的@Service,它会被ProductDubboService调用,整个seata的事务会通过这样的事务传播路径Dubbo->Service->Dao一路传进来,因此对于参于全局seata事务的@Service类就不需要再加@Transactional这样的注解了。
package org.sky.product.service.biz;

import org.sky.exception.DemoRpcRunTimeException;
import org.sky.product.dao.ProductDAO;
import org.sky.product.service.biz.ProductBizService;
import org.sky.service.BaseService;
import org.springframework.beans.factory.annotation.Autowired;
import org.springframework.stereotype.Service;

@Service
public class ProductBizServiceImpl extends BaseService implements ProductBizService {
	@Autowired
	ProductDAO productDAO;

	@Override
	public long addProduct(String productName) throws DemoRpcRunTimeException {
		long newProdId = 0;
		try {
			newProdId = productDAO.addNewProduct(productName);
		} catch (Exception e) {
			logger.error("error occured on Biz Service Side: " + e.getMessage(), e);
			throw new DemoRpcRunTimeException("error occured on Biz Service Side: " + e.getMessage(), e);
		}
		return newProdId;
	}

}
下面是product的微服务ProductDubboService的实现类,我们把ProductDubboService这种用于远程访问的Dubbo的Inerface(在EJB理念里我们管这种叫残根)都放置在了sky-common工程里了。下面给出ProductDubboService的实现类
ProductDubboServiceImpl.java
package org.sky.product.service.dubbo;

import org.apache.dubbo.config.annotation.Service;
import org.sky.exception.DemoRpcRunTimeException;
import org.sky.product.service.biz.ProductBizService;
import org.sky.product.service.dubbo.ProductDubboService;
import org.sky.service.BaseService;
import org.springframework.beans.factory.annotation.Autowired;

@Service(version = "1.0.0", interfaceClass = ProductDubboService.class, timeout = 30000, loadbalance = "roundrobin")
public class ProductDubboServiceImpl extends BaseService implements ProductDubboService {

	@Autowired
	ProductBizService productBizService;

	@Override
	public long addProduct(String productName) throws DemoRpcRunTimeException {
		long result = 0;
		try {
			result = productBizService.addProduct(productName);
			logger.info("======>insert into t_product with product_id->" + result + " and productname->" + productName
					+ " successfully");
		} catch (Exception e) {
			logger.error("error occured on insert product with: product_id->\" + newProdId + \" and productname->\"\r\n"
					+ "					+ productName" + e.getMessage(), e);
			throw new DemoRpcRunTimeException(
					"error occured on insert product with: product_id->\" + newProdId + \" and productname->\"\r\n"
							+ "					+ productName" + e.getMessage(),
					e);
		}
		return result;
	}

}
最后,就是用于运行该工程用的springboot的Application.java文件了
package org.sky.product;

import org.apache.dubbo.config.spring.context.annotation.EnableDubbo;
import org.springframework.boot.SpringApplication;
import org.springframework.boot.autoconfigure.EnableAutoConfiguration;
import org.springframework.context.annotation.ComponentScan;
import org.springframework.transaction.annotation.EnableTransactionManagement;

@EnableDubbo
@EnableAutoConfiguration
@ComponentScan(basePackages = { "org.sky.product" })

public class Application {

	public static void main(String[] args) {
		SpringApplication.run(Application.class, args);
	}

}
运行起来后,它会把这个dubbo provider service自动注册进nacos去。
因此启动顺序一定记得是mysql->nacos->seata再启动各个dubbo provider以及consumer。
seata-stock-service
pom.xml
同seata-product-service项目。
	4.0.0
	org.sky.demo
	seata-stock-service
	0.0.1-SNAPSHOT
	jar
	seata-stock-service
	Demo project Dubbo+Nacos+Seata

		org.sky.demo
		nacos-parent
		0.0.1-SNAPSHOT


		UTF-8


			org.springframework.boot
			spring-boot-starter-jdbc


					org.springframework.boot
					spring-boot-starter-logging


			org.apache.dubbo
			dubbo


			org.apache.curator
			curator-framework


			org.apache.curator
			curator-recipes


			mysql
			mysql-connector-java


			com.alibaba
			druid


			org.springframework.boot
			spring-boot-starter-test
			test


			org.spockframework
			spock-core
			test


			org.spockframework
			spock-spring


			org.springframework.boot
			spring-boot-configuration-processor
			true


			org.springframework.boot
			spring-boot-starter-log4j2


			org.springframework.boot
			spring-boot-starter-web


					org.springframework.boot
					spring-boot-starter-logging


					org.springframework.boot
					spring-boot-starter-tomcat


			org.aspectj
			aspectjweaver


			com.lmax
			disruptor


			redis.clients
			jedis


			com.google.guava
			guava


			com.alibaba
			fastjson


			org.apache.dubbo
			dubbo-registry-nacos


			com.alibaba.nacos
			nacos-client


			org.sky.demo
			skycommon
			${skycommon.version}


			io.seata
			seata-all


			com.alibaba.boot
			nacos-config-spring-boot-starter


					nacos-client
					com.alibaba.nacos


			io.netty
			netty-all


			org.projectlombok
			lombok


		${project.artifactId}
		src/main/java
		src/test/java


				org.apache.maven.plugins
				maven-compiler-plugin


				org.springframework.boot
				spring-boot-maven-plugin

					-Dfile.encoding=UTF-8


							repackage


				org.apache.maven.plugins
				maven-war-plugin
				2.6

					false


				src/main/resources

					application*.properties


				src/main/webapp
				META-INF/resources

					**/**


				src/main/resources
				true

					application.properties
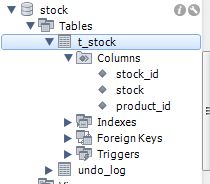
建表语句:
CREATE TABLE `t_stock` (
  `stock_id` int(16) NOT NULL AUTO_INCREMENT,
  `stock` int(6) DEFAULT NULL,
  `product_id` int(16) NOT NULL,
  PRIMARY KEY (`stock_id`)
) ;
application.properties
spring.datasource.type=com.alibaba.druid.pool.DruidDataSource
spring.datasource.driverClassName=com.mysql.jdbc.Driver
spring.datasource.url=jdbc:mysql://192.168.56.101:3306/stock?useUnicode=true&characterEncoding=utf-8&useSSL=false
spring.datasource.username=stock
spring.datasource.password=111111
spring.datasource.initialize=false


spring.redis.database=0
spring.redis.host=192.168.56.101
spring.redis.port=6379
spring.redis.password=111111
spring.redis.pool.max-active=10
spring.redis.pool.max-wait=-1
spring.redis.pool.max-idle=10
spring.redis.pool.min-idle=0
spring.redis.timeout=1000
#tomcat settings
server.port=8081
server.tomcat.maxConnections=300
server.tomcat.maxThreads=300
server.tomcat.uriEncoding=UTF-8
server.tomcat.maxThreads=300
server.tomcat.minSpareThreads=150
server.connectionTimeout=20000
server.tomcat.maxHttpPostSize=0
server.tomcat.acceptCount=300

#Dubbo provider configuration

dubbo.protocol.id=dubbo
dubbo.protocol.name=dubbo
dubbo.application.name=seata-stock-service
dubbo.application.id=seata-stock-service
dubbo.registry.protocol=dubbo
dubbo.registry.address=nacos://192.168.56.101:8848
dubbo.protocol.name=dubbo
dubbo.protocol.port=20981
dubbo.protocol.threads=2000
dubbo.protocol.queues=1000
dubbo.protocol.threadpool=cached
dubbo.provider.retries=3
dubbo.provider.threadpool=cached
dubbo.provider.threads=2000
dubbo.provider.connections=2000
dubbo.provider.acceptes=0
dubbo.provider.executes=0
dubbo.consumer.actives=0
dubbo.scan.base-packages=org.sky.stock.service.dubbo
logging.config=classpath:log4j2.xml
可以看到它是另一个dubbo provider实例,它会运行在20981端口,同时请注意它的dubbo.application.name,和seata-product-service是不同的。
它的registry.conf和seata-product-service中的registry.conf内容完全一模一样,此处就不再重复了。
DruidConfig.java
package org.sky.stock.config;

import javax.sql.DataSource;

import org.springframework.beans.factory.annotation.Value;
import org.springframework.boot.autoconfigure.EnableAutoConfiguration;
import org.springframework.boot.context.properties.ConfigurationProperties;
import org.springframework.boot.web.servlet.FilterRegistrationBean;
import org.springframework.boot.web.servlet.ServletRegistrationBean;
import org.springframework.context.annotation.Bean;
import org.springframework.context.annotation.Configuration;
import org.springframework.context.annotation.Primary;
import org.springframework.jdbc.core.JdbcTemplate;
import org.springframework.jdbc.datasource.DataSourceTransactionManager;
import com.alibaba.druid.pool.DruidDataSource;
import com.alibaba.druid.support.http.StatViewServlet;
import com.alibaba.druid.support.http.WebStatFilter;
import io.seata.rm.datasource.DataSourceProxy;
import io.seata.spring.annotation.GlobalTransactionScanner;

@Configuration
public class DruidConfig {
	@Bean
	@ConfigurationProperties(prefix = "spring.datasource")
	public DruidDataSource druidDataSource() {
		return new DruidDataSource();

	}

	/**
	 * init datasource proxy
	 *
	 * @Param: druidDataSource datasource bean instance
	 * @Return: DataSourceProxy datasource proxy
	 */

	@Bean
	public DataSourceProxy dataSourceProxy(DruidDataSource druidDataSource) {
		return new DataSourceProxy(druidDataSource);
	}

	@Bean
	public DataSourceTransactionManager transactionManager(DataSourceProxy dataSourceProxy) {
		return new DataSourceTransactionManager(dataSourceProxy);
	}

	/**
	 * init jdbc template by using the dataSourceProxy
	 *
	 * @Return: JdbcTemplate
	 */
	@Bean
	public JdbcTemplate dataSource(DataSourceProxy dataSourceProxy) {
		return new JdbcTemplate(dataSourceProxy);
	}

	/**
	 * init global transaction scanner
	 *
	 * @Return: GlobalTransactionScanner
	 */
	@Bean
	public GlobalTransactionScanner globalTransactionScanner() {
		return new GlobalTransactionScanner("seata-stock-service", "demo-tx-grp");
	}

}
可以看到此处的GlobalTransactionScanner的第一个参数是贴合着dubbo.application.name的。
StockDAO.java
package org.sky.stock.dao;

import org.sky.exception.DemoRpcRunTimeException;

public interface StockDAO {

	public void addNewStock(long productId, int stock) throws DemoRpcRunTimeException;
}
StockDAOImpl.java
package org.sky.stock.dao;

import javax.annotation.Resource;

import org.sky.dao.BaseDAO;
import org.sky.exception.DemoRpcRunTimeException;
import org.springframework.jdbc.core.JdbcTemplate;
import org.springframework.stereotype.Component;

@Component
public class StockDAOImpl extends BaseDAO implements StockDAO {
	@Resource
	private JdbcTemplate jdbcTemplate;

	@Override
	public void addNewStock(long productId, int stock) throws DemoRpcRunTimeException {
		String prodSql = "insert into t_stock(product_id,stock)values(?,?)";
		try {
			jdbcTemplate.update(prodSql, productId, stock);
		} catch (Exception e) {
			throw new DemoRpcRunTimeException(e.getMessage(), e);
		}
	}

}
StockBizServiceImpl.java
package org.sky.stock.service.biz;

import org.sky.exception.DemoRpcRunTimeException;
import org.sky.service.BaseService;
import org.sky.stock.dao.StockDAO;
import org.springframework.beans.factory.annotation.Autowired;
import org.springframework.stereotype.Service;

@Service
public class StockBizServiceImpl extends BaseService implements StockBizService {
	@Autowired
	private StockDAO stockDAO;

	@Override
	public void addStock(long productId, int stock) throws DemoRpcRunTimeException {
		try {
			stockDAO.addNewStock(productId, stock);
		} catch (Exception e) {
			throw new DemoRpcRunTimeException("error occured on Biz Service Side: " + e.getMessage(), e);
		}
	}

}
StockDubboServiceImpl.java
package org.sky.stock.service.dubbo;

import org.apache.dubbo.config.annotation.Service;
import org.sky.exception.DemoRpcRunTimeException;
import org.sky.service.BaseService;
import org.sky.stock.service.biz.StockBizService;
import org.springframework.beans.factory.annotation.Autowired;

@Service(version = "1.0.0", interfaceClass = StockDubboService.class, timeout = 30000,loadbalance = "roundrobin")
public class StockDubboServiceImpl extends BaseService implements StockDubboService {

	@Autowired
	private StockBizService stockBizService;

	@Override
	public void addStock(long productId, int stock) throws DemoRpcRunTimeException {
		try {
			stockBizService.addStock(productId, stock);
			logger.info("======>insert into t_stock with successful\n data:\n   productid: " + productId
					+ "\n   stock: " + stock);
		} catch (Exception e) {
			logger.error("error occured on insert stock with productid->: " + productId + " and stock->" + stock
					+ e.getMessage(), e);
			throw new DemoRpcRunTimeException("error occured on insert stock with productid->: " + productId
					+ " and stock->" + stock + e.getMessage(), e);
		}
	}

}
启动用Application.java
package org.sky.stock;

import org.apache.dubbo.config.spring.context.annotation.EnableDubbo;
import org.springframework.boot.SpringApplication;
import org.springframework.boot.autoconfigure.EnableAutoConfiguration;
import org.springframework.context.annotation.ComponentScan;
import org.springframework.transaction.annotation.EnableTransactionManagement;

@EnableDubbo
@EnableAutoConfiguration
@ComponentScan(basePackages = { "org.sky.stock" })

public class Application {

	public static void main(String[] args) {
		SpringApplication.run(Application.class, args);
	}

}
同样,我们把它启动起来。
seata-demo-consumer工程
这个就是一个纯 spring boot controller工程了,它给我们提供一个人机界面,我们可以通过它post一个json请求以达到后端两个个不同的dubbo provider service向两个不同的数据库插入数据,如果有任意错误也可以进行全部的回滚。
pom.xml
	4.0.0
	org.sky.demo
	seata-demo-consumer
	0.0.1-SNAPSHOT

		org.sky.demo
		nacos-parent
		0.0.1-SNAPSHOT

	war
	Demo project Dubbo+Nacos+Seata


			org.apache.dubbo
			dubbo


			org.apache.curator
			curator-recipes


			org.springframework.boot
			spring-boot-starter-test
			test


			org.spockframework
			spock-core
			test


			org.spockframework
			spock-spring


			org.springframework.boot
			spring-boot-configuration-processor
			true


			org.springframework.boot
			spring-boot-starter-log4j2


			org.springframework.boot
			spring-boot-starter-web


					org.springframework.boot
					spring-boot-starter-logging


					org.springframework.boot
					spring-boot-starter-tomcat


			org.springframework.boot
			spring-boot-starter-tomcat
			compile


			org.aspectj
			aspectjweaver


			com.lmax
			disruptor


			redis.clients
			jedis


			com.google.guava
			guava


			com.alibaba
			fastjson


			org.apache.dubbo
			dubbo-registry-nacos


			com.alibaba.nacos
			nacos-client


			org.sky.demo
			skycommon
			${skycommon.version}


			io.seata
			seata-all


			com.alibaba.boot
			nacos-config-spring-boot-starter


					nacos-client
					com.alibaba.nacos


			org.apache.curator
			curator-framework


			org.apache.curator
			curator-recipes


			io.netty
			netty-all


			org.projectlombok
			lombok


			javax.servlet
			javax.servlet-api
			${javax.servlet.version}
			provided


		src/main/java
		src/test/java


				org.springframework.boot
				spring-boot-maven-plugin


				src/main/resources


				src/main/webapp
				META-INF/resources

					**/**


				src/main/resources
				true

					application.properties
					application-${profileActive}.properties
application.properties
此处的application.properties相对provider工程来说会比较简单,它也不需要数据库连接信息。
server.port=8082
server.tomcat.maxConnections=300
server.tomcat.maxThreads=300
server.tomcat.uriEncoding=UTF-8
server.tomcat.maxThreads=300
server.tomcat.minSpareThreads=150
server.connectionTimeout=20000
server.tomcat.maxHttpPostSize=0
server.tomcat.acceptCount=300

#Dubbo provider configuration
dubbo.protocol.id=dubbo
dubbo.protocol.name=dubbo
dubbo.application.name=demo-seata-consumer
dubbo.application.id=demo-seata-consumer
dubbo.registry.protocol=dubbo
dubbo.registry.address=nacos://192.168.56.101:8848
#dubbo.consumer.time=120000

logging.config=classpath:log4j2.xml
但是一样,它也需要连接nacos来Reference dubbo provider的应用。
我们接下来看它的基于于spring boot的自动装配,SeataAutoConfig.java,由于它根本不需要连接什么DB,因此它里面只有一个GlobalTransactionScanner。
SeataAutoConfig.java
package org.sky.seatademo.config;

import io.seata.spring.annotation.GlobalTransactionScanner;

import org.springframework.boot.context.properties.ConfigurationProperties;
import org.springframework.context.annotation.Bean;
import org.springframework.context.annotation.Configuration;
@Configuration
public class SeataAutoConfig {

	/**
	 * init global transaction scanner
	 *
	 * @Return: GlobalTransactionScanner
	 */
	@Bean
	public GlobalTransactionScanner globalTransactionScanner() {
		return new GlobalTransactionScanner("demo-seata-consumer", "demo-tx-grp");
	}
}
注意这边的GlobalTransactionScanner中的第一个参数,这个参数是seata-demo-consumer的dubbo.application.name,同时也是后面我们要生效的Global Transaction的Scope。
来看核心业务逻辑调用:
BusinessDubboServiceImpl.java
package org.sky.seatademo.service.biz;

import org.apache.dubbo.config.annotation.Reference;
import org.sky.exception.DemoRpcRunTimeException;
import org.sky.product.service.dubbo.ProductDubboService;
import org.sky.seatademo.vo.SeataProductVO;
import org.sky.service.BaseService;
import org.sky.stock.service.dubbo.StockDubboService;
import org.springframework.stereotype.Service;

import io.seata.core.context.RootContext;
import io.seata.spring.annotation.GlobalTransactional;

@Service
public class BusinessDubboServiceImpl extends BaseService implements BusinessDubboService {
	@Reference(version = "1.0.0")
	private ProductDubboService productDubboService;
	@Reference(version = "1.0.0")
	private StockDubboService stockDubboService;

	@Override
	@GlobalTransactional(timeoutMills = 300000, name = "seata-at-service")
	public SeataProductVO addProductAndStock(SeataProductVO vo) throws DemoRpcRunTimeException {
		SeataProductVO rtnProduct = new SeataProductVO();
		try {
			// logger.info("======>start global transaction: " + RootContext.getXID());
			long prodId = productDubboService.addProduct(vo.getProductName());
			stockDubboService.addStock(prodId, vo.getStock());
			rtnProduct.setProductId(prodId);
			rtnProduct.setProductName(vo.getProductName());
			rtnProduct.setStock(vo.getStock());
			if (vo.getProductName().equalsIgnoreCase("donny")) {
				throw new Exception("Mk Thru The Exception To Force Rollback");
			} else {
				return rtnProduct;
			}
		} catch (

		Exception e) {
			logger.error("error occured on dubbo BusinessService side: " + e.getMessage(), e);
			throw new DemoRpcRunTimeException("error occured on dubbo BusinessService side: " + e.getMessage(), e);
		}
	}

	@Override
	@GlobalTransactional(timeoutMills = 120000, name = "demo-seata-consumer")
	public SeataProductVO addProductAndStockFailed(SeataProductVO vo) throws DemoRpcRunTimeException {
		SeataProductVO rtnProduct = new SeataProductVO();
		try {
			logger.info("======>start global transaction: " + RootContext.getXID());
			long prodId = productDubboService.addProduct(vo.getProductName());
			stockDubboService.addStock(prodId, vo.getStock());
			rtnProduct.setProductId(prodId);
			rtnProduct.setProductName(vo.getProductName());
			rtnProduct.setStock(vo.getStock());
			throw new Exception("Mk throw the exception to enforce rollback all transaction");
		} catch (Exception e) {
			logger.error("error occured on dubbo BusinessService side: " + e.getMessage(), e);
			throw new DemoRpcRunTimeException("error occured on dubbo BusinessService side: " + e.getMessage(), e);
		}
	}
}
看到没有,首先:
它会@Reference两个dubbo provider的引用,然后在一个business方法内,它开始“切面”事务了,这边事务的范围正是用的这个name="demo-seata-consumer”来标记的。
同时,我们在这个Service中有一段逻辑 ,即当productName为donny时,那么故意我们会抛出一个错误来以迫使全局事务回滚!
必竟donny是一个人,它不是一个“合格”的商品!
值的高度注意的一点j ,为什么我说截止目前为止网上的例子都是跑不通的呢?
是因为,seata使用到的mysql里的几个用于作持久化作用的表的transaction_name和group_name字段都是32位长度的字符,而那些例子里的application_name和group_name都大于了32位,seata运行时就已经报错了更不要说后面还能把事务给做对了呢。
对于人机交五用界面用的SeataDemoController.java
package org.sky.seatademo.controller;

import java.util.HashMap;
import java.util.Map;

import org.apache.dubbo.config.annotation.Reference;
import org.sky.controller.BaseController;
import org.sky.seatademo.service.biz.BusinessDubboService;
import org.sky.seatademo.vo.SeataProductVO;
import org.springframework.beans.factory.annotation.Autowired;
import org.springframework.http.HttpHeaders;
import org.springframework.http.HttpStatus;
import org.springframework.http.MediaType;
import org.springframework.http.ResponseEntity;
import org.springframework.web.bind.annotation.PostMapping;
import org.springframework.web.bind.annotation.RequestBody;
import org.springframework.web.bind.annotation.RequestMapping;
import org.springframework.web.bind.annotation.RestController;

import com.alibaba.fastjson.JSON;
import com.alibaba.fastjson.JSONObject;

@RestController
@RequestMapping("seatademo")
public class SeataDemoController extends BaseController {

	@Autowired
	private BusinessDubboService businessDubboService;

	@PostMapping(value = "/addSeataProduct", produces = "application/json")
	public ResponseEntity addSeataProduct(@RequestBody String params) throws Exception {
		ResponseEntity response = null;
		String returnResultStr;
		HttpHeaders headers = new HttpHeaders();
		headers.setContentType(MediaType.APPLICATION_JSON_UTF8);
		Map result = new HashMap<>();
		try {
			JSONObject requestJsonObj = JSON.parseObject(params);
			SeataProductVO inputProductPara = getSeataProductFromJson(requestJsonObj);
			SeataProductVO returnData = businessDubboService.addProductAndStock(inputProductPara);
			result.put("code", HttpStatus.OK.value());
			result.put("message", "add a new product successfully");
			result.put("productid", returnData.getProductId());
			result.put("productname", returnData.getProductName());
			result.put("stock", returnData.getStock());
			returnResultStr = JSON.toJSONString(result);
			response = new ResponseEntity<>(returnResultStr, headers, HttpStatus.OK);
		} catch (Exception e) {
			logger.error("add a new product with error: " + e.getMessage(), e);
			result.put("message", "add a new product with error: " + e.getMessage());
			returnResultStr = JSON.toJSONString(result);
			response = new ResponseEntity<>(returnResultStr, headers, HttpStatus.EXPECTATION_FAILED);
		}
		return response;
	}
	@PostMapping(value = "/addSeataProductFailed", produces = "application/json")
	public ResponseEntity addSeataProductFailed(@RequestBody String params) throws Exception {
		ResponseEntity response = null;
		String returnResultStr;
		HttpHeaders headers = new HttpHeaders();
		headers.setContentType(MediaType.APPLICATION_JSON_UTF8);
		Map result = new HashMap<>();
		try {
			JSONObject requestJsonObj = JSON.parseObject(params);
			SeataProductVO inputProductPara = getSeataProductFromJson(requestJsonObj);
			SeataProductVO returnData = businessDubboService.addProductAndStockFailed(inputProductPara);
			result.put("code", HttpStatus.OK.value());
			result.put("message", "add a new product successfully");
			result.put("productid", returnData.getProductId());
			result.put("productname", returnData.getProductName());
			result.put("stock", returnData.getStock());
			returnResultStr = JSON.toJSONString(result);
			response = new ResponseEntity<>(returnResultStr, headers, HttpStatus.OK);
		} catch (Exception e) {
			logger.error("add a new product with error: " + e.getMessage(), e);
			result.put("message", "add a new product with error: " + e.getMessage());
			returnResultStr = JSON.toJSONString(result);
			response = new ResponseEntity<>(returnResultStr, headers, HttpStatus.EXPECTATION_FAILED);
		}
		return response;
	}
}
然后就是启动用Application.java
package org.sky.seatademo;

import org.apache.dubbo.config.spring.context.annotation.EnableDubbo;
import org.springframework.boot.SpringApplication;
import org.springframework.boot.autoconfigure.EnableAutoConfiguration;
import org.springframework.boot.web.servlet.ServletComponentScan;
import org.springframework.context.annotation.ComponentScan;
import org.springframework.transaction.annotation.EnableTransactionManagement;

@EnableDubbo
@ServletComponentScan
@EnableAutoConfiguration
@ComponentScan(basePackages = { "org.sky.seatademo" })

public class Application {

	public static void main(String[] args) {
		SpringApplication.run(Application.class, args);
	}

}
这个工程我们把它做成了可以用于在tomcat里部署的war包的形式,因为有不少读者习惯于用tomcat来部署,此处用于演示如何把spring boot的工程做成war。
我们把它也启动起来
这是seata server后端的日志显示
nacos中对于seatar的配置的显示
测试正反两个实例
我们先post一段正常的商品信息
{
	"productname" : "apple",
	"stock" : 10000
}
看上面,我们可以看到TM在进行全局事务的commit。
我们再来提交一个“不正常”的请求
{
	"productname" : "donny",
	"stock" : 10000
}
我们可以看到它触发了逻辑抛错
分别观察两个provider的后端
看,TM协调下,RM里的相应的远程Service进行了rollback。
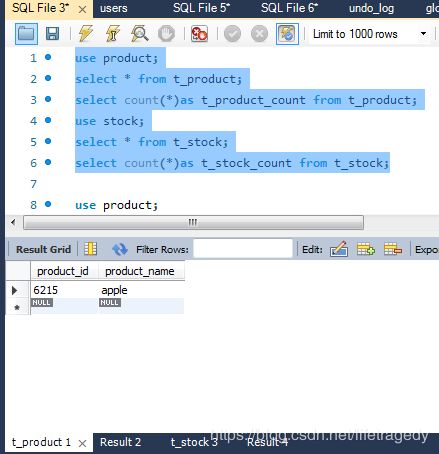
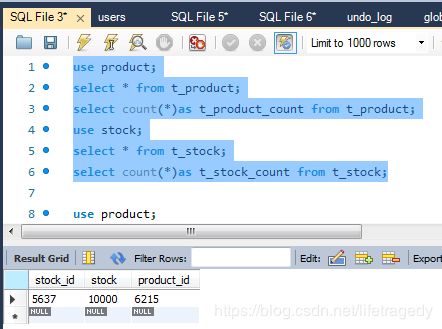
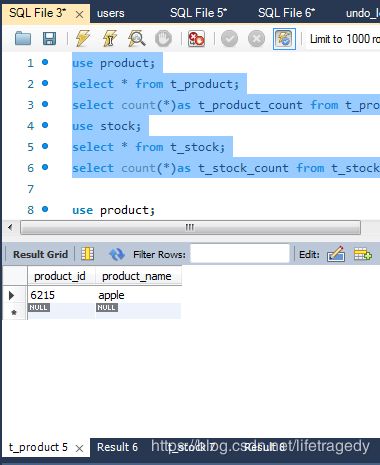
再来看数据库端
刚才的那条叫donny的“劣质商品”没有被插进去,它被seata给回滚了。
我们会在(下)篇里详细讲述基于springboot+dubbo+nacos+seata如何实现TCC事务的实现,到时我们会完成一个跨行转帐的实例。


