【计算机图形学】用python的turtle进行简单的图形绘制
【计算机图形学】用python的turtle进行简单的图形绘制
- python的turtle模块
- 绘制图形
- 绘制点
- 绘制直线
- 绘制椭圆
- 绘制六边形
- 绘制n次贝塞尔曲线
- 结语
python的turtle模块
Turtle graphics is a popular way for introducing programming to kids.
It was part of the original Logo programming language developed by Wally Feurzig and Seymour Papert in 1966.
Imagine a robotic turtle starting at (0, 0) in the x-y plane. After an import turtle, give it the command turtle.forward(15), and it moves (on-screen!) 15 pixels in the direction it is facing, drawing a line as it moves. Give it the command turtle.right(25), and it rotates in-place 25 degrees clockwise.
By combining together these and similar commands, intricate shapes and pictures can easily be drawn.
以上一段是我在使用VS Code时,看到的对turtle模块的介绍。大致翻译一下:
海龟(Turtle)制图是向孩子介绍编程的一个流行方式。
它是Wally Feurzig和Seymour Papert在1966年创造的原始Logo编程语言的一部分。
想象一下,一个自动的海龟从xy平面的原点(0,0)开始,在输入turtle模块后
import turtle
给出一行命令
turtle.forward(15)
然后海龟就在屏幕上向它面向的方向前进了15个像素点,并且在行进道路上划出了一条线。给它一个命令
turtle.right(25)
它就在原地顺时针旋转了25度。
通过结合这些命令和其他相似的命令,就能够轻易地画出复杂的几何图形和图片。
可以看出,python的turtle模块是一个功能非常强大,并且操作简单的绘图工具。
废话不多说,turtle有很多的库函数,网上很容易就查得到,我这里就不多介绍了(或许以后会单写一篇文章进行详细的介绍),接下来直接进入正题!
绘制图形
在turtle中有直接绘制线、矩形、圆形、椭圆形等的函数,但计算机图形学(至少我们的课程)要求用绘制像素点的方式绘制线、图形,而自带的绘点函数只能在turtle所在位置绘点。
绘制点
下面给出在某个像素点绘制点的函数。
import turtle as pen	//下面代码均默认以pen代替turtle字段
def DrawPixel(x,y) :
	pen.up()		//因为turtle在执行goto()时,
					//会在路径上画出一条直线,
					//所以先把笔抬起来
    pen.goto(x,y)	//turtle到指定坐标像素点
    pen.dot(2)		//绘制直径为2的像素点
    		//实测参数为1时在我的电脑上看不到点,所以用2
其中x,y是像素点坐标。turtle模块在绘图时,会默认在画布正中央为坐标原点(0,0)。
绘制直线
def DrawLine(x1,y1,x2,y2) :
    print ("called")
    dx = abs(x2 - x1)
    sx = 1 if(x1dy) else -dy
    l = dx if(dx>dy) else dy
    for i in range(0,l) :
        DrawPixel(x1,y1)
        if x1 == x2 and y1 == y2 :
            break
        e2 = err
        if e2 >= -dx :
            err = err - dy
            x1 = x1 + sx
        if e2 <= dy :
            err = err + dx
            y1 = y1 + sy
绘制椭圆
首先,椭圆是一个中心对称、双轴对称图形,所以只需要绘制出1/4的图形,其余部分都可根据对称画出。
给出长短半径,进行绘制。
def PaintEllipse(a,b) :
    pen.delay(0.1)		//delay是turtle函数与函数之间执行的间隔,
    					//括号中为时间间隔,单位毫秒
    					//因为绘点需要一个点一个点绘制
    					//而不是靠turtle的移动
    					//否则使用pen.speed()
    					//修改turtle的移动速度
    x = 0
    y = b
    d1 = b*b + a*a *(0.25 - b)
    DrawPixel(x,y)
    DrawPixel(-x,-y)
    while b*b*(x+1) < a*a*(y-0.5) :
        if d1 < 0 :
            d1 = d1 + b * b * (2 * x + 3)
            x = x + 1
        else :
            d1 = d1 + b*b*(2*x+3)+a*a*(2-2*y)
            x = x + 1
            y = y - 1
        DrawPixel(x,y)
        DrawPixel(-x,y)
        DrawPixel(-x,-y)
        DrawPixel(x,-y)
    d2 = math.sqrt(b*(x+0.5)) + math.sqrt(a*(y-1)) - math.sqrt(a*b)
    while y > 0 :
        if d2 < 0 :
            d2 = d2 + b*b*(2*x+2) + a*a*(-2*y+3)
            x = x + 1
            y = y - 1
        else :
            d2 = d2 + a*a*(-2*y+3)
            y = y - 1
        DrawPixel(x,y)
        DrawPixel(-x,y)
        DrawPixel(-x,-y)
        DrawPixel(x,-y)
调用函数
PaintEllipse(100,50) //(横轴半径,竖轴半径)
绘制六边形
给出六点坐标,进行绘制并填充。
x,y为六点的list,顺序需对应
def PaintSixEdge(x,y) :
    i = 0
    pen.begin_fill()
    while i < 5 :
        DrawLine(x[i],y[i],x[i+1],y[i+1])
        i = i + 1
        print (x[i])
    DrawLine(x[5],y[5],x[0],y[0])
    pen.end_fill()
调用函数
x = [100,200,100,-100,-200,-100]
y = [100,0,-100,-100,0,100]
PaintSixEdge(x,y)
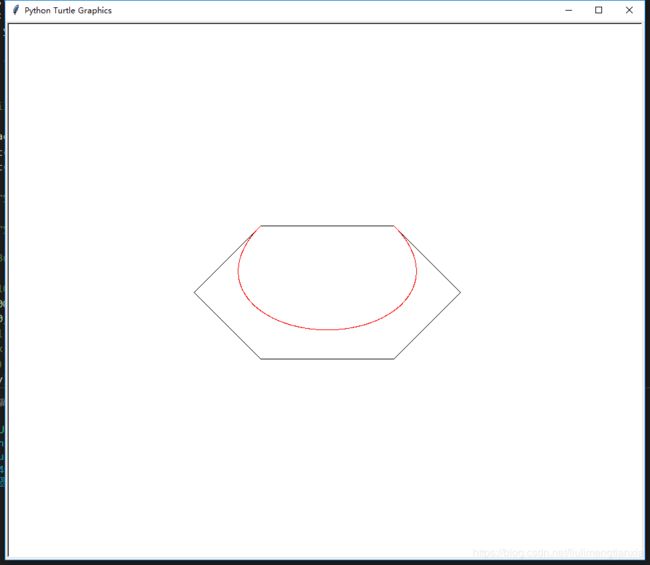
绘制n次贝塞尔曲线
x,y为点的list,顺序需对应
def PaintBezier(x,y) :
    pen.color("red")
    number = len(x)
    t = 0.0
    while t < 1 :
        for k in range(1,number+1) :
            for i in range(0,number-k) :
                x0 = xpos(x,i,k,t)
                y0 = ypos(y,i,k,t)

        DrawPixel(x0,y0)
        t = t + 0.001

def xpos(x,i,k,t) :
    if k == 0 :
        return x[i]
    else :
        return (1-t)*xpos(x,i,k-1,t) + t*xpos(x,i+1,k-1,t)

def ypos(y,i,k,t) :
    if k == 0 :
        return y[i]
    else :
        return (1-t)*ypos(y,i,k-1,t) + t*ypos(y,i+1,k-1,t)
调用函数
x = [100,200,100,-100,-200,-100]
y = [100,0,-100,-100,0,100]
PaintBezier(x,y)
结语
通过复杂的循环,以及改变画笔颜色,还能够生成各种各样的好看的图形,感兴趣的小伙伴们自己试试吧!


