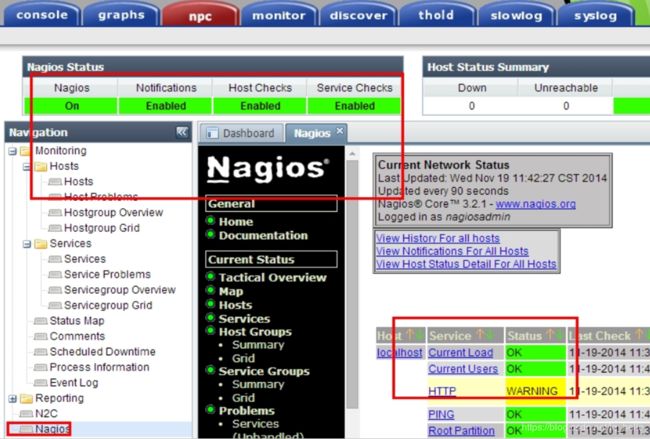
Nagios+cacti整合实战项目
1,关闭防火墙和selinux:
[root@localhost ~]# service iptables stop
[root@localhost ~]# setenforce 0
2,部署安装lamp:
[root@localhost ~]#yum -y install httpd php openssl-devel gcc gcc-c++
3,修改apache配置文件:
[root@localhost ~]#vim /etc/httpd/conf/httpd.conf
#
DirectoryIndex index.php index.html index.html.var  #添加index.php

#
#
AddType application/x-compress .Z
AddType application/x-httpd-php .php    #修改为httpd-php .php

#
4,新建测试页面:
[root@localhost ~]#vim /var/www/html/index.php
();
?>
~
5,测试:

6,安装部署nagios,上传nagios安装包
[root@localhost ~]# ll
-rw-r--r--.  1 root root 11088206 6月   3 06:49 nagios-4.2.4.tar.gz
-rw-r--r--.  1 root root  2728818 6月   3 06:49 nagios-plugins-2.2.1.tar.gz
-rw-r--r--.  1 root root   419695 6月   3 06:49 nrpe-2.15.tar.gz
7,创建组和用户
[root@localhost ~]# groupadd nagios
[root@localhost ~]# useradd -g nagios nagios
8,解压nagios-4.2.4
[root@localhost ~]# tar zxf nagios-4.2.4.tar.gz
[root@localhost ~]# cd nagios-4.2.4
[root@localhost nagios-4.2.4]# mkdir -p /usr/local/nagios
[root@localhost nagios-4.2.4]# ./configure --prefix=/usr/local/nagios/
[root@localhost nagios-4.2.4]# make all
[root@localhost nagios-4.2.4]# make install
[root@localhost nagios-4.2.4]# make install-init
[root@localhost nagios-4.2.4]# make install-config
[root@localhost nagios-4.2.4]# make install-webconf
[root@localhost nagios-4.2.4]# make install-commandmode
[root@localhost nagios-4.2.4]# htpasswd -c /usr/local/nagios/etc/htpasswd.users nagiosadmin   #输入密码
9,启动apache和nagios
[root@localhost nagios-4.2.4]# service httpd restart
[root@localhost nagios-4.2.4]# service nagios restart
10,回到root家目录解压nagios-plugins-2.2.1安装包
[root@localhost ~]# cd
[root@localhost ~]# tar zxf nagios-plugins-2.2.1.tar.gz
[root@localhost ~]# cd nagios-plugins-2.2.1
[root@localhost nagios-plugins-2.2.1]# ./configure --prefix=/usr/local/nagios/
[root@localhost nagios-plugins-2.2.1]# make && make install
[root@localhost ~]# yum -y install mysql mysql-server mysql-devel httpd php php-pdo php-snmp php-mysql lm_sensors net-snmp net-snmp-utils net-snmp-libs rrdtool rrdtool-devel perl-PlRPC perl-DBI perl-rrdtool perl-DBD-MySQL
13,装好依赖软件之后,snmp有3个地方需要配置一下(对服务器本身进行监控)
[root@localhost ~]# vim /etc/snmp/snmpd.conf
第41行:将 com2sec notConfigUser default public 中的 "default" 改为 "127.0.0.1"
第62行:将 access notConfigGroup "" any noauth exact systemview none none 中的 "systemview" 改为 "all"
第85行:将 #view all include .1 80 这一行前面的 # 号去掉
14,配置好snmp以后我们来启动3个重要的服务
[root@localhost ~]# service snmpd start    //启动snmp服务
[root@localhost ~]# chkconfig snmpd on     //设置开机启动
[root@localhost ~]# service httpd start
[root@localhost ~]# chkconfig httpd on
[root@localhost ~]# service mysqld start
[root@localhost ~]# chkconfig mysqld on
15,安装并配置cacti
获取cacti主文件
[root@localhost ~]# wget http://www.cacti.net/downloads/cacti-0.8.8b.tar.gz
[root@localhost ~]# tar -zxvf cacti-0.8.8b.tar.gz
[root@localhost ~]# mv cacti-0.8.8b /var/www/html/cacti    //移到/var/www/html目录下,并将cacti-0.8.8b重命名为cacti
16,设置mysql数据库
[root@localhost ~]# mysql        #新装的mysql没有密码,直接回车进入mysql数据库
mysql> create database cacti;   #首先创建cacti数据库,注意别丢了分号
mysql> grant all on *.* to cacti@'localhost' identified by '123456';   #创建cacti用户并授权
mysql> use cacti;
mysql> source /var/www/html/cacti/cacti.sql;    #导入cacti数据库文件
mysql>\q
17,配置cacti
[root@localhost ~]# vim /var/www/html/cacti/include/config.php
$database_type = "mysql";
$database_default = "cacti";
$database_hostname = "localhost";
$database_username = "cacti";    //因为我们先前在数据库建的是 "cacti" 用户,所以这里默认的 "cactiuser" 要改为 "cacti"
$database_password = "123456";    //这里默认的密码我们也要改为 "123456"
18,增加 cacti 用户以用来写入rrd和log目录的数据,否则就会生成不了图片
[root@localhost ~]# useradd cacti
[root@localhost ~]#cd /var/www/html/cacti
[root@localhost ~]# chown -R cacti.cacti rra
[root@localhost ~]# chown -R cacti.cacti log
19,在cacti用户下创建计划任务以画图
具体多长时间让cacti生成一次监控图表自己决定,这里以cacti的默认时间2分钟生成一次为例
[root@localhost ~]# su cacti
[root@localhost ~]# crontab -l
*/2 * * * * php /var/www/html/cacti/poller.php > /dev/null 2>&1   #保存退出
exit
#如果暂时未看到图表,可以手工执行,生成图表
[root@localhost ~]# php /var/www/html/cacti/poller.php > /dev/null 2>&1
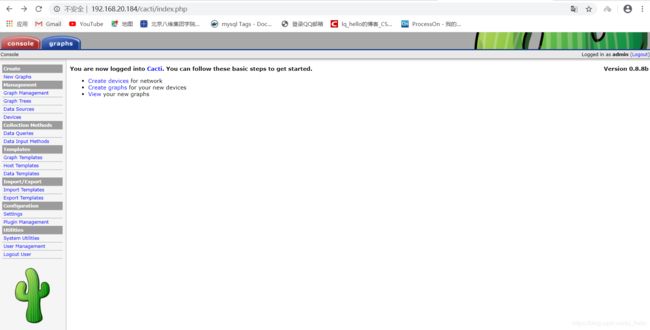
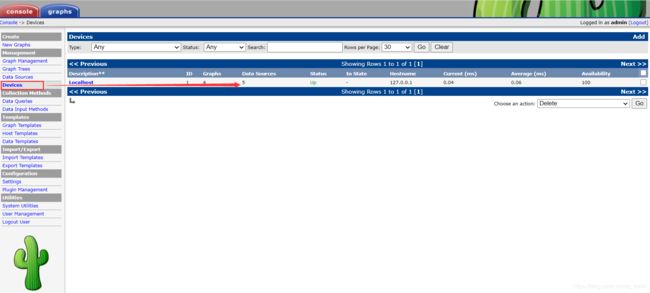
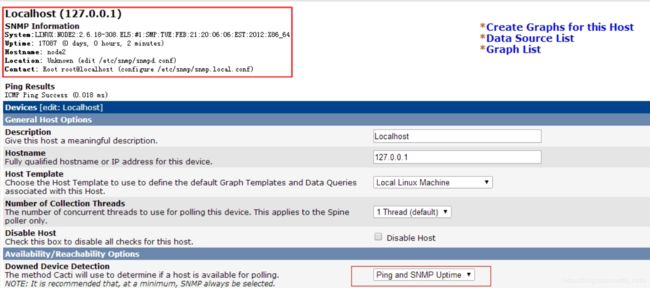
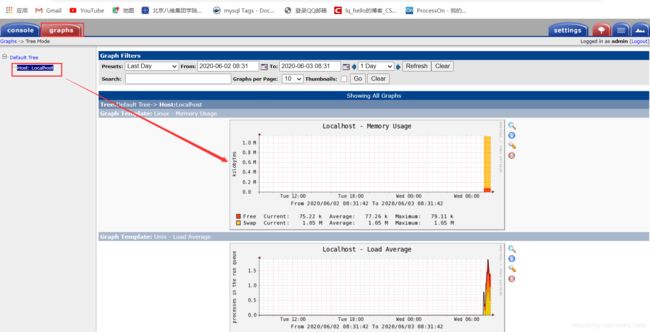
20,配置好之后重启输入http://ip/cacti,从web页面启动cacti,安装,并查看图形化界面
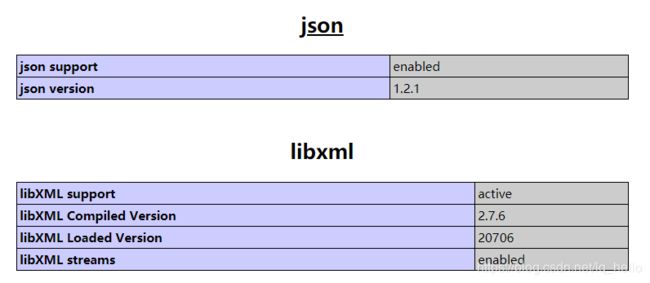
21,通phpinfo.php页面可以看到如下内容即可:
22,安装ndoutils
[root@localhost ~]# wget http://downloads.sourceforge.net/project/nagios/ndoutils-1.x/ndoutils-1.4b9/ndoutils-1.4b9.tar.gz
[root@localhost ~]# tar xzf ndoutils-1.4b9.tar.gz
[root@localhost ~]# cd ndoutils-1.4b9
[root@localhost ~]# ./configure --with-mysql-inc=/usr/include/mysql --with-mysql-lib=/usr/lib/mysql--enable-mysql --with-ndo2db-user=nagios --with-ndo2db-group=nagios
[root@localhost ~]# make &&make install
23,接下来配置ndoutils
[root@localhost ~]# cp config/ndo2db.cfg-sample /usr/local/nagios/etc/ndo2db.cfg
[root@localhost ~]# vim /usr/local/nagios/etc/ndo2db.cfg
ndo2db_user=nagios
ndo2db_group=nagios
socket_type=tcp
socket_name=/usr/local/nagios/var/ndo.sock
tcp_port=5668
db_servertype=mysql
db_host=localhost
db_port=3306
db_name=cacti
db_prefix=npc_
db_user=cacti
db_pass=123456
max_timedevents_age=1440
max_systemcommands_age=10080
max_servicechecks_age=10080
max_hostchecks_age=10080
max_eventhandlers_age=44640
debug_level=1
debug_verbosity=1
debug_file=/usr/local/nagios/var/ndo2db.debug
max_debug_file_size=1000000
[root@localhost ~]# cp config/ndomod.cfg-sample /usr/local/nagios/etc/ndomod.cfg
[root@localhost ~]# vim /usr/local/nagios/etc/ndomod.cfg
instance_name=default
output_type=tcpsocket
output=127.0.0.1
tcp_port=5668
output_buffer_items=5000
buffer_file=/usr/local/nagios/var/ndomod.tmp
file_rotation_interval=14400
file_rotation_timeout=60
reconnect_interval=15
reconnect_warning_interval=15
data_processing_options=-1
config_output_options=2
#同时在nagios.cfg文件最末尾添加如下语句
broker_module=/usr/local/nagios/bin/ndomod.o config_file=/usr/local/nagios/etc/ndomod.cfg
24,安装npc软件:
[root@localhost ~]# tar xf npc2.0.4.tar
[root@localhost ~]# mv npc /var/www/html/cacti/plugins
25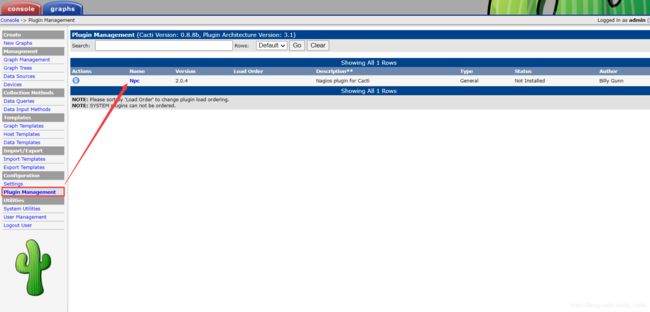
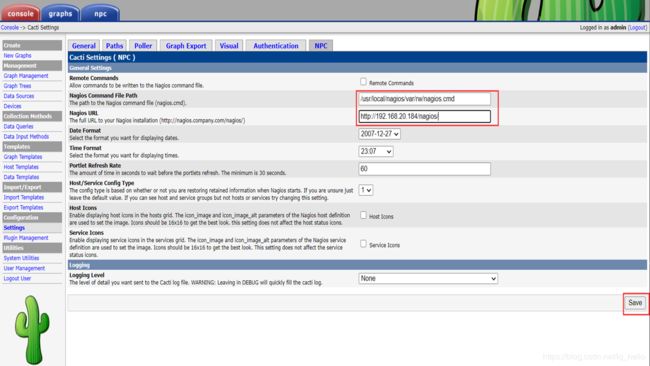
26,选择启用,然后点击settings,找到NPC项,填入如下内容点save保存
27,然后后台启动nod2db服务
[root@localhost ~]# /usr/local/nagios/bin/ndo2db -c /usr/local/nagios/etc/ndo2db.cfg

