python+requests+unittest接口自动化测试框架简单上手
我也是在学习接口自动化测试框架的,看了一篇测试框架:https://mp.csdn.net/mdeditor/90750656#,
觉得有点绕,那方法调来调去的,但是不可否认写的蛮好的,我个人就想写个自己好理解能简单快速的把框架搭起来。
1、首先,我们先来理一下思路。
正常的接口测试流程是什么?
脑海里的反应是不是这样的:
确定测试接口的工具 —> 配置需要的接口参数 —> 进行测试 —> 检查测试结果(有的需要数据库辅助) —> 生成测试报告(html报告)
那么,我们就根据这样的过程来一步步搭建我们的框架。在这个过程中,我们需要做到业务和数据的分离,这样才能灵活,达到我们写框架的目的。只要好好做,一定可以成功。这也是我当初对自己说的。
接下来,我们来进行结构的划分。
首先看测试目录如下图:
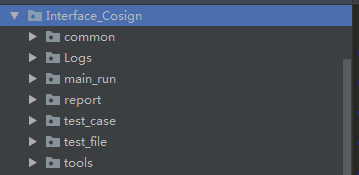
common: 存放一些公共方法
Logs: 存放Logs日志
main_run: 存放主函数,通过运行主函数运行测试
report: 测试报告
test_case: 测试的主要测试内容
test_file : 存放测试用例
tools : 存放HTMLTestRunner.py,生成测试报告的
现在看一下主函数的是怎么运行的
    def run(self):
        # print("测试开始")
        try :
            # 1.获取需要测试的模块名
            case_module_list = self.set_case_list()
            # 2.获取获取要测试测试集
            suit = self.set_case_suit(case_module_list)
            # 3.运行测试生成测试报告
            report_name = self.gain_report(suit)
            #4. 发送邮件
            self.send_eamil(report_name)
        except Exception as e:
            print(e)
        # print("测试结束")

if __name__ == '__main__':
    main= RunAll()
    main.run()
看上面4步是不是觉得蛮简单啊,就调用4个方法就实现了测试框架的搭建,
我按照我写代码的顺序带着大家看看代码,首先是第一步,通过读取txt文档获取哪些是需要测试的模块
import os
import time
import unittest

from Interface_Cosign.common.send_email import sent_email
from Interface_Cosign.tools.HTMLTestRunner import HTMLTestRunner
from Interface_Cosign.common.logger import Logger

my_logger = Logger(logger='RunAll').get_logger()

class RunAll():
    def __init__(self):
        global email_status
        email_status = "off"
        up_file_path = "../"
        self.case_module_path = os.path.join(up_file_path,"test_file","file_list.txt")
        self.case_suit_path = os.path.join(up_file_path,"test_case")
        self.report_path = os.path.join(up_file_path,"report")

    def set_case_list(self):
        case_module_list = []
        with open(self.case_module_path,"r") as f:
            for case in f.readlines():
                if case != "" and not case.startswith("#"):
                    case_module_list.append(case.replace("\n",""))
        return case_module_list
读取text文件如下图:

,再来看看第二步,通过测试套件自动获取需要测试 的模块
    def set_case_suit(self,case_module_list):
        case_suit = unittest.TestSuite()
        case_suit_list = []
        if len(case_module_list) > 0 :
            for case_module in case_module_list :
                print("需要测试的模块:"+ case_module)
                discover = unittest.defaultTestLoader.discover(self.case_suit_path,pattern=case_module+".py",top_level_dir=None)
                case_suit_list.append(discover)

            for suit_list in case_suit_list:
                for suit in suit_list:
                    case_suit.addTest(suit)
        else:
            return None

        return case_suit
unittest.defaultTestLoader.discover这个方式我用的也不是很熟,网上查一下多用2次就熟了
它的底层实现我不知道,我只要知道怎么调用就好.
下面我们就看第三步,这么会用到时间模块,以及第三方生成测试报告的模块HTMLTestRunner。
    def gain_report(self,suit):
        if suit is not None:
            now_time = time.strftime("%Y_%m_%d_%H_%M_%S")
            report_name = self.report_path +"/"+ now_time + "Report.html"
            with open(report_name,"wb") as f:
                runner = HTMLTestRunner(stream=f,title="*****自动化测试报告",description="操作系统:Windows7")
                runner.run(suit)
        else :            report_name="./121212.text"
            my_logger.info("Have no case to test.")
        return report_name
上面因为有else 所以就随便写了一个路径report_name="./121212.text",因为需要返回report_name 。
我们看看生成测试报告效果,反正我对这个效果比较满意,如下图

最后就是第4步,发送邮件,这里需要判断是否生成了测试报告,再考虑发送邮件的问题
    def send_eamil(self,report_name):
        status = os.path.exists(report_name)
        if status:
            size = os.path.getsize(report_name)
            if size > 0:
                global email_status
                email_status = "on"
                # 发送报告邮件
                sent_email(report_name)
            else:
                print("report error generated")
        else:
            print("no report generated or report error generated, no mail sent")
这么快就介绍完了测试框架,是不是觉得蛮简单的。
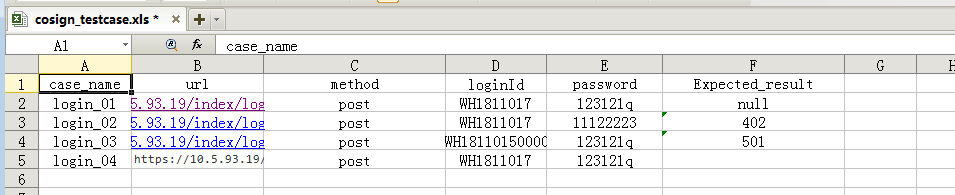
至于读取用例那个是在对应的测试用例模块下进行的,在这里我用登录模块做简单的介绍
下面是login.py模块
import paramunittest
import requests
import unittest

from Interface_Cosign.main_run.read_test_case import read_excel
from Interface_Cosign.common.global_var import ConfigVar

test_cases = read_excel(ConfigVar.EXCEL_NAME, "login")


@paramunittest.parametrized(*test_cases)
class Login(unittest.TestCase):
    def setParameters(self,case_name, url, method, loginId, password, expected_result):
        # self.id = str(case_name)       #self.id是一个坑,与htmlrunner内变量重名
        self.case_name = str(case_name)    #self.case_name必须要有这个字段htmlrunner有调用
        self.url =url
        self.method = str(method)
        self.expected_result = str(expected_result)
        self.headers = {
            "User-Agent": "Mozilla/5.0 (Windows NT 6.1; Win64; x64) AppleWebKit/537.36 (KHTML, like Gecko) Chrome/74.0.3729.108 Safari/537.36"}
        self.data = {"loginId": str(loginId),
                     "pwd": str(password)}


    def setUp(self):
        # self.log = logger.MyLog.get_log()
        # self.logger = self.log.get_logger()
        print(self.case_name + "测试开始前准备")
        # print( "测试开始前准备")

    def tearDown(self):
        print("4.用例"+ self.case_name +"测试结束。\n\n")

    def test_login01(self):
        print( "2.发送请求:"+ self.url)
        try:
            response = requests.post(self.url, headers=self.headers, data=self.data, timeout=3,verify=False)
            print(response)

        except Exception as f:
            print("f:", f)
            response = None
        self.check_result(response)


    def check_result(self,response):
        print("3.断言结果status_code:" + str(response.status_code))
        content = response.content.decode()
        self.assertIn(self.expected_result, content)
        self.assertEqual(response.status_code,200)
这里用到paramunittest进行参数化,感觉用这个蛮爽的,不管多少用例自己帮你一个一个排好进行测试,效率也挺高的,真正的测试就是发送请求获取响应,检查响应结果与预期是否一致。
上面就会需要读取测试用例,那就给你们看看怎么读取的喽
import os
import xlrd

def read_excel(file_name,table_name):
    test_cases = []
    #获取上一层路径
    start_path = os.path.abspath(os.path.join(os.getcwd(), ".."))
    #拼接excel路径并修改路径斜杆方向
    excel_path = os.path.join(start_path, 'test_file',file_name ).replace("\\","/")
    # os.path.abspath(os.path.join(os.getcwd(), ".."))       #获取上一层路径
    # os.path.abspath(os.path.join(os.getcwd(), "../.."))     #获取上上层路径

    workbook = xlrd.open_workbook(excel_path)
    table = workbook.sheet_by_name(table_name)
    rows_num = table.nrows
    for k in range(rows_num):
        if table.row_values(k)[0] != "case_name":
            test_cases.append(table.row_values(k))
    # print(test_cases)
    return test_cases
写的不好之处你们指正,有优化之处也请告诉我,我们相互学习。
测试用例如下:随便写的几条
最后讲一下我觉得比较好的方式就是设置全文档的变量:

我通过改测试文档名,只改这里一处其余都都更改,我觉得这样很方便,这里也可以增加其他的全局变量。
写的不好之处你们指正,有优化之处也请告诉我,我们相互学习。
大部分代码都在这里了,我觉得这样写比较简洁,思路也比较清晰。
终于写完了
小编在最后弱弱的告诉大家哦,本文为原创,有转载请写明出处。