练习 0:起步
原文:Exercise 0. The Setup
译者:飞龙
协议:CC BY-NC-SA 4.0
自豪地采用谷歌翻译
Windows,手动安装
非常长的指南
Windows,VirtualBox 虚拟机(.ova格式的预配置映像)
你需要什么
- VitualBox,虚拟机播放器。
- putty,终端模拟器。
- 预配置的 VirtualBox Debian 映像。
这样做
下载并安装 VirtualBox
下载并安装 Putty。
-
下载此文件:https://docs.google.com/open?id=0Bw1iG1X4Li39ZlhkQmgtM1BhV2s
另一个链接:http://thepiratebay.se/search/vm1.ova/0/99/0
或另一个链接:http://www.fileconvoy.com/dfl.php?id=g280b501145101ce4999185763996254d441643a34
md5: 7ac8a6059460f7f3e39aee7c4ee2c230 sha256: 18d8f31d0894c89865d5306b0cb3284d8889e15d155c7435fc7888f3dbafa3ec -
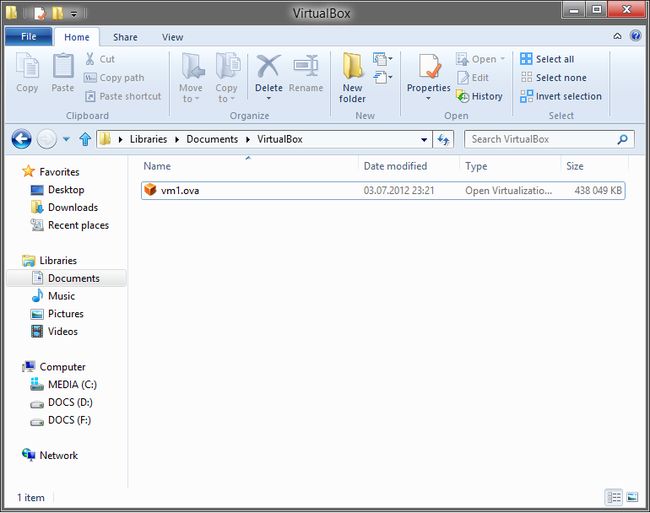
打开文件
-
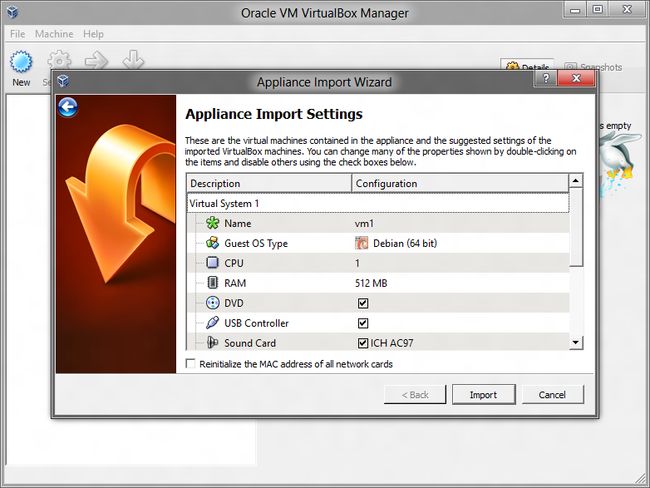
点击
Import -
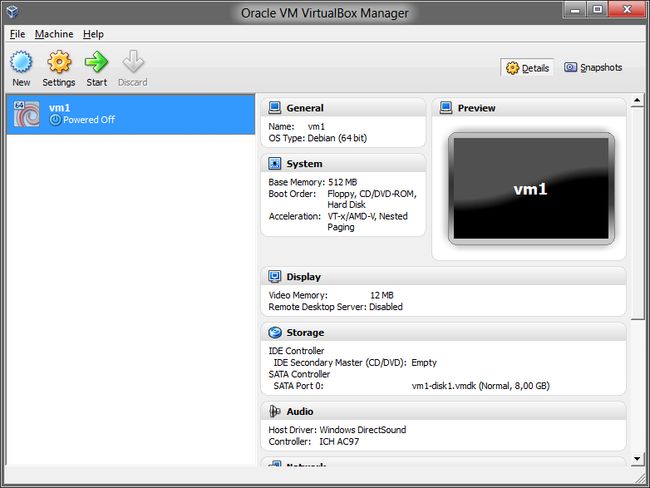
选择
vm1并点击Start -
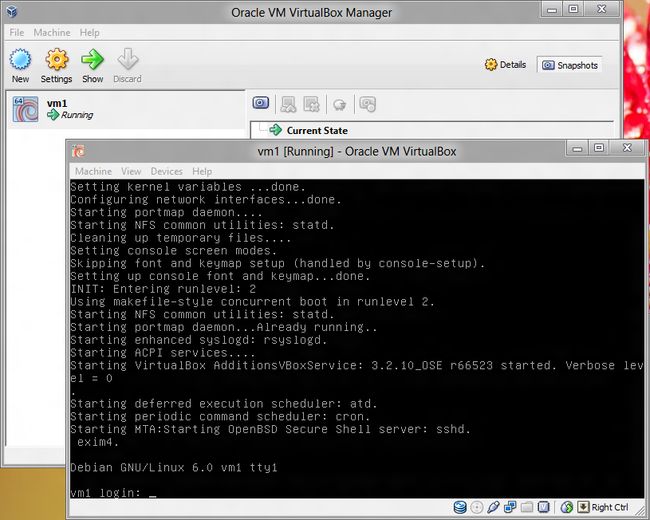
等待
vm1启动 -
启动
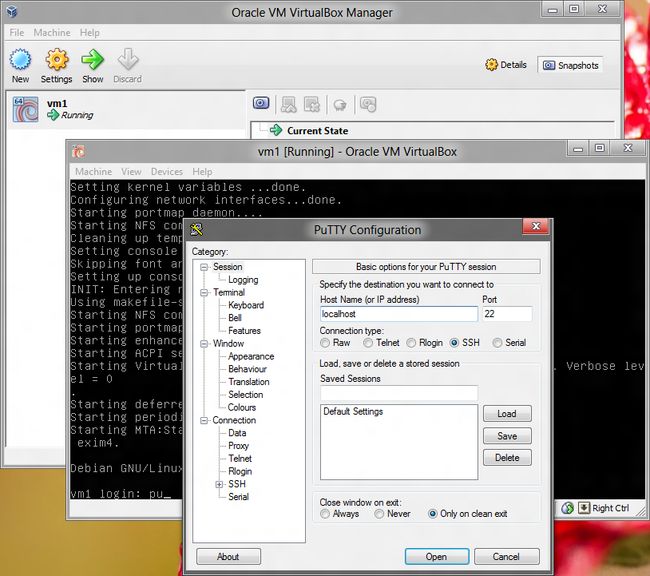
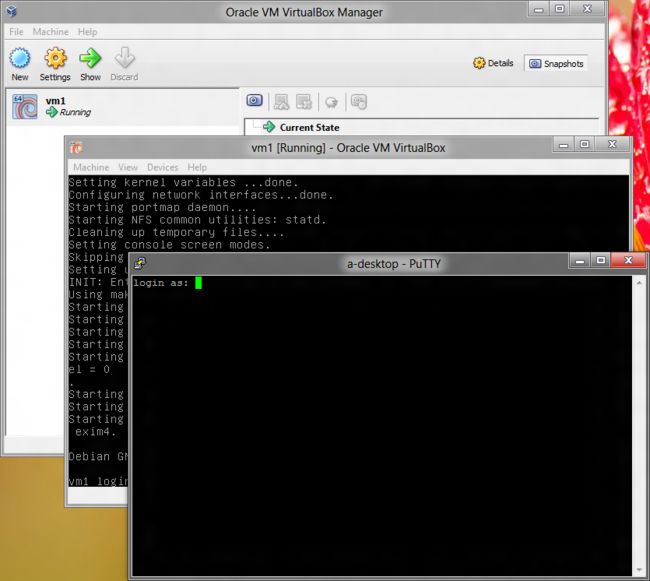
putty,在Host Name或者IP Address中输入localhost。之后点击Open -
输入
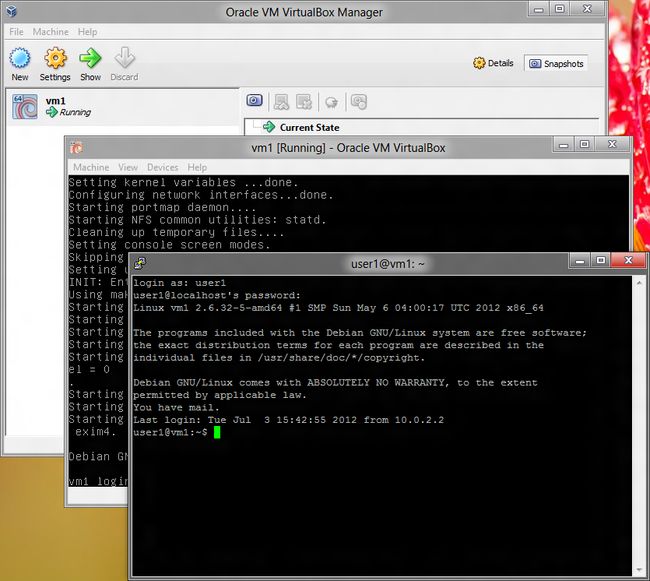
user1,123qwe, -
恭喜,你现在登入了
vm1。
Linux
你已经使用 Linux 了,你还需要什么嘛?开个玩笑。你可以严格遵循我的指南,或者随意在你的系统上做实验。
Mac OS
以后我会在这里把步骤补上。
练习 1:文本编辑器,vim
原文:Exercise 1. Text Editor, The: vim
译者:飞龙
协议:CC BY-NC-SA 4.0
自豪地采用谷歌翻译
在 Linux 中,就像任何类 Unix 操作系统,一切都只是文件。而 Unix 哲学指出,配置文件必须是人类可读和可编辑的。在几乎所有的情况下,它们只是纯文本。所以,首先,你必须学习如何编辑文本文件。
为此,我强烈建议你学习 vim 的基础知识,这是在 Linux 中处理文本的最强大的工具之一。Vim 是由 Bill Joy 于 1976 年编写的,vi 的重新实现。vi 实现了一个非常成功的概念,甚至 Microsoft Visual Studio 2012 有一个插件,它提供了一个模式,与这个超过 35 岁的编辑器兼容。你可以在这里玩转它(这是在浏览器中运行的真正的 Linux)。完成之后,最后获取我的虚拟机。
如果我还没成功说服你,你可以了解 nano来代替。但至少要试试。
现在,登入vm1,之后键入:
vim hello.txt
你应该看到:
Hello, brave adventurer!
~
~
~
~
~
~
~
~
~
~
~
~
~
"hello.txt" [New File]      0,0-1         All
有一个笑话说,vim有两种模式 - “反复哔哔”和“破坏一切”。那么,如果你不知道如何使用 vim,这是非常真实的,因为 vim 是模态的文本编辑器。模式是:
- 普通模式:移动光标并执行删除,复制和粘贴等文本操作。
- 插入模式:输入文本。
译者注:还有一个命令模式,用于生成真 · 随机字符串(笑)。
这十分使新手头疼,因为他们试图尽可能地避免普通模式。那么这是错误的,所以现在我将给你正确的大纲来使用 vim :
start vim
while editing is not finished, repeat
    navigate to desired position in NORMAL mode
    enter INSERT mode by pressing i
        type text
    exit INSERT mode by pressing
when editing is finished, type :wq
最重要的是,几乎任何时候都呆在普通模式,短时间内进入插入模式,然后立即退出。以这种方式,vim 只有一种模式,而这种模式是普通模式。
现在让我们试试吧。记住,按i进入插入模式,以及
iRoses are red
Linux is scary
这是你应该看到的:
Roses are red
Linux is scary
~
~
~
~
~
~
~
~
~
~
~
~
~
                            4,17          All
现在我给你命令列表,在普通模式下移动光标:
-
h- 向左移动 -
j- 向下移动 -
k- 向上移动 -
l- 右移 -
i- 进入插入模式 -
o- 在光标下插入一行并进入插入模式 -
-
x- 删除光标下的符号 -
dd- 删除一行 -
:wq- 将更改写入文件并退出。是的,没错,这是一个冒号,后面跟着wq和 -
:q!- 不要对文件进行更改并退出。
那就够了。现在,将光标放在第一行并输入:
oViolets are blue
之后,将光标放在Linux is scary那一行,并输入:
oBut I'm scary too
你应该看到:
Roses are red
Violets are blue
Linux is scary
But I'm scary too
~
~
~
~
~
~
~
~
~
~
~
                            4,17          All
现在键入:wq保存文件,并退出。你应该看到:
Violets are blue
Linux is scary
But I'm scary too
~
~
~
~
~
~
~
~
~
~
~
"hello.txt" 4L, 64C written
user1@vm1:~$
好的。你做到它了。你刚刚在 vim 中编辑了文本文件,很好很强大!
附加题
- 通过键入键入
vim hello.txt再次启动 vim,并尝试我给你的一些命令。 - 玩这个游戏,它会让你更熟悉 vim:http://vim-adventures.com/
练习 2:文本浏览器,少即是多
原文:Exercise 2. Text Viewer, The: less is More
译者:飞龙
协议:CC BY-NC-SA 4.0
自豪地采用谷歌翻译
现在你可以编辑文本文件,这很好。但是如果你只想查看一个文本文件呢?当然,你可以使用 vim,但很多时候它是过度的。还有两件事要考虑:
- 如果你想查看非常大的文件,你将需要在尽可能快的程序中查看它。
- 通常你不想意外地改变文件中的某些东西。
所以,我向你介绍强大的less,少即是多。“比什么多呢?”你可能会问。嗯...有一次,有一个被称为more的浏览器。它很简单,只是向你显示你要求它显示的文本文件。它是如此简单,只能以一个方向显示文本文件,也就是向前。 马克·恩德尔曼(Mark Nudelman)发现它并不那么令人满意 ,1983 年至 1985 年,他编写了less。从那以后,它拥有了许多先进的功能。因为它比more更先进,一句话就诞生了:“少即是多,多即是少”。
好吧,让我们试试吧。
输入:
less .bashrc
你应该看到:
user1@vm1:~$ less .bashrc
# ~/.bashrc: executed by bash(1) for non-login shells.
# see /usr/share/doc/bash/examples/startup-files (in the package bash-doc)
# for examples

# If not running interactively, don't do anything
[ -z "$PS1" ] && return

# don't put duplicate lines in the history. See bash(1) for more options
# don't overwrite GNU Midnight Commander's setting of `ignorespace'.
HISTCONTROL=$HISTCONTROL${HISTCONTROL+:}ignoredups
.bashrc
如果你的终端不是足够宽,文本将看起来像一团糟,因为它放不下整行。要修复它,请键入- -ch。是的,dash-dash-ch-ENTER-ENTER。这将开启水平滚动。
为了向上向下文浏览文字,使用已经熟悉的j和k。退出按q。
现在我将向你展示less的高级功能,这样你只能看到所需的那些行。键入&enable。你应该看到这个:
# enable color support of ls and also add hand
# enable programmable completion features (you
# this, if it's already enabled in /etc/bash.b
~
~
~
~
~
~
~
~
~
~
~
~
& (END)
注意看!为了移除过滤器,只需键入&。同样,要记住的命令:
-
j- 向上移动 -
k- 向下移动 -
q- 退出less。 -
- -chop-long-lines或- -ch` - 开启水平滚动。 -
/- 搜索。 -
&something- 只显示文件中包含某些内容的行。
附加题
- Linux 具有在线手册,通过键入
man来调用。默认情况下,在我们的系统中,本手册将使用less来查看。 键入man man并阅读,然后退出。 - 就是这样,没有更多的附加题了。
练习 3:Bash:Shell、.profile、.bashrc、.bash_history。
原文:[Exercise 3. Bash: The shell, .profile, .bashrc, .bash_history](https://archive.fo/DKP67
译者:飞龙
协议:CC BY-NC-SA 4.0
自豪地采用谷歌翻译
当使用 CLI(命令行界面)来使用 Linux 时,你正在与一个名为 shell 的程序进行交互。所有你输入的都传递给 shell,它解释你输入的内容,执行参数扩展(这有点类似于代数中的花括号扩展),并为你执行程序。我们将使用的 Shell 称为 Bash,它代表 Bourne Again Shell,而 Bourne Again Shell 又是一个双关语。现在我将使用纯中文,向大家介绍一下 bash 的工作方式:
- 你
- 登入 Linux 虚拟机
- 你的身份由用户名(
user1)和密码(123qwe)确定。 - Bash 执行了。
- Bash
- 从你的配置中读取并执行首个命令,它定义了:
- 命令提示符是什么样子
- 使用 Linux 时,你会看到什么颜色
- 你的编辑器是什么
- 你的浏览器是什么
- ...
- 读取首个命令后,Bash 进入循环
- 没有通过输入
exit或者按下- 读取一行
- 解析这一行,扩展花括号
- 使用扩展参数执行命令
- 没有通过输入
- 从你的配置中读取并执行首个命令,它定义了:
我重复一下,你输入的任何命令都不会直接执行,而是首先扩展,然后执行。例如,当你输入ls *时,星号*将扩展为当前目录中所有文件的列表。
现在你将学习如何修改你的配置,以及如何编写和查看你的历史记录。
这样做
 1: ls -al
 2: cat .profile
 3: echo Hello, $LOGNAME!
 4: cp -v .profile .profile.bak
 5: echo 'echo Hello, $LOGNAME!' >> .profile
 6: tail -n 5 .profile
 7: history -w
 8: ls -altr
 9: cat .bash_history
10: exit
你会看到什么
user1@vm1's password:
Linux vm1 2.6.32-5-amd64 #1 SMP Sun May 6 04:00:17 UTC 2012 x86_64

The programs included with the Debian GNU/Linux system are free software;
the exact distribution terms for each program are described in the
individual files in /usr/share/doc/*/copyright.

Debian GNU/Linux comes with ABSOLUTELY NO WARRANTY, to the extent
permitted by applicable law.
Last login: Thu Jun  7 12:03:29 2012 from sis.site
Hello, user1!
user1@vm1:~$ ls -al
total 20
drwxr-xr-x 2 user1 user1 4096 Jun  7 12:18 .
drwxr-xr-x 3 root  root  4096 Jun  6 21:49 ..
-rw-r--r-- 1 user1 user1  220 Jun  6 21:48 .bash_logout
-rw-r--r-- 1 user1 user1 3184 Jun  6 21:48 .bashrc
-rw-r--r-- 1 user1 user1  697 Jun  7 12:04 .profile
user1@vm1:~$ cat .profile
# ~/.profile: executed by the command interpreter for login shells.
# This file is not read by bash(1), if ~/.bash_profile or ~/.bash_login
# exists.
# see /usr/share/doc/bash/examples/startup-files for examples.
# the files are located in the bash-doc package.

# the default umask is set in /etc/profile; for setting the umask
# for ssh logins, install and configure the libpam-umask package.
#umask 022

# if running bash
if [ -n "$BASH_VERSION" ]; then
    # include .bashrc if it exists
    if [ -f "$HOME/.bashrc" ]; then
        . "$HOME/.bashrc"
    fi
fi

# set PATH so it includes user's private bin if it exists
if [ -d "$HOME/bin" ] ; then
    PATH="$HOME/bin:$PATH"
fi
echo Hello, $LOGNAME!
user1@vm1:~$ echo Hello, $LOGNAME!
Hello, user1!
user1@vm1:~$ cp -v .profile .profile.bak
`.profile' -> `.profile.bak'
user1@vm1:~$ echo 'echo Hello, $LOGNAME!' >> .profile
user1@vm1:~$ tail -n 5 .profile
# set PATH so it includes user's private bin if it exists
if [ -d "$HOME/bin" ] ; then
    PATH="$HOME/bin:$PATH"
fi
echo Hello, $LOGNAME!
user1@vm1:~$ history -w
user1@vm1:~$ ls -altr
total 28
-rw-r--r-- 1 user1 user1 3184 Jun  6 21:48 .bashrc
-rw-r--r-- 1 user1 user1  220 Jun  6 21:48 .bash_logout
drwxr-xr-x 3 root  root  4096 Jun  6 21:49 ..
-rw-r--r-- 1 user1 user1  741 Jun  7 12:19 .profile.bak
-rw------- 1 user1 user1  308 Jun  7 12:21 .bash_history
-rw-r--r-- 1 user1 user1  697 Jun  7 12:25 .profile
drwxr-xr-x 2 user1 user1 4096 Jun  7 12:25 .
user1@vm1:~$ cat .bash_history
ls -al
cat .profile
echo Hello, $LOGNAME!
cp -v .profile .profile.bak
echo 'echo Hello, $LOGNAME!' >> .profile
tail -n 5 .profile
history -w
ls -altr
user1@vm1:~$ exit
logout
不要害怕,所有命令都会解释。行号对应“现在输入它”的部分。
解释
打印当前目录中的所有文件,包括隐藏的文件。选项
-al告诉ls以long格式打印文件列表,并包括所有文件,包括隐藏文件。.profile和.bash_rc是隐藏文件,因为它们以点.开头。以点开头的每个文件都是隐藏的,这很简单。这两个特殊文件是 shell 脚本,它们包含登录时执行的指令。打印出你的
.profile文件。只是这样。告诉你的 shell,你这里是 bash,输出一个字符串
Hello, $LOGNAME!,用环境变量``$LOGNAME替换$LOGNAME,它包含你的登录名。将
.profile文件复制到.profile.bak。选项-v让cp详细输出,这意味着它会打印所有的操作。记住这个选项,它通常用于让命令给你提供比默认更多的信息。-
在
.bash_rc配置文件中添加一行。从现在开始,每次登录到vm1时, 都将执行该命令。注意,>>代表向文件添加了一些东西,但>意味着使用一些东西来替换文件。如果你不小心替换了.profile而不是向它添加,则命令cp -v .profile.bak .profile会向你返回旧的
.profile文件。 从
.profile文件中精确打印出最后 5 行。将所有命令历史写入
.bash_history文件。通常这是在会话结束时完成的,当你通过键入exit或按+ D 打印当前目录中的文件。选项
-tr表示文件列表按时间反向排序。这意味着最近创建和修改的文件最后打印。注意你现在有两个新的文件。打印出保存命令历史记录的文件。注意你所有的输入都在这里。
关闭会话
附加题
在线搜索为什么
ls -al告诉你“总共 20”,但是只有 5 个文件存在。 这是什么意思? 请注意,.和..是特殊文件条目,分别对应于当前目录和父目录的。登录
vm1并键入man -K /etc/profile,现在使用光标键滚动到INVOCATION部分并阅读它。 要退出man,请键入q。 键入man man来找出man -K选项的含义。在命令之前键入
uname与空格。 现在,键入history。 看到了吗?如果你将空格放到命令前面,则不会将其保存在历史记录中!提示:当你需要在命令行上指定密码时,很实用。找到 bash 的 wiki 页面,并尝试阅读它。不用担心,如果它吓到你,只需要省略可怕的部分。
