show_and_tell 代码实现及测试-——批量训练
introduction
Image Caption是一个融合计算机视觉、自然语言处理和机器学习的综合问题。
能够用正确的英语句子自动描述图像的内容是一项非常具有挑战性的任务,但它可以帮助视障人士更好地理解网络上的图像内容。例如,这项任务比研究良好的图像分类或对象识别任务要困难得多,这是Computer vision community的主要关注点。实际上,描述不仅必须捕获图像中包含的对象,而且还必须表达这些对象之间的关系。
参考论文:https://arxiv.org/abs/1411.4555
代码实现: https://github.com/mosessoh/CNN-LSTM-Caption-Generator
视频: https://www.youtube.com/watch?v=XgJGvhkv_Mo
中文翻译: https://www.jianshu.com/p/3330a56f0d5e
鉴于GitHub中原作者的代码需要用到caffe,这里介绍一种只需要用tensorflow来训练的改进版,其效果是一样的。
注意:作者电脑配置是i7-7700HQ 2.80GHz ,GTX1070ti ,16G 可以做个参考
在下载数据集前要注意磁盘空间要留出150G左右(真正可能会用到100G)
第一步:
下载程序:http://download.csdn.net/download/laurenitum0716/10256327
第二步:
配置环境下载包
1.tensorflow1.0及以上
作者所用的事tensorflow1.4 ,还未装的小伙伴可以参考我的另一篇博文
https://blog.csdn.net/m0_38073193/article/details/82290249
显卡足够的小伙伴建议安装tensorflow(GPU),训练速度会比CPU版的快上10倍,作者只用了4个小时左右就训练好了。
2.NumPy 用pip下载即可
3.Natural Language Toolkit (NLTK)
安装教程:1) pip 下载nltk
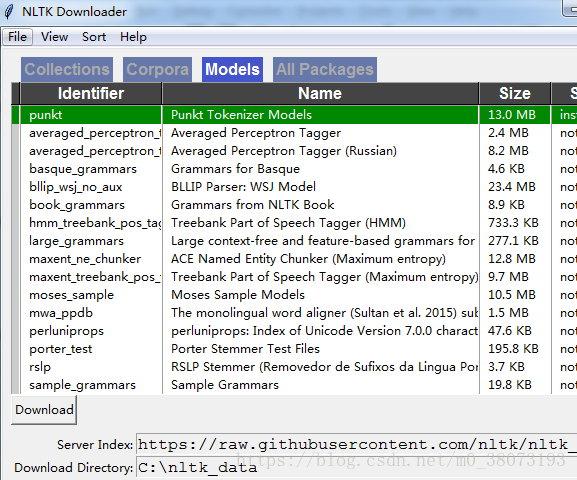
然后在python中输入以下代码后下载punkt,下载至C:\Users\Jabin\AppData\Roaming。
import nltk
nltk.download()
2)有些人可能通过第一种方法没法下载成功,下面我给大家介绍第二种方法
在github上下载nltk_data ,网址:https://github.com/nltk/nltk_data,同样也是下载到
C:\Users\Jabin\AppData\Roaming 目录下,解压缩。
可以打一行代码from nltk.book import *,看看是否成功安装了nltk_data
第三步
下载数据集并进行训练
1.下载数据集
- 训练图片集:http://msvocds.blob.core.windows.net/coco2014/train2014.zip
- 评估图片集:http://msvocds.blob.core.windows.net/coco2014/val2014.zip
- Caption标注集:
http://msvocds.blob.core.windows.net/annotations-1-0-3/captions_train-val2014.zip - 放在 \Show_And_Tell\data\mscoco\raw-data中,如下图
2. 训练数据集
执行 /Show_And_Tell/data/build_mscoco_data.py 将原始数据转换为TFRecord文件。
第四步
下载与训练模型并进行训练
1.下载与训练模型并解压到/Show_And_Tell/data/inception_v3。
下载地址:http://download.tensorflow.org/models/inception_v3_2016_08_28.tar.gz
2.执行train.py进行训练(Global step至少要大于5000)
也可以直接下载训练好的数据(训练65000次)
https://pan.baidu.com/s/10V7_vBm_9c693WA2-jCu9Q
密码:mjbk
解压至:/Show_And_Tell/data/mscoco/train文件夹下即可。
第五步
执行测试
运行run_inference.py进行测试(图片一直上传失败。。。截一小部分才上传成功。。。。。。)
可以在这里更改图片信息
补充:
源代码是只能进行当图测试,作者对其稍微改进了一下,可以一次性生成一个文件夹里所有图像的描述,并打印在文本文件中
代码如下:
from __future__ import absolute_import
from __future__ import division
from __future__ import print_function

import math
import os

import tensorflow as tf
from PIL import Image
import configuration
import inference_wrapper
from inference_utils import caption_generator
from inference_utils import vocabulary
import matplotlib.pyplot as plt

FLAGS = tf.flags.FLAGS


fout = open(r'G:\数据集\picture_biying\picture\world cup\picture_description.txt', 'a+')

#检索所有图像
# filedir = "C:\\Users\\lsz95\\Desktop\\图像"
filedir = "G:\\数据集\\picture_biying\\picture\\world cup"
picture_dir = []
for root, dirs, files in os.walk(filedir):
    for file in files:
        print(os.path.join(root, file))
        picture_dir.append(os.path.join(root, file))
print(picture_dir)

# tf.flags.DEFINE_string("input_files", "data/mscoco/raw-data/val2014/COCO_val2014_000000003832.jpg",
#                        "File pattern or comma-separated list of file patterns "
#                        "of image files.")
tf.flags.DEFINE_string("input_files", picture_dir,
                               "File pattern or comma-separated list of file patterns "
                               "of image files.")
tf.flags.DEFINE_string("checkpoint_path", "data/mscoco/train",
                       "Model checkpoint file or directory containing a "
                       "model checkpoint file.")
tf.flags.DEFINE_string("vocab_file", "data/mscoco/raw-data/word_counts.txt", "Text file containing the vocabulary.")


tf.logging.set_verbosity(tf.logging.INFO)


def main(_):


    #

    # Build the inference graph.
    g = tf.Graph()
    with g.as_default():
        model = inference_wrapper.InferenceWrapper()
        restore_fn = model.build_graph_from_config(configuration.ModelConfig(),
                                                   FLAGS.checkpoint_path)
    g.finalize()

    # Create the vocabulary.
    vocab = vocabulary.Vocabulary(FLAGS.vocab_file)

    filenames = []
    for file_pattern in FLAGS.input_files:
        filenames.extend(tf.gfile.Glob(file_pattern))
    tf.logging.info("Running caption generation on %d files matching %s",
                    len(filenames), FLAGS.input_files)
    print(filenames)
    with tf.Session(graph=g) as sess:
        # Load the model from checkpoint.
        restore_fn(sess)

        # Prepare the caption generator. Here we are implicitly using the default
        # beam search parameters. See caption_generator.py for a description of the
        # available beam search parameters.
        generator = caption_generator.CaptionGenerator(model, vocab)
        j=0
        for filename in filenames:
            try:
                # picture_name= filename.split("\\")[-1].split(".")[0].split("_")[0][4:]
                # picture_name = filename.split("\\")[-1].split(".")[0].split("_")[0]
                picture_name = filename.split("\\")[-1].split(".")[0]
                j+=1
                with tf.gfile.FastGFile(filename, "rb") as f:
                    image = f.read()
                captions = generator.beam_search(sess, image)
                # print("Captions for image %s:" % os.path.basename(filename))
                for i, caption in enumerate(captions):
                    # Ignore begin and end words.
                    sentence = [vocab.id_to_word(w) for w in caption.sentence[1:-1]]
                    sentence = " ".join(sentence)
                print("  %d) %s (p=%f)" % (i, sentence, math.exp(caption.logprob)))
                print("   %d)  %s  %s \n" % (j, picture_name,sentence))
                fout.write("%s||%s \n" % (picture_name, sentence))

                # print("   %d) %s %s  %s \n" % (j, picture_name,picture_name2,sentence))
                # fout.write("%s $|$ %s $|$ %s \n" % (picture_name,picture_name2, sentence))
            except:
                 # fout.write("fail")
                 print("------------")
        #     图像加描述图形显示
        #     img = Image.open(filename)
        #
        #     plt.subplot(2,2,j)
        #     plt.imshow(img)
        #     plt.axis('off')
        #     plt.title(str(sentence))
        # plt.show()
        fout.close()

if __name__ == "__main__":
    tf.app.run()
运行结果如下:


