XMU Java第五次实验
Java第五次实验
赛车
描述
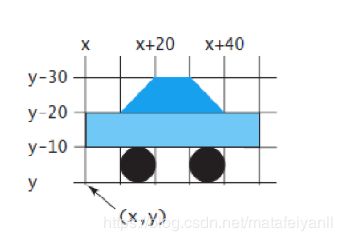
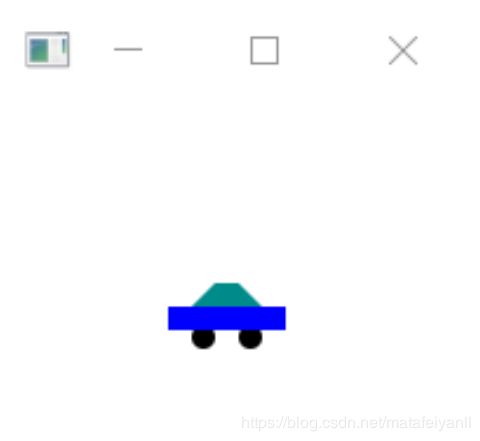
绘制一辆赛车(颜色任选,款式如图),使用上下左右箭头控制赛车的移动。注意不能让赛车的任何部位超出界面的边界。
设计思路
先确定整体布局,在Scene上采用BorderPane,BorderPane后面放置一个group,group用于添加组件,两个轮子采用Circle,车身采用Rectangle,梯形部分用Polygan画实心梯形,然后再设置移动事件,用setOnKeyPressed驱动,按上下左右键,如果不超出范围,则可以移动。
代码
package Conv.company;

import javafx.application.Application;
import javafx.scene.Group;
import javafx.scene.layout.BorderPane;
import javafx.scene.shape.Circle;
import javafx.stage.Stage;
import static javafx.scene.paint.Color.*;
import javafx.collections.ObservableList;
import javafx.scene.Scene;
import javafx.scene.shape.Polygon;
import javafx.scene.shape.Rectangle;

public class movingcar extends Application {
    @Override
    public void start(Stage primaryStage) throws Exception {
        BorderPane pane = new BorderPane();
        Group group=new Group();
        // 添加组件
        Circle leftwheel = new Circle(115,113,5,BLACK);
        Circle rightwheel = new Circle(135,113,5,BLACK);
        Rectangle body = new Rectangle(100,100, 50,10);
        Polygon hat = new Polygon();
        ObservableList<Double> list=hat.getPoints();
        list.addAll(120.0,90.0,110.0,100.0,140.0,100.0,130.0,90.0);
        hat.setFill(DARKCYAN);
        body.setFill(BLUE);

        //移动事件
        group.setOnKeyPressed(e->{
            switch(e.getCode()){
                case DOWN:
                    if(group.getLayoutY()+10<=90)
                        group.setLayoutY(group.getLayoutY()+10);
                    break;
                case UP:
                    if(group.getLayoutY()-10>=-90)
                        group.setLayoutY(group.getLayoutY()-10);
                    break;
                case LEFT:
                    if(group.getLayoutX()-10>=-100)
                        group.setLayoutX(group.getLayoutX()-10);
                    break;
                case RIGHT:
                    if(group.getLayoutX()+10<=80)
                        group.setLayoutX(group.getLayoutX()+10);
                    break;
            }
        });

        group.getChildren().addAll(leftwheel,rightwheel,body,hat);
        pane.getChildren().add(group);
        Scene scene = new Scene(pane, 200, 200);
        primaryStage.setScene(scene);
        primaryStage.setTitle("Racing car");
        primaryStage.show();
        group.requestFocus();
    }
}
效果
幻灯片放映
描述
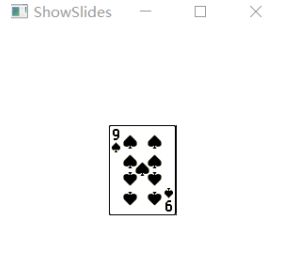
写一个程序,将54张扑克牌图片,按照每次1张,每张1秒的放映间隔,按顺序循环显示图片。并且要求:(1)向上箭头加快放映速度;向下箭头减缓放映速度;(2)双击鼠标左键暂停放映,再次双击则继续。
程序界面自定。
设计思路
首先读取扑克牌,将它按顺序存入一个imag数组中,定义一个EventHandler用于处理事件,事件是按顺序播放给定扑克牌,利用Timeline,指定每一个关键帧的时间间隔为1s。接着定义一个事件处理器,setOnMouseClicked和setOnKeyPressed用于控制放映速度和暂停。
代码
package Conv.company;

import java.io.IOException;
import java.io.InputStream;
import java.util.jar.JarEntry;
import java.util.jar.JarFile;
import javafx.animation.Animation;
import javafx.animation.KeyFrame;
import javafx.animation.KeyValue;
import javafx.animation.Timeline;
import javafx.application.Application;
import javafx.event.ActionEvent;
import javafx.event.EventHandler;
import javafx.scene.Scene;
import javafx.scene.image.Image;
import javafx.scene.image.ImageView;
import javafx.scene.layout.StackPane;
import javafx.stage.Stage;
import javafx.util.Duration;

public class ShowSlides extends Application {
    int n=1;
    ImageView []imag=new ImageView[55];
    @Override
    public void start(Stage primaryStage) throws Exception {
        StackPane pane = new StackPane();
        for(int i=1;i<=54;i++){
            String card=new String("cards/"+String.valueOf(i)+".png");
            imag[i]=readImageFromJar("cards.jar",card);
        }

        EventHandler<ActionEvent> eventHandler = e->{
            if(n>=55)
                n=1;
            pane.getChildren().add(imag[n]);
            n++;
        };
        Timeline animation = new Timeline(new KeyFrame(Duration.seconds(1),eventHandler));
        animation.setCycleCount(Timeline.INDEFINITE);
        animation.play();
        pane.setOnMouseClicked(e->{
            if (animation.getStatus()==Animation.Status.PAUSED && e.getClickCount()==2){
                animation.play();
            }else if(e.getClickCount()==2){
                animation.pause();
            }
        });
        pane.setOnKeyPressed(e->{
            switch(e.getCode()){
                case UP:animation.setRate(animation.getRate()+1);
                case DOWN:animation.setRate(animation.getRate()-1);
            }
        });


        Scene scene = new Scene(pane, 300, 300);
        primaryStage.setTitle("ShowSlides");
        primaryStage.setScene(scene);
        primaryStage.show();
        pane.requestFocus();
    }
    // readfile
    public static ImageView readImageFromJar(String jarname, String picname){
        ImageView imageView = null;
        try {
            JarFile jarFile = new JarFile(jarname);
            JarEntry entry = jarFile.getJarEntry(picname);
            InputStream in = jarFile.getInputStream(entry);
            imageView = new ImageView(new Image(in));
            in.close();
            jarFile.close();
        }
        catch (IOException e) {
            System.err.println("read file error.");
        }
        return imageView;
    }
}
效果
交通灯
描述
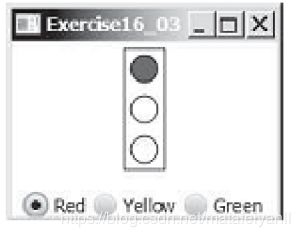
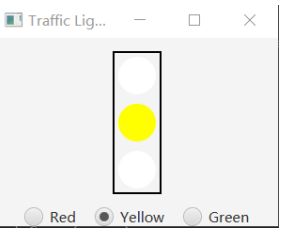
如图,当用户选择交通灯下方的颜色时,自动填充(相当于点亮)上面对应的颜色灯,并注意清空(相当于熄灭)原先点亮的灯。程序开始自动点亮红灯。
设计思路
先确定总体布局,再添加事件驱动。总体采用Border Pane,下一层是一个HBox,为底下的按键,水平摆放 和一个StackPane,为红绿灯标识,StackPane里面包括一个VBox(里面含有三盏红绿灯,垂直摆放)和一个rectangle。然后依次添加按钮的事件驱动,因为三个按钮只能有一个勾选,所以采用ToggleGroup来监听。
代码
package Conv.company;

import javafx.application.Application;
import javafx.stage.Stage;
import javafx.geometry.Pos;
import javafx.scene.Scene;
import javafx.scene.control.RadioButton;
import javafx.scene.control.ToggleGroup;
import javafx.scene.layout.BorderPane;
import javafx.scene.layout.HBox;
import javafx.scene.layout.StackPane;
import javafx.scene.layout.VBox;
import javafx.scene.paint.Color;
import javafx.scene.shape.Circle;
import javafx.scene.shape.Rectangle;

public class TrafficLights extends Application {
    @Override
    public void start(Stage primaryStage) throws Exception {
        StackPane centerPane = new StackPane();
        BorderPane pane = new BorderPane();

        //添加三个控制按钮
        HBox radioButtonsPane = new HBox();
        RadioButton Red_light = new RadioButton("Red");
        RadioButton Yellow_light = new RadioButton("Yellow");
        RadioButton Green_light = new RadioButton("Green");
        radioButtonsPane.getChildren().addAll(Red_light, Yellow_light, Green_light);
        radioButtonsPane.setSpacing(20);
        radioButtonsPane.setAlignment(Pos.CENTER);

        //只有一个勾选,采用ToggleGroup监听
        ToggleGroup group = new ToggleGroup();
        Red_light.setToggleGroup(group);
        Yellow_light.setToggleGroup(group);
        Green_light.setToggleGroup(group);

        //添加三盏灯,中间部分用StackPane
        Circle light1 = new Circle(20,Color.WHITE);
        Circle light2 = new Circle(20,Color.WHITE);
        Circle light3 = new Circle(20,Color.WHITE);
        VBox trafficLights = new VBox();
        trafficLights.getChildren().addAll(light1, light2, light3);
        trafficLights.setAlignment(Pos.CENTER);
        trafficLights.setSpacing(10);
        Rectangle border = new Rectangle(0, 0, 50, 150);
        border.setStroke(Color.BLACK);
        border.setStrokeWidth(2);
        border.setFill(Color.TRANSPARENT);
        centerPane.getChildren().addAll(trafficLights,border);

        //总体采用BorderPane
        pane.setCenter(centerPane);
        pane.setBottom(radioButtonsPane);

        Red_light.setOnAction(e -> {
            if(Red_light.isSelected() == true)
            {
                light1.setFill(Color.RED);
                light2.setFill(Color.WHITE);
                light3.setFill(Color.WHITE);
            }
        });
        Yellow_light.setOnAction(e -> {
            if(Yellow_light.isSelected() == true)
            {
                light1.setFill(Color.WHITE);
                light2.setFill(Color.YELLOW);
                light3.setFill(Color.WHITE);
            }
        });
        Green_light.setOnAction(e -> {
            if(Green_light.isSelected() == true)
            {
                light1.setFill(Color.WHITE);
                light2.setFill(Color.WHITE);
                light3.setFill(Color.GREEN);
            }
        });

        Scene scene = new Scene(pane, 300, 200);
        primaryStage.setTitle("Traffic Lights");
        primaryStage.setScene(scene);
        primaryStage.show();
    }
}
效果
沿正弦曲线运动的小球
描述
沿正弦曲线运动的小球:
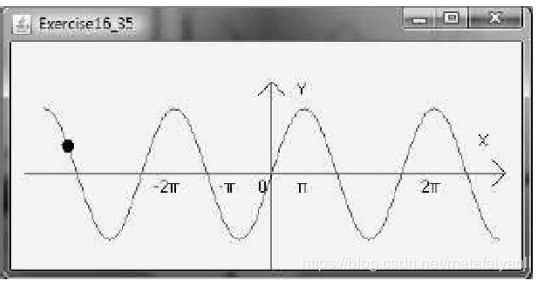
如图,编程实现让小球沿着正弦曲线从左向右运动,如果到达曲线右边界,则回到最左边重新开始运动。用户按一次空格键可以暂停小球运动,再按一次空格键可以让小球继续运动。
设计思路
采用Polyline画一条正弦曲线和Line画坐标轴,我是先定义一个中心CenterX和CenterY,然后在这个中心的基础上扩展。用PathTransition让小球在指定位置运动。然后再定义事件驱动。
代码
package Conv.company;

import javafx.animation.Animation;
import javafx.animation.PathTransition;
import javafx.application.Application;
import javafx.collections.ObservableList;
import javafx.scene.Scene;
import javafx.scene.input.KeyCode;
import javafx.scene.layout.Pane;
import javafx.scene.paint.Color;
import javafx.scene.shape.*;
import javafx.scene.shape.Polygon;
import javafx.stage.Stage;
import javafx.util.Duration;

import java.awt.*;

public class SinBall extends Application {
    @Override
    public void start(Stage primaryStage) throws Exception {
        Pane pane = new Pane();
        int width = 500,height = 300;

        Polyline polyline = new Polyline();
        double CenterX = width/2;
        double CenterY = height/2;
        ObservableList<Double> list = polyline.getPoints();
        for (int i = -200; i < 200; i++) {
            list.add((double)i+CenterX);
            list.add( 50*Math.cos(((double)i)/50.0 * Math.PI) + CenterY);
        }

        Line axisX = new Line(CenterX-200, CenterY, CenterX+200, CenterY);
        Line axisY = new Line(CenterX, CenterY-100, CenterX, CenterY+100);
        pane.getChildren().add(polyline);
        pane.getChildren().addAll(axisX, axisY);

        Circle ball = new Circle(5);
        ball.setFill(Color.RED);
        pane.getChildren().add(ball);

        PathTransition pt = new PathTransition();
        pt.setDuration(Duration.millis(4000));
        pt.setPath(polyline);
        pt.setNode(ball);
        pt.setOrientation(PathTransition.OrientationType.ORTHOGONAL_TO_TANGENT);
        pt.play();

        pt.currentTimeProperty().addListener((ov, old_val, new_val) -> {
            if(pt.getCurrentTime().compareTo(pt.getDuration()) >= 0)
                pt.playFromStart();
        });

        pane.setOnKeyPressed(e->{
            if (pt.getStatus()== PathTransition.Status.PAUSED && e.getCode()== KeyCode.SPACE){
                pt.play();
            }else if(e.getCode()== KeyCode.SPACE){
                pt.pause();
            }
        });


        Scene scene = new Scene(pane, width, height);
        primaryStage.setTitle("Ball");
        primaryStage.setScene(scene);
        primaryStage.show();
        ball.requestFocus();

    }
}
