使用kubeadm部署高可用的k8s集群
使用kubeadm部署k8s高可用集群
部署k8s集群方式有很多种,包括二进制文件部署,kubespray,rancher,kubeadm等等。
纯粹的二进制文件部署非常复杂和麻烦,而使用良好的工具来达到“偷懒”的目的是我们程序员的天性,因此自动化部署工具才是我们的首选。
关于部署工具的选用逻辑也很简单,kubeadm是官方提供和推荐的,因此可以认为kubeadm是可用而且可靠的,文档也足够全面,官方的文档已经足够支撑我们把集群部署起来。使用上也很方便,所以不在这上面纠结太多,直接选用。
安装kubeadm
官方文档在此 安装kubeadm
为了方便阅读,结合实际操作过程中我自己的理解,这里整理一下整个部署过程
这里我们的系统已经安装好 docker 18.06.01-ce,关于如何安装docker这里不再赘述,可以看我的另外一篇文章 安装docker
服务器要求:
CPU:2+核
内存:2+G
硬盘:30+G
集群服务器之间内网完全互通
这些 端口未被占用
关闭 swap 不确定是否关闭的话,可以执行 swapoff -a 来关闭
确保集群服务器之间时间同步
关闭防火墙
关闭SElinux
关于容器运行时
k8s 默认的容器运行时是docker,但是不仅仅支持docker,还支持包括 containerd,CRI-O。
如果你的机器上安装了一个以上的运行时,需要卸载掉,只保留一个,或者在后面执行到kubeadm init 时,通过 --cri-socket 来指定使用哪个运行时,否则会出错。
什么是运行时?可以简单理解为容器运行环境,包括运行方式,运行依赖组件,等等,后面有机会再详细聊聊。
怎么检查机器上安装了几个进行时呢?检查以下目录是否存在就知道了
| 运行时 | kubeadm检测的socket 文件路径 |
|---|---|
| Docker | /var/run/docker.sock |
| containerd | /run/containerd/containerd.sock |
| CRI-O | /var/run/crio/crio.sock |
一些可选配置
1.给服务器配置互相免密ssh
ssh-keygen -t RSA
一路按enter,把生成的id_rsa.pub传到其他服务器上,然后执行
cat id_rsa.pub >> /root/.ssh/authorized_keys
2.修改服务器hostname便于辨识,例如:
hostnamectl set-hostname k8smaster
3.修改/etc/hosts,把集群内的服务器都加进去
下面正式开始安装k8s集群
设置yum源,国外的源比较慢,本次我使用阿里的镜像
cat < /etc/yum.repos.d/kubernetes.repo
[kubernetes]
name=Kubernetes
baseurl=https://mirrors.aliyun.com/kubernetes/yum/repos/kubernetes-el7-x86_64/
enabled=1
gpgcheck=1
repo_gpgcheck=1
gpgkey=https://mirrors.aliyun.com/kubernetes/yum/doc/yum-key.gpg https://mirrors.aliyun.com/kubernetes/yum/doc/rpm-package-key.gpg
EOF
执行yum install
yum install -y kubelet kubeadm kubectl --disableexcludes=kubernetes
启用服务
systemctl enable --now kubelet
一些准备工作
设置文件驱动和cgroup驱动
默认的文件驱动可能是其他,这里我们设置成overlay2
注意,k8s不支持vfs文件驱动,可以通过 docker info 命令查看你的 storage driver
默认的cgroup驱动是cgroupfs,官方推荐用systemd
cat << EOF > /etc/systemd/system/kubelet.service.d/20-etcd-service-manager.conf
[Service]
ExecStart=/usr/bin/kubelet --address=127.0.0.1 --pod-manifest-path=/etc/kubernetes/manifests --cgroup-driver=systemd  --storage-driver=overlay2 --
Restart=always
EOF
重启
systemctl daemon-reload
systemctl restart kubelet
安装ipvs模块
在所有的Kubernetes节点执行以下脚本(若内核大于4.19替换nf_conntrack_ipv4为nf_conntrack):
cat > /etc/sysconfig/modules/ipvs.modules <#执行脚本
chmod 755 /etc/sysconfig/modules/ipvs.modules && bash /etc/sysconfig/modules/ipvs.modules && lsmod | grep -e ip_vs -e nf_conntrack_ipv4
#安装相关管理工具
yum install ipset ipvsadm -y
修改内核参数
cat > /etc/sysctl.d/k8s.conf <使用keepalive+HAproxy搭建负载均衡
高可用的集群需要搭建负载均衡器,所有control plain 节点都在负载均衡器后面提供服务
搭建方法和步骤,可参考其他文章或者使用其他方案,我在使用nginx做负载均衡器时出现了问题,健康检查始终失败,因此推荐使用keepalive+HAproxy
这里引用了官网的架构图来说明

初始化master节点
官网的初始化脚本是
sudo kubeadm init --control-plane-endpoint "LOAD_BALANCER_DNS:LOAD_BALANCER_PORT" --upload-certs
但是在国内直接执行是无法安装成功的,因为默认的镜像仓库在国内无法访问。因此我们需要对初始化脚本进行修改。
可以使用以下命令来生成默认的启动配置文件,然后基于此文件进行自定义参数修改
kubeadm config print init-defaults > kubeadm-config.yaml
生成之后,可以修改 kubeadm-config.yaml,我的配置是:
apiVersion: kubeadm.k8s.io/v1beta2
bootstrapTokens:
- groups:
  - system:bootstrappers:kubeadm:default-node-token
  token: abcdef.0123456789abcdef
  ttl: 24h0m0s
  usages:
  - signing
  - authentication
kind: InitConfiguration
localAPIEndpoint:
  advertiseAddress: 本机IP
  bindPort: 6443
nodeRegistration:
  criSocket: /var/run/dockershim.sock
  name: k8s-master
  taints:
  - effect: NoSchedule
    key: node-role.kubernetes.io/master
---
apiServer:
  timeoutForControlPlane: 4m0s
apiVersion: kubeadm.k8s.io/v1beta2
certificatesDir: /etc/kubernetes/pki
clusterName: kubernetes
controlPlaneEndpoint: "你的负载均衡器IP地址:你的负载均衡器端口"
controllerManager: {}
dns:
  type: CoreDNS
etcd:
  local:
    dataDir: /var/lib/etcd
imageRepository: registry.cn-hangzhou.aliyuncs.com/google_containers
kind: ClusterConfiguration
kubernetesVersion: v1.17.0
networking:
  dnsDomain: cluster.local
  serviceSubnet: 10.96.0.0/12
scheduler: {}
---
apiVersion: kubeproxy.config.k8s.io/v1alpha1
kind: KubeProxyConfiguration
featureGates:
  SupportIPVSProxyMode: true
mode: ipvs
使用kubeadm init 初始化master节点
kubeadm 初始化master节点时使用以下命令,该命令包含了自动上传cert,日志级别更敏感(–v=6) 同时保存了启动日志到kubeadm-init.log文件中:
kubeadm init --config=kubeadm-config.yaml --upload-certs --v=6 | tee kubeadm-init.log
几个重要的参数说明:
controlPlaneEndpoint: 这个就是我们用keepalive+HAproxy搭建的负载均衡器的入口了
imageRepository : 由于墙的原因无法访问官网的镜像仓库,因此需要改成使用国内的,这里我使用了阿里云的仓库
kubernetesVersion :指定k8s的版本,默认会拉取最新版
安装成功之后会看到如下日志:
[init] Using Kubernetes version: v1.17.0
[preflight] Running pre-flight checks
[preflight] Pulling images required for setting up a Kubernetes cluster
[preflight] This might take a minute or two, depending on the speed of your internet connection
[preflight] You can also perform this action in beforehand using 'kubeadm config images pull'
[kubelet-start] Writing kubelet environment file with flags to file "/var/lib/kubelet/kubeadm-flags.env"
[kubelet-start] Writing kubelet configuration to file "/var/lib/kubelet/config.yaml"
[kubelet-start] Starting the kubelet
[certs] Using certificateDir folder "/etc/kubernetes/pki"
[certs] Generating "ca" certificate and key
[certs] Generating "apiserver" certificate and key
[certs] apiserver serving cert is signed for DNS names [k8s-master kubernetes kubernetes.default kubernetes.default.svc kubernetes.default.svc.cluster.local k8s-master] and IPs [10.96.0.1 10.18.1.81]
[certs] Generating "apiserver-kubelet-client" certificate and key
[certs] Generating "front-proxy-ca" certificate and key
[certs] Generating "front-proxy-client" certificate and key
[certs] Generating "etcd/ca" certificate and key
[certs] Generating "etcd/server" certificate and key
[certs] etcd/server serving cert is signed for DNS names [k8s-master localhost] and IPs [10.18.1.81 127.0.0.1 ::1]
[certs] Generating "etcd/peer" certificate and key
[certs] etcd/peer serving cert is signed for DNS names [k8s-master localhost] and IPs [10.18.1.81 127.0.0.1 ::1]
[certs] Generating "etcd/healthcheck-client" certificate and key
[certs] Generating "apiserver-etcd-client" certificate and key
[certs] Generating "sa" key and public key
[kubeconfig] Using kubeconfig folder "/etc/kubernetes"
[kubeconfig] Writing "admin.conf" kubeconfig file
[kubeconfig] Writing "kubelet.conf" kubeconfig file
[kubeconfig] Writing "controller-manager.conf" kubeconfig file
[kubeconfig] Writing "scheduler.conf" kubeconfig file
[control-plane] Using manifest folder "/etc/kubernetes/manifests"
[control-plane] Creating static Pod manifest for "kube-apiserver"
[control-plane] Creating static Pod manifest for "kube-controller-manager"
[control-plane] Creating static Pod manifest for "kube-scheduler"
[etcd] Creating static Pod manifest for local etcd in "/etc/kubernetes/manifests"
[wait-control-plane] Waiting for the kubelet to boot up the control plane as static Pods from directory "/etc/kubernetes/manifests". This can take up to 4m0s
[apiclient] All control plane components are healthy after 14.501793 seconds
[upload-config] Storing the configuration used in ConfigMap "kubeadm-config" in the "kube-system" Namespace
[kubelet] Creating a ConfigMap "kubelet-config-1.17" in namespace kube-system with the configuration for the kubelets in the cluster
[upload-certs] Storing the certificates in Secret "kubeadm-certs" in the "kube-system" Namespace
[upload-certs] Using certificate key:
bb3ac325ea4b564a40ddadbd400f27d9e1e103e3d09af0779038eddcf28858b3
[mark-control-plane] Marking the node k8s-master as control-plane by adding the label "node-role.kubernetes.io/master=''"
[mark-control-plane] Marking the node k8s-master as control-plane by adding the taints [node-role.kubernetes.io/master:NoSchedule]
[bootstrap-token] Using token: abcdef.0123456789abcdef
[bootstrap-token] Configuring bootstrap tokens, cluster-info ConfigMap, RBAC Roles
[bootstrap-token] configured RBAC rules to allow Node Bootstrap tokens to post CSRs in order for nodes to get long term certificate credentials
[bootstrap-token] configured RBAC rules to allow the csrapprover controller automatically approve CSRs from a Node Bootstrap Token
[bootstrap-token] configured RBAC rules to allow certificate rotation for all node client certificates in the cluster
[bootstrap-token] Creating the "cluster-info" ConfigMap in the "kube-public" namespace
[kubelet-finalize] Updating "/etc/kubernetes/kubelet.conf" to point to a rotatable kubelet client certificate and key
[addons] Applied essential addon: CoreDNS
[addons] Applied essential addon: kube-proxy

Your Kubernetes control-plane has initialized successfully!

To start using your cluster, you need to run the following as a regular user:

  mkdir -p $HOME/.kube
  sudo cp -i /etc/kubernetes/admin.conf $HOME/.kube/config
  sudo chown $(id -u):$(id -g) $HOME/.kube/config

You should now deploy a pod network to the cluster.
Run "kubectl apply -f [podnetwork].yaml" with one of the options listed at:
  https://kubernetes.io/docs/concepts/cluster-administration/addons/

You can now join any number of the control-plane node running the following command on each as root:

  kubeadm join 你的IP:你的端口 --token abcdef.0123456789abcdef \
    --discovery-token-ca-cert-hash sha256:c608fc79f1ec9173005b8de9144521e8cda7084437ebafd3be4c05b1080e3a37 \
    --control-plane --certificate-key bb3ac325ea4b564a40ddadbd400f27d9e1e103e3d09af0779038eddcf28858b3

Please note that the certificate-key gives access to cluster sensitive data, keep it secret!
As a safeguard, uploaded-certs will be deleted in two hours; If necessary, you can use
"kubeadm init phase upload-certs --upload-certs" to reload certs afterward.

Then you can join any number of worker nodes by running the following on each as root:

kubeadm join 你的IP:你的端口--token abcdef.0123456789abcdef \
    --discovery-token-ca-cert-hash sha256:c608fc79f1ec9173005b8de9144521e8cda7084437ebafd3be4c05b1080e3a37
注意: 我们需要将加入集群的命令保存起来,后续添加 control-plane node和 worker node 要用到(日志中加粗的部分)
此外,由于Kubernetes 集群默认需要加密方式访问,所以我们将刚刚部署生成的 Kubernetes 集群的安全配置文件,保存到当前用户的.kube 目录下,kubectl 默认会使用这个目录下的授权信息访问 Kubernetes 集群。这样我们就不用每次都通过export KUBECONFIG 环境变量告诉 kubectl 这个安全配置文件的位置。
mkdir -p $HOME/.kube
sudo cp -i /etc/kubernetes/admin.conf $HOME/.kube/config
sudo chown $(id -u):$(id -g) $HOME/.kube/config
部署网络插件
此时使用 kubectl get nodes 命令可以查看集群的节点状态:
NAME         STATUS     ROLES    AGE   VERSION
k8s-master   NotReady   master   14m   v1.17.3
可以看到是 NotReady,因为我们还没有部署网络插件。
有多种网络插件可以选择,这里我们使用weave:
kubectl apply -f "https://cloud.weave.works/k8s/net?k8s-version=$(kubectl version | base64 | tr -d '\n')"
该命令会自动选择匹配的版本并安装
安装完成之后,通过 kubectl get nodes 可以看到状态以及是 Ready 了
通过kubectl get pods -n kube-system 可以看到,所有pods 都是running状态
NAME                                 READY   STATUS    RESTARTS   AGE
coredns-7f9c544f75-9zx6r             1/1     Running   0          105m
coredns-7f9c544f75-cw5v4             1/1     Running   0          105m
etcd-k8s-master                      1/1     Running   0          105m
kube-apiserver-k8s-master            1/1     Running   0          105m
kube-controller-manager-k8s-master   1/1     Running   0          105m
kube-proxy-g6vl6                     1/1     Running   0          105m
kube-scheduler-k8s-master            1/1     Running   0          105m
weave-net-6txfv                      2/2     Running   0          87m
其中名字叫weave-net-6txfv 的就是我们的网络插件pod了
安装dashboard
下载配置文件到本地
wget https://raw.githubusercontent.com/kubernetes/dashboard/master/src/deploy/recommended/kubernetes-dashboard.yaml
修改配置文件的以下部分,以让dashboard起来之后,可以通过主机IP+port进行访问。
之所以要这么做,是因为从1.17.0版本开始,dashboard就不允许除了localhost之外的机器访问了,作以下修改是为了把dashboard通过nodePort的方式暴露出来
kind: Service
    apiVersion: v1
    metadata:
      labels:
        k8s-app: kubernetes-dashboard
      name: kubernetes-dashboard
      namespace: kubernetes-dashboard
    spec:
      # 添加Service的type为NodePort
      type: NodePort
      ports:
        - port: 443
          targetPort: 8443
          # 添加映射到虚拟机的端口,k8s只支持30000以上的端口
          nodePort: 30001
      selector:
        k8s-app: kubernetes-dashboard
还需要修改授权,给kubernetes-dashboard授予clust-admin这个“集群超管”角色。找到并修改以下片段(可通过关键字kind: ClusterRoleBinding 快速定位):
apiVersion: rbac.authorization.k8s.io/v1
kind: ClusterRoleBinding
metadata:
  name: kubernetes-dashboard
  namespace: kube-system
roleRef:
  apiGroup: rbac.authorization.k8s.io
  kind: ClusterRole
  name: cluster-admin
subjects:
  - kind: ServiceAccount
    name: kubernetes-dashboard
    namespace: kube-system
使用配置文件启动服务
kubectl apply -f kubernetes-dashboard.yaml
安装完之后,通过代理访问
在浏览器上访问
http://ip:30001
得益于安装dashboard的时候,设置了nodePort,我们可以看到以下登录页面
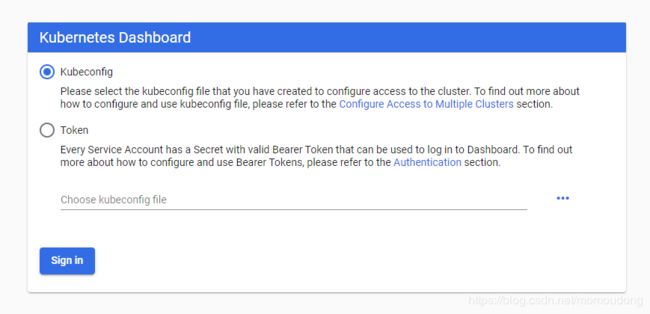
配置登录权限
Dashboard 支持 Kubeconfig 和 Token 两种认证方式,为了简化配置,我们上一步已经通过配置文件 Dashboard 默认用户(kubernetes-dashboard)赋予了 clust-admin 权限。
找到 kubernetes-dashboard 用户的 token
kubectl -n kube-system describe secret $(kubectl -n kube-system get secret | grep kubernetes-dashboard | awk '{print $1}')
把输出的token复制到token.txt文本文件中保存以后备用,并在login页面token登录,输入刚刚找到的token
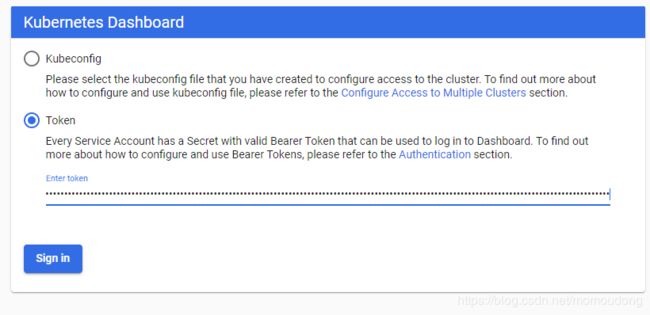
成功登录。
安装容器存储插件
下载相应的配置文件
wget https://raw.githubusercontent.com/rook/rook/master/cluster/examples/kubernetes/ceph/common.yaml

wget https://raw.githubusercontent.com/rook/rook/master/cluster/examples/kubernetes/ceph/operator.yaml

wget https://raw.githubusercontent.com/rook/rook/master/cluster/examples/kubernetes/ceph/cluster.yaml
然后执行安装即可
切记,一定要按照书序安装,有依赖关系
kubectl apply -f common.yaml
kubectl apply -f operator.yaml
kubectl apply -f cluster.yaml