MicroPython-ESP32串口通信
串口通信:
UART执行标准UART/USART双工串行通信协议,关于串口通信你需要的预备知识有码元, 波特率, 奇偶校验等概念。
硬件接线:
两个单片机设备进行串口通信,或者单片机通过USB转TTL模块与PC进行串口通信。
关于USB转TTL

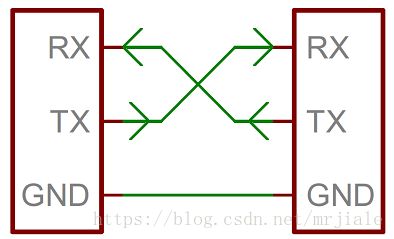
设备与设备之间至少需要接三个线。如下图所示:

- GND是地线,提供低电平的参考电压
- RX 信息接收端
- TX 信息发送端
至于VCC接口,可接可不接, 如果USB转TTL的正负极接反了容易导致电脑主板的烧毁。
要注意他们两个单片机的工作电压是否匹配,例如ESP32的工作电压是3.3v那么另外一个VCC接口也只能接VCC。 有的USB转TTL模块有3.3v与5v两个接口, 可以将ESP32开发板的VCC与USB转TTL的3.3v接口相连接, 或者将ESP32的VIN接口与USB转TTL的5v接口相连接。
单片机A的RX 接单片机B的TX, 单片机B的RX 接单片机A的TX。
UART构造器:
ESP32自身只有两个UART资源
导入UART 模块:from machine import UART
UART对象的构造器函数:UART(id, baudrate, bits, parity, rx, tx, stop, timeout)
- id : 串口编号:
ESP32的UART资源只有两个, id有效取值范围为1,2 - bandrate: 波特率(时钟频率):
常用波特率为:9600 (默认),115200,信息接受双方的波特率必须一致,否则会乱码。 - bits:单个字节的位数(比特数):
8 (默认),7,9 - parity: 校验方式:
None 不进行校验(默认),0 偶校验,1 奇校验 - rx:
接收口的GPIO编号 - tx:
发送口的GPIO编号 - stop: 停止位个数:
1 (默认),2 - timerout: 超时时间:
取值范围: 0 < timeout ≤ 2147483647
演示实例:
from machine import UART
uart = UART(2, baudrate=115200, rx=13,tx=12,timeout=10)
UART的API讲解:
字符串读写:
uart.read(10)       # read 10 characters, returns a bytes object
                    # 读入10个字符, 返回一个比特对象

uart.read()         # read all available characters
                    # 读取所有的有效字符

uart.readline()     # read a line
                    # 读入一行

uart.readinto(buf)  # read and store into the given buffer
                    # 读入并且保存在缓存中

uart.write('abc')   # write the 3 characters
                    # 向串口写入3个字符abc
字符读写:
uart.readchar()     # read 1 character and returns it as an integer
                    # 读入一个字符

uart.writechar(42)  # write 1 character
                    # 写入ASCALL码为42的字符

uart.writechar(ord('*')) # 等同于uart.writechar(42)
检测串口是否有数据:
uart.any() # returns the number of characters waiting
ESP32串口通信-字符串数据自发实验:接线 将开发板的 13号引脚与12号引脚用杜邦线相连接
from machine import UART,Pin
import utime

# 初始化一个UART对象
uart = UART(2, baudrate=115200, rx=13,tx=12,timeout=10)

count = 1

while True:
    print('\n\n===============CNT {}==============='.format(count))

    # 发送一条消息
    print('Send: {}'.format('hello {}\n'.format(count)))
    print('Send Byte :') # 发送字节数
    uart.write('hello {}\n'.format(count))
    # 等待1s钟
    utime.sleep_ms(1000)

    if uart.any():
        # 如果有数据 读入一行数据返回数据为字节类型
        # 例如  b'hello 1\n'
        bin_data = uart.readline()
        # 将手到的信息打印在终端
        print('Echo Byte: {}'.format(bin_data))

        # 将字节数据转换为字符串 字节默认为UTF-8编码
        print('Echo String: {}'.format(bin_data.decode()))
    # 计数器+1
    count += 1
    print('---------------------------------------')
样例输出:
===============CNT 1===============
Send: hello 1

Send Byte :
8
Echo Byte: b'hello 1\n'
Echo String: hello 1

---------------------------------------


===============CNT 2===============
Send: hello 2

Send Byte :
8
Echo Byte: b'hello 2\n'
Echo String: hello 2

---------------------------------------


===============CNT 3===============
Send: hello 3

Send Byte :
8
Echo Byte: b'hello 3\n'
Echo String: hello 3

---------------------------------------
上文讲解了如何使用ESP32的UART资源,如何发送与接收字符串。 如果后续深入学习的话,可能还涉及到:
- PC串口调试助手的使用。
- 自定义二进制通信协议。二进制数据打包与解包,需要用到python的的struct模块。
- 使用PySerial让PC与ESP32进行串口通信
出品:1Z实验室 (1ZLAB: Make Things Easy)
1Z实验室 Make Things Easy . 致力于在机器人+计算机视觉+人工智能的重叠区域, 制作小白友好的教程.