介绍
Spring Boot Admin是一个Github上的一个开源项目,它在Spring Boot Actuator的基础上提供简洁的可视化WEB UI,是用来管理 Spring Boot 应用程序的一个简单的界面,提供如下功能:
- 显示 name/id 和版本号
- 显示在线状态
- Logging日志级别管理
- JMX beans管理
- Threads会话和线程管理
- Trace应用请求跟踪
- 应用运行参数信息,如:
- Java 系统属性
- Java 环境变量属性
- 内存信息
- Spring 环境属性
Spring Boot Admin 包含服务端和客户端,按照以下配置可让Spring Boot Admin运行起来。
本文示例代码:boot-admin-demo
使用
Server端
1、pom文件引入相关的jar包
新建一个admin-server的Spring Boot项目,在pom文件中引入server相关的jar包
            de.codecentric
            spring-boot-admin-server
            1.5.3


            de.codecentric
            spring-boot-admin-server-ui
            1.5.3


            de.codecentric
            spring-boot-admin-starter-client
            1.5.3
其中spring-boot-admin-starter-client的引入是让server本身能够发现自己(自己也是客户端)。
2、 application.yml配置
在application.yml配置如下,除了server.port=8083的配置是server 对外公布的服务端口外,其他配置是server本身作为客户端的配置,包括指明指向服务端的地址和当前应用的基本信息,使用@@可以读取pom.xml的相关配置。
在下面Client配置的讲解中,可以看到下面类似的配置。
server:
  port: 8083
spring:
  boot:
    admin:
      url: http://localhost:8083
info:
  name: server
  description: @project.description@
  version: @project.version@
3、配置日志级别
在application.yml的同级目录,添加文件logback.xml,用以配置日志的级别,包含的内容如下:
在此处配置成了DEBUG,这样可以通过控制台日志查看server端和client端的交互情况。
4、添加入口方法注解
在入口方法上添加@EnableAdminServer注解。
@Configuration
@EnableAutoConfiguration
@EnableAdminServer
public class ServerApplication {

    public static void main(String[] args) {
        SpringApplication.run(ServerApplication.class, args);
    }
}
5、启动项目
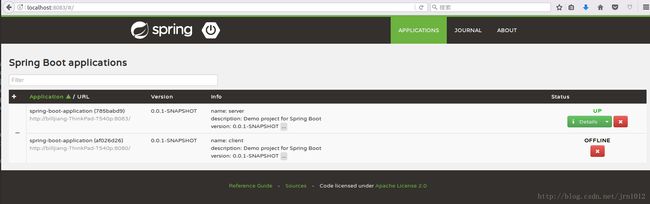
启动admin-server项目后,可以看到当前注册的客户端,点击明细,还可以查看其他明细信息。
Client端
在上述的Server端配置中,server本身也作为一个客户端注册到自己,所以client配置同server端配置起来,比较见到如下。
创建一个admin-client项目,在pom.xml添加相关client依赖包。
1、pom.xml添加client依赖
            de.codecentric
            spring-boot-admin-starter-client
            1.5.3
2、application.yml配置
在application.yml配置注册中心地址等信息:
spring:
  boot:
    admin:
      url: http://localhost:8083
info:
  name: client
  description: @project.description@
  version: @project.version@
endpoints:
  trace:
    enabled: true
    sensitive: false
3、配置日志文件
在application.yml的同级目录,添加文件logback.xml,用以配置日志的级别,包含的内容如下:
配置为DEBUG的级别,可以输出和服务器的通信信息,以便我们在后续心跳检测,了解Spring Boot Admin的实现方式。
4、启动Admin-Client应用
启动客户端项目,在服务端监听了客户端的启动,并在页面给出了消息提示,启动后,服务端的界面显示如下:(两个客户端都为UP状态)
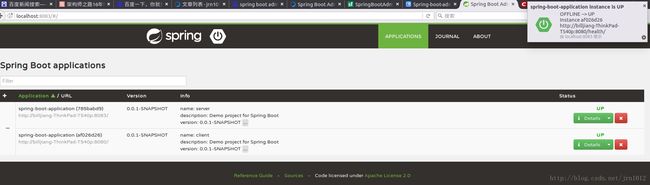
以上就可以使用Spring Boot Admin的各种监控服务了,下面谈一谈客户端和服务端怎么样做心跳检测的。
心跳检测/健康检测原理
原理
在Spring Boot Admin中,Server端作为注册中心,它要监控所有的客户端当前的状态。要知道当前客户端是否宕机,刚发布的客户端也能够主动注册到服务端。
服务端和客户端之间通过特定的接口通信(/health接口)通信,来监听客户端的状态。因为客户端和服务端不能保证发布顺序。
有如下的场景需要考虑:
- 客户端先启动,服务端后启动
- 服务端先启动,客户端后启动
- 服务端运行中,客户端下线
- 客户端运行中,服务端下线
所以为了解决以上问题,需要客户端和服务端都设置一个任务监听器,定时监听对方的心跳,并在服务器及时更新客户端状态。
上文的配置使用了客户端主动注册的方法。
调试准备
为了理解Spring Boot Admin的实现方式,可通过DEBUG 和查看日志的方式理解服务器和客户端的通信(心跳检测)
在pom.xml右键spring-boot-admin-server和spring-boot-admin-starter-client,Maven->
DownLoad Sources and Documentation在logback.xml中设置日志级别为DEBUG
客户端发起POST请求
客户端相关类
- RegistrationApplicationListener
- ApplicationRegistrator
在客户端启动的时候调用RegistrationApplicationListener的startRegisterTask,该方法每隔 registerPeriod = 10_000L,(10秒:默认)向服务端POST一次请求,告诉服务器自身当前是有心跳的。
- RegistrationApplicationListener
    @EventListener
    @Order(Ordered.LOWEST_PRECEDENCE)
    public void onApplicationReady(ApplicationReadyEvent event) {
        if (event.getApplicationContext() instanceof WebApplicationContext && autoRegister) {
            startRegisterTask();
        }
    }

    public void startRegisterTask() {
        if (scheduledTask != null && !scheduledTask.isDone()) {
            return;
        }

        scheduledTask = taskScheduler.scheduleAtFixedRate(new Runnable() {
            @Override
            public void run() {
                registrator.register();
            }
        }, registerPeriod);
        LOGGER.debug("Scheduled registration task for every {}ms", registerPeriod);
    }
- ApplicationRegistrator
public boolean register() {
boolean isRegistrationSuccessful = false;
Application self = createApplication();
for (String adminUrl : admin.getAdminUrl()) {
try {
@SuppressWarnings("rawtypes") ResponseEntity在主要的register()方法中,向服务端POST了Restful请求,请求的地址为/api/applications
并把自身信息带了过去,服务端接受请求后,通过sha-1算法计算客户单的唯一ID,查询hazelcast缓存数据库,如第一次则写入,否则更新。
服务端接收处理请求相关类
- RegistryController
    @RequestMapping(method = RequestMethod.POST)
    public ResponseEntity register(@RequestBody Application application) {
        Application applicationWithSource = Application.copyOf(application).withSource("http-api")
                .build();
        LOGGER.debug("Register application {}", applicationWithSource.toString());
        Application registeredApp = registry.register(applicationWithSource);
        return ResponseEntity.status(HttpStatus.CREATED).body(registeredApp);
    }
- ApplicationRegistry
public Application register(Application application) {
        Assert.notNull(application, "Application must not be null");
        Assert.hasText(application.getName(), "Name must not be null");
        Assert.hasText(application.getHealthUrl(), "Health-URL must not be null");
        Assert.isTrue(checkUrl(application.getHealthUrl()), "Health-URL is not valid");
        Assert.isTrue(
                StringUtils.isEmpty(application.getManagementUrl())
                        || checkUrl(application.getManagementUrl()), "URL is not valid");
        Assert.isTrue(
                StringUtils.isEmpty(application.getServiceUrl())
                        || checkUrl(application.getServiceUrl()), "URL is not valid");

        String applicationId = generator.generateId(application);
        Assert.notNull(applicationId, "ID must not be null");

        Application.Builder builder = Application.copyOf(application).withId(applicationId);
        Application existing = getApplication(applicationId);
        if (existing != null) {
            // Copy Status and Info from existing registration.
            builder.withStatusInfo(existing.getStatusInfo()).withInfo(existing.getInfo());
        }
        Application registering = builder.build();

        Application replaced = store.save(registering);
        if (replaced == null) {
            LOGGER.info("New Application {} registered ", registering);
            publisher.publishEvent(new ClientApplicationRegisteredEvent(registering));
        } else {
            if (registering.getId().equals(replaced.getId())) {
                LOGGER.debug("Application {} refreshed", registering);
            } else {
                LOGGER.warn("Application {} replaced by Application {}", registering, replaced);
            }
        }
        return registering;
    }
- HazelcastApplicationStore (缓存数据库)
在上述更新状态使用了publisher.publishEvent事件订阅的方式,接受者接收到该事件,做应用的业务处理,在这块使用这种方式个人理解是为了代码的复用性,因为服务端定时轮询客户端也要更新客户端在服务器的状态。
pulishEvent设计到的类有:
- StatusUpdateApplicationListener->onClientApplicationRegistered
- StatusUpdater-->updateStatus
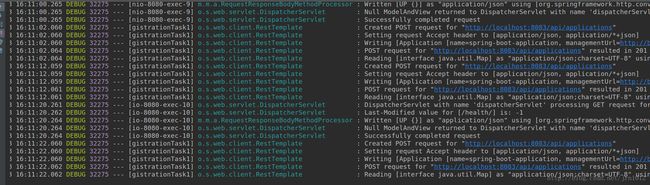
这里不详细展开,下文还会提到,通过日志,可以查看到客户端定时发送的POST请求:
服务端定时轮询
在服务器宕机的时候,服务器接收不到请求,此时服务器不知道客户端是什么状态,(当然可以说服务器在一定的时间里没有收到客户端的信息,就认为客户端挂了,这也是一种处理方式),在Spring Boot Admin中,服务端通过定时轮询客户端的/health接口来对客户端进行心态检测。
这里设计到主要的类为:
- StatusUpdateApplicationListene
@EventListener
    public void onApplicationReady(ApplicationReadyEvent event) {
        if (event.getApplicationContext() instanceof WebApplicationContext) {
            startStatusUpdate();
        }
    }
    public void startStatusUpdate() {
        if (scheduledTask != null && !scheduledTask.isDone()) {
            return;
        }

        scheduledTask = taskScheduler.scheduleAtFixedRate(new Runnable() {
            @Override
            public void run() {
                statusUpdater.updateStatusForAllApplications();
            }
        }, updatePeriod);
        LOGGER.debug("Scheduled status-updater task for every {}ms", updatePeriod);

    }
- StatusUpdater
    public void updateStatusForAllApplications() {
        long now = System.currentTimeMillis();
        for (Application application : store.findAll()) {
            if (now - statusLifetime > application.getStatusInfo().getTimestamp()) {
                updateStatus(application);
            }
        }
    }
public void updateStatus(Application application) {
        StatusInfo oldStatus = application.getStatusInfo();
        StatusInfo newStatus = queryStatus(application);
        boolean statusChanged = !newStatus.equals(oldStatus);

        Application.Builder builder = Application.copyOf(application).withStatusInfo(newStatus);

        if (statusChanged && !newStatus.isOffline() && !newStatus.isUnknown()) {
            builder.withInfo(queryInfo(application));
        }

        Application newState = builder.build();
        store.save(newState);

        if (statusChanged) {
            publisher.publishEvent(
                    new ClientApplicationStatusChangedEvent(newState, oldStatus, newStatus));
        }
    }
服务端日志:
这里就不详细展开,如有不当之处,欢迎大家指正。
本文参考了:
- Spring Boot Admin的使用
- Spring-boot-admin功能说明
- SpringBootAdmin使用
- Spring Boot Admin 的使用