Qt文档阅读笔记-QQmlApplicationEngine解析与实例(qml与C++混合编程及QQuick与widgets混合)
目录
官方解析
博主例子
官方解析
QQmlApplicationEngine提供了从一个QML文件里面加载应用程序的方式。
这类联合了QQmlEngine和QmlComponent去加载单独的QML文件。他还向QML提供了应用程序的功能,这个应用程序的功能能够让C++与QML混合编程,使用C++控制业务逻辑,用QML做界面:
官方给的用法:
  QQuickWidget *view = new QQuickWidget;
  view->setSource(QUrl::fromLocalFile("myqmlfile.qml"));
  view->show();
他这个不像QQuickView,QQmlApplicationEngine那样,他不会自动创建一个根窗口,如果你使用Qt Quick里面的视觉item,你需要把qml里面加一个Window,然后将其放进去。
如果不使用需要QGuiApplication的QML模块(比如QtQuick)可以使用QCoreApplication与QQmlApplicationEngine。
下面列出了默认QQmlEngine关联了的配置列表:
1.QML中的Qt.quit()与QCoreApplication::quit()关联在了一起;
2.自动从主QML文件附近加载翻译文件;
3.如果存在QQuickWIndow就会自动设置an incubation controller;
4.会自动设置QQmlFileSelector作为url拦截,应用于QML文件选择;
通过继承QQmlEngine可以更好的实现
博主例子
下面来补充下官方的例子(官方只给出了3行代码现在把他完善起来)
完善后包含如下内容:
qml与C++混合编程及QQuick与widgets混合
做一个qml实现的表格,C++来控制业务,程序运行截图如下:
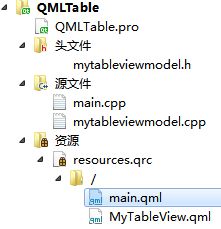
程序结构图如下:
源码如下:
mytableviewmodel.h
#ifndef MYTABLEVIEWMODEL_H
#define MYTABLEVIEWMODEL_H

#include

class MyTableViewModel: public QAbstractTableModel
{
    Q_OBJECT
public:
    MyTableViewModel();

    int rowCount(const QModelIndex &parent) const Q_DECL_OVERRIDE;
    int columnCount(const QModelIndex &parent) const Q_DECL_OVERRIDE;
    QVariant data(const QModelIndex &index, int role) const Q_DECL_OVERRIDE;
    QHash roleNames() const Q_DECL_OVERRIDE;

    Q_INVOKABLE void addItem(QString one, QString two, QString three);

private:

    QVector> m_aryData;

};

#endif // MYTABLEVIEWMODEL_H
main.cpp
#include
#include
#include
#include
#include
#include
#include "mytableviewmodel.h"

int main(int argc, char *argv[])
{
    QGuiApplication app(argc, argv);
    QQmlApplicationEngine engine;

    MyTableViewModel model;
    model.addItem(QStringLiteral("中文"), QStringLiteral("999"), QStringLiteral("888"));
    engine.rootContext()->setContextProperty("theModel", &model);
    engine.load(QUrl(QLatin1String("qrc:/main.qml")));

    return app.exec();
}
mytableviewmodel.cpp
#include "mytableviewmodel.h"

MyTableViewModel::MyTableViewModel(): QAbstractTableModel(NULL)
{

}

int MyTableViewModel::rowCount(const QModelIndex &parent) const
{
    Q_UNUSED(parent)
    return m_aryData.size();
}

int MyTableViewModel::columnCount(const QModelIndex &parent) const
{
    Q_UNUSED(parent)
    return 3;
}

QVariant MyTableViewModel::data(const QModelIndex &index, int role) const
{
    return m_aryData[index.row()][role];
}

QHash MyTableViewModel::roleNames() const
{
    QHash roles;
    roles[0] = "1";
    roles[1] = "2";
    roles[2] = "3";
    return roles;
}

void MyTableViewModel::addItem(QString one, QString two, QString three)
{
    beginInsertRows(QModelIndex(), m_aryData.size(),m_aryData.size());
    QVector list;
    list << one << two << three;
    m_aryData << list;
    endInsertRows();
}
main.qml
import QtQuick 2.8
import QtQuick.Controls 2.1

ApplicationWindow {
    //id: frmWindow
    //width: 400
    //height: 300
    visible: true


    MyTableView{
        id: myTableView
        height: parent.height
        width: parent.width

        focus: false

        tableView.itemDelegate:Rectangle {
            TextField{
                id: textField
                height: 25
                text: styleData.value
            }
        }

        tableView.rowDelegate: Rectangle {
            height: 25
        }

    }
}
MyTableView.qml
import QtQuick 2.8
import QtQuick.Controls 1.4

TableView {

    property alias tableView: tableView

    id: tableView
    TableViewColumn {title: "第一列"; role: "1"; width: 120}
    TableViewColumn {title: "第二列"; role: "2"; width: 120}
    TableViewColumn {title: "第三列"; role: "3"; width: 120}
    model: theModel
}
如果要用qml和传统widgets混合,因为QQuickView已经提供了转化为QWidget的接口,所以很简单,修改如下代码:
main.cpp
#include
#include
#include
#include
#include
#include
#include "mytableviewmodel.h"

int main(int argc, char *argv[])
{
    //与传统widgets结合
    QApplication app(argc, argv);

    QQuickView view;
    MyTableViewModel model;
    model.addItem(QStringLiteral("中文"), QStringLiteral("999"), QStringLiteral("888"));
    view.engine()->rootContext()->setContextProperty("theModel", &model);
    view.setResizeMode(QQuickView::SizeRootObjectToView);
    view.setSource(QUrl("qrc:/main.qml"));

    QWidget *widget = QWidget::createWindowContainer(&view);
    widget->show();

    return app.exec();
}
main.qml
import QtQuick 2.8
import QtQuick.Controls 2.1

Item {
    //id: frmWindow
    //width: 400
    //height: 300
    visible: true


    MyTableView{
        id: myTableView
        height: parent.height
        width: parent.width

        focus: false

        tableView.itemDelegate:Rectangle {
            TextField{
                id: textField
                height: 25
                text: styleData.value
            }
        }

        tableView.rowDelegate: Rectangle {
            height: 25
        }

    }
}

