CAS服务端搭建和结合Springboot搭建CAS客户端验证单点登录
1.背景介绍 什么是CAS
单点登录(SSO),在多系统之间用户只需要登录一次就可以访问所有互相信任的系统
SSO基础的访问流程:
1. 访问服务: SSO 客户端发送请求访问应用系统提供的服务资源。
2. 定向认证: SSO 客户端会重定向用户请求到 SSO 服务器。
3. 用户认证:用户身份认证。
4. 发放票据: SSO 服务器会产生一个随机的 Service Ticket 。
5. 验证票据: SSO 服务器验证票据 Service Ticket 的合法性,验证通过后,允许客户端访问服务。
6. 传输用户信息: SSO 服务器验证票据通过后,传输用户认证结果信息给客户端
CAS是一个应用实例,基础流程如下:
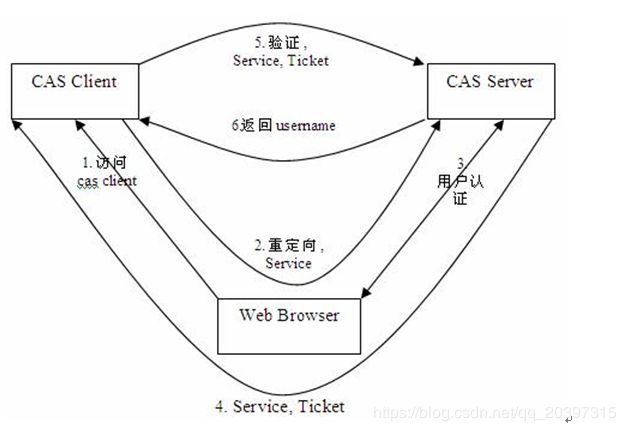
CAS分为Server和Client端,Cas Server需要独立部署,主要负责对用户的认证;CAS client 负责处理对客户端受保护资源的访问请求,需要登录的时候重定向到server 端
2.搭建CAS5.3
采用JAVA1.8,则建议采用基于CAS5.3版本的,使用Maven工程构建,CAS5.X之后使用的是基于SpringBoot的,模版引擎使用Thymeleaf.
2.1下载地址
CAS Server5.3版本,可以下载ZIP包,并解压至自己的目录下
2.2打包成服务端的war包
在解压目录下进入cmd,执行 mvn package (前提保证自己的环境有maven),即可在target下生成cas.war包
2.3WAR包在tomcat下启动,然后修改一些可选的参数
在2.2复制步骤完成后,即可启动tomcat,启动后在即可在tomcat的webapps目录下看到解压后的cas目录
修改参数:
1.由于CAS默认使用https,为了方便springboot搭建的客户端采用http访问,需要改为兼容使用http协议
在webapps\cas\WEB-INF\classes目录的application,properties添加如下的内容

2.在webapps\cas\WEB-INF\classes\services目录下的HTTPSandIMAPS-10000001.json ,修改以兼容https

3.也可以修改端口,默认是https协议8443端口,
可在webapps\cas\WEB-INF\classes目录的application,properties添加如下的内容

4.修改默认的登录账号和密码
在webapps\cas\WEB-INF\classes目录的application,properties的最后面修改密码为如下

5.保存修改,直接重启tomcat,修改就会生效
3.采用Springboot搭建客户端
1.在pom.xml中加入以下关键的依赖
     net.unicon.cas
     cas-client-autoconfig-support
     1.7.0-GA
2.在application.yml中添加以下配置,应该还是比较好理解
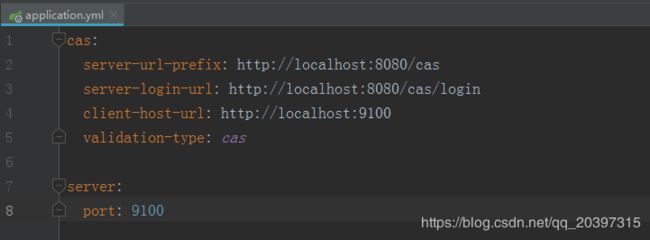
ValidationType源码中的定义,有三种类型,CAS\CAS3\SAML,协议方面没有太多研究
//
// Source code recreated from a .class file by IntelliJ IDEA
// (powered by Fernflower decompiler)
//

package net.unicon.cas.client.configuration;

import java.lang.annotation.Documented;
import java.lang.annotation.ElementType;
import java.lang.annotation.Inherited;
import java.lang.annotation.Retention;
import java.lang.annotation.RetentionPolicy;
import java.lang.annotation.Target;
import org.springframework.context.annotation.Import;

@Target({ElementType.TYPE})
@Retention(RetentionPolicy.RUNTIME)
@Documented
@Inherited
@Import({CasClientConfiguration.class})
public @interface EnableCasClient {
    public static enum ValidationType {
        CAS,
        CAS3,
        SAML;

        private ValidationType() {
        }
    }
}
3.添加@EnableCasClient
@EnableCasClient
@SpringBootApplication
public class CasClientApplication {

    public static void main(String[] args) {
        SpringApplication.run(CasClientApplication.class, args);
    }

}
4.controller层写测试controller
@RestController
public class TestController {

    @GetMapping("/castest")
    public String casTest(){
        return "cas success";
    }

}
5.启动springboot项目,访问 localhost:9100/castest
则会跳转至登录页面
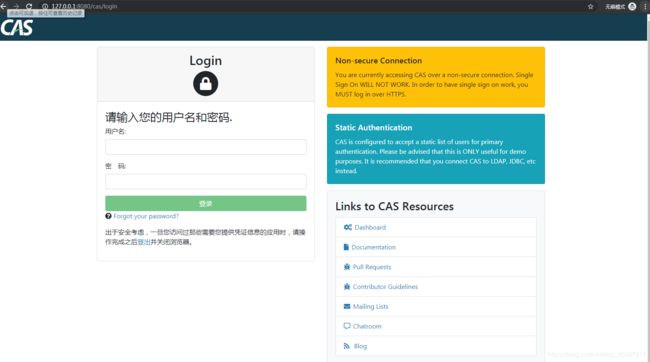
输入用户名和密码 admin/admin即可访问当前访问的资源.
4.访问dashboard
可能你会发现访问登录页面下的dashboard会提示没有权限之类的错误,解决办法:需要加新的配置信息.
1.在application.properties中修改如下信息

2.在application.properties中新增如下信息
| cas.adminPagesSecurity.ip=.+ cas.monitor.endpoints.dashboard.enabled=true cas.monitor.endpoints.discovery.enabled=true cas.monitor.endpoints.auditEvents.enabled=true cas.monitor.endpoints.authenticationEvents.enabled=true cas.monitor.endpoints.configurationState.enabled=true cas.monitor.endpoints.healthCheck.enabled=true cas.monitor.endpoints.loggingConfig.enabled=true cas.monitor.endpoints.metrics.enabled=true cas.monitor.endpoints.attributeResolution.enabled=true cas.monitor.endpoints.singleSignOnReport.enabled=true cas.monitor.endpoints.statistics.enabled=true cas.monitor.endpoints.trustedDevices.enabled=true cas.monitor.endpoints.status.enabled=true cas.monitor.endpoints.singleSignOnStatus.enabled=true cas.monitor.endpoints.springWebflowReport.enabled=true cas.monitor.endpoints.registeredServicesReport.enabled=true cas.monitor.endpoints.configurationMetadata.enabled=true |
3.另外在user-detail.properties里面新增管理员的账号信息,只有这里的账号可以访问status

4.直接重启tomcat即可访问dashboard
