深入浅出机器学习MNIST实战(一)
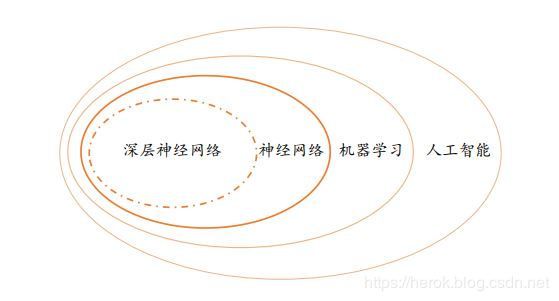
第一次接触机器学习,觉得这个方向挺有趣的,人工智能是未来IT发展的趋势。人工智能,机器学习,神经网络,深度学习的相互之间的关系如图所示。
同样机器学习分为有监督学习,无监督学习,强化学习三类,本次实验从最简单的有监督学习入手。神经网络目前有两种主要方向分类与回归,比如区分猫和狗属于分类问题,识别图片中人属于线性回归问题。
本次实验环境PyCharm+Python3.7+TensorFlow2.0,具体环境搭建网上教程很多,这里不在讲解,python基础语法,TensorFlow2.0基础语法也不在讲解。
mnist是常用的手写数字0-9的训练样本,可以支持在线下载,执行load_data时,首先检测本地C:\Users\用户名\.keras\datasets是否已经有mnist,如果有直接加载 ,没有就在线下载
数据加载
mnist = tf.keras.datasets.mnist #导入mnist
(x_train,y_train),(x_test,y_test) = mnist.load_data() #分割
x_train训练数据,y_train训练标签,x_test测试数据,y_test测试标签。这里也可以自行下载mnist压缩包,手动制作mnist数据集
归一化
x_train = tf.keras.utils.normalize(x_train, axis=1)#归一化处理
x_test = tf.keras.utils.normalize(x_test, axis=1)
神经网络模型采用全链接层
model = tf.keras.models.Sequential()#创建顺序模型
model.add(tf.keras.layers.Flatten()) #输入 从 28 x 28 变为 1 x 784
model.add(tf.keras.layers.Dense(256, activation=tf.nn.relu)) #隐藏层
model.add(tf.keras.layers.Dense(256, activation=tf.nn.relu))
model.add(tf.keras.layers.Dense(10,   activation='softmax')) #输出层 tf.nn.softmax
编译模型
model.compile(optimizer='adam',  #优化器
              loss='sparse_categorical_crossentropy',  #损失函数
              metrics=['accuracy'])
拟合模型
model.fit(x_train, y_train, epochs=3) #拟合这个模型,epochs=次数评估模型准确度
val_loss, val_acc = model.evaluate(x_test, y_test) #测试集,损失值,准确度返回保存模型
model.save('model_mnist.h5')预测字体
predictions = model.predict(img)预测图片需要先进行预处理
img = cv2.imread("./bmp_mnist/2.jpg")
img = cv2.cvtColor(img, cv2.COLOR_BGR2GRAY)
rows,cols= img.shape[0:2]
for i in range(rows): #反转一下黑白
for j in range(rows):
img[i][j] = 255-img[i][j]
#print(i,j)img = np.array(img,dtype=float64) #将剔除尾巴上的shape dtype
img = np.reshape(img,(-1,28)) #重新定义数组格式
img = tf.keras.utils.normalize(img, axis=1)#归一化处理img = np.reshape(img,(1,28,28)) #将数据转换成(1,28,28)格式完整代码如下:
import sys
import cv2
import numpy as np
import matplotlib
import matplotlib.pyplot as plt
import pygame
from pygame.locals import *
import pytesseract
from PIL import Image
import glob
import os
import random
import sklearn
from sklearn import datasets
import tensorflow.keras as keras
import tensorflow as tf
import numpy
from numpy import float32,float64
import matplotlib.pyplot as plt
import decodeidx
from decodeidx import load_train_images,load_train_labels,load_test_images,load_test_labels
os.environ['TF_CPP_MIN_LOG_LEVEL'] = '2'
#这里可以修改路径
#mnist = tf.keras.datasets.mnist #导入mnist
#(x_train,y_train),(x_test,y_test) = mnist.load_data() #分割
def train_model_save():
x_train = load_train_images()
y_train = load_train_labels()
x_test = load_test_images()
y_test = load_test_labels()
#y_train = tf.one_hot(y_train, depth=10)
#y_test = tf.one_hot(y_test, depth=10)
x_train = tf.keras.utils.normalize(x_train, axis=1)#归一化处理
x_test = tf.keras.utils.normalize(x_test, axis=1)
#plt.imshow(x_train[0],cmap=plt.cm.binary) # 显示黑白图像
#plt.show()
model = tf.keras.models.Sequential()#创建顺序模型
model.add(tf.keras.layers.Flatten()) #输入 从 28 x 28 变为 1 x 784
model.add(tf.keras.layers.Dense(256, activation=tf.nn.relu)) #隐藏层
model.add(tf.keras.layers.Dense(256, activation=tf.nn.relu))
model.add(tf.keras.layers.Dense(10, activation='softmax')) #输出层 tf.nn.softmax
model.compile(optimizer='adam', #优化器
loss='sparse_categorical_crossentropy', #损失函数
metrics=['accuracy'])
#print(x_train.shape) #(60000, 28, 28)
model.fit(x_train, y_train, epochs=3) #拟合这个模型,epochs=次数
#print(x_test[0].shape,x_train[0].dtype) #(28, 28) float64
#print(x_test.shape) #(10000, 28, 28)
val_loss, val_acc = model.evaluate(x_test, y_test) #测试集,损失值,准确度返回
print(val_loss)
print(val_acc)
model.save('model_mnist.h5')
return model
model = train_model_save()
model = tf.keras.models.load_model('model_mnist.h5')
img = cv2.imread("./bmp_mnist/2.jpg")
img = cv2.cvtColor(img, cv2.COLOR_BGR2GRAY)
rows,cols= img.shape[0:2]

for i  in range(rows):  #反转一下黑白
    for j in range(rows):
        img[i][j] = 255-img[i][j]
        #print(i,j)
img = np.array(img,dtype=float64)  #将剔除尾巴上的shape dtype
img = np.reshape(img,(-1,28))   #重新定义数组格式
img = tf.keras.utils.normalize(img, axis=1)#归一化处理
#img = np.reshape(img,(-1,784)) #将28*28变成1*784
img = np.reshape(img,(1,28,28))
#print(model.summary())
print(img.shape)
predictions = model.predict(img)
print(predictions)
print(np.argmax(predictions[0])) #返回最大的索引,predictions[0]代表10个输出
识别数字7实验结果如下,输入图片大小为28*28:
本次实验采用的tensorflow2.0封装好的函数,训练model次数不多,但是精度不是很高,容易出错,CNN能够大大提高精度,在后篇文章中讲解,下篇文章自行实现fit和估值函数


