卡尔曼滤波器的两种python实现方法:(1)opencv自带的cv2.KalmanFilter (2)pykalman算法库
预备知识:
卡尔曼滤波的理论知识:

具体的理论知识可参考以下博文,非常感谢相关博主的贡献:
(1)https://blog.csdn.net/u013453604/article/details/50301477
(2)https://blog.csdn.net/NNNNNNNNNNNNY/article/details/53964823
(3)https://blog.csdn.net/coming_is_winter/article/details/79048700
(4)https://blog.csdn.net/dinnerhowe/article/details/79483194
以一个鼠标追踪的任务分析两种卡尔曼滤波的实现方式:
(一)opencv自带的cv2.KalmanFilter
具体见博文:https://blog.csdn.net/ZYX19950825/article/details/63683161
该卡尔曼滤波器算法分为两个阶段:
预测predict():卡尔曼滤波器使用由当前点计算的协方差来估计目标的新位置。
更新correct():卡尔曼滤波器记录目标的位置,并为下一次循环计算修正协方差。
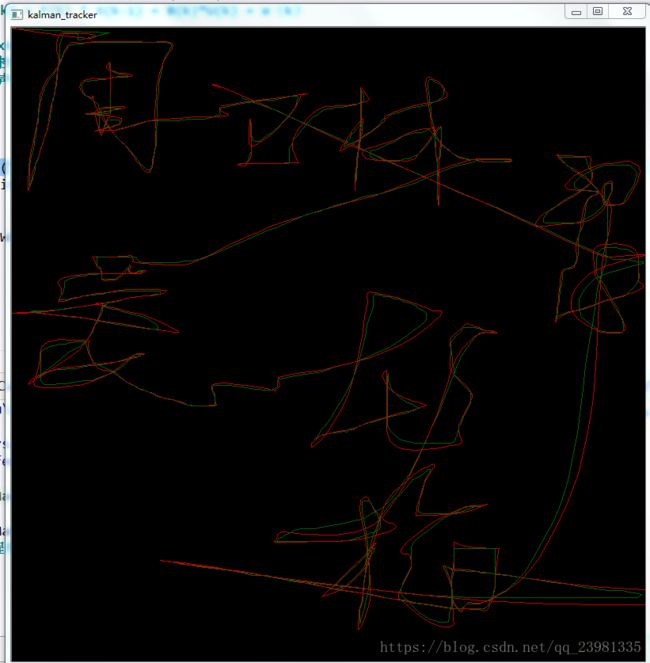
将绘制一个空帧和两条线:一条线对应于鼠标的实际运动,另一条对应于卡尔曼滤波器预测的轨迹。
import cv2
import numpy as np
#创建一个大小800*800的空帧
frame = np.zeros((800,800,3),np.uint8)
#初始化测量坐标和鼠标运动预测的数组
last_measurement = current_measurement = np.array((2,1),np.float32)
last_predicition = current_prediction = np.zeros((2,1),np.float32)
'''
mousemove()函数在这里的作用就是传递X,Y的坐标值,便于对轨迹进行卡尔曼滤波
'''
def mousemove(event,x,y,s,p):
#定义全局变量
global frame,current_measurement,measurements,last_measurement,current_prediction,last_prediction
#初始化
last_measurement = current_measurement
last_prediction = current_prediction
#传递当前测量坐标值
current_measurement = np.array([[np.float32(x)],[np.float32(y)]])
#用来修正卡尔曼滤波的预测结果
kalman.correct(current_measurement)
# 调用kalman这个类的predict方法得到状态的预测值矩阵,用来估算目标位置
current_prediction = kalman.predict()
#上一次测量值
lmx,lmy = last_measurement[0],last_measurement[1]
#当前测量值
cmx,cmy = current_measurement[0],current_measurement[1]
#上一次预测值
lpx,lpy = last_prediction[0],last_prediction[1]
#当前预测值
cpx,cpy = current_prediction[0],current_prediction[1]
#绘制测量值轨迹(绿色)
cv2.line(frame,(lmx,lmy),(cmx,cmy),(0,100,0))
#绘制预测值轨迹(红色)
cv2.line(frame,(lpx,lpy),(cpx,cpy),(0,0,200))
cv2.namedWindow("kalman_tracker")
#调用函数处理鼠标事件,具体事件必须由回调函数的第一个参数来处理,该参数确定触发事件的类型(点击和移动)
'''
void setMousecallback(const string& winname, MouseCallback onMouse, void* userdata=0)
winname:窗口的名字
onMouse:鼠标响应函数,回调函数。指定窗口里每次鼠标时间发生的时候,被调用的函数指针。
这个函数的原型应该为void on_Mouse(int event, int x, int y, int flags, void* param);
userdate:传给回调函数的参数
void on_Mouse(int event, int x, int y, int flags, void* param);
event是 CV_EVENT_*变量之一
x和y是鼠标指针在图像坐标系的坐标(不是窗口坐标系)
flags是CV_EVENT_FLAG的组合, param是用户定义的传递到setMouseCallback函数调用的参数。
常用的event:
CV_EVENT_MOUSEMOVE
CV_EVENT_LBUTTONDOWN
CV_EVENT_RBUTTONDOWN
CV_EVENT_LBUTTONUP
CV_EVENT_RBUTTONUP
和标志位flags有关的:
CV_EVENT_FLAG_LBUTTON
'''
cv2.setMouseCallback("kalman_tracker",mousemove)
'''
Kalman这个类需要初始化下面变量:
转移矩阵,测量矩阵,控制向量(没有的话,就是0),
过程噪声协方差矩阵,测量噪声协方差矩阵,
后验错误协方差矩阵,前一状态校正后的值,当前观察值。
在此cv2.KalmanFilter(4,2)表示转移矩阵维度为4,测量矩阵维度为2
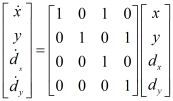
卡尔曼滤波模型假设k时刻的真实状态是从(k − 1)时刻的状态演化而来,符合下式:
X(k) = F(k) * X(k-1) + B(k)*U(k) + W(k)
其中
F(k) 是作用在xk−1上的状态变换模型(/矩阵/矢量)。
B(k) 是作用在控制器向量uk上的输入-控制模型。
W(k) 是过程噪声,并假定其符合均值为零,协方差矩阵为Qk的多元正态分布。
'''
kalman = cv2.KalmanFilter(4,2)
#设置测量矩阵
kalman.measurementMatrix = np.array([[1,0,0,0],[0,1,0,0]],np.float32)
#设置转移矩阵
kalman.transitionMatrix = np.array([[1,0,1,0],[0,1,0,1],[0,0,1,0],[0,0,0,1]],np.float32)
#设置过程噪声协方差矩阵
kalman.processNoiseCov = np.array([[1,0,0,0],[0,1,0,0],[0,0,1,0],[0,0,0,1]],np.float32)*0.03
while True:
cv2.imshow("kalman_tracker",frame)
if (cv2.waitKey(30) & 0xff) == 27:
break
cv2.destroyAllWindows()
运行结果:
卡尔曼相关解读:
1.opencv中kalman点跟踪例子
2.学习OpenCV——Kalman滤波
在后面这篇博客中介绍了矩阵值设置原因:
stateNum=4;//状态数,包括(x,y,dx,dy)坐标及速度(每次移动的距离)
measureNum=2;//观测量,能看到的是坐标值,当然也可以自己计算速度
(二)pykalman算法库


具体pykalman的安装及文档说明见官网:http://pykalman.github.io/#optimizing-parameters
from pykalman import KalmanFilter主要通过KalmanFilter.filter(), KalmanFilter.filter_update()两个函数实现卡尔曼滤波,他们的区别是:
(1)KalmanFilter.filter()
Apply the Kalman Filter to estimate the hidden state at time ![]() for
for ![]() given observations up to and including time t. Observations are assumed to correspond to times
given observations up to and including time t. Observations are assumed to correspond to times ![]() .
.
The output of this method corresponding to time ![]() can be used in KalmanFilter.filter_update() for online updating.
can be used in KalmanFilter.filter_update() for online updating.
(2)KalmanFilter.filter_update()
Perform a one-step update to estimate the state at time ![]() give an observation at time
give an observation at time ![]() and the previous estimate for time
and the previous estimate for time ![]() given observations from times
given observations from times ![]() . This method is useful if one wants to track an object with streaming observations.
. This method is useful if one wants to track an object with streaming observations.
简而言之,就是说KalmanFilter.filter()主要用于前面观测状态皆给出的情况,KalmanFilter.filter_update()主要用于已知前一时刻的状态估计量(包括t时刻的预测状态![]() 及协方差的预测值
及协方差的预测值![]() )的时候,要根据t+1时刻的观测值估计t+1时刻的状态估计量,所以用于需要实时估计的情况,如鼠标跟踪。
)的时候,要根据t+1时刻的观测值估计t+1时刻的状态估计量,所以用于需要实时估计的情况,如鼠标跟踪。
import cv2
import numpy as np
from pykalman import KalmanFilter

frame = np.zeros((800,800,3),np.uint8)
kf = KalmanFilter(transition_matrices=np.array([[1,0,1,0], [0,1,0,1],[0,0,1,0], [0,0,0,1]]),
                  observation_matrices =np.array([[1,0,0,0],[0,1,0,0]]),
                  transition_covariance= 0.03*np.eye(4))
#transition_matrices:公式中的A
# observation_matrices:公式中的H
#transition_covariance:公式中的Q

t=0


#状态值为x_t=[x,y,dx,dy],其中(x,y)为鼠标当前位置,(dx,dy)指速度分量
#直接获得的观测为位置(x,y)

def mousemove(event,x,y,s,p):
    global t, filtered_state_means0,filtered_state_covariances0,lmx,lmy,lpx,lpy
    current_measurement = np.array([np.float32(x),np.float32(y)])
    cmx, cmy = current_measurement[0], current_measurement[1]
    if t == 0:
        filtered_state_means0=np.array([0.0,0.0,0.0,0.0])
        filtered_state_covariances0=np.eye(4)
        lmx, lmy = 0.0, 0.0
        lpx, lpy = 0.0, 0.0

    filtered_state_means, filtered_state_covariances= (kf.filter_update( filtered_state_means0,filtered_state_covariances0,current_measurement))
    cpx,cpy= filtered_state_means[0], filtered_state_means[1]
    #绘制测量值轨迹(绿色)
    cv2.line(frame,(int(lmx),int(lmy)),(int(cmx),int(cmy)),(0,100,0))
    #绘制预测值轨迹(红色)
    cv2.line(frame,(int(lpx),int(lpy)),(int(cpx),int(cpy)),(0,0,200))
    filtered_state_means0, filtered_state_covariances0=filtered_state_means, filtered_state_covariances
    t=t+1
    lpx, lpy = filtered_state_means[0], filtered_state_means[1]
    lmx, lmy =current_measurement[0], current_measurement[1]
cv2.namedWindow("kalman_tracker")
cv2.setMouseCallback("kalman_tracker",mousemove)
while True:
    cv2.imshow("kalman_tracker",frame)
    if (cv2.waitKey(30) & 0xff) == 27:
        break

cv2.destroyAllWindows()
运行结果:
