使用OpenGL ES和GLKit绘图
GLKit框架提供view和view controller类,他们移除了setup和maintenance代码,这些代码在其他情况下绘制和启动OpenGL ES content是需要的。GLKView class管理OpenGL ES的基础施设,为你的绘制代码提供一个地方,GLKViewController class为一个GLKit view中的平滑启动OpenGL ES content提供一个渲染循环。这些classes延伸了绘制view content和管理view presentation的标准的UIKit设计模式。因此,你可以将精力集中于OpenGL ES rendering代码,让你的app快速搭建和运行起来。GLKit 框架也提供其他简化OpenGL ES 2.0 and 3.0 development的特性。
A GLKit View Draws OpenGL ES Content on Demand
The GLKView class提供一个OpenGL ES–based的等价于标准UIView drawing的循环。一个UIView实例自动配置它的graphics context,因此你的 drawRect:实现只需要执行Quartz 2D drawing命令,同理,一个GLKView实例自动配置自身,因此你的drawing method只需要执行OpenGL ES的drawing命令。 The GLKView class提供的这些功能是通过维持一个framebuffer对象,这个framebuffer保存着OpenGL ES drawing commands的结果,并在你的drawing method返回时立即自动present到Core Animation上。
和一个标准的UIKit view一样,一个GLKit view在需要的时候才渲染它的content。当你的view第一次显示时,它调用你的drawing method,Core Animation缓存渲染的输出并随时在你的view显示时显示。当你想改变你的view的contents时,调用它的setNeedsDisplay方法并再次调用你的drawing method,缓存结果图像,并展示在screen上。当render的数据改变频率很低或者是只响应用户的动作时,这种方式非常有用。By rendering new view contents only when you need to, you conserve battery power on the device and leave more time for the device to perform other actions.
Creating and Configuring a GLKit View
You can create and configure a GLKView object either programmatically or using Interface Builder. Before you can use it for drawing, you must associate it with an EAGLContext object (see Configuring OpenGL ES Contexts).
1.When creating a view programmatically, first create a context and then pass it to the view’s initWithFrame:context: method.
2.After loading a view from a storyboard, create a context and set it as the value of the view’s context property.
一个A GLKit view自动创建和配置它自己的OpenGL ES framebuffer对象和renderbuffers。你通过view的drawable来控制这些对象的属性,如Listing 3-1。如果你改变了 a GLKit view的size, scale factor, or drawable properties,它自动删除并重新创建合适的framebuffer objects and renderbuffers用于下一次绘制contexts。
Listing 3-1 Configuring a GLKit view
- (void)viewDidLoad
{
    [super viewDidLoad];

    // Create an OpenGL ES context and assign it to the view loaded from storyboard
    GLKView *view = (GLKView *)self.view;
    view.context = [[EAGLContext alloc] initWithAPI:kEAGLRenderingAPIOpenGLES2];

    // Configure renderbuffers created by the view
    view.drawableColorFormat = GLKViewDrawableColorFormatRGBA8888;
    view.drawableDepthFormat = GLKViewDrawableDepthFormat24;
    view.drawableStencilFormat = GLKViewDrawableStencilFormat8;

    // Enable multisampling
    view.drawableMultisample = GLKViewDrawableMultisample4X;
}
You can enable multisampling for a GLKView instance using its drawableMultisample property. Multisampling is a form of antialiasing that smooths jagged edges, improving image quality in most 3D apps at the cost of using more memory and fragment processing time—if you enable multisampling, always test your app’s performance to ensure that it remains acceptable.
Drawing With a GLKit View
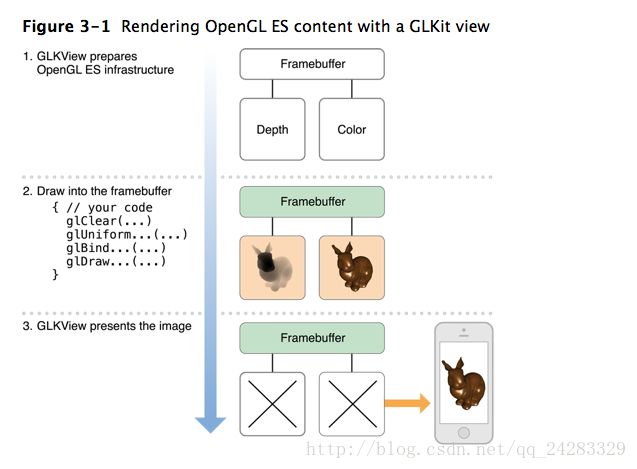
Figure 3-1 概括了绘制OpenGL ES content的三个步骤:准备OpenGL ES基础设施,执行绘制命令,表现和渲染context到Core Animation。 The GLKView class实现了第一步和第三步。对于第二步,由你来实现一个绘制方法,如Listing 3-2.
Listing 3-2 Example drawing method for a GLKit view
- (void)drawRect:(CGRect)rect
{
    // Clear the framebuffer
    glClearColor(0.0f, 0.0f, 0.1f, 1.0f);
    glClear(GL_COLOR_BUFFER_BIT | GL_DEPTH_BUFFER_BIT);

    // Draw using previously configured texture, shader, uniforms, and vertex array
    glBindTexture(GL_TEXTURE_2D, _planetTexture);
    glUseProgram(_diffuseShading);
    glUniformMatrix4fv(_uniformModelViewProjectionMatrix, 1, 0, _modelViewProjectionMatrix.m);
    glBindVertexArrayOES(_planetMesh);
    glDrawElements(GL_TRIANGLE_STRIP, 256, GL_UNSIGNED_SHORT);
}
Note: The glClear function hints to OpenGL ES that any existing framebuffer contents can be discarded, avoiding costly memory operations to load the previous contents into memory. To ensure optimal performance, you should always call this function before drawing.
The GLKView class能够提供一个简单的接口来进行 OpenGL ES drawing是因为她管理OpenGL ES rendering的过程:
1.在调用你的drawing method之前,the view:
- 将当前context设置为他的EAGLContext;
- Creates a framebuffer object and renderbuffers based on its current size, scale factor, and drawable properties (if needed);
- Binds the framebuffer object as the current destination for drawing commands;
- Sets the OpenGL ES viewport to match the framebuffer size
2.After your drawing method returns, the view:
Resolves multisampling buffers (if multisampling is enabled)
Discards renderbuffers whose contents are no longer needed
Presents renderbuffer contents to Core Animation for caching and display
Rendering Using a Delegate Object
许多OpenGL ES apps在一个定制的class实现渲染代码。这种方式的一个好处是这可以让你通过定义多个不同 的渲染class来支持多个渲染算法。共享通用功能代码的渲染算法可以继承一个超类。例如,你可能使用不同的渲染类来支持both OpenGL ES 2.0 and 3.0,或者你可能使用它们来定制在更强大的硬件上渲染更好质量的图像。
GLKit同样使用这种方式–你可以让你的渲染对象作为a standard GLKView instance的代理。不用于继承GLKView并实现drawRect: method,你的渲染类adopts the GLKViewDelegate protocol并实现glkView:drawInRect: method。Listing 3-3示范了如何在app的启动时间内根据特定硬件特性来选择renderer class。
Listing 3-3 Choosing a renderer class based on hardware features
- (BOOL)application:(UIApplication *)application didFinishLaunchingWithOptions:(NSDictionary *)launchOptions
{
    // Create a context so we can test for features
    EAGLContext *context = [[EAGLContext alloc] initWithAPI:kEAGLRenderingAPIOpenGLES2];
    [EAGLContext setCurrentContext:context];

    // Choose a rendering class based on device features
    GLint maxTextureSize;
    glGetIntegerv(GL_MAX_TEXTURE_SIZE, &maxTextureSize);
    if (maxTextureSize > 2048)
        self.renderer = [[MyBigTextureRenderer alloc] initWithContext:context];
    else
        self.renderer = [[MyRenderer alloc] initWithContext:context];

    // Make the renderer the delegate for the view loaded from the main storyboard
    GLKView *view = (GLKView *)self.window.rootViewController.view;
    view.delegate = self.renderer;

    // Give the OpenGL ES context to the view so it can draw
    view.context = context;

    return YES;
}
A GLKit View Controller Animates OpenGL ES Content
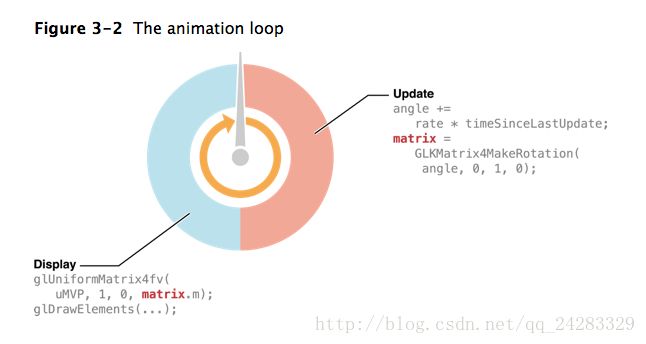
默认情况下,一个GLKView对象在需要的时候渲染它的contens。也就是说,用OpenGL ES 绘制的一个关键的优势是它能够使用硬件处理器处理复杂场景(如游戏或模拟器这种很少展现静态图像)的连续动画。在这些场景中,GLKit框架提供了一个view controller class,它为GLKView对象维持一个动画循环。这个循环遵循一般游戏和模拟器的设计模式,它有两个阶段:更新和显示(update and display)。

Understanding the Animation Loop
在update阶段,view controller调用它自己的update method(或者他的delegate’s glkViewControllerUpdate: method)。在这个方法中,你应该准备好下一帧的渲染。例如,一个游戏在该方法中根据输入事件来决定玩家和敌人角色的位置,一个模拟器在改方法中使用它的视觉科技系统。如果你需要决定下一帧状态的时间信息,你可以使用view controller’s timing properties such as the timeSinceLastUpdate property。在Figure 3-2中,the update phase increments an angle variable and uses it to calculate a transformation matrix.
对于显示阶段,the view controller调用它的view的display方法,它调用你的drawing method。在你的drawing method中,你向GPU提交OpenGL ES drawing 命令来渲染你的content。为了优化性能,你的app应该在渲染新的frame之前修改你的OpenGL ES objects,并在其后提交drawing commands。在Figure 3-2中,在显示阶段设置了一个在update阶段计算的矩阵到一个uniform variable中,并提交一个drawing 命令来渲染新的content.
这个动画循环在这两个阶段交替,它是基于view controller’s framesPerSecond 这个属性来决定速率的。你可以通过preferredFramesPerSecond这个属性来设置帧率,为了优化当前显示硬件的性能,the view controller自动选择一个优化的帧率来接近你的选择的值。
Important: For best results, choose a frame rate your app can consistently achieve. A smooth, consistent frame rate produces a more pleasant user experience than a frame rate that varies erratically.
Using a GLKit View Controller
Listing 3-4 demonstrates a typical strategy for rendering animated OpenGL ES content using a GLKViewController subclass and GLKView instance.
Listing 3-4 Using a GLKit view and view controller to draw and animate OpenGL ES content
@implementation PlanetViewController // subclass of GLKViewController

- (void)viewDidLoad
{
    [super viewDidLoad];

    // Create an OpenGL ES context and assign it to the view loaded from storyboard
    GLKView *view = (GLKView *)self.view;
    view.context = [[EAGLContext alloc] initWithAPI:kEAGLRenderingAPIOpenGLES2];

    // Set animation frame rate
    self.preferredFramesPerSecond = 60;

    // Not shown: load shaders, textures and vertex arrays, set up projection matrix
    [self setupGL];
}

- (void)update
{
    _rotation += self.timeSinceLastUpdate * M_PI_2; // one quarter rotation per second

    // Set up transform matrices for the rotating planet
    GLKMatrix4 modelViewMatrix = GLKMatrix4MakeRotation(_rotation, 0.0f, 1.0f, 0.0f);
    _normalMatrix = GLKMatrix3InvertAndTranspose(GLKMatrix4GetMatrix3(modelViewMatrix), NULL);
    _modelViewProjectionMatrix = GLKMatrix4Multiply(_projectionMatrix, modelViewMatrix);
}

- (void)glkView:(GLKView *)view drawInRect:(CGRect)rect
{
    // Clear the framebuffer
    glClearColor(0.0f, 0.0f, 0.1f, 1.0f);
    glClear(GL_COLOR_BUFFER_BIT | GL_DEPTH_BUFFER_BIT);

    // Set shader uniforms to values calculated in -update
    glUseProgram(_diffuseShading);
    glUniformMatrix4fv(_uniformModelViewProjectionMatrix, 1, 0, _modelViewProjectionMatrix.m);
    glUniformMatrix3fv(_uniformNormalMatrix, 1, 0, _normalMatrix.m);

    // Draw using previously configured texture and vertex array
    glBindTexture(GL_TEXTURE_2D, _planetTexture);
    glBindVertexArrayOES(_planetMesh);
    glDrawElements(GL_TRIANGLE_STRIP, 256, GL_UNSIGNED_SHORT, 0);
}

@end