OpenCV图像处理教程C++(十三)图像上采样与降采样以及基本阈值操作
图像金字塔:最底下图像尺寸最大,最上面最小。
上采样:当前图像分辨率从图像金字塔的低分辨率到高分辨率采样,得到的是一个更高分辨率的图像。
降采样:当前图像分辨率从图像金字塔的高分辨率到低分辨率采样,得到的是一个更低分辨率的图像。
高斯金字塔:
从低向上,逐层降采样得到
降采样之后图像大小是原图像MXN的M/2XN/2,就是对原图像删除偶数行与列,
即得到降采样之后上一层的图片
高斯金字塔的生成过程分为两步:
- 对当前层进行高斯模糊
- 删除当前层的偶数行列
即得到上一层的图像,这样上一层和下一层相比,都只有它的1/4大小
高斯不同:(DOG)
定义:就是把同一张图像在不同的参数下做高斯模糊之后的结果相减,得到的输出图像称为高斯不同。
高斯不同是图像的内在特征,在灰度图像增强,角点检测中经常用到。
拉普拉斯金字塔:
对图像的向上取样
将图像在每个方向扩大为原来的两倍,新增的行和列以0填充
使用先前同样的内核(乘以4)与放大后的图像卷积,获得 “新增像素”的近似值
得到的图像即为放大后的图像,但是与原来的图像相比会发觉比较模糊,因为在缩放的过程中已经丢失了一些信息,如果想在缩小和放大整个过程中减少信息的丢失,这些数据形成了拉普拉斯金字塔。
pyrUp()函数剖析:
void pyrUp(InputArray src,//输入图像,即源图像,填Mat类的对象即可
           OutputArraydst,//输出图像,和源图片有一样的尺寸和类型。
           const Size& dstsize=Size(),// 输出图像的大小;有默认值Size(),即默认情况下,由Size(src.cols*2,src.rows*2)来进行计算
           int borderType=BORDER_DEFAULT )//边界模式,一般我们不用去管它
pyrDown()函数剖析:
void pyrDown(InputArray src,
             OutputArray dst,
             const Size& dstsize=Size(),
             int borderType=BORDER_DEFAULT)
代码:
#include
#include
using namespace cv;
using namespace std;
int main() {
Mat src, dst_up, dst_down;
src = imread("C:\\Users\\Administrator\\Desktop\\pic\\5.jpg");
imshow("input", src);
pyrUp(src, dst_up, Size(src.cols * 2, src.rows * 2));
imshow("pyrUp", dst_up);
pyrDown(src, dst_down, Size(src.cols / 2, src.rows / 2));
imshow("pyrDown", dst_down);
//高斯不同:(DOG)
Mat gray_src, g1, g2, dog;
cvtColor(src, gray_src, CV_RGB2GRAY);
GaussianBlur(gray_src, g1, Size(3, 3),0,0);
GaussianBlur(g1, g2, Size(3, 3), 0, 0);
subtract(g1, g2, dog);
imshow("DOG", dog);
waitKey(0);
}resize( )函数剖析:
resize( )为OpenCV中专职调整图像大小的函数。
void resize(InputArray src,//输入图像,即源图像,填Mat类的对象即可。
            OutputArray dst,//输出图像,当其非零时,dsize(第三个参数)的尺寸,或者由src.size()计算出来
            Size dsize, //输出图像的大小;如果它等于零,由公式进行计算
                        //dsize=Size(round(fx*src.cols),round(fy*src.rows))
            double fx=0,//沿水平轴的缩放系数,有默认值0,且当其等于0时,由下式进行计算:
                        //dsize.width/src.cols;
            double fy=0,//沿垂直轴的缩放系数,有默认值0,且当其等于0时,由下式进行计算:
                       //dszie.height/src.rows;
            int interpolation=INTER_LINEAR )//用于指定插值方式,默认为INTER_LINEAR(线性插值)
             //INTER_NEAREST - 最近邻插值
            //INTER_LINEAR - 线性插值(默认值)
            //INTER_AREA - 区域插值(利用像素区域关系的重采样插值)
           //INTER_CUBIC –三次样条插值(超过4×4像素邻域内的双三次插值)
          //INTER_LANCZOS4 -Lanczos插值(超过8×8像素邻域的Lanczos插值)
//若要缩小图像,一般情况下最好用CV_INTER_AREA来插值,

//而若要放大图像,一般情况下最好用CV_INTER_CUBIC(效率不高,慢,不推荐使用)或CV_INTER_LINEAR(效率较高,速度较快,推荐使用)。
代码:
#include
#include
using namespace cv;
using namespace std;
int main() {
Mat src, dst1,dst2;
src = imread("C:\\Users\\Administrator\\Desktop\\pic\\5.jpg");
imshow("input", src);
resize(src, dst1, Size(src.cols / 2, src.rows / 2));//若要缩小图像,一般情况下最好用CV_INTER_AREA来插值
imshow("outputdown", dst1);
resize(src, dst2, Size(src.cols * 2, src.rows * 2), (0, 0), (0, 0),4);//若要放大图像,一般情况下最好用CV_INTER_CUBIC(效率不高,慢,不推荐使用)或CV_INTER_LINEAR(效率较高,速度较快,推荐使用)
imshow("outputup", dst2);
waitKey(0);
}图像阈值(threshold):图像分割的标尺
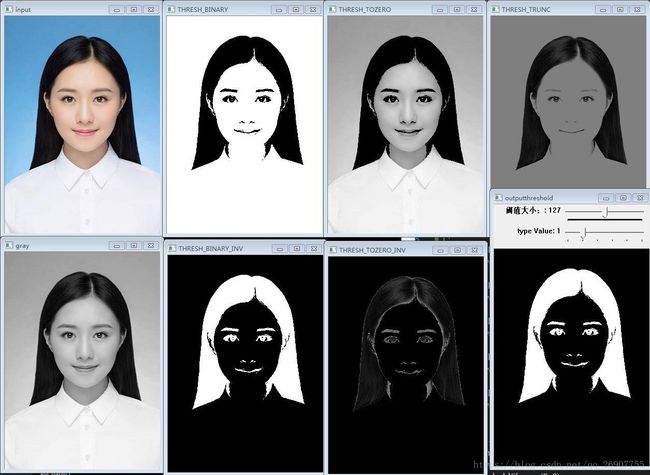
阈值类型:
阈值二值化(threshold binary):
设定一个临界值,将像素值大于临界值的像素设置成255,低于临界值设置成0
dst(x,y)={maxVal ifsrc(x,y)>thresh
dst(x,y)={0 otherwise
阈值反二值化:
设定一个临界值,将像素值大于临界值的像素设置成0,低于临界值设置成255。
dst(x,y)={0 ifsrc(x,y)>thresh
dst(x,y)={maxVal otherwise
截断:
设定一个临界值,将像素值大于临界值的像素设置成临界值,低于临界值不变。
dst(x,y)={threshhold ifsrc(x,y)>thresh
dst(x,y)={src(x,y) otherwise
阈值取0:
设定一个临界值,将像素值大于临界值的像素不变,低于临界值设置成0。
dst(x,y)={src(x,y) ifsrc(x,y)>thresh
dst(x,y)={0 otherwise
阈值反取0:
设定一个临界值,将像素值大于临界值的像素设置成0,低于临界值不变。
dst(x,y)={0 ifsrc(x,y)>thresh
dst(x,y)={src(x,y) otherwise
代码:
#include
#include
using namespace cv;
using namespace std;
Mat src, gray_src, dst,dst1,dst2,dst3,dst4,dst5;
int threshold_value = 127;
int type_value = 1;
void getThresholdChange(int, void*) {
cvtColor(src, gray_src, CV_RGB2GRAY);
imshow("gray", gray_src);
threshold(gray_src, dst1, threshold_value, 255, THRESH_BINARY);//阈值二值化
imshow("THRESH_BINARY", dst1);
threshold(gray_src, dst2, threshold_value, 255, THRESH_BINARY_INV);//阈值反二值化
imshow("THRESH_BINARY_INV", dst2);
threshold(gray_src, dst3, threshold_value, 255, THRESH_TRUNC);//截断
imshow("THRESH_TRUNC", dst3);
threshold(gray_src, dst4, threshold_value, 255, THRESH_TOZERO);//阈值取0
imshow("THRESH_TOZERO", dst4);
threshold(gray_src, dst5, threshold_value, 255, THRESH_TOZERO_INV);//阈值反取0
imshow("THRESH_TOZERO_INV", dst5);
threshold(gray_src, dst, threshold_value, 255, type_value);
imshow("outputthreshold", dst);
}
int main() {
src = imread("C:\\Users\\Administrator\\Desktop\\pic\\z2.jpg");
imshow("input", src);
getThresholdChange(0, 0);
createTrackbar("阈值大小:", "outputthreshold", &threshold_value, 255, getThresholdChange);
createTrackbar("type Value", "outputthreshold", &type_value, 5, getThresholdChange);
waitKey(0);
}结果:


