Java Swing布局管理器
引言
在使用 Swing 向容器添加组件时,需要考虑组件的位置和大小。如果不使用布局管理器,则需要先在纸上画好各个组件的位置并计算组件间的距离,再向容器中添加。这样虽然能够灵活控制组件的位置,实现却非常麻烦。
为了加快开发速度,Java 提供了一些布局管理器,它们可以将组件进行统一管理,这样开发人员就不需要考虑组件是否会重叠等问题。本文绍 Swing 提供的8种布局类型,所有布局都实现 LayoutManager 接口。
一、绝对布局
1.1 边框布局管理器(BorderLayout)
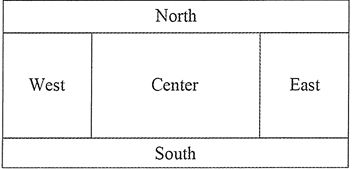
BorderLayout(边框布局管理器)是 Window、JFrame 和 JDialog 的默认布局管理器。边框布局管理器将窗口分为 5 个区域:North、South、East、West 和 Center。其中,North 表示北,将占据面板的上方;Soufe 表示南,将占据面板的下方;East表示东,将占据面板的右侧;West 表示西,将占据面板的左侧;中间区域 Center 是在东、南、西、北都填满后剩下的区域,如图 所示:
提示:边框布局管理器并不要求所有区域都必须有组件,如果四周的区域(North、South、East 和 West 区域)没有组件,则由 Center 区域去补充。如果单个区域中添加的不只一个组件,那么后来添加的组件将覆盖原来的组件,所以,区域中只显示最后添加的一个组件。
1.2 BorderLayout 布局管理器的构造方法
BorderLayout()
创建一个 Border 布局,组件之间没有间隙。
BorderLayout(int hgap,int vgap)
创建一个 Border 布局,其中 hgap 表示组件之间的横向间隔;vgap 表示组件之间的纵向间隔,单位是像素。
1.3 示例
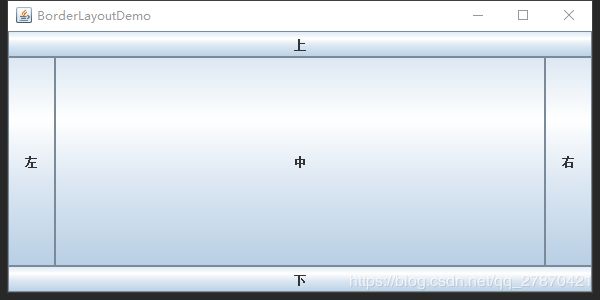
使用 BorderLayout 将窗口分割为 5 个区域,并在每个区域添加一个标签按钮。实现代码如下:
import javax.swing.*;
import java.awt.*;

public class BorderLayoutDemo {
    public static void main(String[] agrs) {
        JFrame frame=new JFrame("BorderLayoutDemo");    //创建Frame窗口
        frame.setSize(400,200);

        frame.setLayout(new BorderLayout());    //为Frame窗口设置布局为BorderLayout

        JButton button1=new JButton ("上");
        JButton button2=new JButton("左");
        JButton button3=new JButton("中");
        JButton button4=new JButton("右");
        JButton button5=new JButton("下");

        frame.add(button1,BorderLayout.NORTH);
        frame.add(button2,BorderLayout.WEST);
        frame.add(button3,BorderLayout.CENTER);
        frame.add(button4,BorderLayout.EAST);
        frame.add(button5,BorderLayout.SOUTH);

        frame.setBounds(300,200,600,300);
        frame.setVisible(true);
        frame.setDefaultCloseOperation(JFrame.EXIT_ON_CLOSE);
    }
}
二、流式布局管理器(FlowLayout)
2.1 FlowLayout
FlowLayout(流式布局管理器)是 JPanel 和 JApplet 的默认布局管理器。
FlowLayout 会将组件按照从从左到右、上到下的放置规律逐行进行定位。与其他布局管理器不同的是,FlowLayout 布局管理器不限制它所管理组件的大小,而是允许它们有自己的最佳大小。
2.2 FlowLayout 布局管理器的构造方法
FlowLayout():创建一个布局管理器,使用默认的居中对齐方式和默认 5 像素的水平和垂直间隔。
FlowLayout(int align):创建一个布局管理器,使用默认 5 像素的水平和垂直间隔。其中,align 表示组件的对齐方式,对齐的值必须是 FlowLayout.LEFT、FlowLayout.RIGHT 和 FlowLayout.CENTER,指定组件在这一行的位置是居左对齐、居右对齐或居中对齐。
FlowLayout(int align, int hgap,int vgap):创建一个布局管理器,其中 align 表示组件的对齐方式;hgap 表示组件之间的横向间隔;vgap 表示组件之间的纵向间隔,单位是像素。
2.3 示例
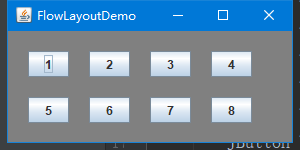
使用 FlowLayout 类对窗口进行布局,向容器内添加 9 个按钮,并设置横向和纵向的间隔都为 20 像素。具体实现代码如下:
import javax.swing.*;
import java.awt.*;

public class FlowLayoutDemo {
    public static void main(String[] agrs)  {
        JFrame jFrame=new JFrame("FlowLayoutDemo");    //创建Frame窗口

        JPanel jPanel=new JPanel();    //创建面板
        JButton btn1=new JButton("1");    //创建按钮
        JButton btn2=new JButton("2");
        JButton btn3=new JButton("3");
        JButton btn4=new JButton("4");
        JButton btn5=new JButton("5");
        JButton btn6=new JButton("6");
        JButton btn7=new JButton("7");
        JButton btn8=new JButton("8");
        JButton btn9=new JButton("9");

        jPanel.add(btn1);    //面板中添加按钮
        jPanel.add(btn2);
        jPanel.add(btn3);
        jPanel.add(btn4);
        jPanel.add(btn5);
        jPanel.add(btn6);
        jPanel.add(btn7);
        jPanel.add(btn8);
        jPanel.add(btn9);

        //向JPanel添加FlowLayout布局管理器,将组件间的横向和纵向间隙都设置为20像素
        jPanel.setLayout(new FlowLayout(FlowLayout.LEADING,20,20));
        jPanel.setBackground(Color.gray);    //设置背景色
        jFrame.add(jPanel);    //添加面板到容器
        jFrame.setBounds(300,200,300,150);    //设置容器的大小
        jFrame.setVisible(true);
        jFrame.setDefaultCloseOperation(JFrame.EXIT_ON_CLOSE);
    }
}
上述程序向 JPanel 面板中添加了 9 个按钮,并使用 FlowLayout 布局管理器使 9 个按钮间的横向和纵向间隙都为 20 像素。此时这些按钮将在容器上按照从上到下、从左到右的顺序排列,如果一行剩余空间不足容纳组件将会换行显示,最终运行结果如图 所示:
三、卡片布局管理器(CardLayout)
3.1 CardLayout
CardLayout(卡片布局管理器)能够帮助用户实现多个成员共享同一个显示空间,并且一次只显示一个容器组件的内容。
CardLayout 布局管理器将容器分成许多层,每层的显示空间占据整个容器的大小,但是每层只允许放置一个组件。
3.2 CardLayout 的构造方法
CardLayout():构造一个新布局,默认间隔为 0。
CardLayout(int hgap, int vgap):创建布局管理器,并指定组件间的水平间隔(hgap)和垂直间隔(vgap)。
3.3 示例
使用 CardLayout 类对容器内的两个面板进行布局。其中第一个面板上包括三个按钮,第二个面板上包括三个文本框。最后调用 CardLayout 类的 show() 方法显示指定面板的内容,代码如下:
import javax.swing.*;
import java.awt.*;

public class CardLayoutDemo {
    public static void main(String[] agrs) {
        JFrame frame=new JFrame("CardLayoutDemo");    //创建Frame窗口

        JPanel p1=new JPanel();    //面板1
        JPanel p2=new JPanel();    //面板2
        JPanel cards=new JPanel(new CardLayout());    //卡片式布局的面板

        p1.add(new JButton("登录按钮"));
        p1.add(new JButton("注册按钮"));
        p1.add(new JButton("找回密码按钮"));

        p2.add(new JTextField("用户名文本框",20));
        p2.add(new JTextField("密码文本框",20));
        p2.add(new JTextField("验证码文本框",20));

        cards.add(p1,"card1");    //向卡片式布局面板中添加面板1
        cards.add(p2,"card2");    //向卡片式布局面板中添加面板2

        CardLayout cl=(CardLayout)(cards.getLayout());
        cl.show(cards,"card1");    //调用show()方法显示面板2

        frame.add(cards);
        frame.setBounds(300,200,400,200);
        frame.setVisible(true);
        frame.setDefaultCloseOperation(JFrame.EXIT_ON_CLOSE);
    }
}
上述代码创建了一个卡片式布局的面板 cards,该面板包含两个大小相同的子面板 p1 和 p2。需要注意的是,在将 p1 和 p2 添加到 cards 面板中时使用了含有两个参数的 add() 方法,该方法的第二个参数用来标识子面板。当需要显示某一个面板时,只需要调用卡片式布局管理器的 show() 方法,并在参数中指定子面板所对应的字符串即可,这里显示的是 p1 面板,运行效果如图 所示:
如果将“cl.show(cards,“card1”)”语句中的 card1 换成 card2,将显示 p2 面板的内容,此时运行结果如图 所示:
四、网格布局管理器(GridLayout)
4.1 GridLayout
GridLayout(网格布局管理器)为组件的放置位置提供了更大的灵活性。
它将区域分割成行数(rows)和列数(columns)的网格状布局,组件按照由左至右、由上而下的次序排列填充到各个单元格中。
提示:GridLayout 布局管理器总是忽略组件的最佳大小,而是根据提供的行和列进行平分。该布局管理的所有单元格的宽度和高度都是一样的。
4.2 GridLayout 的构造方法
GridLayout(int rows,int cols):创建一个指定行(rows)和列(cols)的网格布局。布局中所有组件的大小一样,组件之间没有间隔。
GridLayout(int rows,int cols,int hgap,int vgap):创建一个指定行(rows)和列(cols)的网格布局,并且可以指定组件之间横向(hgap)和纵向(vgap)的间隔,单位是像素。
4.3 示例
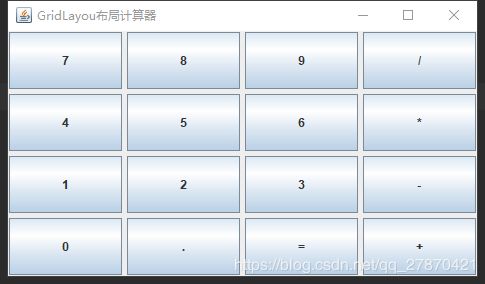
使用 GridLayout 类的网格布局设计一个简单计算器。代码的实现如下:
import javax.swing.*;
import java.awt.*;

public class GridLayoutDemo {
    public static void main(String[] args) {
        JFrame frame=new JFrame("GridLayou布局计算器");

        JPanel panel=new JPanel();    //创建面板
        //指定面板的布局为GridLayout,4行4列,间隙为5
        panel.setLayout(new GridLayout(4,4,5,5));
        panel.add(new JButton("7"));    //添加按钮
        panel.add(new JButton("8"));
        panel.add(new JButton("9"));
        panel.add(new JButton("/"));
        panel.add(new JButton("4"));
        panel.add(new JButton("5"));
        panel.add(new JButton("6"));
        panel.add(new JButton("*"));
        panel.add(new JButton("1"));
        panel.add(new JButton("2"));
        panel.add(new JButton("3"));
        panel.add(new JButton("-"));
        panel.add(new JButton("0"));
        panel.add(new JButton("."));
        panel.add(new JButton("="));
        panel.add(new JButton("+"));

        frame.add(panel);    //添加面板到容器
        frame.setBounds(300,200,200,150);
        frame.setVisible(true);
        frame.setDefaultCloseOperation(JFrame.EXIT_ON_CLOSE);
    }
}
上述程序设置面板为 4 行 4 列、间隙都为 5 像素的网格布局,在该面板上包含 16 个按钮,其横向和纵向的间隙都为 5。该程序的运行结果如图所示:
五、网格包布局管理器(GridBagLayout)
5.1 GridBagLayout
GridBagLayout(网格包布局管理器)是在网格基础上提供复杂的布局,是最灵活、 最复杂的布局管理器。
GridBagLayout 不需要组件的尺寸一致,允许组件扩展到多行多列。每个 GridBagLayout 对象都维护了一组动态的矩形网格单元,每个组件占一个或多个单元,所占有的网格单元称为组件的显示区域。
GridBagLayout 所管理的每个组件都与一个 GridBagConstraints 约束类的对象相关。这个约束类对象指定了组件的显示区域在网格中的位置,以及在其显示区域中应该如何摆放组件。除了组件的约束对象,GridBagLayout 还要考虑每个组件的最小和首选尺寸,以确定组件的大小。
5.2 GridBagLayout属性设置
为了有效地利用网格包布局管理器,在向容器中添加组件时,必须定制某些组件的相关约束对象。GridBagConstraints 对象的定制是通过下列变量实现的。
- 1.gridx 和 gridy
用来指定组件左上角在网格中的行和列。
容器中最左边列的 gridx 为 0,最上边行的 gridy 为 0。这两个变量的默认值是GridBagConstraints.RELATIVE,表示对应的组件将放在前一个组件的右边或下面。
- 2.gridwidth 和 gridheight
用来指定组件显示区域所占的列数和行数,以网格单元而不是像素为单位,默认值为 1。
- 3.fill
指定组件填充网格的方式,可以是如下值:GridBagConstraints.NONE(默认值)、GridBagConstraints.HORIZONTAL(组件横向充满显示区域,但是不改变组件高度)、GridBagConstraints.VERTICAL(组件纵向充满显示区域,但是不改变组件宽度)以及 GridBagConstraints.BOTH(组件横向、纵向充满其显示区域)。
- 4.ipadx 和 ipady
指定组件显示区域的内部填充,即在组件最小尺寸之外需要附加的像素数,默认值为 0。
- 5.insets
指定组件显示区域的外部填充,即组件与其显示区域边缘之间的空间,默认组件没有外部填充。
- 6.anchor
指定组件在显示区域中的摆放位置。可选值有 GridBagConstraints.CENTER(默认值)、GridBagConstraints.NORTH、GridBagConstraints.NORTHEAST、GridBagConstraints.EAST、GridBagConstraints.SOUTH、GridBagConstraints.SOUTHEAST、GridBagConstraints.WEST、GridBagConstraints.SOUTHWEST 以及 GridBagConstraints.NORTHWEST。
- 7.weightx 和 weighty
用来指定在容器大小改变时,增加或减少的空间如何在组件间分配,默认值为 0,即所有的组件将聚拢在容器的中心,多余的空间将放在容器边缘与网格单元之间。weightx 和 weighty 的取值一般在 0.0 与 1.0 之间,数值大表明组件所在的行或者列将获得更多的空间。
5.3 示例
创建一个窗口,使用 GridBagLayout 进行布局,实现一个简易的手机拨号盘。这里要注意如何控制行内组件的显示方式以及使用 GridBagConstraints.REMAINDER 来控制一行的结束。代码的实现如下:
import javax.swing.*;
import java.awt.*;

public class GridBagLayoutDemo {

    //向JFrame中添加JButton按钮
    public static void makeButton(String title,JFrame frame,GridBagLayout gridBagLayout,GridBagConstraints constraints) {
        JButton button=new JButton(title);    //创建Button对象
        gridBagLayout.setConstraints(button,constraints);
        frame.add(button);
    }
    public static void main(String[] agrs) {
        JFrame frame=new JFrame("拨号盘");
        GridBagLayout gbaglayout=new GridBagLayout();    //创建GridBagLayout布局管理器
        GridBagConstraints constraints=new GridBagConstraints();
        frame.setLayout(gbaglayout);    //使用GridBagLayout布局管理器
        constraints.fill = GridBagConstraints.BOTH;    //组件填充显示区域
        constraints.weightx=0.0;    //恢复默认值
        constraints.gridwidth = GridBagConstraints.REMAINDER;    //结束行
        JTextField tf=new JTextField("13612345678");
        gbaglayout.setConstraints(tf, constraints);
        frame.add(tf);
        constraints.weightx=0.5;    // 指定组件的分配区域
        constraints.weighty=0.2;
        constraints.gridwidth=1;
        makeButton("7",frame,gbaglayout,constraints);    //调用方法,添加按钮组件
        makeButton("8",frame,gbaglayout,constraints);
        constraints.gridwidth=GridBagConstraints.REMAINDER;    //结束行
        makeButton("9",frame,gbaglayout,constraints);
        constraints.gridwidth=1;    //重新设置gridwidth的值

        makeButton("4",frame,gbaglayout,constraints);
        makeButton("5",frame,gbaglayout,constraints);
        constraints.gridwidth=GridBagConstraints.REMAINDER;
        makeButton("6",frame,gbaglayout,constraints);
        constraints.gridwidth=1;

        makeButton("1",frame,gbaglayout,constraints);
        makeButton("2",frame,gbaglayout,constraints);
        constraints.gridwidth=GridBagConstraints.REMAINDER;
        makeButton("3",frame,gbaglayout,constraints);
        constraints.gridwidth=1;

        makeButton("返回",frame,gbaglayout,constraints);
        constraints.gridwidth=GridBagConstraints.REMAINDER;
        makeButton("拨号",frame,gbaglayout,constraints);
        constraints.gridwidth=1;
        frame.setBounds(400,400,400,400);    //设置容器大小
        frame.setVisible(true);
        frame.setDefaultCloseOperation(JFrame.EXIT_ON_CLOSE);
    }
}
在上述程序中创建了一个 makeButton() 方法,用来将 JButton 组件添加到 JFrame 窗口中。在 main() 方法中分别创建了 GridBagLayout 对象和 GridBagConstraints 对象,然后设置 JFrame 窗口的布局为 GridBagLayout,并设置了 GridBagConstraints 的一些属性。接着将 JTextField 组件添加至窗口中,并通知布局管理器的 GridBagConstraints 信息。
在接下来的代码中,调用 makeButton() 方法向 JFrame 窗口填充按钮,并使用 GridBagConstraints. REMAINDER 来控制结束行。当一行结束后,重新设置 GridBagConstraints 对象的 gridwidth 为 1。最后设置 JFrame 窗口为可见状态,程序运行后的拨号盘效果如图所示:
六、盒布局管理器(BoxLayout)
6.1 BoxLayout
BoxLayout(盒布局管理器)通常和 Box 容器联合使用。
6.2 BoxLayout构造函数
BoxLayout(Container c,int axis)
其中,参数 Container 是一个容器对象,即该布局管理器在哪个容器中使用;第二个参数为 int 型,用来决定容器上的组件水平(X_AXIS)或垂直(Y_AXIS)放置,可以使用 BoxLayout 类访问这两个属性。
6.3 Box相关方法
createHorizontalBox():返回一个 Box 对象,它采用水平 BoxLayout,即 BoxLayout 沿着水平方向放置组件,让组件在容器内从左到右排列。
createVerticalBox():返回一个 Box 对象,它采用垂直 BoxLayout,即 BoxLayout 沿着垂直方向放置组件,让组件在容器内从上到下进行排列。
static Component createHorizontalGlue()	创建一个不可见的、可以被水平拉伸和收缩的组件
static Component createVerticalGlue()	创建一个不可见的、可以被垂直拉伸和收缩的组件
static Component createHorizontalStrut(int width)	创建一个不可见的、固定宽度的组件
static Component createVerticalStrut(int height)	创建一个不可见的、固定高度的组件
static Component createRigidArea(Dimension d)	创建一个不可见的、总是具有指定大小的组件
6.4 示例
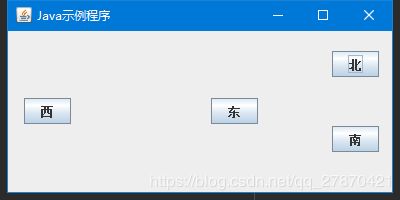
使用 BoxLayout 类对容器内的 4 个按钮进行布局管理,使两个按钮为横向排列,另外两个按钮为纵向排列,代码如下:
import javax.swing.*;
import java.awt.*;

public class BoxLayoutDemo {
    public static void main(String[] agrs) {
        JFrame frame=new JFrame("Java示例程序");

        Box b1=Box.createHorizontalBox();    //创建横向Box容器
        Box b2=Box.createVerticalBox();    //创建纵向Box容器
        frame.add(b1);    //将外层横向Box添加进窗体

        b1.add(Box.createVerticalStrut(200));    //添加高度为200的垂直框架
        b1.add(new JButton("西"));    //添加按钮1
        b1.add(Box.createHorizontalStrut(140));    //添加长度为140的水平框架
        b1.add(new JButton("东"));    //添加按钮2
        b1.add(Box.createHorizontalGlue());    //添加水平胶水
        b1.add(b2);    //添加嵌套的纵向Box容器

        //添加宽度为100,高度为20的固定区域
        b2.add(Box.createRigidArea(new Dimension(100,20)));
        b2.add(new JButton("北"));    //添加按钮3
        b2.add(Box.createVerticalGlue());    //添加垂直组件
        b2.add(new JButton("南"));    //添加按钮4
        b2.add(Box.createVerticalStrut(40));    //添加长度为40的垂直框架

        //设置窗口的关闭动作、标题、大小位置以及可见性等
        frame.setDefaultCloseOperation(JFrame.EXIT_ON_CLOSE);
        frame.setBounds(100,100,400,200);
        frame.setVisible(true);
    }
}
在程序中创建了 4 个 JButton 按钮和两个 Box 容器(横向 Box 容器和纵向 Box 容器),并将前两个 JButton 按钮添加到横向 Box 容器中,将后两个 JButton 容器添加到纵向 Box 容器中。程序的运行结果如图 所示:
七、绝对布局
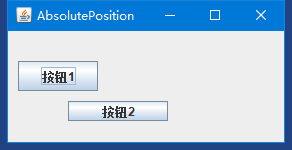
在Swing中,除了使用布局管理器之外还可以使用绝对布局。绝对布局,就是硬性指定组件在容 器中的位置和大小,可以使用绝对坐标的方式来指定组件的位置。
7.1 使用步骤
使用绝对布局的步骤如下:
- 使用Container.setLayout(null)方法取消布局管理器。
- 使用Component.setBounds()方法设置每个组件的大小与位置。
7.2 示例:
import javax.swing.*;
import java.awt.*;

public class AbsolutePosition extends JFrame {

    public AbsolutePosition() {
        setTitle("AbsolutePosition");
        setLayout(null);
        setBounds(0, 0, 200, 150);

        Container c = getContentPane();
        JButton b1 = new JButton("按钮1");
        JButton b2 = new JButton("按钮2");

        b1.setBounds(10, 30, 80, 30);
        b2.setBounds(60, 70, 100, 20);
        c.add(b1);
        c.add(b2);
        setVisible(true);

        setDefaultCloseOperation(WindowConstants.EXIT_ON_CLOSE);
    }

    public static void main(String[] args) {
        AbsolutePosition absolutePosition = new AbsolutePosition();
    }
}
八、弹簧布局管理器(SpringLayout)
8.1 SpringLayout
由 SpringLayout 类实现的布局管理器称为弹簧布局管理器。利用该布局管理器管理组件,当改变窗体的大小时,能够在不改变组件间相对位置的前提下自动调整组件大小,使组件依旧布满整个窗体,从而保证了窗体的整体效果。
8.2 putConstraint(String e1,Conponet c1,int pad,String e2,Componet c2)
弹簧布局管理器以容器和组件的边缘为操作对象,通过为组件和容器边缘以及组件和组件边缘建立约束,实现对组件布局的管理。通过方法 putConstraint(String e1,Conponet c1,int pad,String e2,Componet c2)可以为各边之间建立约束,该方法的入口参数说明如下:
- c1:需要参考的组件对象;
- c2:需要参考的组件对象的具体需要参考的边;
- e1:被参考的组件对象;
- e2:被参考的组件对象的具体被参考的边;
- pad:两条边之间的距离,即两个组件之间的间距。
8.3 示例
import javax.swing.*;
import java.awt.*;
import java.awt.event.WindowAdapter;
import java.awt.event.WindowEvent;

class SpringLayout_3 extends JFrame {

    private static final long serialVersionUID = -6045918631932051025L;

    public SpringLayout_3() {
        // TODO Auto-generated constructor stub
        Container container = getContentPane();
        SpringLayout springLayout = new SpringLayout();
        container.setLayout(springLayout);
        JLabel topicLabel = new JLabel("主题 :");
        JLabel contentLabel = new JLabel("内容 :");
        final JTextField textField = new JTextField(30);
        JTextArea textArea = new JTextArea(3, 30);
        JScrollPane scrollPane = new JScrollPane();
        scrollPane.setViewportView(textArea);
        textArea.setLineWrap(true);
        final JButton confirmButton = new JButton("取消");
        JButton cancelButton = new JButton("确认");
        Spring st = Spring.constant(10);
        Spring st2 = Spring.constant(30);
        container.add(topicLabel);
        springLayout.putConstraint(SpringLayout.NORTH, topicLabel, st,SpringLayout.NORTH, container);
        springLayout.putConstraint(SpringLayout.WEST, topicLabel, st,SpringLayout.WEST, container);
        container.add(textField);
        springLayout.putConstraint(SpringLayout.WEST, textField, st2, SpringLayout.EAST, topicLabel);
        springLayout.putConstraint(SpringLayout.NORTH, textField, 0,SpringLayout.NORTH, topicLabel);
        springLayout.putConstraint(SpringLayout.EAST, textField, Spring.minus(st),SpringLayout.EAST, container);
        container.add(contentLabel);
        springLayout.putConstraint(SpringLayout.WEST, contentLabel, 0, SpringLayout.WEST, topicLabel);
        springLayout.putConstraint(SpringLayout.NORTH, contentLabel, st, SpringLayout.SOUTH, topicLabel);
        container.add(scrollPane);
        springLayout.putConstraint(SpringLayout.NORTH, scrollPane, 0, SpringLayout.NORTH, contentLabel);
        springLayout.putConstraint(SpringLayout.WEST, scrollPane, 0, SpringLayout.WEST, textField);
        springLayout.putConstraint(SpringLayout.EAST, scrollPane, Spring.minus(st), SpringLayout.EAST, container);
        container.add(confirmButton);
        springLayout.putConstraint(SpringLayout.SOUTH, scrollPane, Spring.minus(st), SpringLayout.NORTH, confirmButton);
        springLayout.putConstraint(SpringLayout.EAST, confirmButton, Spring.minus(st), SpringLayout.EAST, container);
        springLayout.putConstraint(SpringLayout.SOUTH, confirmButton, Spring.minus(st), SpringLayout.SOUTH, container);
        container.add(cancelButton);
        springLayout.putConstraint(SpringLayout.EAST, cancelButton, Spring.minus(st), SpringLayout.WEST, confirmButton);
        springLayout.putConstraint(SpringLayout.NORTH, cancelButton, 0, SpringLayout.NORTH, confirmButton);
        // make the text field focused every time the window is activated
        addWindowFocusListener(new WindowAdapter() {
            @Override
            public void windowGainedFocus(WindowEvent e) {
                // TODO Auto-generated method stub
                textField.requestFocus();
            }
        });
    }

    public static void main(String[] args) {

        // TODO Auto-generated method stub

        SpringLayout_3 frame = new SpringLayout_3();

        frame.setTitle("使用弹簧布局管理器");

        frame.setVisible(true);

        frame.setDefaultCloseOperation(JFrame.EXIT_ON_CLOSE);

        frame.setBounds(100, 100, 600, 300);

    }
}
运行效果如图所示;:
