springMvc详细请求流程
本篇文章将以下面几个步骤讲解
1.标准流程图
2.组件和流程详细介绍
3.代码实现--DispatcherServle请求分发的完整过程
4.提问解答
5.解决疑惑
1.标准流程图
(详细版)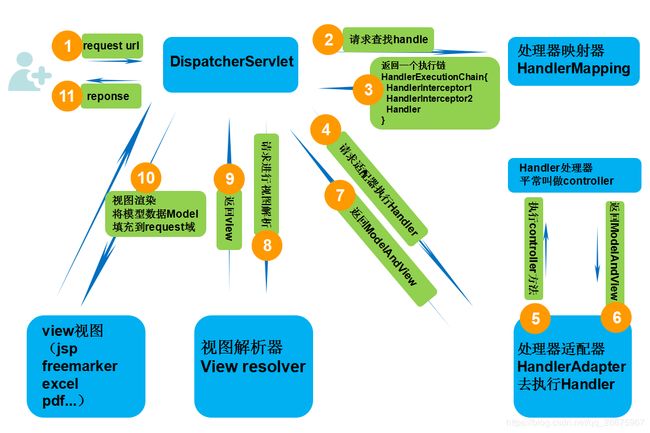
(精简版)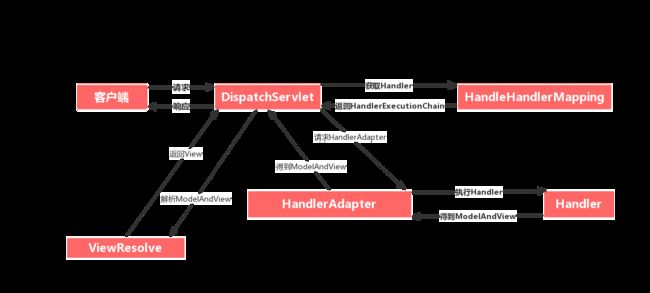
2.组件和流程详解
第一步:发起请求到前端控制器(DispatcherServlet)
第二步:前端控制器请求HandlerMapping查找 Handler
第三步:处理器映射器HandlerMapping向前端控制器HandlerExecutionChain对象(包含一个Handler处理器(页面控制器)对象,多个HandlerInterceptor拦截器对象)
第四步:前端控制器调用处理器适配器去执行Handler(通俗的讲就是controller)
第五步:处理器适配器HandlerAdapter将会根据适配的结果去执行Handler
第六步:Handler执行完成给适配器返回ModelAndView
第七步:处理器适配器向前端控制器返回ModelAndView (ModelAndView是springmvc框架的一个底层对象,包括 Model和view)
第八步:前端控制器请求视图解析器去进行视图解析 (根据逻辑视图名解析成真正的视图(jsp/freemarker/pdf/...)),通过这种策略很容易更换其他视图技术,只需要更改视图解析器即可
第九步:视图解析器向前端控制器返回View
第十步:前端控制器进行视图渲染 (视图渲染将模型数据(在ModelAndView对象中)填充到request域)
第十一步:前端控制器向用户响应结果
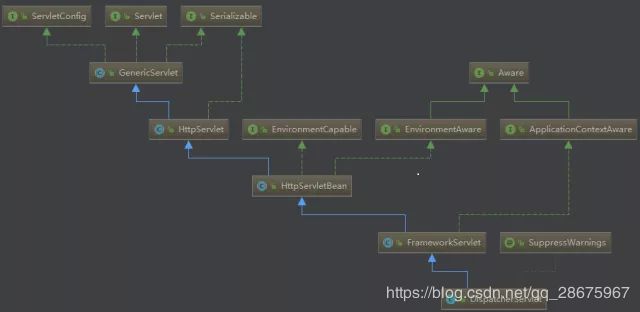
3.代码实现- DispatcherServle请求分发的完整过程
下面将以DispatcherServle.java展开,因为涉及到的类继承关系太多,所以先看DispatcherServlet的继承关系图,首先说明一下,好多方法都是底层调底层,最底层的就是Servlet的service()方法,也就是和Servlet的生命周期有关了
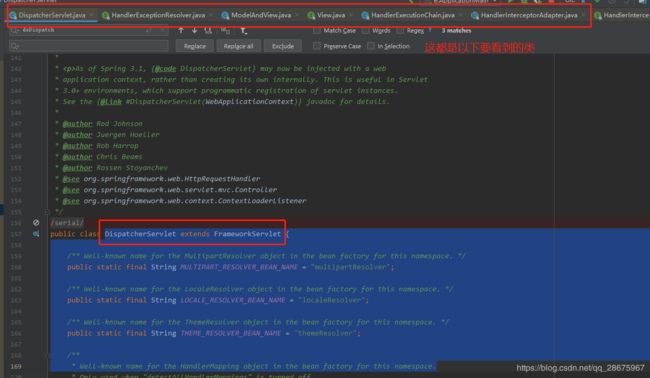
首先打开DispatcherServlet.java文件
找到doService方法,看代码
protected void doService(HttpServletRequest request, HttpServletResponse response) throws Exception {
		if (logger.isDebugEnabled()) {
			String resumed = WebAsyncUtils.getAsyncManager(request).hasConcurrentResult() ? " resumed" : "";
			logger.debug("DispatcherServlet with name '" + getServletName() + "'" + resumed +
					" processing " + request.getMethod() + " request for [" + getRequestUri(request) + "]");
		}

		// Keep a snapshot of the request attributes in case of an include,
		// to be able to restore the original attributes after the include.
		Map attributesSnapshot = null;
		if (WebUtils.isIncludeRequest(request)) {
			attributesSnapshot = new HashMap();
			Enumeration attrNames = request.getAttributeNames();
			while (attrNames.hasMoreElements()) {
				String attrName = (String) attrNames.nextElement();
				if (this.cleanupAfterInclude || attrName.startsWith(DEFAULT_STRATEGIES_PREFIX)) {
					attributesSnapshot.put(attrName, request.getAttribute(attrName));
				}
			}
		}

		// Make framework objects available to handlers and view objects.
		request.setAttribute(WEB_APPLICATION_CONTEXT_ATTRIBUTE, getWebApplicationContext());
		request.setAttribute(LOCALE_RESOLVER_ATTRIBUTE, this.localeResolver);
		request.setAttribute(THEME_RESOLVER_ATTRIBUTE, this.themeResolver);
		request.setAttribute(THEME_SOURCE_ATTRIBUTE, getThemeSource());

		FlashMap inputFlashMap = this.flashMapManager.retrieveAndUpdate(request, response);
		if (inputFlashMap != null) {
			request.setAttribute(INPUT_FLASH_MAP_ATTRIBUTE, Collections.unmodifiableMap(inputFlashMap));
		}
		request.setAttribute(OUTPUT_FLASH_MAP_ATTRIBUTE, new FlashMap());
		request.setAttribute(FLASH_MAP_MANAGER_ATTRIBUTE, this.flashMapManager);

		try {
             //重中之重,这里主要分析doDispatch(也就是请求分发核心内容)
			doDispatch(request, response);
		}
		finally {
			if (!WebAsyncUtils.getAsyncManager(request).isConcurrentHandlingStarted()) {
				// Restore the original attribute snapshot, in case of an include.
				if (attributesSnapshot != null) {
					restoreAttributesAfterInclude(request, attributesSnapshot);
				}
			}
		}
	}
可以看到doService里面调用了doDispatch(request, response);这个方法,那我们再来看看doDispatch这个方法
protected void doDispatch(HttpServletRequest request, HttpServletResponse response) throws Exception {
		HttpServletRequest processedRequest = request;

        //处理任务执行链
		HandlerExecutionChain mappedHandler = null;
        //该请求是否是文件上传请求
		boolean multipartRequestParsed = false;
        //Web异步处理器
		WebAsyncManager asyncManager = WebAsyncUtils.getAsyncManager(request);

		try {
			ModelAndView mv = null;
			Exception dispatchException = null;

			try {
                 //校验是否是文件上传请求
				processedRequest = checkMultipart(request);
				multipartRequestParsed = (processedRequest != request);

				// Determine handler for the current request.
                // 1. 得到HandlerExecutionChain(里面包含了handler和interceptors)
				mappedHandler = getHandler(processedRequest);
				if (mappedHandler == null || mappedHandler.getHandler() == null) {
					noHandlerFound(processedRequest, response);
					return;
				}

				// Determine handler adapter for the current request.
                // 2.得到处理器适配器
				HandlerAdapter ha = getHandlerAdapter(mappedHandler.getHandler());

				// Process last-modified header, if supported by the handler.
				String method = request.getMethod();
				boolean isGet = "GET".equals(method);
				if (isGet || "HEAD".equals(method)) {
					long lastModified = ha.getLastModified(request, mappedHandler.getHandler());
					if (logger.isDebugEnabled()) {
						logger.debug("Last-Modified value for [" + getRequestUri(request) + "] is: " + lastModified);
					}
					if (new ServletWebRequest(request, response).checkNotModified(lastModified) && isGet) {
						return;
					}
				}

				if (!mappedHandler.applyPreHandle(processedRequest, response)) {
					return;
				}

				// Actually invoke the handler.
                // 3.执行处理器,得到modelAndView
                //这里面的步骤,会先去处理拦截器,再去处理controller,处理完业务后,才返回mv
				mv = ha.handle(processedRequest, response, mappedHandler.getHandler());

				if (asyncManager.isConcurrentHandlingStarted()) {
					return;
				}
                //如果mv为null,返回默认的viewname
				applyDefaultViewName(processedRequest, mv);
                //执行应用和拦截器后的方法
				mappedHandler.applyPostHandle(processedRequest, response, mv);
			}
			catch (Exception ex) {
				dispatchException = ex;
			}
			catch (Throwable err) {
				// As of 4.3, we're processing Errors thrown from handler methods as well,
				// making them available for @ExceptionHandler methods and other scenarios.
				dispatchException = new NestedServletException("Handler dispatch failed", err);
			}

             // 4. viewResolve解析modelAndView,返回得到view,但是流程在这个方法的具体里面
             //大致调用方法是processDispatchResult->render->resolveViewName->viewResolvers遍历, View view = viewResolver.resolveViewName(viewName, locale);
            //处理程序处理后的结果,要么是modelAndView,要是异常
			processDispatchResult(processedRequest, response, mappedHandler, mv, dispatchException);
		}
		catch (Exception ex) {
			triggerAfterCompletion(processedRequest, response, mappedHandler, ex);
		}
		catch (Throwable err) {
			triggerAfterCompletion(processedRequest, response, mappedHandler,
					new NestedServletException("Handler processing failed", err));
		}
		finally {
			if (asyncManager.isConcurrentHandlingStarted()) {
				// Instead of postHandle and afterCompletion
				if (mappedHandler != null) {
					mappedHandler.applyAfterConcurrentHandlingStarted(processedRequest, response);
				}
			}
			else {
				// Clean up any resources used by a multipart request.
				if (multipartRequestParsed) {
					cleanupMultipart(processedRequest);
				}
			}
		}
	}
可以仔细看看代码里面我标明的1.2.3.4个步骤,简直和介绍图一模一样啊,整个大体的请求分发就是这个步骤!!
4.提出疑问?
1.那些标注了@RequestMapping注解的相关参数值(如value、method等),存到哪里了,怎么整个过程都没有提到它?
2.那些标注了@Controller注解的方法及方法参数信息(类型、注解等)又存到哪里了呢,怎么整个过程都没有提到它?
5.解决疑惑
我先口述一下大致的初始化参数存储,再到controller呈现的一个过程,最后用图来证明
流程如下:
首先:SpringMVC框架在启动的时候会遍历Spring容器中的所有bean,对标注了@Controller或@RequestMapping注解的类中方法进行遍历,将类和方法上的@RequestMapping注解值进行合并,使用@RequestMapping注解的相关参数值(如value、method等)封装一个RequestMappingInfo,将这个Controller实例、方法及方法参数信息(类型、注解等)封装到HandlerMethod中,然后以RequestMappingInfo为key,HandlerMethod为value存到一个以Map为结构的handlerMethods中。
然后:将@RequestMapping注解中的value(即请求路径)值取出,即url,然后以url为key,以RequestMappingInfo为value,存到一个以Map为结构的urlMap属性中。
最后:客户端发起请求的时候,根据请求的URL到urlMap中查找,找到RequestMappingInfo,然后根据RequestMappingInfo到handlerMethods中查找,找到对应的HandlerMethod,接着将HandlerMethod封装到HandlerExecutionChain;接着遍历容器中所有HandlerAdapter实现类,找到支持这次请求的HandlerAdapter,如RequestMappingHandlerAdapter,然后执行SpringMVC拦截器的前置方法(preHandle方法),然后对请求参数解析及转换,然后(使用反射)调用具体Controller的对应方法返回一个ModelAndView对象,执行拦截器的后置方法(postHandle方法),然后对返回的结果进行处理,最后执行afterCompletion方法。
案例出来前,先重点介绍几个对象:请看图
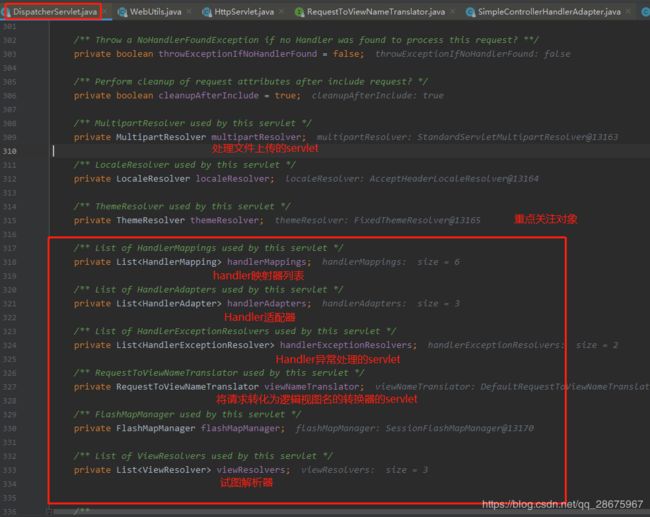
举出案例:
发出请求:
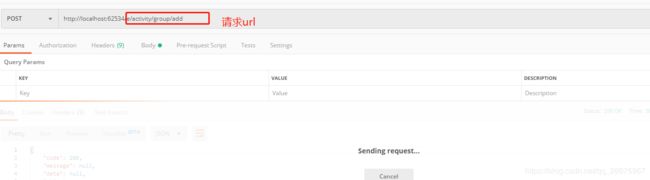
请求后直接打断点到DispatcherServlet,好这个时候请看一下,现在主要介绍handlerMappings,让我们来仔细分析
private List handlerMappings --》请看图
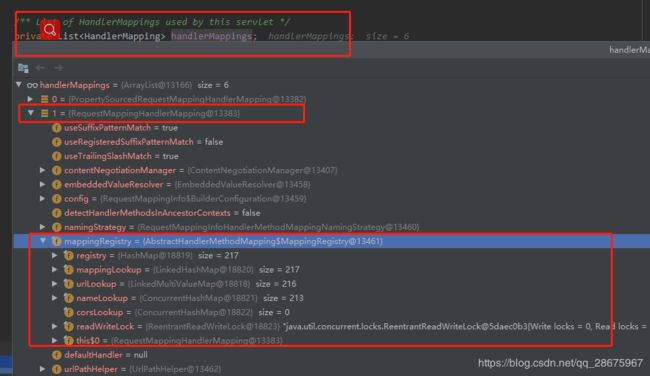
下面来对mappingRegistry里面的属性一一解释
1.1 registry:以url和method组成RequestMappingInfo作为key,以AbstractHandlerMethodmapping作为value,存储在HashMap结构中

1.2 mappingLookup:以RequestMappingInfo作为key,HandlerMethod(由各个属性组成)为value,存储在LinkedHashMap结构中,这里key是url和请求方式,value是类以及对应方法的组合,看图
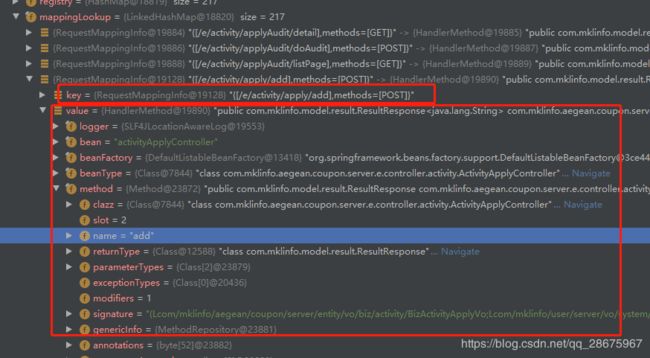
1.3 nameLookup: key 是类名简写+ # +方法名,value是类名+方法名+返回类型,等等
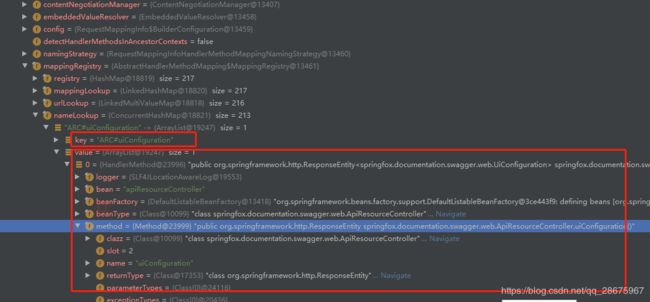
主要介绍这三种handlerMapping,存的都是我们经常看到的那些参数
看到这些参数后,请在结合上面口述的流程,你或许就有些明白了
注意:这些参数啥时候存进去的?上面已经说过了是SpringMVC框架在启动的时候会遍历Spring容器中的所有bean,就是那个时候干的事,那么SpringMVC框架在启动的时候究竟做了什么事呢,请看。。。。