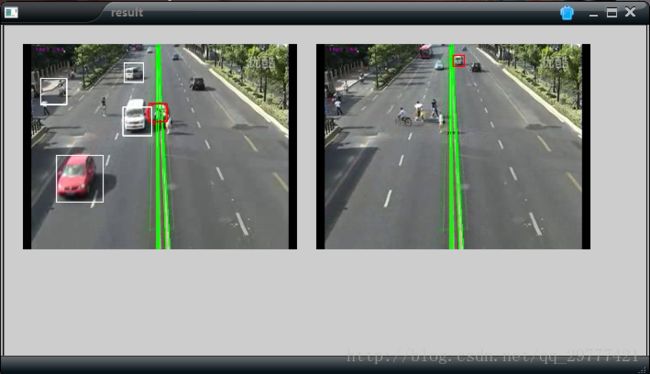
基于OpenCV的车辆压黄线检测
For 物联网数据处理综合实训
小学期老师出的作业,以前没接触过OpenCV,边学边做的。现在实训过了,把代码分享出来,以供大家参考。
环境:VS2013–基于对话框的MFC
方法:级联分类器和霍夫变换
思路:视频分帧->转化为灰度图像->多尺寸检测->边缘检测和霍夫变换->显示结果
#include "stdafx.h"
#include "PPByOpenCV.h"
#include "PPByOpenCVDlg.h"
#include "afxdialogex.h"
#include
#include
#include width *3/4)
line(frame, Point(Lines[i][0], 0), Point(Lines[i][2], img->height), Scalar(0, 255, 0), 2, 8);
}
for (int i = 0; i < cars.size(); i++)
{
pt1.x = cars[i].x;
pt1.y = cars[i].y;
pt2.x = (cars[i].x + cars[i].width);
pt2.y = (cars[i].y + cars[i].height);
rectangle(frame, pt1, pt2, Scalar(255, 255, 255), 2, 8, 0);
if ((pt1.x + pt2.x) / 2 >= rect.x && (pt1.x + pt2.x) / 2 <= (rect.x + 40))
{
rectangle(frame, pt1, pt2, Scalar(0, 0, 255), 2, 8, 0);
is = true;
}
}
//rectangle(frame, line, Scalar(0, 0, 0), 3, 8, 0);
imshow("result", frame);
if (is){
img = cvCloneImage(&(frame.operator IplImage()));
string curr_filename = "F:\\test\\frame_";
curr_filename += to_string(frame_num);
curr_filename += ".jpg";
cvSaveImage(curr_filename.c_str(), img);
filelist.push_back(curr_filename);
}
waitKey(10);
}
void CPPByOpenCVDlg::OnBnClickedButton1()
{
// TODO: 在此添加控件通知处理程序代码
if (is_Stop)
{
SetDlgItemText(IDC_BUTTON1, L"停止检测");
is_Stop = false;
}
else
{
SetDlgItemText(IDC_BUTTON1, L"开始检测");
is_Stop = true;
}
splitIntoFrames();
}
void CPPByOpenCVDlg::OnBnClickedButton2()
{
// TODO: 在此添加控件通知处理程序代码
CString Dir = L"F:\\test"; //默认打开的文件路径
CFileDialog openFileDlg(TRUE,Dir,NULL, OFN_HIDEREADONLY | OFN_READONLY, NULL, NULL);
openFileDlg.GetOFN().lpstrInitialDir = L"F:\\test";
INT_PTR result = openFileDlg.DoModal();
if (result == IDOK) {
CString filePath = openFileDlg.GetPathName();
DWORD dwNum = WideCharToMultiByte(CP_OEMCP, NULL, filePath, -1, NULL, NULL, 0, NULL);
char *CString2char = new char[dwNum];
WideCharToMultiByte(CP_OEMCP, NULL, filePath, -1, CString2char, dwNum, 0, NULL);
Mat image = cvLoadImage(CString2char, 1);
imshow(CString2char, image);
}
}
void cvShowManyImages(char* title, int nArgs)
{
// img - Used for getting the arguments
IplImage *img;
// DispImage - the image in which input images are to be copied
IplImage *DispImage;
int size;
int i;
int m, n;
int x, y;
// w - Maximum number of images in a row
// h - Maximum number of images in a column
int w, h;
// scale - How much we have to resize the image
float scale;
int max;
// If the number of arguments is lesser than 0 or greater than 12
// return without displaying
if (nArgs <= 0)
{
printf("Number of arguments too small....\n");
return;
}
else if (nArgs > 12)
{
printf("Number of arguments too large....\n");
return;
}
// Determine the size of the image, and the number of rows/cols from number of arguments
else if (nArgs == 1)
{
w = h = 1;
size = 300;
}
else if (nArgs == 2)
{
w = 2; h = 1;
size = 300;
}
else if (nArgs == 3 || nArgs == 4)
{
w = 2; h = 2;
size = 300;
}
else if (nArgs == 5 || nArgs == 6) {
w = 3; h = 2;
size = 200;
}
else if (nArgs == 7 || nArgs == 8)
{
w = 4; h = 2;
size = 200;
}
else
{
w = 4; h = 3;
size = 150;
}
// Create a new 3 channel image0
DispImage = cvCreateImage(cvSize(100 + size*w, 60 + size*h), 8, 3);
// Used to get the arguments passed
// Loop for nArgs number of arguments
for (i = 0, m = 20, n = 20; i < nArgs; i++, m += (20 + size))
{
// Get the Pointer to the IplImage
img = cvLoadImage(filelist[i].c_str(), 1);
// Check whether it is NULL or not
// If it is NULL, release the image, and return
if (img == 0)
{
cvReleaseImage(&DispImage);
return;
}
// Find the width and height of the image
x = img->width;
y = img->height;
// Find whether height or width is greater in order to resize the image
max = (x > y) ? x : y;
// Find the scaling factor to resize the image
scale = (float)((float)max / size);
// Used to Align the images
if (i % w == 0 && m != 20)
{
m = 20;
n += 0 + size;
}
// Set the image ROI to display the current image
//cvSetImageROI(DispImage, cvRect(m, n, (int)( x/scale ), (int)( y/scale )));
cvSetImageROI(DispImage, cvRect(m, n, (int)(x / scale), (int)(y / scale)));
// cout<<"x="<
// Resize the input image and copy the it to the Single Big Image
cvResize(img, DispImage);
// Reset the ROI in order to display the next image
cvResetImageROI(DispImage);
}
// Create a new window, and show the Single Big Image
//cvNamedWindow( title, 1 );
cvShowImage(title, DispImage);
/*cvWaitKey(0);*/
//cvDestroyWindow(title);
// End the number of arguments
// Release the Image Memory
cvReleaseImage(&DispImage);
} 


