Apache Flume
Apache Flume
一、概述
Flume is a distributed, reliable, and available service for efficiently collecting, aggregating, and moving large amounts of log data.
Flume分布式、可靠、高效的数据采集、聚合和传输工具。具备容错和故障恢复能力,可以进行实时数据采集,可用于开发在线分析应用;
通俗理解: 工具,不生产数据,只是数据搬运工;
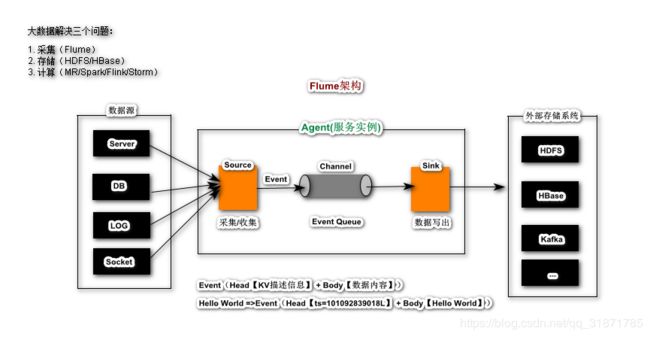
架构原理
名词解释
- Agent: 代理服务,代表一个Flume服务实例,多个Agent构成一个Flume集群
- Source: Agent中一个核心组件,用以接受或者手机数据源产生的数据
- Channel: Agent中一个核心组件,用以临时存储Source采集的数据,当数据sink到存储系统后,Channel中的数据会自动被删除
- Sink:Agent中一个核心组件,用以连接Channel和外部存储系统,将Channel中数据写出到外部的存储系统
- Event: 事件对象,它是Flume Agent中数据传输的最小单元,有Event Head和Event Body组成;
二、环境搭建
准备工作
- JDK1.8
- 足够的内存 + 磁盘攻坚
- 目录读写权限
安装
[root@HadoopNode00 ~]# tar -zxf apache-flume-1.7.0-bin.tar.gz -C /usr
三、使用
配置文件语法【重点】
# example.conf: A single-node Flume configuration

# Name the components on this agent
# a1 agent别名【自定义】
# agent: source[r1] sink[k1] channel[c1]
a1.sources = r1
a1.sinks = k1
a1.channels = c1

# Describe/configure the source
# 收集TCP网络端口请求数据  TCP Server
a1.sources.r1.type = netcat
a1.sources.r1.bind = 192.168.197.10
a1.sources.r1.port = 44444

# Describe the sink
# 将数据输出到服务运行窗口
a1.sinks.k1.type = logger

# Use a channel which buffers events in memory
a1.channels.c1.type = memory
a1.channels.c1.capacity = 1000
a1.channels.c1.transactionCapacity = 100

# Bind the source and sink to the channel
a1.sources.r1.channels = c1
a1.sinks.k1.channel = c1
Quick Start
沿用上面flume agent配置
作用:收集TCP请求数据,并将采集数据输出到服务的控制台窗口
启动Flume Agent
[root@HadoopNode00 apache-flume-1.7.0-bin]# bin/flume-ng agent --conf-file conf/quickstart.properties --name a1 -Dflume.root.logger=INFO,console
数据服务器发送请求数据
Linux平台
[root@HadoopNode00 ~]# yum install -y telnet
[root@HadoopNode00 ~]# telnet localhost 44444
Trying ::1...
telnet: connect to address ::1: Connection refused
Trying 127.0.0.1...
Connected to localhost.
Escape character is '^]'.
Hello World
OK
Hello Flume
OK
Hello Hadoop
OK
Windows平台
# 1. 打开控制面板
# 2. 程序 打开或者关闭windows功能
# 3. 勾选telnet客户端
# 4. 重启cmd窗口测试

telnet 192.168.197.10 44444
四、深入学习Flume的各个组件
http://flume.apache.org/releases/content/1.9.0/FlumeUserGuide.html#exec-source
Source
主要作用:接受收集外部数据源产生数据的一个组件
Netcat【测试,不重要】
网络服务 启动TCP Server收集 TCP Client请求数据
a1.sources = r1
a1.channels = c1
a1.sources.r1.type = netcat
a1.sources.r1.bind = 0.0.0.0
a1.sources.r1.port = 6666
a1.sources.r1.channels = c1
Exec【了解】
通过执行一个给定的Linux的操作指令,将指令执行结果作为source组件的数据来源
a1.sources.r1.type = exec
a1.sources.r1.command = tail -f /root/Hello.log
Spooling Directory【重点】
收集采集某一个目录的所有数据文件的内容,一旦数据文件采集完成,它的后缀后自动更改为
.completed
a1.sources.r1.type = spooldir
a1.sources.r1.spoolDir = /root/data
注意:
spoolDirectory source数据文件只会被采集一次exec source使用命令tail -f xxx.log, 数据重复采集,导致产生重复数据
Kafka Source【了解】
从kafka中拉取数据作为source数据来源
tier1.sources.source1.type = org.apache.flume.source.kafka.KafkaSource
# 批处理数据大小
tier1.sources.source1.batchSize = 5000
# 批处理时间间隔2s
tier1.sources.source1.batchDurationMillis = 2000
# Kakfa地址 如果是kafka集群,多个节点用","分割
tier1.sources.source1.kafka.bootstrap.servers = localhost:9092,localhost:9093
# kafka 订阅主题
tier1.sources.source1.kafka.topics = test1, test2
# kafka消费者的所属消费组
tier1.sources.source1.kafka.consumer.group.id = custom.g.idz
Avro【重点】
采集或者收集来自于外部Avro Client发送实时数据,通常在构建Flume集群时会使用到Avro
# Describe/configure the source
a1.sources.r1.type = avro
a1.sources.r1.bind = 192.168.197.10
a1.sources.r1.port = 8888
发送测试数据
[root@HadoopNode00 apache-flume-1.7.0-bin]# bin/flume-ng avro-client --host 192.168.197.10 --port 8888 --filename /root/log.txt
Sequence Generator【不需要了解】
测试使用,用以生成
0~long.max_value序列数据
Channel
通道,Source采集数据临时存放Channel Event Queue; 主要功能类似于写缓存或者写缓冲;
Memory
Events会临时存放在Memory Queue
优点:效率极高
缺点:数据可能会丢失
a1.channels = c1
a1.channels.c1.type = memory
a1.channels.c1.capacity = 10000
a1.channels.c1.transactionCapacity = 10000
a1.channels.c1.byteCapacityBufferPercentage = 20
a1.channels.c1.byteCapacity = 800000
JDBC
将Events永久存放在内嵌数据库服务Derby中,不支持其它数据库系统(MySQL、Oracle)
a1.channels = c1
a1.channels.c1.type = jdbc
Kafka【重点】
将Events存放在Kafka 分布式流数据平台中
a1.channels.c1.type = org.apache.flume.channel.kafka.KafkaChannel
a1.channels.c1.kafka.bootstrap.servers = localhost:9092,localhost....
File【重点】
将Events存放在filesystem中
a1.channels = c1
a1.channels.c1.type = file
a1.channels.c1.checkpointDir = /mnt/flume/checkpoint
a1.channels.c1.dataDirs = /mnt/flume/data
Spillable Memory
内存溢写的Channel,使用内存+磁盘存放Channel中的数据
a1.channels = c1
a1.channels.c1.type = SPILLABLEMEMORY
a1.channels.c1.memoryCapacity = 10000
a1.channels.c1.overflowCapacity = 1000000
a1.channels.c1.byteCapacity = 800000
a1.channels.c1.checkpointDir = /mnt/flume/checkpoint
a1.channels.c1.dataDirs = /mnt/flume/data
注意:删除flume历史数据[root@HadoopNode00 apache-flume-1.7.0-bin]# rm -rf ~/.flume/
Sink
将采集到的数据写出到外部的存储系统;
Logger
以INFO级别的日志形式输出Events,通常用于测试和调式
a1.channels = c1
a1.sinks = k1
a1.sinks.k1.type = logger
a1.sinks.k1.channel = c1
HBaseSinks
将采集到的数据写出保存到HDFS BigTable中;
注意:
- 务必提前启动zk和hdfs
- 如果使用的是HBase 2.0+版本,请使用
type=hbase2
# Describe the sink
a1.sinks.k1.type = hbase
a1.sinks.k1.table = ns:t_flume
a1.sinks.k1.columnFamily = cf1
File Roll
将采集到的数据存放到本地文件系统中
# Describe the sink
a1.sinks.k1.type = file_roll
a1.sinks.k1.sink.directory = /root/data2
# 禁用滚动
a1.sinks.k1.sink.rollInterval = 0
Null
丢弃采集的所有数据
a1.channels = c1
a1.sinks = k1
a1.sinks.k1.type = null
a1.sinks.k1.channel = c1
Avro Sink
将采集到数据发送给Avro Server
a1.channels = c1
a1.sinks = k1
a1.sinks.k1.type = avro
a1.sinks.k1.channel = c1
a1.sinks.k1.hostname = 10.10.10.10
a1.sinks.k1.port = 4545
如何构建flume服务集群
Agent【1】
[root@HadoopNode00 apache-flume-1.7.0-bin]# vi conf/s1.properties
# example.conf: A single-node Flume configuration

# Name the components on this agent
# a1 agent别名【自定义】
# agent: source[r1] sink[k1] channel[c1]
a1.sources = r1
a1.sinks = k1
a1.channels = c1

# Describe/configure the source
a1.sources.r1.type = netcat
a1.sources.r1.bind = 192.168.197.10
a1.sources.r1.port = 9999

# Describe the sink
# 将数据输出到服务运行窗口
a1.sinks.k1.type = avro
a1.sinks.k1.hostname = 192.168.197.10
a1.sinks.k1.port = 7777

# Use a channel which buffers events in memory
a1.channels.c1.type = memory
a1.channels.c1.capacity = 1000
a1.channels.c1.transactionCapacity = 100

# Bind the source and sink to the channel
a1.sources.r1.channels = c1
a1.sinks.k1.channel = c1
Agent【2】
[root@HadoopNode00 apache-flume-1.7.0-bin]# vi conf/s2.properties
# example.conf: A single-node Flume configuration

# Name the components on this agent
# a1 agent别名【自定义】
# agent: source[r1] sink[k1] channel[c1]
a1.sources = r1
a1.sinks = k1
a1.channels = c1

# Describe/configure the source
a1.sources.r1.type = avro
a1.sources.r1.bind = 192.168.197.10
a1.sources.r1.port = 7777

# Describe the sink
# 将数据输出到服务运行窗口
a1.sinks.k1.type = file_roll
a1.sinks.k1.sink.directory = /root/data3
a1.sinks.k1.sink.rollInterval = 0

# Use a channel which buffers events in memory
a1.channels.c1.type = memory
a1.channels.c1.capacity = 1000
a1.channels.c1.transactionCapacity = 100

# Bind the source and sink to the channel
a1.sources.r1.channels = c1
a1.sinks.k1.channel = c1
分别启动服务
-
先启动第二个
[root@HadoopNode00 apache-flume-1.7.0-bin]# bin/flume-ng agent --conf-file conf/s2.properties --name a1 -Dflume.root.logger=INFO,console -
再启动第一个
[root@HadoopNode00 apache-flume-1.7.0-bin]# bin/flume-ng agent --conf-file conf/s1.properties --name a1 -Dflume.root.logger=INFO,console
测试集群
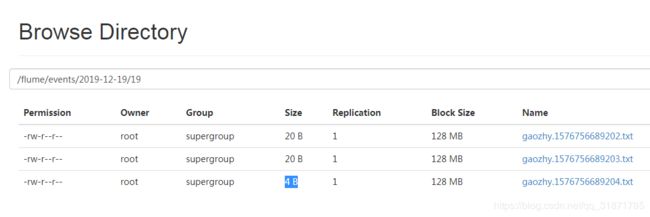
HDFS Sink【重点】
将采集到的数据保存到HDFS中
# Describe the sink
# 将数据输出到服务运行窗口
a1.sinks.k1.type = hdfs
a1.sinks.k1.hdfs.path = /flume/events/%Y-%m-%d/%H
a1.sinks.k1.hdfs.filePrefix = gaozhy
a1.sinks.k1.hdfs.fileSuffix = .txt
a1.sinks.k1.hdfs.rollInterval = 15
# 基于Events 数量滚动操作
a1.sinks.k1.hdfs.rollCount = 5
a1.sinks.k1.hdfs.fileType = DataStream
a1.sinks.k1.hdfs.useLocalTimeStamp = true
Kafka Sink【重点】
将采集到数据写出到Kafka集群Topic中
a1.sinks.k1.channel = c1
a1.sinks.k1.type = org.apache.flume.sink.kafka.KafkaSink
a1.sinks.k1.kafka.topic = mytopic
a1.sinks.k1.kafka.bootstrap.servers = localhost:9092
a1.sinks.k1.kafka.flumeBatchSize = 20
a1.sinks.k1.kafka.producer.acks = 1
a1.sinks.k1.kafka.producer.linger.ms = 1
a1.sinks.k1.kafka.producer.compression.type = snappy
可选组件
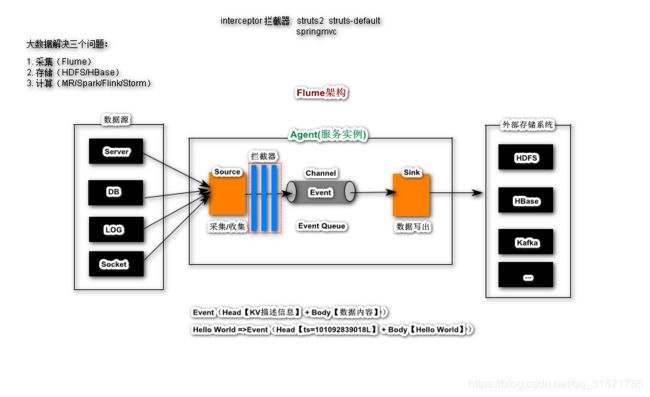
拦截器(Interceptor)
Timestamp Interceptor
主要作用:在Event Header中添加KV,Key为timestamp,Value为数据采集时间戳
a1.sources.r1.type = netcat
a1.sources.r1.bind = 192.168.197.10
a1.sources.r1.port = 44444
a1.sources.r1.interceptors = i1
a1.sources.r1.interceptors.i1.type = timestamp

---------------------------------------------------------------------------
19/12/19 23:18:24 INFO sink.LoggerSink: Event: { headers:{timestamp=1576768704952} body: 31 31 0D   11. }
19/12/19 23:18:25 INFO sink.LoggerSink: Event: { headers:{timestamp=1576768705631} body: 32 32 0D   22. }
19/12/19 23:18:26 INFO sink.LoggerSink: Event: { headers:{timestamp=1576768706571} body: 33 33 0D   33. }
Host Interceptor
主要作用:在Event Header中添加KV,Key为host,Value为ip地址或者主机名,标识数据来源
a1.sources.r1.type = netcat
a1.sources.r1.bind = 192.168.197.10
a1.sources.r1.port = 44444
a1.sources.r1.interceptors = i1 i2
a1.sources.r1.interceptors.i1.type = timestamp
a1.sources.r1.interceptors.i2.type = host

---------------------------------------------------------------------------
19/12/19 23:23:43 INFO sink.LoggerSink: Event: { headers:{host=192.168.197.10, timestamp=1576769023573} body: 31 31 0D                                        11. }
19/12/19 23:23:44 INFO sink.LoggerSink: Event: { headers:{host=192.168.197.10, timestamp=1576769024244} body: 32 32 0D                                        22. }
19/12/19 23:23:44 INFO sink.LoggerSink: Event: { headers:{host=192.168.197.10, timestamp=1576769024854} body: 33 33 0D                                        33. }
Static Interceptor
主要作用:在Event Header中添加KV,KeyValue为静态信息,也就是用户自定义的KV信息
datacenter=bj
datacenter=sh
a1.sources.r1.type = netcat
a1.sources.r1.bind = 192.168.197.10
a1.sources.r1.port = 44444
a1.sources.r1.interceptors = i1 i2 i3
a1.sources.r1.interceptors.i1.type = timestamp
a1.sources.r1.interceptors.i2.type = host
a1.sources.r1.interceptors.i3.type = static
a1.sources.r1.interceptors.i3.key = datacenter
a1.sources.r1.interceptors.i3.value = bj


---------------------------------------------------------------------------
19/12/19 23:30:34 INFO sink.LoggerSink: Event: { headers:{host=192.168.197.10, datacenter=bj, timestamp=1576769434926} body: 31 31 0D                                        11. }
19/12/19 23:30:35 INFO sink.LoggerSink: Event: { headers:{host=192.168.197.10, datacenter=bj, timestamp=1576769435649} body: 32 32 0D                                        22. }
19/12/19 23:30:36 INFO sink.LoggerSink: Event: { headers:{host=192.168.197.10, datacenter=bj, timestamp=1576769436316} body: 33 33 0D                                        33. }
Remove Header
有问题
UUID Interceptor
主要作用:在Event Header中添加一个UUID唯一标识
a1.sources.r1.type = netcat
a1.sources.r1.bind = 192.168.197.10
a1.sources.r1.port = 44444
a1.sources.r1.interceptors = i1 i2 i3 i4
a1.sources.r1.interceptors.i1.type = timestamp
a1.sources.r1.interceptors.i2.type = host
a1.sources.r1.interceptors.i3.type = static
a1.sources.r1.interceptors.i3.key = datacenter
a1.sources.r1.interceptors.i3.value = bj
a1.sources.r1.interceptors.i4.type = org.apache.flume.sink.solr.morphline.UUIDInterceptor$Builder

---------------------------------------------------------------------------
19/12/19 23:42:32 INFO sink.LoggerSink: Event: { headers:{host=192.168.197.10, datacenter=bj, id=e7c8855c-6712-4877-ac00-33a2a05d6982, timestamp=1576770152337} body: 31 31 0D                                        11. }
19/12/19 23:42:33 INFO sink.LoggerSink: Event: { headers:{host=192.168.197.10, datacenter=bj, id=119029af-606f-47d8-9468-3f5ef78c4319, timestamp=1576770153078} body: 32 32 0D                                        22. }
Search and Replace
主要作用:搜索和替换的拦截器
a1.sources.r1.type = netcat
a1.sources.r1.bind = 192.168.197.10
a1.sources.r1.port = 44444
a1.sources.r1.interceptors = i1 i2 i3
a1.sources.r1.interceptors.i1.type = timestamp
a1.sources.r1.interceptors.i2.type = host
a1.sources.r1.interceptors.i3.type = search_replace
a1.sources.r1.interceptors.i3.searchPattern = ^ERROR.*$
a1.sources.r1.interceptors.i3.replaceString = abc


---------------------------------------------------------------------------
19/12/19 23:53:29 INFO sink.LoggerSink: Event: { headers:{host=192.168.197.10, timestamp=1576770809449} body: 0D                                              . }
19/12/19 23:53:38 INFO sink.LoggerSink: Event: { headers:{host=192.168.197.10, timestamp=1576770817952} body: 31 31 0D                                        11. }
19/12/19 23:53:38 INFO sink.LoggerSink: Event: { headers:{host=192.168.197.10, timestamp=1576770818567} body: 32 32 0D                                        22. }
19/12/19 23:53:53 INFO sink.LoggerSink: Event: { headers:{host=192.168.197.10, timestamp=1576770831967} body: 61 62 63 0D                                     abc. }
19/12/19 23:54:15 INFO sink.LoggerSink: Event: { headers:{host=192.168.197.10, timestamp=1576770851674} body: 61 62 63 0D                                     abc. }
Regex Filtering【重点】
正则过滤的拦截器, 符合正则表达式数据放行,不符合丢弃
a1.sources.r1.type = netcat
a1.sources.r1.bind = 192.168.197.10
a1.sources.r1.port = 44444
a1.sources.r1.interceptors = i1 i2 i3
a1.sources.r1.interceptors.i1.type = regex_filter
a1.sources.r1.interceptors.i1.regex = ^ERROR.*$
a1.sources.r1.interceptors.i2.type = host
a1.sources.r1.interceptors.i3.type = static
a1.sources.r1.interceptors.i3.key = datacenter
a1.sources.r1.interceptors.i3.value = bj
Regex Extractor
抽取匹配到的字符串内容,添加在Event Header中
192.168.0.3 GET /login.jsp 404

ip地址
status状态码

a1.sources.r1.type = netcat
a1.sources.r1.bind = 192.168.197.10
a1.sources.r1.port = 44444
a1.sources.r1.interceptors = i1
a1.sources.r1.interceptors.i1.type = regex_extractor
a1.sources.r1.interceptors.i1.regex = (\\d{1,3}.\\d{1,3}.\\d{1,3}.\\d{1,3})\\s\\w*\\s\\/.*\\s(\\d{3})$
a1.sources.r1.interceptors.i1.serializers = s1 s2
a1.sources.r1.interceptors.i1.serializers.s1.name = ip
a1.sources.r1.interceptors.i1.serializers.s2.name = code


//----------------------------------------------------------------------------------
19/12/20 00:56:31 INFO sink.LoggerSink: Event: { headers:{code=404, ip=192.168.0.3} body: 31 39 32 2E 31 36 38 2E 30 2E 33 20 47 45 54 20 192.168.0.3 GET  }
19/12/20 00:56:53 INFO sink.LoggerSink: Event: { headers:{code=200, ip=192.168.254.254} body: 31 39 32 2E 31 36 38 2E 32 35 34 2E 32 35 34 20 192.168.254.254  }
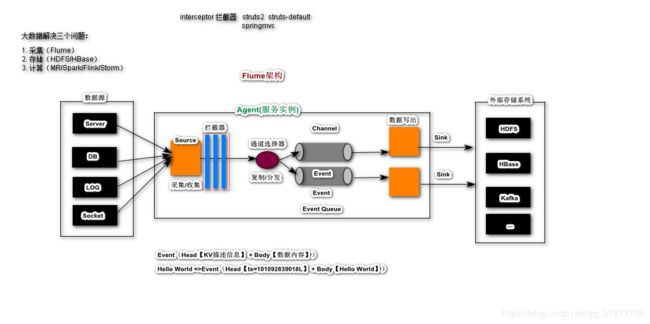
通道选择器( Channel Selectors)
Replicating Channel Selector
source采集到的数据会复制给所有的通道
# example.conf: A single-node Flume configuration

# Name the components on this agent
# a1 agent别名【自定义】
# agent: source[r1] sink[k1] channel[c1]
a1.sources = r1
a1.sinks = k1 k2
a1.channels = c1 c2

# Describe/configure the source
# 收集TCP网络端口请求数据  TCP Server
a1.sources.r1.type = netcat
a1.sources.r1.bind = 192.168.197.10
a1.sources.r1.port = 44444
a1.sources.r1.selector.type = replicating


# Describe the sink
# 将数据输出到服务运行窗口
a1.sinks.k1.type = logger
a1.sinks.k2.type = file_roll
a1.sinks.k2.sink.directory = /root/data2
a1.sinks.k2.sink.rollInterval = 0

# Use a channel which buffers events in memory
a1.channels.c1.type = memory
a1.channels.c1.capacity = 1000
a1.channels.c1.transactionCapacity = 100

a1.channels.c2.type = memory
a1.channels.c2.capacity = 1000
a1.channels.c2.transactionCapacity = 100


# Bind the source and sink to the channel
a1.sources.r1.channels = c1 c2
a1.sinks.k1.channel = c1
a1.sinks.k2.channel = c2
Multiplexing Channel (分发)
source采集到的数据会按照分发规则的不同,传递给不同的通道
# example.conf: A single-node Flume configuration

# Name the components on this agent
# a1 agent别名【自定义】
# agent: source[r1] sink[k1] channel[c1]
a1.sources = r1
a1.sinks = k1 k2
a1.channels = c1 c2

# Describe/configure the source
# 收集TCP网络端口请求数据  TCP Server
a1.sources.r1.type = netcat
a1.sources.r1.bind = 192.168.197.10
a1.sources.r1.port = 44444

a1.sources.r1.interceptors = i1
a1.sources.r1.interceptors.i1.type = regex_extractor
a1.sources.r1.interceptors.i1.regex = ^(\\w*).*$
a1.sources.r1.interceptors.i1.serializers = s1
a1.sources.r1.interceptors.i1.serializers.s1.name = level

a1.sources.r1.selector.type = multiplexing
# event header中k v
a1.sources.r1.selector.header = level
a1.sources.r1.selector.mapping.ERROR = c1
a1.sources.r1.selector.mapping.INFO = c2
a1.sources.r1.selector.mapping.DEBUG = c2
a1.sources.r1.selector.default = c1

# Describe the sink
# 将数据输出到服务运行窗口
a1.sinks.k1.type = logger
a1.sinks.k2.type = file_roll
a1.sinks.k2.sink.directory = /root/data2
a1.sinks.k2.sink.rollInterval = 0

# Use a channel which buffers events in memory
a1.channels.c1.type = memory
a1.channels.c1.capacity = 1000
a1.channels.c1.transactionCapacity = 100

a1.channels.c2.type = memory
a1.channels.c2.capacity = 1000
a1.channels.c2.transactionCapacity = 100


# Bind the source and sink to the channel
a1.sources.r1.channels = c1 c2
a1.sinks.k1.channel = c1
a1.sinks.k2.channel = c2
Sink Processors(处理器)
也称为SinkGroup,将多个Sink组织为一个Group;主要的作用是Sink写出时的负载均衡和容错
Failover Sink
容错能力的SinkGroup,它根据sink的设定优先级,将数据写出到优先级最高的目标存储系统
问题:监控sink故障,而不能监控外部存储系统故障
# example.conf: A single-node Flume configuration

# Name the components on this agent
# a1 agent别名【自定义】
# agent: source[r1] sink[k1] channel[c1]
a1.sources = r1
a1.sinks = k1 k2
a1.channels = c1

# Describe/configure the source
# 收集TCP网络端口请求数据  TCP Server
a1.sources.r1.type = netcat
a1.sources.r1.bind = 192.168.197.10
a1.sources.r1.port = 44444

# Describe the sink
# 将数据输出到服务运行窗口
a1.sinks.k1.type = logger

a1.sinks.k2.type = hdfs
a1.sinks.k2.hdfs.path = /flume/events/%Y-%m-%d/%H
a1.sinks.k2.hdfs.filePrefix = gaozhy
a1.sinks.k2.hdfs.fileSuffix = .txt
a1.sinks.k2.hdfs.rollInterval = 15
# 基于Events 数量滚动操作
a1.sinks.k2.hdfs.rollCount = 5
a1.sinks.k2.hdfs.fileType = DataStream
a1.sinks.k2.hdfs.useLocalTimeStamp = true

a1.sinkgroups = g1
a1.sinkgroups.g1.sinks = k1 k2
a1.sinkgroups.g1.processor.type = failover
a1.sinkgroups.g1.processor.priority.k1 = 10
a1.sinkgroups.g1.processor.priority.k2 = 50
a1.sinkgroups.g1.processor.maxpenalty = 10000

# Use a channel which buffers events in memory
a1.channels.c1.type = memory
a1.channels.c1.capacity = 1000
ources.r1.type = netcat
a1.sources.r1.bind = 192.168.197.10
a1.sources.r1.port = 44444
a1.channels.c1.transactionCapacity = 100

# Bind the source and sink to the channel
a1.sources.r1.channels = c1
a1.sinks.k1.channel = c1
a1.sinks.k2.channel = c1
Load balancing Sink Processor
负载均衡的sink写出; 针对于一组数据的负载均衡
# Describe/configure the source
# 收集TCP网络端口请求数据  TCP Server
a1.sources.r1.type = netcat
a1.sources.r1.bind = 192.168.197.10
a1.sources.r1.port = 44444

# Describe the sink
# 将数据输出到服务运行窗口
a1.sinks.k1.type = logger

a1.sinks.k2.type = file_roll
a1.sinks.k2.sink.directory = /root/data2
# 禁用滚动
a1.sinks.k2.sink.rollInterval = 0

a1.sinkgroups = g1
a1.sinkgroups.g1.sinks = k1 k2
a1.sinkgroups.g1.processor.type = load_balance
a1.sinkgroups.g1.processor.backoff = true
a1.sinkgroups.g1.processor.selector = round_robin


# Use a channel which buffers events in memory
a1.channels.c1.type = memory
a1.channels.c1.capacity = 1000
ources.r1.type = netcat
a1.sources.r1.bind = 192.168.197.10
a1.sources.r1.port = 44444
a1.channels.c1.transactionCapacity = 100

# Bind the source and sink to the channel
a1.sources.r1.channels = c1
a1.sinks.k1.channel = c1
a1.sinks.k2.channel = c1
Log4j Appender
导入依赖
<dependency>
    <groupId>org.apache.flumegroupId>
    <artifactId>flume-ng-sdkartifactId>
    <version>1.7.0version>
dependency>

<dependency>
    <groupId>org.slf4jgroupId>
    <artifactId>slf4j-log4j12artifactId>
    <version>1.7.5version>
dependency>
<dependency>
    <groupId>org.apache.flume.flume-ng-clientsgroupId>
    <artifactId>flume-ng-log4jappenderartifactId>
    <version>1.7.0version>
dependency>
开发应用
package org.example;

import org.apache.commons.logging.Log;
import org.apache.commons.logging.LogFactory;

public class LogTest {
    // log 日志采集器
    private static Log log = LogFactory.getLog(LogTest.class);

    public static void main(String[] args) {
        log.debug("this is debug"); // 记录一个debug级别的日志数据
        log.info("this is info");
        log.warn("this is warn");
        log.error("this is error");
        log.fatal("this is fatal");
    }
}
作业
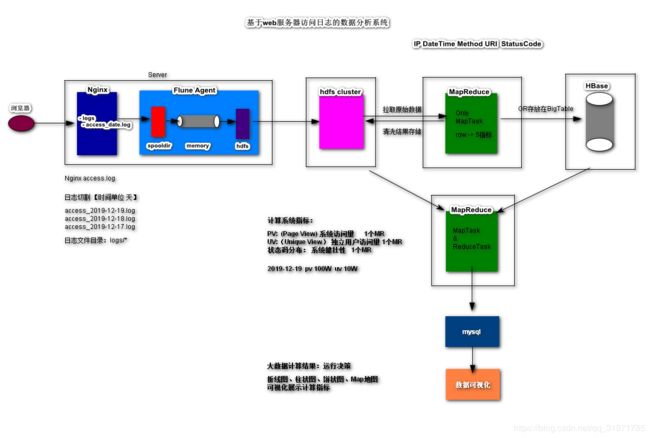
基于web服务器访问日志的数据分析系统
安装Nginx服务器
# 1. 安装nginx的运行依赖
[root@HadoopNode00 conf]# yum install gcc-c++ perl-devel pcre-devel openssl-devel zlib-devel wget

# 2. 上传Nginx

# 3. 编译安装
[root@HadoopNode00 ~]# tar -zxf nginx-1.11.1.tar.gz
[root@HadoopNode00 ~]# cd nginx-1.11.1
[root@HadoopNode00 nginx-1.11.1]# ./configure --prefix=/usr/local/nginx
[root@HadoopNode00 nginx-1.11.1]# make && make install

# 4. 进入到nginx服务器的安装目录

[root@HadoopNode00 nginx-1.11.1]# cd /usr/local/nginx/
[root@HadoopNode00 nginx]# ll
total 16
drwxr-xr-x. 2 root root 4096 Dec 20 22:10 conf
drwxr-xr-x. 2 root root 4096 Dec 20 22:10 html
drwxr-xr-x. 2 root root 4096 Dec 20 22:10 logs
drwxr-xr-x. 2 root root 4096 Dec 20 22:10 sbin

# 5. 启动Nginx服务器
[root@HadoopNode00 nginx]# sbin/nginx -c conf/nginx.conf
root@HadoopNode00 nginx]# ps -ef | grep nginx
root     62524     1  0 22:11 ?        00:00:00 nginx: master process sbin/nginx -c conf/nginx.conf
nobody   62525 62524  0 22:11 ?        00:00:00 nginx: worker process
root     62575 62403  0 22:11 pts/2    00:00:00 grep nginx

# 6. 访问:http://hadoopnode00/
日志切割
[root@HadoopNode00 nginx]# vi logsplit.sh
#nginx日志切割脚本
#!/bin/bash
#设置日志文件存放目录
logs_path="/usr/local/nginx/logs/"

#设置pid文件
pid_path="/usr/local/nginx/logs/nginx.pid"

#重命名日志文件
mv ${logs_path}access.log /usr/local/nginx/data/access_$(date -d "now" +"%Y-%m-%d-%I:%M:%S").log

# 向nginx主进程发信号重新打开日志
# 信号量操作 USR1 通知nginx服务器在移动完访问access.log后,使用新的access.log记录用户新的请求日志
kill -USR1 `cat ${pid_path}`

[root@HadoopNode00 nginx]# chmod u+x logsplit.sh
[root@HadoopNode00 nginx]# ll
total 44
drwx------. 2 nobody root 4096 Dec 20 22:11 client_body_temp
drwxr-xr-x. 2 root   root 4096 Dec 20 22:10 conf
drwxr-xr-x. 2 root   root 4096 Dec 20 22:19 data
drwx------. 2 nobody root 4096 Dec 20 22:11 fastcgi_temp
drwxr-xr-x. 2 root   root 4096 Dec 20 22:10 html
drwxr-xr-x. 2 root   root 4096 Dec 20 22:11 logs
-rwxr--r--. 1 root   root  493 Dec 20 22:27 logsplit.sh
drwx------. 2 nobody root 4096 Dec 20 22:11 proxy_temp
drwxr-xr-x. 2 root   root 4096 Dec 20 22:10 sbin
drwx------. 2 nobody root 4096 Dec 20 22:11 scgi_temp
drwx------. 2 nobody root 4096 Dec 20 22:11 uwsgi_temp
定时任务
周期性的触发日志切割的操作,可以设定为每天的
0:0linux操作系统中的一个用来定义定时任务的命令:
crontab
# 1. 进入到定时任务的编辑模式,类似vi编辑器
[root@HadoopNode00 nginx]# crontab -e

# 2. 新增一个定时任务,用来周期性触发split日志操作
# 触发时机,五个时间单位:分 时 日 月 周
# 0 0 * * *   每天的0点0分触发日志切割操作
# */1 * * * *  每隔1分钟触发日志切割操作
*/1 * * * * /usr/local/nginx/logsplit.sh
定制Flume Agent
[root@HadoopNode00 apache-flume-1.7.0-bin]# vi conf/nginx.properties
a1.sources = r1
a1.sinks = k1
a1.channels = c1

# Describe/configure the source
# 收集TCP网络端口请求数据  TCP Server
a1.sources.r1.type = spooldir
a1.sources.r1.spoolDir = /usr/local/nginx/data

a1.sinks.k1.type = hdfs
a1.sinks.k1.hdfs.path = /flume/events/%Y-%m-%d/
a1.sinks.k1.hdfs.filePrefix = nginx
a1.sinks.k1.hdfs.fileSuffix = .log
a1.sinks.k1.hdfs.rollInterval = 15
# 基于Events 数量滚动操作

a1.sinks.k1.hdfs.round = true
a1.sinks.k1.hdfs.roundValue = 10
a1.sinks.k1.hdfs.roundUnit = minute
a1.sinks.k1.hdfs.fileType = DataStream
a1.sinks.k1.hdfs.useLocalTimeStamp = true

# Use a channel which buffers events in memory
a1.channels.c1.type = memory
a1.channels.c1.capacity = 1000
a1.channels.c1.transactionCapacity = 100

# Bind the source and sink to the channel
a1.sources.r1.channels = c1
a1.sinks.k1.channel = c1
数据采集
[root@HadoopNode00 apache-flume-1.7.0-bin]# start-dfs.sh
[root@HadoopNode00 apache-flume-1.7.0-bin]# bin/flume-ng agent --conf-file conf/nginx.properties --name a1 -Dflume.root.logger=INFO,console
数据清洗
# 1. 原始数据
192.168.197.1 - - [20/Dec/2019:22:12:42 +0800] "GET / HTTP/1.1" 200 612 "-" "Mozilla/5.0 (Windows NT 6.1; Win64; x64) AppleWebKit/537.36 (KHTML, like Gecko) Chrome/78.0.3904.108 Safari/537.36"
192.168.197.1 - - [20/Dec/2019:22:12:42 +0800] "GET /favicon.ico HTTP/1.1" 404 571 "http://hadoopnode00/" "Mozilla/5.0 (Windows NT 6.1; Win64; x64) AppleWebKit/537.36 (KHTML, like Gecko) Chrome/78.0.3904.108 Safari/537.36"

# 2. 5个指标 客户端的ip地址  请求时间  请求方式  uri  响应状态码
正则表达式
- 请参考正则表达式学习笔记
- 强烈安利:https://regex101.com/
正则表达式:
^(\d{1,3}\.\d{1,3}\.\d{1,3}\.\d{1,3}).*\[(.*)\]\s"(\w+)\s(.*)\sHTTP\/1.1"\s(\d{3})\s.*$

192.168.197.1 - - [20/Dec/2019:22:14:00 +0800] "GET / HTTP/1.1" 304 0 "-" "Mozilla/5.0 (Windows NT 6.1; Win64; x64) AppleWebKit/537.36 (KHTML, like Gecko) Chrome/78.0.3904.108 Safari/537.36"
计算(略)
数据可视化展示
通过图形图表可视化展示计算结果
https://www.highcharts.com.cn/docs

