零、相关准备
0.1 YAML语法
- YAML类似XML或JSON,易于读写
- 对于Ansible,每一个YAML文件都从列表开始,列表每项对应键值对
- YAML怪癖,文件开始行都是
---,这是格式的一部分 - 列表中所有成员开始于相同的缩进级别,并且使用一个
-作为开头(一个横杠和一个空格) - Ansible使用"{{ var }}"来引用变量,e.g.
foo: "{{ variable }}"
0.2 环境要求
- 只要求管理主机安装Python2.6或Python2.7
- 管理主机系统可以是Red Hat,Debian,CentOS,OS X,BSD的各种版本(Windows系统不可做控制主机)
- 通过Yum安装
yum install ansible - 公钥认证,Ansible1.2.1及其之后的版本都会默认启用公钥认证.
0.3 Inventory文件
0.3.1. 基础Inventory文件
mail.example.com

[webservers]
foo.example.com
bar.example.com
www[01:50].example.com

[dbservers]
one.example.com
two.example.com
three.example.com:2202 #默认2202 ssh端口
0.3.2.动态Inventory
从其他系统读取配置信息:
1, 从云端拉取 inventory
2, LDAP(Lightweight Directory Access Protocol,轻量级目录访问协议)
3, `Cobbler `_
4, 或者是一份昂贵的企业版的 CMDB(配置管理数据库) 软件.
开发动态的Inventory数据源
一、Ansible简介
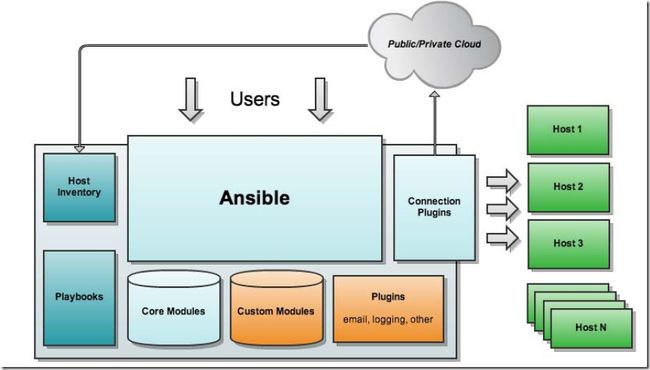
- python编写,由paramiko和PyYAML两个关键模块构成
- ansible工作在agentless模式下,具有幂等性
- ansible基于模块工作,本身没有批量部署的能力
- ansible提供一种框架:
(1)、连接插件connection plugins:负责和被监控端实现通信;
(2)、host inventory:指定操作的主机,是一个配置文件里面定义监控的主机;
(3)、各种模块核心模块、command模块、自定义模块;
(4)、借助于插件完成记录日志邮件等功能;
(5)、playbook:剧本执行多个任务时,非必需可以让节点一次性运行多个任务。
1.1 ansible模块查看
ansible-doc -l
ansible-doc -s MODULE_NAME
1.2 ansible常用模块
- command
- cron
- user
- group
- copy
- file
- ping
- service
- shell
- raw
- script
- yum
- setup
二、playbook编写
2.1. lineinfile模块
2.1.1 增加一行
此处以修改设备密码复杂度为例,增加配置,playbook如下:
---
# possibly save as tasks/add_password_strategy.yml
- name: add password strategy
  lineinfile:
    dest: /etc/pam.d/system-auth
    line: 'password requisite pam_cracklib.so ucredit=-1 lcredit=-1 dcredit=-1'
  tags:
    - add_passord_strategy
2.1.2 删除一行
删除文件中hello开头的一行,playbook如下:
---
# possibly saved as tasks/examples/delete_line.yml
- name: delete line template
  lineinfile:
    dest: '/root/test.ccg'
    regexp: '^hello'
    state: absent #absent代表删除
2.1.3 修改一行
此处以修改密码最小长度参数为例,playbook如下:
---
# possibly saved as tasks/examples/change_PASS_MIN_LEN.yml
- name: change PASS_MIN_LEN
  lineinfile:
    dest: /etc/login.defs
    regexp: '^PASS_MIN_LEN'
    line: 'PASS_MIN_LEN    8'
  tags:
    - change_PASS_MIN_LEN
2.1.4 多行操作
- 修改多行,修改多个参数
- name: Set some kernel parameters
  lineinfile:
    dest: /etc/sysctl.conf
    regexp: "{{ item.regexp }}"
    line: "{{ item.line }}"
  with_items:
    - { regexp: '^kernel.shmall', line: 'kernel.shmall = 2097152' }
    - { regexp: '^kernel.shmmax', line: 'kernel.shmmax = 134217728' }
    - { regexp: '^fs.file-max', line: 'fs.file-max = 65536' }

- name: Configure kernel parameters
  lineinfile:
    dest: /etc/sysctl.conf
    regexp: "^{{ item.property | regex_escape() }}="
    line: "{{ item.property }}={{ item.value }}"
  with_items:
    - { property: 'kernel.shmall', value: '2097152' }
    - { property: 'kernel.shmmax', value: '134217728' }
    - { property: 'fs.file-max', value: '65536' }
- 增加多行
- name: add lines
  lineinfile:
    dest: fruits.txt
    line: '{{ item }}'
  with_items:
    - 'Orange'
    - 'Apple'
    - 'Banana'
2.2 service模块
启动sshd服务
---
#possibly saved as tasks/start_sshd.yml
- name: ensure sshd is running
  service: name=sshd state=started
  tags:
    - start_sshd
参数说明
- name
- state stared/stoped/restarted/reloaded
- enabled yes/no
2.3 command模块
---
# possibly saved as tasks/permit_su_root.yml
- name: permit su root
  lineinfile:
    dest: /etc/pam.d/su
    line: 'auth sufficient pam_rootok.so'
- name: permit su root except wheel
  lineinfile:
    dest: /etc/pam.d/su
    line: 'auth required pam_wheel.so group=wheel'
缺点:运行中的变量无法使用变量、管道。如需使用,可选用raw模块,或shell模块。
2.4 blockinfile模块
# Before 2.3, option 'dest' or 'name' was used instead of 'path'
- name: insert/update "Match User" configuration block in /etc/ssh/sshd_config
  blockinfile:
    path: /etc/ssh/sshd_config
    block: |
      Match User ansible-agent
      PasswordAuthentication no

- name: insert/update eth0 configuration stanza in /etc/network/interfaces
        (it might be better to copy files into /etc/network/interfaces.d/)
  blockinfile:
    path: /etc/network/interfaces
    block: |
      iface eth0 inet static
          address 192.0.2.23
          netmask 255.255.255.0

- name: insert/update configuration using a local file and validate it
  blockinfile:
    block: "{{ lookup('file', './local/ssh_config') }}"
    dest: "/etc/ssh/ssh_config"
    backup: yes
    validate: "/usr/sbin/sshd -T -f %s"

- name: insert/update HTML surrounded by custom markers after  line
  blockinfile:
    path: /var/www/html/index.html
    marker: ""
    insertafter: ""
    content: |
      Welcome to {{ ansible_hostname }}
      Last updated on {{ ansible_date_time.iso8601 }}

- name: remove HTML as well as surrounding markers
  blockinfile:
    path: /var/www/html/index.html
    marker: ""
    content: ""

- name: Add mappings to /etc/hosts
  blockinfile:
    path: /etc/hosts
    block: |
      {{ item.ip }} {{ item.name }}
    marker: "# {mark} ANSIBLE MANAGED BLOCK {{ item.name }}"
  with_items:
    - { name: host1, ip: 10.10.1.10 }
    - { name: host2, ip: 10.10.1.11 }
    - { name: host3, ip: 10.10.1.12 }
2.4 常用命令
2.4.1 ansible
#语法
ansible  [-f forks] [-m module_name] [-a args]
ansible -i iplist test1 -m ping
ansible -i iplist test1 -m command -a "hostname"
ansible -i iplist test1 -m copy -a 'src=test dest=/tmp/haha owner=root mode=640'
ansible -i iplist test1 -m shell -a "echo new_password | passwd --stdin user1"
2.4.2 ansilbe-playbook
ansible-playbook -i ip.txt today.yml
ansible-playbook -i ip.txt -C today.yml # predict
ansible-playbook --list-hosts today.yml
ansible-playbook --syntax-check today.yml
三、Template使用
3.1 Ansible template module例子
对hello_world.j2文件使用templae module
- hosts: all
  vars:
    variable_to_be_replaced: 'Hello world'
    inline_variable: 'hello again'
  tasks:
    - name: Ansible Template Example
      template:
        src: hello_world.j2
        dest: /Users/mdtutorials2/Documents/Ansible/hello_world.txt

hello_world.j2
--------------
{{ variable_to_be_replaced }}
This line won't be changed
Variable given as inline - {{ inline_variable }} - :)

output - hello_world.txt
------
Hello world
This line won't be changed
Variable given as inline - hello again - :)

mdtutorials2$ ls -lrt hello_world.txt
-rw-r--r--  1 root  wheel  81 Oct 16 07:23 hello_world.txt
从例子中可以发现,hello_world.j2中的变量已被替换成你需要的内容。
注意:dest路径如果是文件夹,则模版文件直接拷贝到目标机器,文件名不变
3.2 Ansible template with_items for multiple files
- hosts: loc
  tasks:
    - name: Ansible template with_items example.
      template:
        src: "{{ item.src }}"
        dest: "{{ item.dest }}"
        mode: 0777
      with_items:
        - {src: 'ex.j2',dest: '/home/dnpjose/ex_rew1.txt'}
        - {src: 'ex2.j2',dest: '/home/dnpjose/ex_rew2.txt'}
        - {src: 'ex3.j2',dest: '/home/dnpjose/ex_rew3.txt'}
3.3 更多Template Module的属性
- force – If the destination file already exists, then this parameter decides whether it should be replaced or not. By default, the value is ‘yes’. So if there is any difference between the rendered source file and the destination file, destination file would be replaced. If you do not want this behaviour, set the value to ‘no’.
- Mode – If you want to set the permissions for the destination file explicitly, then you can use this parameter.
- backup – If you want a backup file to be created in the destination directory, you should set the value of the backup parameter to ‘yes’. By default, the value is ‘no’. The backup file will be created every time there is a change in the destination directory. A timestamp would be appended to the filename. So if I changed the ‘template.j2’ file in the last example two time and also changed the backup parameter to yes, then I get the following two files after two runs.
3.4 Ansible template comment example
You can do this by giving Jinja2 style comments by enclosing the comments within {# … #}.
e.g.: {# This is an Ansible template comment. This won’t be shown in the output file #}
四、运行Playbook
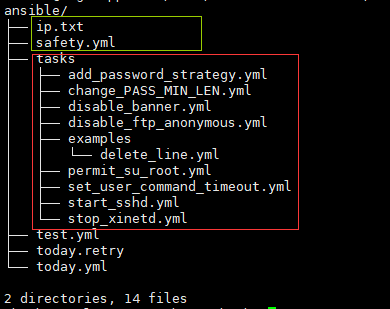
剧本结构如图:
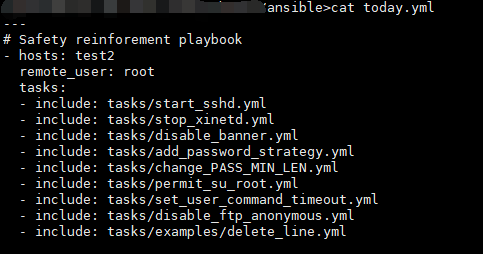
today.yml:
Inventory清单:
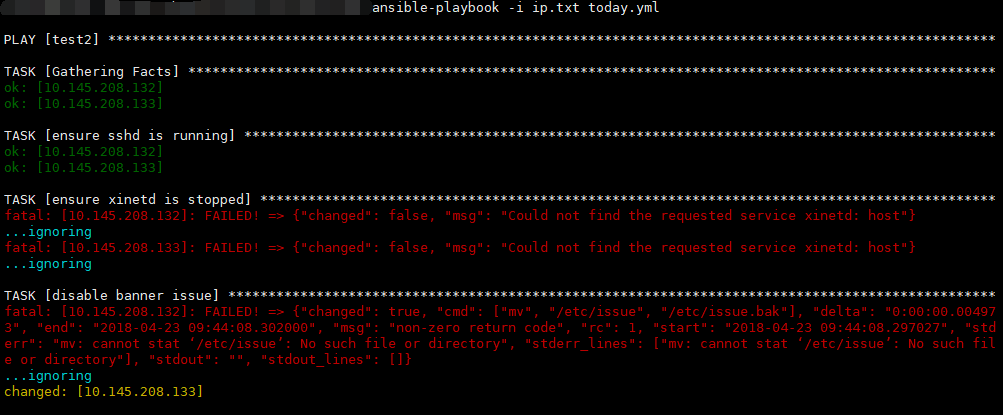
执行命令:
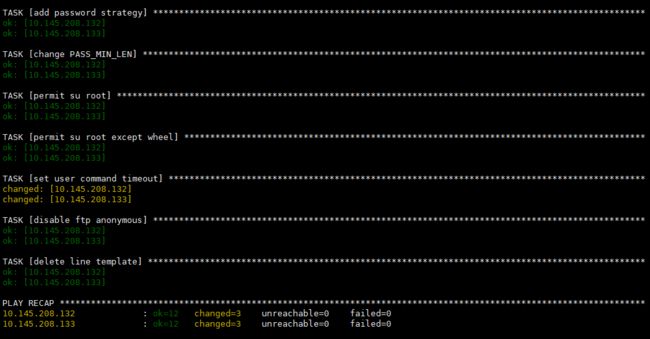
ansible-playbook -i ip.txt today.yml,结果如下:
五、API
5.1 Python API
e.g.打印机器运行时间和系统负载信息
#!/usr/bin/python

import ansible.runner
import sys

# 构造ansible runner 并且开启10个线程向远程主机执行uptime命令
results = ansible.runner.Runner(
    pattern='*', forks=10,
    module_name='command', module_args='/usr/bin/uptime',
).run()

if results is None:
   print "No hosts found"
   sys.exit(1)

print "UP ***********"
for (hostname, result) in results['contacted'].items():
    if not 'failed' in result:
        print "%s >>> %s" % (hostname, result['stdout'])

print "FAILED *******"
for (hostname, result) in results['contacted'].items():
    if 'failed' in result:
        print "%s >>> %s" % (hostname, result['msg'])

print "DOWN *********"
for (hostname, result) in results['dark'].items():
    print "%s >>> %s" % (hostname, result)
六、 附录
6.1 参考资料
- ansible中文文档
- ansible template
- ansible判断和循环
- ansible role
6.2 名词说明
- 幂等性:多次执行是安全的,结果一致
