Elasticsearch 编程API入门系列
说明:我这里是3台机器组建的es集群,然后编写其代码!
192.168.80.10、192.168.80.11、192.168.80.12
我这里,elasticsearch用的是2.4.X版本。
API文档:https://www.elastic.co/guide/en/elasticsearch/client/java-api/2.4/java-docs.html
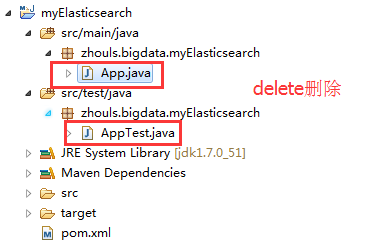
删除默认的App.java
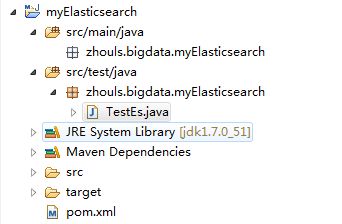
以TestEs.java为例
项目结构
通过TransportClient这个类,指定es集群中其中一台或多台机的ip地址和端口
TransportClient client = TransportClient.builder().build().addTransportAddress(new InetSocketTransportAddress (InetAddress.getByName("host1"), 9300)).addTransportAddress(new InetSocketTransportAddress(InetAddress.getByName("host2"), 9300));
如果需要使用其他名称的集群(默认是elasticsearch),需要如下设置
Settings settings = Settings.settingsBuilder().put("cluster.name", "myClusterName").build();
TransportClientclient = TransportClient.builder().settings(settings).build().addTransportAddress(new InetSocketTransportAddress (InetAddress.getByName("host1"), 9300));
通过TransportClient这个接口,自动嗅探整个集群的状态,es会自动把集群中其它机器的ip地址加到客户端中
Settings settings = Settings.settingsBuilder().put("client.transport.sniff", true).build();
TransportClient.builder().settings(settings).build().addTransportAddress(new InetSocketTransportAddress (InetAddress.getByName("host1"), 9300));
索引index(四种json,map,bean,es helper)
IndexResponse response = client.prepareIndex("zhouls", "emp", "1").setSource().get()
查询get
GetResponse response = client.prepareGet("zhouls", "emp", "1").get();
更新update
删除delete
DeleteResponse response = client.prepareDelete("zhouls", "emp", "1").execute().actionGet();
总数count
long count = client.prepareCount("zhouls").get().getCount();
前提
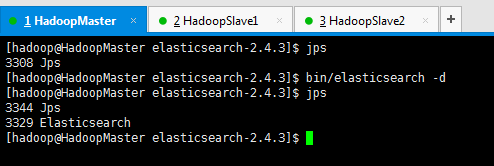
准备,开启3台机器组建的es集群进程
代码编写:
package zhouls.bigdata.myElasticsearch;

import static org.junit.Assert.*;

import java.net.InetAddress;
import java.util.HashMap;
import java.util.List;

import org.elasticsearch.action.bulk.BulkItemResponse;
import org.elasticsearch.action.bulk.BulkRequestBuilder;
import org.elasticsearch.action.bulk.BulkResponse;
import org.elasticsearch.action.delete.DeleteRequest;
import org.elasticsearch.action.get.GetResponse;
import org.elasticsearch.action.index.IndexRequest;
import org.elasticsearch.action.index.IndexResponse;
import org.elasticsearch.action.search.SearchResponse;
import org.elasticsearch.action.search.SearchType;
import org.elasticsearch.action.update.UpdateResponse;
import org.elasticsearch.client.transport.TransportClient;
import org.elasticsearch.cluster.node.DiscoveryNode;
import org.elasticsearch.common.settings.Settings;
import org.elasticsearch.common.transport.InetSocketTransportAddress;
import org.elasticsearch.common.transport.TransportAddress;
import org.elasticsearch.common.xcontent.XContentBuilder;
import org.elasticsearch.common.xcontent.XContentFactory;
import org.elasticsearch.index.query.MatchQueryBuilder.Operator;
import org.elasticsearch.index.query.QueryBuilders;
import org.elasticsearch.search.SearchHit;
import org.elasticsearch.search.SearchHits;
import org.elasticsearch.search.aggregations.Aggregation;
import org.elasticsearch.search.aggregations.AggregationBuilders;
import org.elasticsearch.search.aggregations.bucket.terms.Terms;
import org.elasticsearch.search.aggregations.bucket.terms.Terms.Bucket;
import org.elasticsearch.search.aggregations.metrics.sum.Sum;
import org.elasticsearch.search.sort.SortOrder;
import org.junit.Before;
import org.junit.Test;

import com.fasterxml.jackson.databind.ObjectMapper;
import com.google.common.collect.ImmutableList;

public class TestEs {

    //es和hadoop没关系啊,获取一个transportclient就可以操作es了


    private TransportClient transportClient;
    @Before//@Before和@Test的区别:每次执行都要先经过@Before,好比是,它是一个模板。
    //before表示在执行每个test方法之前运行,常与@Test搭配使用
    public void test0() throws Exception {
        //获取TransportClient,来操作es
        transportClient = TransportClient.builder().build();
        //需要使用9300端口
        TransportAddress transportAddress = new InetSocketTransportAddress(InetAddress.getByName("192.168.80.10"), 9300);
        //添加节点信息,最少指定集群内的某一个节点即可操作这个es集群
        transportClient.addTransportAddress(transportAddress);
    }

    /**
     * 用java代码测试的时候这样写是没有问题的,比较简单
     * @throws Exception
     */
    @Test
    public void test1() throws Exception {
        //获取TransportClient,来操作es
        TransportClient transportClient = TransportClient.builder().build();
        //需要使用9300端口,指定es集群中的节点信息, 这个地方指定的端口是节点和节点之间的通信端口是9300,不是Http请求的端口9200.
        TransportAddress transportAddress = new InetSocketTransportAddress(InetAddress.getByName("192.168.80.11"), 9300);
        //添加节点信息,最少指定集群内的某一个节点即可操作这个es集群
        transportClient.addTransportAddress(transportAddress);
        System.out.println(transportClient.toString());
    }

    /**
     * 可以这样写,防止代码中指定的链接失效
     * 但是写起来比较麻烦
     * 在实际工作中这样写不是很靠谱,需要完善,做测试可以
     * @throws Exception
     */
    @Test
    public void test2() throws Exception {
        //获取TransportClient,来操作es,通过TransportClient可以和es集群交互
        TransportClient transportClient = TransportClient.builder().build();
        //需要使用9300端口,指定es集群中的节点信息, 这个地方指定的端口是节点和节点之间的通信端口是9300,不是Http请求的端口9200.
        TransportAddress transportAddress = new InetSocketTransportAddress(InetAddress.getByName("192.168.80.10"), 9300);
        TransportAddress transportAddress1 = new InetSocketTransportAddress(InetAddress.getByName("192.168.80.11"), 9300);
        TransportAddress transportAddress2 = new InetSocketTransportAddress(InetAddress.getByName("192.168.80.12"), 9300);
        //添加节点信息,最少指定集群内的某一个节点即可操作这个es集群
        transportClient.addTransportAddresses(transportAddress,transportAddress1,transportAddress2);//加入多个地址
        System.out.println(transportClient.toString());
    }

    /**
     * 实际生产环境下面,建议这样用,加上下面这些配置信息
     * @throws Exception
     */
    @Test
    public void test3() throws Exception {
        //指定es的配置信息
        Settings settings = Settings.settingsBuilder()
                .put("cluster.name", "elasticsearch")//集群名称
                        //如果集群名称在配置文件中被修改了,那么在这需要显式定义一下
                        //es集群名称默认是 elasticsearch  sniff嗅; 发现;
                .put("client.transport.sniff", true)//开启集群的嗅探功能,只需要指定集群中一个节点信息即可获取到集群中的所有节点信息
                        //开启集群的嗅探功能,这样可以保证es会自动把集群中的其他节点信息添加到transportClient里面
                        //开启嗅探功能后 只要指定集群中的任意一个可用节点就可以了.当把代码运行之后TransportClient里面会把集群中所有节点的信息都拿到,能识别集群中的所有节点.
                .build();

        //获取TransportClient,来操作es,//通过TransportClient可以和es集群交互
        TransportClient transportClient = TransportClient.builder().settings(settings).build();
        //需要使用9300端口,指定es集群中的节点信息, 这个地方指定的端口是节点和节点之间的通信端口是9300,不是Http请求的端口9200.
        TransportAddress transportAddress = new InetSocketTransportAddress(InetAddress.getByName("192.168.80.10"), 9300);
        //添加节点信息,最少指定集群内的某一个节点即可操作这个es集群
        transportClient.addTransportAddress(transportAddress);

        //获取client链接到的节点信息, //获取当前transportClient连接到了集群多少个节点
        List connectedNodes = transportClient.connectedNodes();
        for (DiscoveryNode discoveryNode : connectedNodes) {//for星型循环,将connectedNodes的值,一一传给DiscoveryNode discoveryNode
            System.out.println(discoveryNode.getHostName());//打印192.168.80.10;192.168.80.11;192.168.80.12
            //如果加入transportClient.addTransportAddresses(transportAddress)  只有一个ip,打印的就只有一个.
        }
    }


    String index = "zhouls";//设置索引库
    String type = "emp";//设置类型

    //索引index(四种格式:json,map,bean,es helper)

    /**
     * index-1 json
     * 实际工作中使用
     * @throws Exception
     */
    @Test
    public void test4() throws Exception {
        String jsonStr = "{\"name\":\"tom zhang\",\"age\":19}";//需要转义下  //向索引库中传入一个String字符串,还可以接受其他类型
        IndexResponse indexResponse = transportClient.prepareIndex(index, type, "1")//添加一个id=1的数据
                                                     .setSource(jsonStr)//设值,这是json格式的
                                                     .get();
                        //.execute().actionGet();   这个和上面的get()方法是一样的,get()就是对.execute().actionGet() 进行了封装
        System.out.println(indexResponse.getVersion());
                        //得到这个数据的version,如果version=1代表是新添加的数据
    }


    /**
     * index-2 hashmap
     * 实际工作中使用
     * @throws Exception
     */
    @Test
    public void test5() throws Exception {//把hashmap类型的数据放入index库
        HashMap hashMap = new HashMap();
                //HashMap hashMap是迭代器变量
        hashMap.put("name", "tom");
        hashMap.put("age", 15);
        IndexResponse indexResponse = transportClient.prepareIndex(index, type, "2")//添加一个id=2的数据
                                                     .setSource(hashMap)//设值
                                                     .get();
                    //.execute().actionGet();   这个和上面的get()方法是一样的,get()就是对.execute().actionGet() 进行了封装
        System.out.println(indexResponse.getVersion());
    }


    /**
     * index-3 bean
     * 实际工作中使用
     * 使用对象的时候需要把对象中的属性转化成json字符串
     * @throws Exception
     */

//
//                com.fasterxml.jackson.core
//                jackson-databind
//                2.1.3
//


    @Test
    public void test6() throws Exception {//传入一个对象到index索引库,这里是Person对象
        Person person = new Person();
        person.setName("mack");
        person.setAge(20);

         //如果直接传入一个person对象会报错,java.lang.IllegalArgumentException,必须把对象转换成一个Json字符串,使用jackson依赖
        //IndexResponse indexResponse = transportClient.prepareIndex(index, type, "9").setSource(person).get();


        ObjectMapper objectMapper = new ObjectMapper();
        String writeValueAsString = objectMapper.writeValueAsString(person);
        IndexResponse indexResponse = transportClient.prepareIndex(index, type, "3")
                                                     .setSource(writeValueAsString)
                                                     .get();
//        IndexResponse indexResponse = transportClient.prepareIndex(index, type, "3").setSource(objectMapper.writeValueAsString(person)).get();

        System.out.println(indexResponse.getVersion());
    }

    /**
     * index -4 es helper
     * 测试数据这样使用
     * @throws Exception
     */
    @Test
    public void test7() throws Exception {
        XContentBuilder builder = XContentFactory.jsonBuilder()//XContentFactory 这个是ES官方提供的可以构建Json字符串的工具类.
                                                 .startObject()
                                                 .field("name", "jessic")
                                                 .field("age", 28)
                                                 .endObject();

        IndexResponse indexResponse = transportClient.prepareIndex(index, type, "4")
                                                     .setSource(builder)
                                                     .get();
        System.out.println(indexResponse.getVersion());
    }


    /**
     * get 查询
     * 通过id查询
     * @throws Exception
     */
    @Test
    public void test8() throws Exception {
        GetResponse getResponse = transportClient.prepareGet(index, type, "4")//查询id为4的数据
                                                 .get();
        System.out.println(getResponse.getSourceAsString());
    }

    /**
     * 局部更新
     * @throws Exception
     */
    @Test
    public void test9() throws Exception {
        XContentBuilder builder = XContentFactory.jsonBuilder()//XContentFactory 这个是ES官方提供的可以构建Json字符串的工具类.
                                                 .startObject()
                                                 .field("age", 29)
                                                 .endObject();

        UpdateResponse updateResponse = transportClient.prepareUpdate(index, type, "4")//更新id为4的数据
                                                 .setDoc(builder)
                                                 .get();
        System.out.println(updateResponse.getVersion());//version打印2 数据更新
    }

    /**
     * 删除
     * 通过id删除
     * @throws Exception
     */
    @Test
    public void test10() throws Exception {
            transportClient.prepareDelete(index, type, "4")//删除id为4的数据
                        .get();
    }

    /**
     * count 取总数  类似于sql中的 select count(1) from table;
     * 求总数
     * 类似于mysql中的select count(*)
     */
    @Test
    public void test11() throws Exception {
        long count = transportClient.prepareCount(index)//查找索引库中的数据个数
                                    .setTypes(type)
                                    .get()
                                    .getCount();
        System.out.println(count);
    }


    /**
     * bulk 批量操作 适合初始化数据的时候使用,提高效率
     * 批量操作 bulk
     * @throws Exception
     */
    @Test
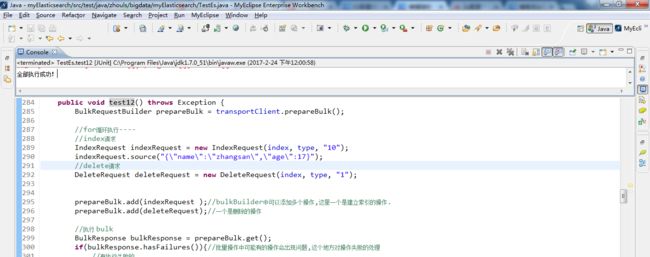
    public void test12() throws Exception {
        BulkRequestBuilder prepareBulk = transportClient.prepareBulk();

        //for循环执行----
        //index请求
        IndexRequest indexRequest = new IndexRequest(index, type, "10");
        indexRequest.source("{\"name\":\"zhangsan\",\"age\":17}");
        //delete请求
        DeleteRequest deleteRequest = new DeleteRequest(index, type, "1");


        prepareBulk.add(indexRequest );//bulkBuilder中可以添加多个操作,这里一个是建立索引的操作.
        prepareBulk.add(deleteRequest);//一个是删除的操作

        //执行 bulk
        BulkResponse bulkResponse = prepareBulk.get();
        if(bulkResponse.hasFailures()){//批量操作中可能有的操作会出现问题,这个地方对操作失败的处理
            //有执行失败的
            BulkItemResponse[] items = bulkResponse.getItems();
            for (BulkItemResponse bulkItemResponse : items) {
                //获取失败信息,并打印
                System.out.println(bulkItemResponse.getFailureMessage());
            }
        }else{
            System.out.println("全部执行成功!");
        }
    }
作者:大数据躺过的坑
出处:http://www.cnblogs.com/zlslch/
