CentOS7上yum部署ELK 6.5.1集群
这里写自定义目录标题
- 1. yum部署单机ELK
- 1.1 部署elasticsearch
- 1.1.1 部署jdk
- 1.1.2 安装Elasticsearch
- 1.1.3 验证
- 1.1.4 配置信息
- 1.1.5 reference
- 1.2 部署kibana
- 1.2.1 Install kibana
- 1.2.2 配置信息
- 1.2.3 验证
- 1.2.4 reference
- 2.部署metricbeat采集系统指标
- 2.1 安装metricbeat
- 2.2 配置信息
- 2.3 验证
- 2.4 reference
- 3. 进阶:ES集群搭建
- 3.1 部署ES
- 3.2 配置信息
- 3.3 验证
1. yum部署单机ELK
1.1 部署elasticsearch
1.1.1 部署jdk
yum install java-1.8.0-openjdk -y
1.1.2 安装Elasticsearch
vim /etc/yum.repos.d/elk.repo
[elasticsearch-6.x]
name=Elasticsearch repository for 6.x packages
baseurl=https://artifacts.elastic.co/packages/6.x/yum
gpgcheck=1
gpgkey=https://artifacts.elastic.co/GPG-KEY-elasticsearch
enabled=1
autorefresh=1
type=rpm-md
yum -y install elasticsearch
systemctl start elasticsearch
systemctl enable elasticsearch
1.1.3 验证
curl -X GET "localhost:9200/"
{
  "name" : "i0B9MC4",
  "cluster_name" : "elasticsearch",
  "cluster_uuid" : "iMZbskMsS-Sa9TPKyq7C_w",
  "version" : {
    "number" : "6.5.1",
    "build_flavor" : "default",
    "build_type" : "rpm",
    "build_hash" : "8c58350",
    "build_date" : "2018-11-16T02:22:42.182257Z",
    "build_snapshot" : false,
    "lucene_version" : "7.5.0",
    "minimum_wire_compatibility_version" : "5.6.0",
    "minimum_index_compatibility_version" : "5.0.0"
  },
  "tagline" : "You Know, for Search"
}
1.1.4 配置信息
/etc/elasticsearch/elasticsearch.yml
默认监听9200端口
1.1.5 reference
Install Elasticsearch with RPM
1.2 部署kibana
1.2.1 Install kibana
yum install kibana -y
systemctl start kibana
systemctl enable kibana
1.2.2 配置信息
/etc/kibana/kibana.yml
默认监听5601,可以通过浏览器访问,默认查询从本机9200端口(ES)
1.2.3 验证
1.2.4 reference
Install Kibana with RPM
2.部署metricbeat采集系统指标
elk中的l:logstash,太重,先来个轻量的采集器:beats家族中的指标采集metricbeat
2.1 安装metricbeat
yum install metricbeat -y
systemctl start metricbeat
systemctl enable metricbeat
metricbeat setup // loads the Kibana dashboards.
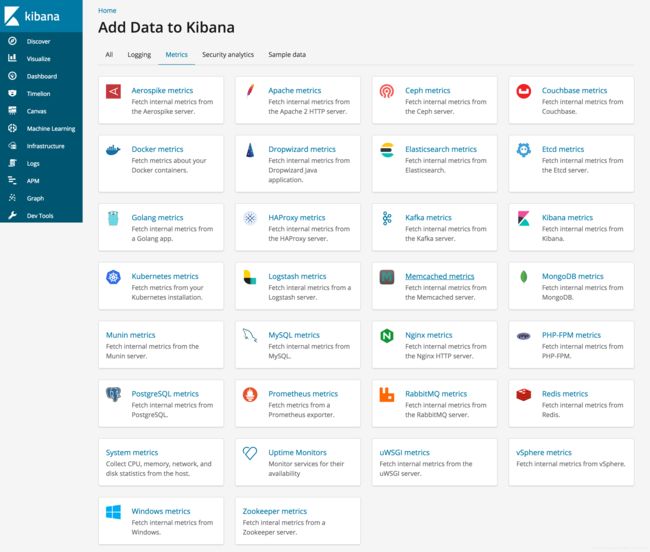
或者参照kibana的指引(以System metrics为例)

2.2 配置信息
/etc/metricbeat/metricbeat.yml
/etc/metricbeat/modules.d/   // 每个组件的采集配置,把文件名中的`.disabled`去掉就是启用
默认不是自动加载配置,修改后需要重启metricbeat。
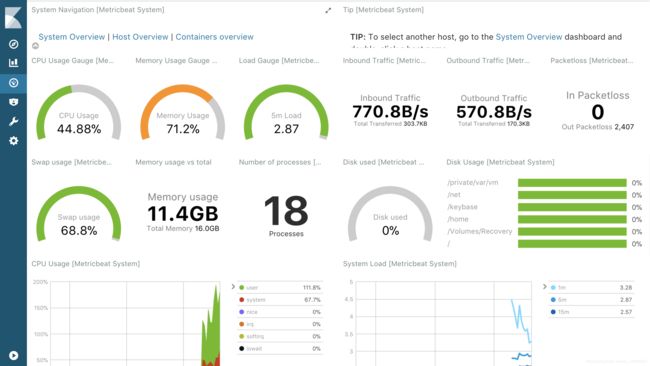
2.3 验证
2.4 reference
- Getting started with Metricbeat
3. 进阶:ES集群搭建
例如集群中一共有3个节点,还需要部署2个节点。
3.1 部署ES
其他2节点,如1.1.1 和 1.1.2 中yum -y install elasticsearch部署好ES
3.2 配置信息
非常简单,默认只需要修改elasticsearch.yml的几个配置项(cluster.name、node.name、discovery.zen.ping.unicast.hosts、discovery.zen.minimum_master_nodes)
# ---------------------------------- Cluster -----------------------------------
#
# Use a descriptive name for your cluster:
#
cluster.name: your_cluster_name  ## 集群保持一致
#
# ------------------------------------ Node ------------------------------------
#
# Use a descriptive name for the node:
#
node.name: your_node_name  ## 保持唯一,每个节点名称不一样
#
# --------------------------------- Discovery ----------------------------------
#
# Pass an initial list of hosts to perform discovery when new node is started:
# The default list of hosts is ["127.0.0.1", "[::1]"]
#
discovery.zen.ping.unicast.hosts: ["10.0.0.1", "10.0.0.2","10.0.0.3"]  ## 所有节点的内网IP,用于发现集群的节点
#
# Prevent the "split brain" by configuring the majority of nodes (total number of master-eligible nodes / 2 + 1):
#
discovery.zen.minimum_master_nodes: 2  ## 防止集群脑裂,主节点数量/2+1,不然网络不好,1个集群变2个不可用集群(数据不完整)就GG了。
#
3.3 验证
# curl http://localhost:9200
{
  "name" : "node-2",
  "cluster_name" : "your_cluster_name",
  "cluster_uuid" : "iMZbskMsS-Sa9TPKyq7C_w",
  "version" : {
    "number" : "6.5.1",
    "build_flavor" : "default",
    "build_type" : "rpm",
    "build_hash" : "8c58350",
    "build_date" : "2018-11-16T02:22:42.182257Z",
    "build_snapshot" : false,
    "lucene_version" : "7.5.0",
    "minimum_wire_compatibility_version" : "5.6.0",
    "minimum_index_compatibility_version" : "5.0.0"
  },
  "tagline" : "You Know, for Search"
}
kibana上默认有对集群做监控
其实没那么难。
ELK对metrics、logging、apm、security等多个领域都有采集器,非常强大,建议做运维的同学多摸索一下。


