SSM框架——Spring+SpringMVC+Mybatis的搭建教程
一:概述
SSM框架在项目开发中经常使用到,相比于SSH框架,它在仅几年的开发中运用的更加广泛。
- Spring作为一个轻量级的框架,有很多的拓展功能,最主要的我们一般项目使用的就是IOC和AOP。
- SpringMVC是Spring实现的一个Web层,相当于Struts的框架,但是比Struts更加灵活和强大!
- Mybatis是 一个持久层的框架,在使用上相比Hibernate更加灵活,可以控制sql的编写,使用 XML或注解进行相关的配置!
根据上面的描述,学习SSM框架就非常的重要了!
二:搭建一个SSM的过程
- 使用Maven管理项目
使用Maven在Eclipse中创建一个webapp的项目 ,具体的创建过程不做演示,如有不会创建的[创建项目]
也可以使用Maven命令进行创建,在Dos窗口进入指定的目录,执行下面命令:
mvn archetype:create -DgroupId=org.ssm.dufy -DartifactId=ssm-demo -DarchetypeArtifactId=maven-archetype-webapp -DinteractiveMode=false
使用命令要注意,系统安装了Maven,并配置好了环境变量![Maven的安装和环境变量配置]
-
导入项目(命名创建),添加依赖
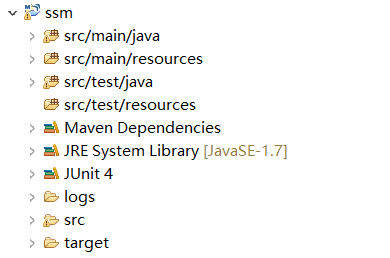
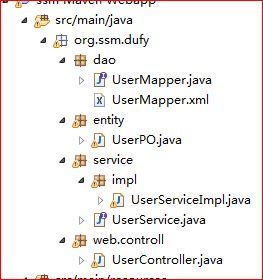
导入项目是IDE中,或者直接在IDE创建,一般默认有【src/main/java】,手动创建【src/test/resources】、【src/test/java】文件夹。如下项目结构:

然后直接配置 pom.xml文件中的包依赖!
  4.0.0
  ssm
  ssm
  war
  0.0.1-SNAPSHOT
  ssm Maven Webapp
  http://maven.apache.org

    4.0.5.RELEASE
    3.2.1
    1.6.6
    1.2.12
    5.1.35


        org.springframework
        spring-core
        ${spring.version}


        org.springframework
        spring-webmvc
        ${spring.version}


        org.springframework
        spring-context
        ${spring.version}


        org.springframework
        spring-context-support
        ${spring.version}


        org.springframework
        spring-aop
        ${spring.version}


        org.springframework
        spring-aspects
        ${spring.version}


        org.springframework
        spring-tx
        ${spring.version}


        org.springframework
        spring-jdbc
        ${spring.version}


        org.springframework
        spring-web
        ${spring.version}


            org.springframework
            spring-test
            ${spring.version}
            test


            org.springframework
            spring-webmvc
            ${spring.version}


            org.springframework
            spring-web
            ${spring.version}


        mysql
        mysql-connector-java
        ${mysql.version}


         com.alibaba
         druid
         0.2.23


            com.alibaba
            fastjson
            1.1.41


        log4j
        log4j
        ${log4j.version}


        org.slf4j
        slf4j-api
        ${slf4j.version}


        ch.qos.logback
        logback-classic
        1.1.2


        ch.qos.logback
        logback-core
        1.1.2


        org.logback-extensions
        logback-ext-spring
        0.1.1


        org.mybatis
        mybatis
        ${mybatis.version}


        org.mybatis
        mybatis-spring
        1.2.0


              javax.servlet
              javax.servlet-api
              3.0.1


              javax.servlet.jsp
              javax.servlet.jsp-api
              2.3.2-b01


              javax.servlet
              jstl
              1.2


      junit
      junit
      3.8.1
      test


    ssm
- 创建数据库和表,生成代码
创建数据库我参考别人的博客数据库设计,这块没有自己去书写,直接添上代码
DROP TABLE IF EXISTS `user_t`;

CREATE TABLE `user_t` (
  `id` int(11) NOT NULL AUTO_INCREMENT,
  `user_name` varchar(40) NOT NULL,
  `password` varchar(255) NOT NULL,
  `age` int(4) NOT NULL,
  PRIMARY KEY (`id`)
) ENGINE=InnoDB AUTO_INCREMENT=2 DEFAULT CHARSET=utf8;

/*Data for the table `user_t` */

insert  into `user_t`(`id`,`user_name`,`password`,`age`) values (1,'测试','sfasgfaf',24)
代码请查看:
- Spring 和 mybatis整合,连接数据库,进行Junit测试
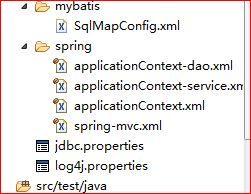
配置文件主要有
applicationContent.xml :Spring的相关配置!
Spring-mhbatis.xml : Spring和Mybatis集成配置!
jdbc.properties : 数据库信息配置!
log4j.xml : 日志输出信息配置!(不做介绍,详细信息查看源码)
主要介绍applicationContext.xml、jdbc.properties。主要内容如下:
jdbc.properties
jdbc_driverClassName =com.mysql.jdbc.Driver
jdbc_url=jdbc:mysql://localhost:3306/ssm?useUnicode=true&characterEncoding=utf8
jdbc_username=root
jdbc_password=root
applicationContext.xml
	xmlns:xsi="http://www.w3.org/2001/XMLSchema-instance" xmlns:context="http://www.springframework.org/schema/context"
	xmlns:aop="http://www.springframework.org/schema/aop" xmlns:tx="http://www.springframework.org/schema/tx"
	xsi:schemaLocation="http://www.springframework.org/schema/beans http://www.springframework.org/schema/beans/spring-beans-3.0.xsd
http://www.springframework.org/schema/context http://www.springframework.org/schema/context/spring-context-3.0.xsd
http://www.springframework.org/schema/aop http://www.springframework.org/schema/aop/spring-aop-3.0.xsd
http://www.springframework.org/schema/tx http://www.springframework.org/schema/tx/spring-tx-3.0.xsd
">

			class="org.springframework.beans.factory.config.PropertyPlaceholderConfigurer">


			init-method="init" destroy-method="close">


					value="20" />


			class="org.springframework.jdbc.datasource.DataSourceTransactionManager">


					pointcut="execution(* org.ssm.dufy.service.impl.*.*(..))" />
测试代码,两种方式:
测试1:
package org.ssm.dufy.service;

import org.junit.Test;
import org.junit.runner.RunWith;
import org.springframework.beans.factory.annotation.Autowired;
import org.springframework.test.context.ContextConfiguration;
import org.springframework.test.context.junit4.SpringJUnit4ClassRunner;
import org.ssm.dufy.entity.User;

/**
 * 配置spring和junit整合,junit启动时加载springIOC容器 spring-test,junit
 */
@RunWith(SpringJUnit4ClassRunner.class)
// 告诉junit spring配置文件
@ContextConfiguration({ "classpath:applicationContext.xml"})
public class IUserServiceTest {

    @Autowired
    public IUserService userService;

    @Test
    public void getUserByIdTest(){

        User user = userService.getUserById(1);
        System.out.println(user.getUserName());
    }

}
测试2:
package org.ssm.dufy.service;

import org.springframework.context.ApplicationContext;
import org.springframework.context.support.ClassPathXmlApplicationContext;
import org.ssm.dufy.entity.User;

public class IUserServiceTest2 {


    public static void main(String[] args) {
        ApplicationContext application = new ClassPathXmlApplicationContext("applicationContext.xml");
        IUserService uService = (IUserService) application.getBean("userService");
        User user = uService.getUserById(1);
        System.out.println(user.getUserName());
    }
}
5:整合SpringMVC,添加配置,创建jsp
SpringMVC需要的依赖在pom.xml中已经加上了,现在需在Web项目中的web.xml中添加启动SpringMVC启动配置和Spring整合SpringMVC的配置了。
新增如下两个文件:
![]()
spring-mvc.xml
web.xml
	xmlns="http://java.sun.com/xml/ns/javaee"
	xsi:schemaLocation="http://java.sun.com/xml/ns/javaee http://java.sun.com/xml/ns/javaee/web-app_3_0.xsd"
	id="WebApp_ID" version="3.0">
  SSM-DEMO


		contextConfigLocation
		/WEB-INF/classes/spring/applicationContext.xml,/WEB-INF/classes/spring/applicationContext-*.xml


		org.springframework.web.context.ContextLoaderListener


        SpringEncodingFilter
        org.springframework.web.filter.CharacterEncodingFilter

            encoding
            UTF-8


            forceEncoding
            true


        SpringEncodingFilter
        /*


		springmvc
		org.springframework.web.servlet.DispatcherServlet


			contextConfigLocation
			classpath:spring/spring-mvc.xml


		springmvc
		*.action


    index.jsp
新增index.jsp文件
<%@ page contentType="text/html; charset=utf-8"%>

<html>
<body>
<h2>Hello World!h2>
body>
html>
6.启动web服务,测试
将上面的项目添加到Tomcat中,启动,控制台没有报错,并在地址栏访问,http://localhost:8080/ssm。页面显示 Hello World! 项目配置ok!
7:编写Controller,和对应得业务界面
新增UserController ,通过参数传递uid获取用户,若用户存在,跳转到showName.jsp ,若用户不存在,则跳转到error.jsp,并返回提示信息!
package org.ssm.dufy.web;

import javax.servlet.http.HttpServletRequest;

import org.springframework.beans.factory.annotation.Autowired;
import org.springframework.stereotype.Controller;
import org.springframework.ui.Model;
import org.springframework.web.bind.annotation.RequestMapping;
import org.springframework.web.bind.annotation.RequestMethod;
import org.springframework.web.bind.annotation.RequestParam;
import org.springframework.web.servlet.ModelAndView;
import org.ssm.dufy.entity.User;
import org.ssm.dufy.service.IUserService;

@Controller
public class UserController {

    @Autowired
    private IUserService userService;

    @RequestMapping(value="/showname",method=RequestMethod.GET)
    public String showUserName(@RequestParam("uid") int uid,HttpServletRequest request,Model model){
        System.out.println("showname");
        User user = userService.getUserById(uid);
        if(user != null){
            request.setAttribute("name", user.getUserName());
            model.addAttribute("mame", user.getUserName());
            return "showName";
        }
        request.setAttribute("error", "没有找到该用户!");
        return "error";
    }
}
Jsp内容如下:
![]()
showName.jsp
<%@ page contentType="text/html; charset=utf-8"%>

<html>
<head>
    <title>show nametitle>
head>
<body>
    <h1>Welcomeh1> ${name }<h1>访问此页面h1>

body>
html>
error.jsp
<%@ page contentType="text/html; charset=utf-8"%>

<html>
<head>
    <title>error pagetitle>
head>
<body>
    <h2> ${error } h2>

body>
html>
三:遇到的问题
1:找不到UserService,报错
可能是包扫描路径的问题,检查一下Service是否在扫描的范围内
2:jsp接收不到request.setAttribute("","");内容
查资料说是因为 JSP的版本问题,可以在Jsp 上面添加 <%@ page isELIgnored="false" %>
或者修改web.xml ,添加version版本!
<web-app xmlns:xsi="http://www.w3.org/2001/XMLSchema-instance"
    xmlns="http://java.sun.com/xml/ns/javaee" xmlns:web="http://java.sun.com/xml/ns/javaee/web-app_2_5.xsd"
    xsi:schemaLocation="http://java.sun.com/xml/ns/javaee http://java.sun.com/xml/ns/javaee/web-app_3_0.xsd"
    id="WebApp_ID" version="3.0" metadata-complete="true">
四:心得总结
或许这些都是站在别人的基础的搭建的,但是看一篇SSM的搭建文章可能很快,看完觉得自己懂了,但是我建议一定要自己去搭建一次,看一遍,和动手做一遍完全是两个概念!
五:参考文章
SSM框架——详细整合教程(Spring+SpringMVC+MyBatis)
Mybatis3.x与Spring4.x整合
附:
项目源代码:
http://download.csdn.net/download/qq_35065439/10115245

