微信小程序之自定义对话框组件弹窗动画
学习微信小程序组件之后,一直都是使用别人的组件开发的,刚看到一篇文章讲解微信小程序自定义组件通俗易懂的开发案例觉得一看就会自己写组件了,真的很棒,感谢原作者的手把手教你实现微信小程序中的自定义组件,自己也添加了一些修改(修改部分样式,添加是否显示“取消”按钮功能,添加弹窗淡入淡出动画,初始化组件赋值操作等一些简单的东西和注释化流程提示)。
主要是敲一遍代码学习之后才体会到原理是这样子的嘛,光看文档是看得懂,跟自己做出来真的是两码事。
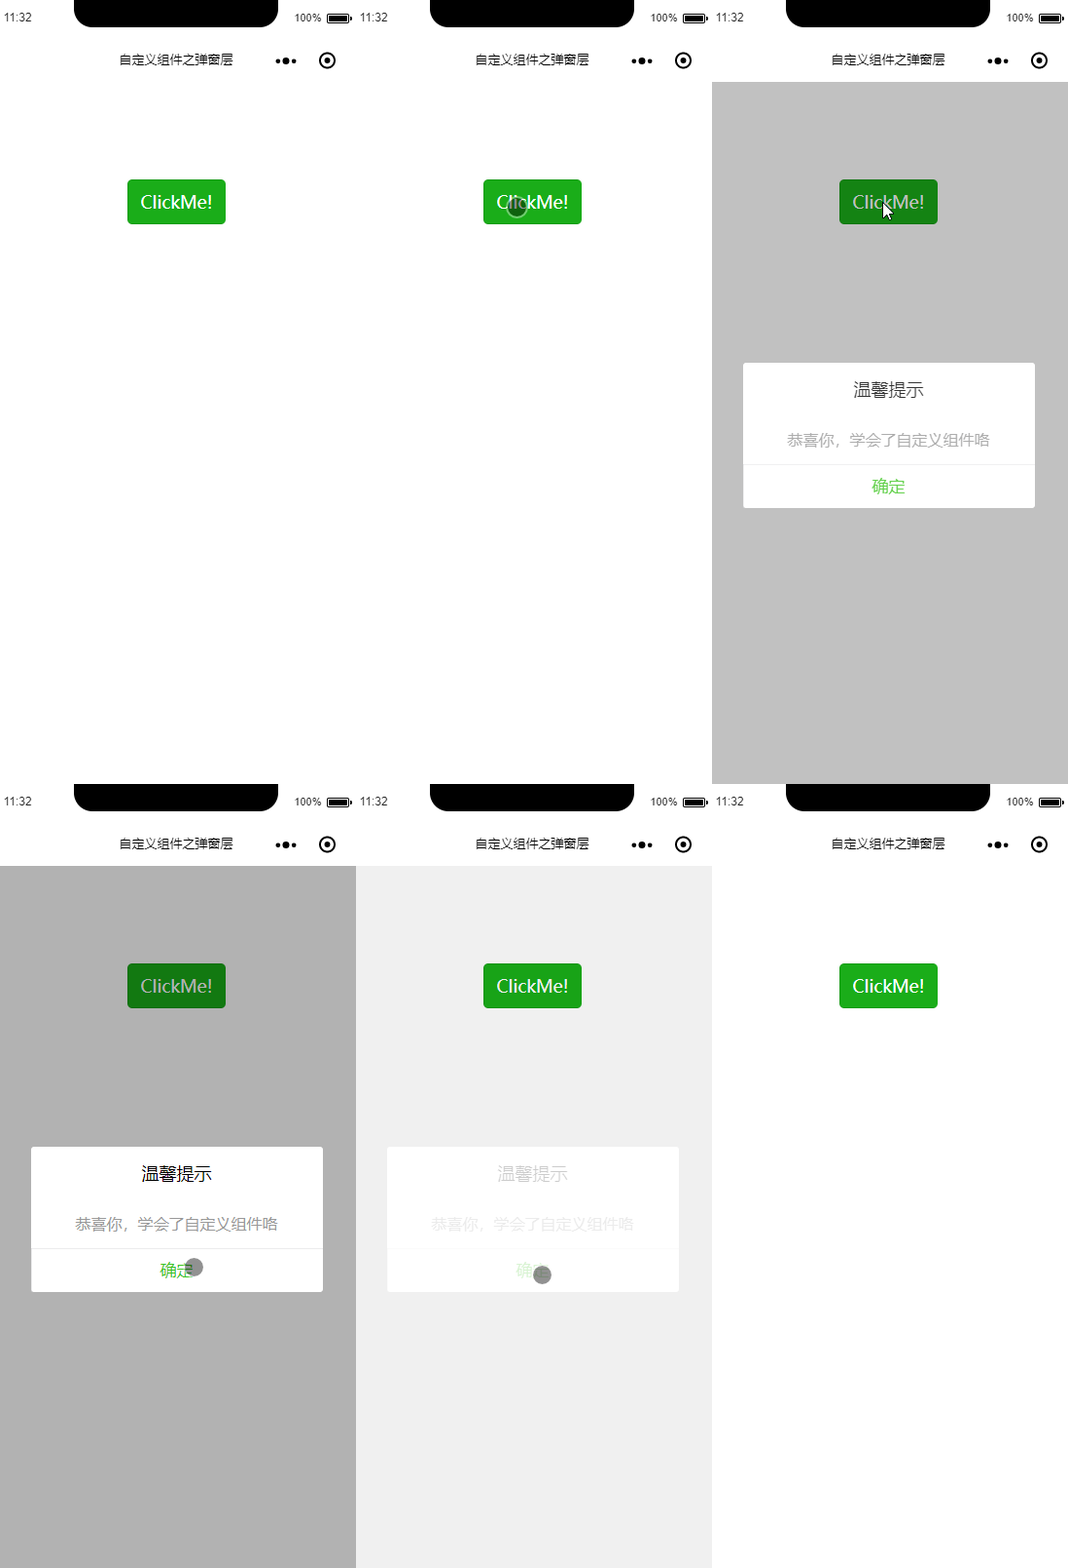
(一)效果展示
1.默认效果:

事件触发流程说明:console中显示

2.去掉“取消”按钮效果:

github下载源码
(二)实现流程
创建子组件页面:
1、新建一个页面如:components文件夹下的Dailog文件夹下的dialog,注意:该页面不需要app.json的(声明的话会报:无效的 pageJSON(components/Dialog/dialog)["component"]),dialog.json记得设置:"component": true, // 自定义组件声明
{
  "component": true, // 自定义组件声明
  "usingComponents": {}//引用其他的组件
}
2、编写wxml/wxss页面代码(跟正常pages页面代码一样);
<view class='wx_dialog_container' hidden="{{!isShow}}" animation="{{updatePanelAnimationData}}">
  <view class='wx-dialog'>
    <view class='wx-dialog-title'>{{ title }}view>
    <view class='wx-dialog-content'>{{ content }}view>
    <view class='wx-dialog-footer'>
      <view class='wx-dialog-btn' catchtap='_cancelEvent' hidden='{{!isShowCancelBtn}}'>{{ cancelText }}view>
      <view class='wx-dialog-btn' catchtap='_confirmEvent'>{{ confirmText }}view>
    view>
  view>
view>
/* components/Dialog/dialog.wxss */

.wx_dialog_container {
  position: fixed;
  z-index: 999;
  top: 0;
  left: 0;
  width: 100vw;
  height: 100vh;
  background: rgba(0, 0, 0, 0.3);
  display: flex;
  justify-content: center;
  align-items: center;
}

.wx-dialog {
  width: 80%;
  max-width: 600rpx;
  background-color: #fff;
  text-align: center;
  border-radius: 6rpx;
}

.wx-dialog-title {
  font-size: 36rpx;
  padding: 30rpx 30rpx 10rpx;
}

.wx-dialog-content {
  padding: 30rpx 30rpx 10rpx;
  min-height: 80rpx;
  font-size: 32rpx;
  line-height: 1.3;
  text-align: justify;
  text-justify: newspaper;
  word-wrap: break-word;
  word-break: break-all;
  color: #999;
  display: flex;
  justify-content: center;
  align-items: center;
}

.wx-dialog-footer {
  display: flex;
  align-items: center;
  position: relative;
  line-height: 90rpx;
  font-size: 34rpx;
}

.wx-dialog-footer::before {
  content: '';
  position: absolute;
  left: 0;
  top: 0;
  right: 0;
  height: 2rpx;
  border-top: 2rpx solid #d5d5d6;
  color: #d5d5d6;
  -webkit-transform-origin: 0 0;
  transform-origin: 0 0;
  -webkit-transform: scaleY(0.5);
  transform: scaleY(0.5);
}

.wx-dialog-btn {
  display: block;
  -webkit-flex: 1;
  flex: 1;
  -webkit-tap-highlight-color: rgba(0, 0, 0, 0);
  position: relative;
}

.wx-dialog-footer .wx-dialog-btn:nth-of-type(1) {
  color: #353535;
}

.wx-dialog-footer .wx-dialog-btn:nth-of-type(2) {
  color: #3cc51f;
}

.wx-dialog-footer .wx-dialog-btn:nth-of-type(2):after {
  content: " ";
  position: absolute;
  left: 0;
  top: 0;
  width: 2rpx;
  bottom: 0;
  border-left: 2rpx solid #d5d5d6;
  color: #d5d5d6;
  -webkit-transform-origin: 0 0;
  transform-origin: 0 0;
  -webkit-transform: scaleX(0.5);
  transform: scaleX(0.5);
}
3、编写js,这个页面构造器跟正常的pages页面的不一样,可以先参考官方的来写Component构造器
// components/Dialog/dialog.js
// 子组件
Component({
  options: {
    multipleSlots: true // 在组件定义时的选项中启用多slot支持
  },
  /**
   * 组件的默认属性列表
   * 用于组件自定义设置
   */
  properties: {
    // 弹窗标题
    title: { // 属性名
      type: String, // 类型(必填),目前接受的类型包括:String, Number, Boolean, Object, Array, null(表示任意类型)
      value: '标题' // 属性初始值(可选),如果未指定则会根据类型选择一个
    },
    // 弹窗内容
    content: {
      type: String,
      value: '弹窗内容'
    },
    // 弹窗取消按钮文字
    cancelText: {
      type: String,
      value: '取消'
    },
    // 弹窗确认按钮文字
    confirmText: {
      type: String,
      value: '确定'
    },
    // 弹窗是否显示“取消”按钮
    isShowCancelBtn: {
      type: Boolean,
      value: false
    }
  },

  /**
   * 私有数据,组件的初始数据
   * 可用于模版渲染
   */
  data: {
    // 弹窗显示控制:默认不显示
    isShow: false,
    updatePanelAnimationData: ''
  },

  /**
   * 组件的方法列表
   * 更新属性和数据的方法与更新页面数据的方法类似
   */
  methods: {
    /*
     * 公有方法(父组件会调用)
     */

    //隐藏弹框
    hideDialog() {
      this.leavePupAnimation();
    },


    //展示弹框
    showDialog() {
      this.goIntoPupAnimation();
    },

    // 弹窗淡入动画设置
    goIntoPupAnimation() {
      // 第1步:创建动画实例
      let animation = wx.createAnimation({
        duration: 500, //动画时长
        timingFunction: "linear", //线性
      });
      // 第2步:这个动画实例赋给当前的动画实例
      this.animation = animation;
      // 第3步:执行第一组动画
      animation.opacity(0).step();
      // 第4步:导出动画对象赋给数据对象储存
      this.setData({
        updatePanelAnimationData: animation.export(),
        isShow: true //显示弹窗
      })
      // 第5步:设置定时器到指定时候后,执行第二组动画
      setTimeout(function() {
        // 执行第二组动画
        animation.opacity(1).step();
        // 给数据对象储存的第一组动画,更替为执行完第二组动画的动画对象
        this.setData({
          updatePanelAnimationData: animation,
        })
      }.bind(this), 500)

    },

    // 弹窗淡出动画设置
    leavePupAnimation() {
      // 第1步:创建动画实例
      let animation = wx.createAnimation({
        duration: 500, //动画时长
        timingFunction: "linear", //线性
      });
      // 第2步:这个动画实例赋给当前的动画实例
      this.animation = animation;
      // 第3步:执行第一组动画
      animation.opacity(0).step();
      // 第4步:导出动画对象赋给数据对象储存
      this.setData({
        updatePanelAnimationData: animation.export()
      })
      // 第5步:设置定时器到指定时候后,执行第二组动画
      setTimeout(function() {
        // 执行第二组动画
        animation.opacity(0).step();
        // 给数据对象储存的第一组动画,更替为执行完第二组动画的动画对象
        this.setData({
          updatePanelAnimationData: animation,
          isShow: false //隐藏弹窗
        })
      }.bind(this), 500)

    },


    /*
     * 内部私有方法建议以下划线开头:子组件内调用
     * triggerEvent 用于触发事件
     */
    _cancelEvent(e) {
      //触发点击“取消”按钮回调
      console.log('子组件dialog.js——您点击了“取消”按钮');
      console.log('取消按钮信息:', e);
      // 通过triggerEvent来给父组件传递信息的
      this.triggerEvent("cancelEvent", '取消'); // 将子组件数据通过参数的形式传递给父组件,这里是向父组件传递事件名,传递一个参数值('取消')给父组件
      this.hideDialog(); //隐藏弹窗
    },


    _confirmEvent(e) {
      //触发点击“确认”按钮回调
      console.log('子组件dialog.js——点击了“确认”按钮');
      console.log('确认按钮信息:', e);
      this.triggerEvent("confirmEvent", '确认');
      this.hideDialog(); //隐藏弹窗
    }
  }
})
父组件页面引用子组件:
1、声明引用子组件:
{
  "usingComponents": {
    "dialog": "/components/Dialog/dialog" //左边是页面使用组件名,类似:;右边是子组件路径
  }
}
2、页面使用组件:
<view class="container">


  <dialog id='dialog'
  title='{{dialogData.title}}'
  content='{{dialogData.content}}'
  cancelText='{{dialogData.cancelText}}'
  confirmText='{{dialogData.confirmText}}'
  isShowCancelBtn='{{dialogData.isShowCancelBtn}}'
  bind:cancelEvent="{{dialogData.cancelEvent}}"
  bind:confirmEvent="{{dialogData.confirmEvent}}">
  dialog>


  <button type="primary" bindtap="showDialog"> ClickMe! button>
view>
3、初始化子组件数据:
//index.js
//获取应用实例
const app = getApp()

Page({
  data: {
    dialogData: { //传向子组件自定义的弹窗内容:默认
      title: '温馨提示', //标题
      content: '恭喜你,学会了自定义组件咯', //内容
      cancelText: '取消', //取消按钮内容
      confirmText: '确定', //确认按钮内容,
      isShowCancelBtn: false, //是否显示“取消”按钮,默认显示
      cancelEvent: '_cancelEvent', //绑定点击取消按钮后的事件
      confirmEvent: '_confirmEvent', //绑定点击确认按钮后的事件
    }
  },
  /**
   * 生命周期函数--监听页面显示
   */
  onShow: function() {
    //获得dialog组件:初始化组件
    this.dialog = this.selectComponent("#dialog"); //获取子组件实例对象,这样就可以直接访问组件的任意数据和方法。
    // 自定义初始化数据内容,会传给子组件显示(可以不设置,有默认值)
    // this.setData({
    //   dialogData: { //传向子组件自定义的弹窗内容:默认
    //     title: '温馨提示', //标题
    //     content: '恭喜你,学会了自定义组件咯', //内容
    //     cancelText: '取消', //取消按钮内容
    //     confirmText: '确定', //确认按钮内容,
    //     isShowCancelBtn: true, //是否显示“取消”按钮,默认显示
    //     cancelEvent: '_cancelEvent', //绑定点击取消按钮后的事件
    //     confirmEvent: '_confirmEvent', //绑定点击确认按钮后的事件
    //   }
    // })
  },

  // 点击显示弹窗提示
  showDialog() {
    console.log('父组件——点击显示子组件弹窗操作');
    this.dialog.showDialog(); //调用组件弹窗显示方法:showDialog()

  },

  //取消事件
  _cancelEvent(e) {
    console.log('父组件index.js——你在子组件点击“取消”按钮,在这里执行回调操作');
    console.log('父组件index.js——取消事件——获取子组件传递过来的值:', e);
  },

  //确认事件
  _confirmEvent(e) {
    console.log('父组件index.js——你在子组件点击“确认”按钮,在这里执行回调操作');
    console.log('父组件index.js——确认事件——获取子组件传递过来的值:', e);
  }

})
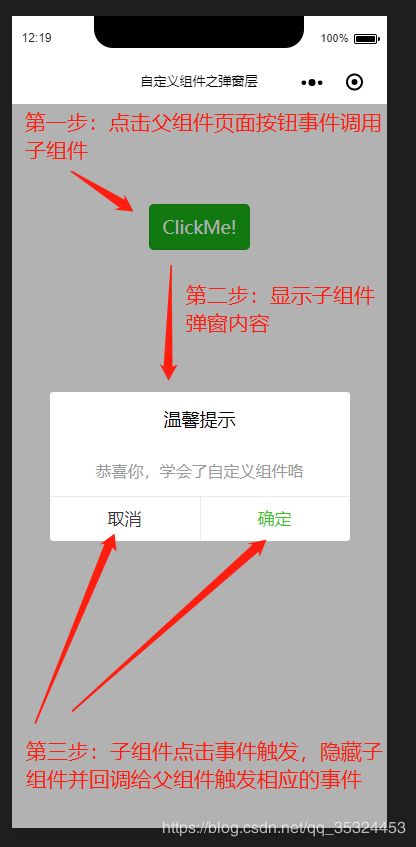
(三)实现原理
(四)参考文献
- 手把手教你实现微信小程序中的自定义组件
- 微信小程序之自定义模态弹窗(带动画)实例
可以根据这个示例,自定义很多自己想要的组件了,比如说根据这个组件弹窗写一个仿微信小程序的消息提示框、表单信息框之类的等等,感谢阅读。github下载源码
