Spring Cloud学习笔记(一站式分布式框架搭建)
Spring Cloud学习笔记(分布式服务)
文章目录
- Spring Cloud学习笔记(分布式服务)
- 1、Spring Cloud简介
- 2、搭建服务注册中心
- 2.1、创建一个空白的Springboot工程
- 2.2、pom.xml文件(主要是添加Eureka依赖)
- 2.3、开启服务注册中心
- 2.4、配置服务注册中心
- 2.5、启动项目
- 3、注册服务提供者
- 3.1、重新创建一个Springboot工程
- 3.2、pom.xml文件(主要添加Eureka依赖)
- 3.3、Controller(访问入口)
- 3.4、需要激活Eureka中的DiscoveryClient
- 3.5、配置服务的名称和注册中心的地址
- 3.6、启动服务提供者
- 3.7、说明
- 4、高可用服务注册中心
- 4.1、添加配置
- 4.2、把修改好的项目再次打成jar包
- 4.3、启动项目
- 4.4、测试
- 5、服务的发现与消费
- 5.1、概念
- 5.2、注册服务
- 5.3、服务消费者
- 5.4、pom.xml文件(主要添加Eureka和Ribbon依赖)
- 5.5、启动类配置
- 5.6、Controller(访问接口)
- 5.7、配置服务注册中心的地址
- 5.8、启动测试
- 6、说明
1、Spring Cloud简介
百度百科: SpringCloud是一系列框架的有序集合。它利用SpringBoot的开发便利性巧妙地简化了分布式系统基础设施的开发,如服务发现注册、配置中心、消息总线、负载均衡、断路器、数据监控等,都可以用SpringBoot的开发风格做到一键启动和部署。SpringCloud并没有重复制造轮子,它只是将目前各家公司开发的比较成熟、经得起实际考验的服务框架组合起来,通过SpringBoot风格进行再封装屏蔽掉了复杂的配置和实现原理,最终给开发者留出了一套简单易懂、易部署和易维护的分布式系统开发工具包。
学习理解: Spring Cloud不是一个东西,它的作用和Dubbo差不多(但是Dubbo需要另外的注册中心的支持),而Spring Cloud是一个一站式分布式框架,使用Spring Cloud我们可以更加快速地实现服务和应用程序的多站点部署。Spring Cloud中使用Eureka搭建服务注册中心,然后再向服务注册中心中注册服务,注册中心有了服务之后,就需要客户端进行服务发现和服务消费,从而完成整个过程。
2、搭建服务注册中心
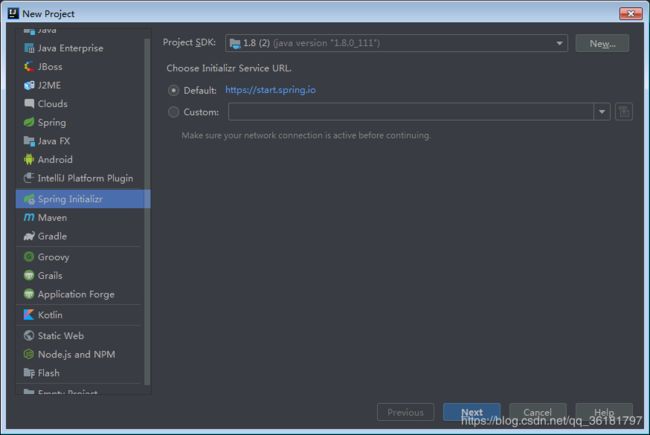
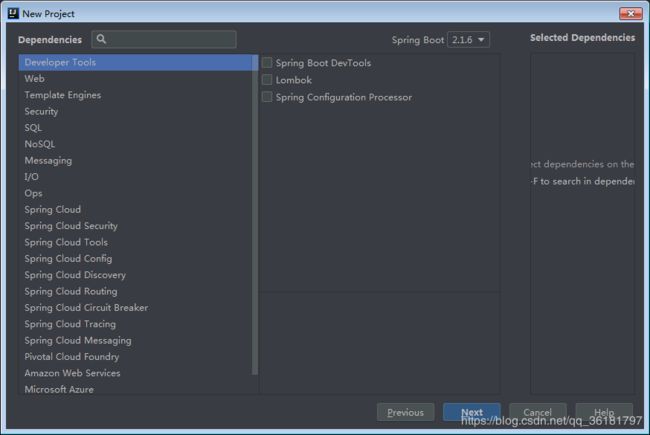
2.1、创建一个空白的Springboot工程
2.2、pom.xml文件(主要是添加Eureka依赖)
注意自己的Springboot的版本,然后去官网看下不同的版本对应的依赖包是啥,否则搞不好就会启动出错的。(如Dalston.SR3 依赖于Springboot1.5.x版本,而springboot2.0.x以上就要用Finchley.RELEASE)。
    4.0.0

        org.springframework.boot
        spring-boot-starter-parent
        2.1.6.RELEASE


    com.eureka
    eureka-server
    0.0.1-SNAPSHOT
    eureka-server
    Demo project for Spring Boot


        1.8


            org.springframework.boot
            spring-boot-starter


            org.springframework.cloud
            spring-cloud-starter-eureka-server
            1.4.4.RELEASE


            org.springframework.boot
            spring-boot-starter-test
            test


            org.springframework.cloud
            spring-cloud-starter-eureka
            1.4.4.RELEASE


                org.springframework.cloud
                spring-cloud-dependencies

                Finchley.RELEASE
                pom
                import


                org.springframework.boot
                spring-boot-maven-plugin
2.3、开启服务注册中心
启动一个服务注册中心只需要一个注解(@EnableEurekaServer)
在Springboot启动类上打上该注解就好了
package com.eureka.server;

import org.springframework.boot.SpringApplication;
import org.springframework.boot.autoconfigure.SpringBootApplication;
import org.springframework.cloud.netflix.eureka.server.EnableEurekaServer;

@EnableEurekaServer
@SpringBootApplication
public class ServerApplication {

    public static void main(String[] args) {
        SpringApplication.run(ServerApplication.class, args);
    }
}
2.4、配置服务注册中心
在配置文件application.properties中配置:
server.port=1111
eureka.instance.hostname=localhost
eureka.client.register-with-eureka=false
eureka.client.fetch-registry=false
eureka.client.service-url.defaultZone=http://${eureka.instance.hostname}:${server.port}/eureka/
2.5、启动项目
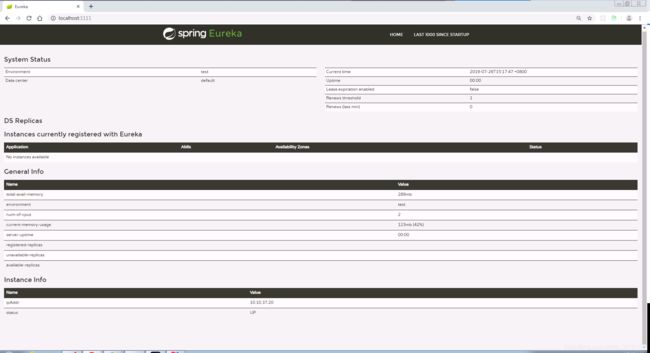
搞好上面的一切,就可以注解启动项目了,然后访问这个端口,出现这样的界面就表示一个服务注册中心搭建完成了,这样我们就不需要像zookeeper那样安装了,直接把这个Springboot工程打成jar包,然后用 java -jar 就可以方便使用了。
3、注册服务提供者
3.1、重新创建一个Springboot工程
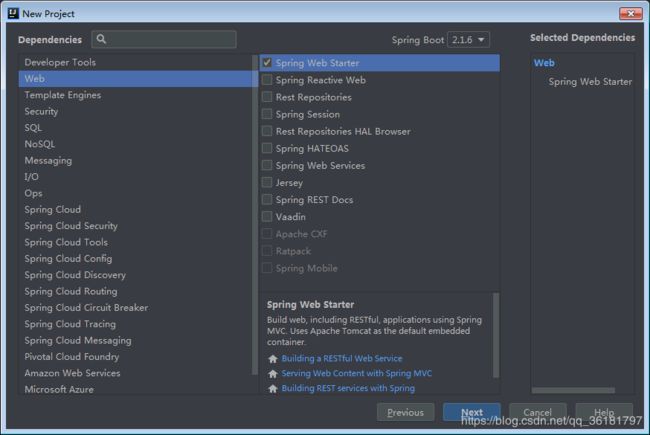
创建一个web工程,所以我们需要选中web的starter的就好了
3.2、pom.xml文件(主要添加Eureka依赖)
同时也要注意Springboot的版本和springcloud的版本。
    4.0.0

        org.springframework.boot
        spring-boot-starter-parent
        2.1.6.RELEASE


    com.example
    provider
    0.0.1-SNAPSHOT
    provider
    Demo project for Spring Boot


        1.8


            org.springframework.boot
            spring-boot-starter-web


            org.springframework.boot
            spring-boot-starter-test
            test


            org.springframework.cloud
            spring-cloud-starter-eureka
            1.4.4.RELEASE


            log4j
            log4j
            1.2.17


                org.springframework.cloud
                spring-cloud-dependencies
                Finchley.RELEASE
                pom
                import


                org.springframework.boot
                spring-boot-maven-plugin
3.3、Controller(访问入口)
创建controller层,写一个controller类:
package com.example.provider.controller;

import org.apache.log4j.Logger;
import org.springframework.beans.factory.annotation.Autowired;
import org.springframework.cloud.client.ServiceInstance;
import org.springframework.cloud.client.discovery.DiscoveryClient;
import org.springframework.web.bind.annotation.RequestMapping;
import org.springframework.web.bind.annotation.RequestMethod;
import org.springframework.web.bind.annotation.RestController;

import java.util.List;

/**
 * @Name:
 * @Description: 提供一个访问入口
 * @Author:[email protected]
 * @Date:2019/7/25 14:05
 */
@RestController
public class HelloController {
    private final Logger logger = Logger.getLogger(getClass());
    @Autowired
    private DiscoveryClient client;

    @RequestMapping(value = "/hello", method = RequestMethod.GET)
    public String index(){
       List instanceList = client.getInstances("hello-service");
        for (int i = 0; i < instanceList.size(); i++) {
            logger.info("/hello,host:"+instanceList.get(i).getHost()+",service_id:"+instanceList.get(i).getServiceId());
        }
        return "你可太牛了!";
    }
}
3.4、需要激活Eureka中的DiscoveryClient
主要在启动类的入口函数出加上一个注解就好了(@EnableDiscoveryClient)
package com.example.provider;

import org.springframework.boot.SpringApplication;
import org.springframework.boot.autoconfigure.SpringBootApplication;
import org.springframework.cloud.client.discovery.EnableDiscoveryClient;

@EnableDiscoveryClient
@SpringBootApplication
public class ProviderApplication {

    public static void main(String[] args) {
        SpringApplication.run(ProviderApplication.class, args);
    }
}
3.5、配置服务的名称和注册中心的地址
需要在application.properties配置文件中配置:
spring.application.name=hello-service
eureka.client.service-url.defaultZone=http://localhost:1111/eureka
3.6、启动服务提供者
直接启动服务提供者,这时再刷新下之前的服务注册中心的页面就可以看到如下:

3.7、说明
以上搭好了一个服务注册中心和一个服务提供者,但是实际中不可能是一个单点的服务注册中心的,一旦发生瘫痪那么整个服务就崩掉了,所以实际应用中需要搭建高可用的注册中心。但是由于本机的系统文件不能更改,所以之后只能参考单点的注册中心了。
4、高可用服务注册中心
(说明:由于本机不支持修改系统文件,本节内容我没有实现,但是具体可以参考 https://blog.csdn.net/u012702547/article/details/77823434 这篇文章来进行)
在Eureka中,通过集群的方式来解决单节点的服务注册中心的问题,它可以把自己也作为服务来向其他服务注册中心来注册自己,这样就形成了一组相互注册的服务注册中心,从而实现服务清单可以相互同步,以3达到高可用的效果。
4.1、添加配置
在上一节的工程的基础上,在添加两个配置文件:
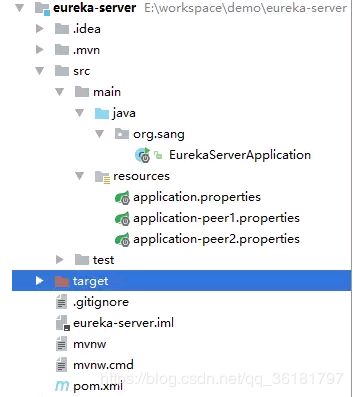
两哥配置文件内容如下:
application-peer1.properties:
spring.application.name=eureka-server
server.port=1111
eureka.instance.hostname=peer1
eureka.client.register-with-eureka=true
eureka.client.service-url.defaultZone=http://peer2:1112/eureka/
application-peer2.properties:
 spring.application.name=eureka-server
 server.port=1112
 eureka.instance.hostname=peer2
 eureka.client.register-with-eureka=true
 eureka.client.service-url.defaultZone=http://peer1:1111/eureka/
说明:
1.在peer1的配置文件中,让它的service-url指向peer2,在peer2的配置文件中让它的service-url指向peer1
2.为了让peer1和peer2能够被正确的访问到,我们需要在C:\Windows\System32\drivers\etc目录下的hosts文件总添加两行配置,如下:
127.0.0.1 peer1
127.0.0.1 peer2
3.由于peer1和peer2互相指向对方,实际上我们构建了一个双节点的服务注册中心集群
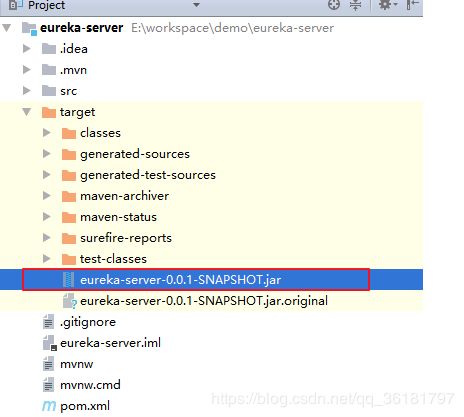
4.2、把修改好的项目再次打成jar包
4.3、启动项目
利用命令行启动项目:
java -jar eureka-server-0.0.1-SNAPSHOT.jar --spring.profiles.active=peer1
java -jar eureka-server-0.0.1-SNAPSHOT.jar --spring.profiles.active=peer2
4.4、测试
修改服务提供者的配置文件:
spring.application.name=hello-service
eureka.client.service-url.defaultZone=http://peer1:1111/eureka,http://peer2:1112/eureka
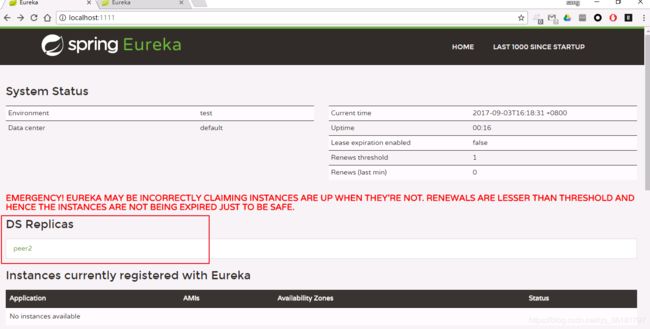
在service-url中添加了两个注册中心地址,两个地址中间用,隔开,然后再启动服务提供者的项目,启动成功之后我们再去刷新http://localhost:1111和http://localhost:1112两个页面,会出现如下的页面:
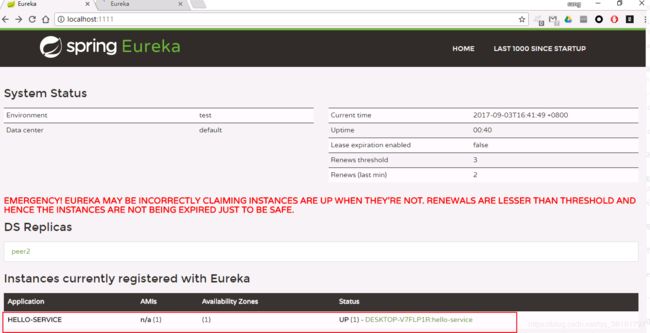

这样这个服务提供者就在这两个服务注册中心都注册了。
5、服务的发现与消费
5.1、概念
服务的发现和消费实际上是两个行为,这两个行为要由不同的对象来完成:服务的发现由Eureka客户端来完成,而服务的消费由Ribbon来完成。Ribbo是一个基于HTTP和TCP的客户端负载均衡器,当我们将Ribbon和Eureka一起使用时,Ribbon会从Eureka注册中心去获取服务端列表,然后进行轮询访问以到达负载均衡的作用,服务端是否在线这些问题则交由Eureka去维护。
5.2、注册服务
使用上面的服务提供者的jar包,利用命令行来启动两个服务:
java -jar provider-0.0.1-SNAPSHOT.jar --server.port=8080
java -jar provider-0.0.1-SNAPSHOT.jar --server.port=8081
(注:这里的eureka-server是单节点的)
出现下图的样子:
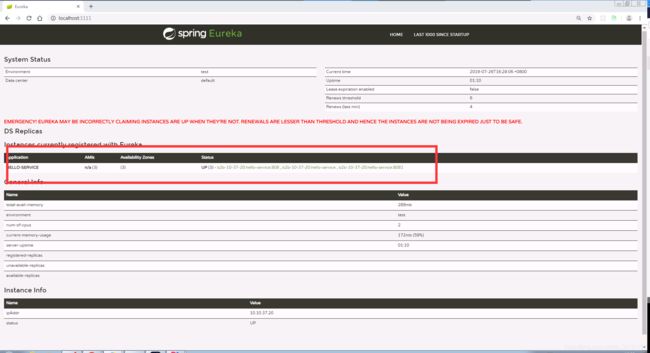
到这里服务的提供者就全部准备好了。
5.3、服务消费者
创建一个简单的Springboot 的web工程。
5.4、pom.xml文件(主要添加Eureka和Ribbon依赖)
注意版本就好
    4.0.0

        org.springframework.boot
        spring-boot-starter-parent
        2.1.6.RELEASE


    com.example
    ribbon-consumer
    0.0.1-SNAPSHOT
    ribbon-consumer
    Demo project for Spring Boot


        1.8


            org.springframework.boot
            spring-boot-starter-web


            org.springframework.boot
            spring-boot-starter-test
            test


            org.springframework.cloud
            spring-cloud-starter-eureka
            1.4.4.RELEASE


            org.springframework.cloud
            spring-cloud-starter-ribbon
            1.3.4.RELEASE


                org.springframework.cloud
                spring-cloud-dependencies
                Finchley.RELEASE
                pom
                import


                org.springframework.boot
                spring-boot-maven-plugin
5.5、启动类配置
1、亮明Eureka客户端的身份
在启动类上加上@EnableDiscoveryClient注解就好了,这样该应用就自动具备了发现服务的能力了。
2、提供RestTemplate的Bean
RestTemplate可以帮助我们发起一个GET或者POST请求,这里我们只需要提供一个RestTemplate Bean就可以了,在提供Bean的同时,添加@LoadBalanced注解,表示开启客户端负载均衡。
package com.example.ribbonconsumer;

import org.springframework.boot.SpringApplication;
import org.springframework.boot.autoconfigure.SpringBootApplication;
import org.springframework.cloud.client.discovery.EnableDiscoveryClient;
import org.springframework.cloud.client.loadbalancer.LoadBalanced;
import org.springframework.context.annotation.Bean;
import org.springframework.web.client.RestTemplate;

@EnableDiscoveryClient
@SpringBootApplication
public class RibbonConsumerApplication {

    public static void main(String[] args) {
        SpringApplication.run(RibbonConsumerApplication.class, args);
    }
    @LoadBalanced
    @Bean
    RestTemplate restTemplate(){
        return new RestTemplate();
    }
}
5.6、Controller(访问接口)
理解:创建一个Controller类,并向Controller类中注入RestTemplate对象,同时在Controller中提供一个名为/ribbon-consumer的接口,在该接口中,我们通过刚刚注入的restTemplate来实现对HELLO-SERVICE服务提供的/hello接口进行调用(上面有HELLO-SERVICE的具体实现的)。在调用的过程中,我们的访问地址是HELLO-SERVICE,而不是一个具体的地址。
package com.example.ribbonconsumer.Controller;

import org.springframework.beans.factory.annotation.Autowired;
import org.springframework.web.bind.annotation.RequestMapping;
import org.springframework.web.bind.annotation.RequestMethod;
import org.springframework.web.bind.annotation.RestController;
import org.springframework.web.client.RestTemplate;

/**
 * @Name:
 * @Description:
 * @Author:[email protected]
 * @Date:2019/7/25 15:14
 */

@RestController
public class ConsumerController {
    @Autowired
    RestTemplate restTemplate;
    @RequestMapping(value = "/ribbon-consumer",method = RequestMethod.GET)
    public String helloController(){
        return restTemplate.getForEntity("http://HELLO-SERVICE/hello",String.class).getBody();
    }
}
5.7、配置服务注册中心的地址
spring.application.name=ribbon-consumer
server.port=9000
eureka.client.service-url.defaultZone=http://localhost:1111/eureka
5.8、启动测试
启动消费者后,刷新Eureka页面:

然后访问消费者的接口(http://localhost:9000/ribbon-consumer):

想知道这个服务时哪个服务提供者提供的只需要观察消费者的日志就可以了,
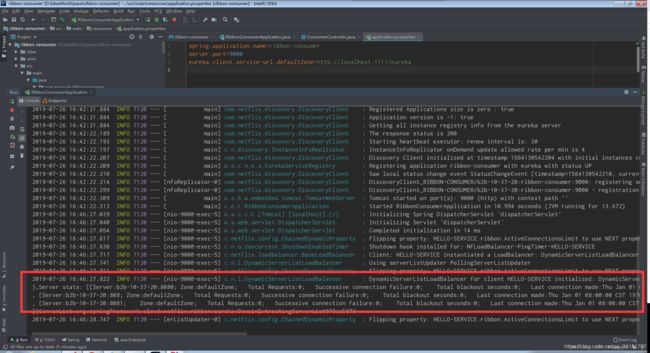
我们可以看到Ribbon输出了当前客户端维护的HELLO-SERVICE的服务列表情况,每一个provider的位置都展示出来,Ribbon就是按照这个列表进行轮询,进而实现基于客户端的负载均衡。同时这里的日志还输出了其他信息,比如各个实例的请求总数量,第一次连接信息,上一次连接信息以及总的请求失败数量等。
6、说明
上面的几小节就可以帮助我们完成一个简单的springcloud的demo了,本篇博客是学习博客,只是记录下学习的过程,主要参考了:
https://mp.weixin.qq.com/s/K-WDRVLh-AFda_g7ga4iwA
https://mp.weixin.qq.com/s/ie042Q_h8ppsroEjQ0bdgg
https://mp.weixin.qq.com/s/GoIZdwt5gJje-ZWMBUoBPw
https://blog.csdn.net/q15150676766/article/details/80931187
这几篇文章可以很好的带领我们一起熟悉springcloud的搭建过程,另外还有两篇文章是帮助理解的:
https://mp.weixin.qq.com/s/kAqOTKUt_qPlxzI4aGS5Pw (Eureka中的核心概念 )
https://mp.weixin.qq.com/s/k4LtO3W6FcNmZU9zBmpojg (客户端负载均衡)
https://blog.csdn.net/u012702547/article/details/77917939(Spring RestTemplate中几种常见的请求方式)
通过自己动手搭建一遍demo可以更好的加深理解,可以为以后实际使用做一个良好的铺垫。
