【FPN车辆目标检测】数据集获取以及Windows7+TensorFlow+Faster-RCNN+FPN代码环境配置和运行过程实测
PS 最近在学目标检测想用最新的FPN网络,刚好看到这篇博客https://blog.csdn.net/Angela_qin/article/details/80944604尝试把它复现,说的小白一点。
1.数据集获取
博主只说是车辆目标检测没将数据集在哪里获取。我在代码中发现E:/study_materials/ECCV Vision Meets Drones Challenge/datasets/carData/carData/的路径设置。去百度了下ECCV Vision Meets Drones Challenge 果然有数据
网址http://www.aiskyeye.com/views/getInfo?loc=2 注册之后下载即可,一共四个挑战第一个Object Detection in image就是,下载它的数据集。
2.minconda+pycharm 安装
这个可以自己去找资料或看我之前的博客https://blog.csdn.net/qq_36401512/article/details/84583552 (centos7版本改windows版)。https://blog.csdn.net/qq_36401512/article/details/84580625 (centos7版本改windows版)。
3.下载https://github.com/yangxue0827/FPN_Tensorflow源代码,
照着博客更改
1.FPN_Tensorflow-master\libs\label_name_dict\label_dict.py文件,最上面from libs.configs import cfgs 下面改成
# -*- coding: utf-8 -*-
from __future__ import division, print_function, absolute_import

from libs.configs import cfgs
if cfgs.DATASET_NAME == 'car':
    NAME_LABEL_MAP = {
        'back_ground': 0,
        "car": 1
    }
elif cfgs.DATASET_NAME == 'ship':
    NAME_LABEL_MAP = {
        'back_ground': 0,
        "ship": 1
    }
2.FPN_Tensorflow-master\data\io\convert_data_to_tfrecord.py文件 对比作者添加了
if gtbox_label.shape[0]==0:
continue
这一小段,避免有的图片没有车辆标注。当然路径什么的还是要自己改的具体如下:
# -*- coding: utf-8 -*-
from __future__ import division, print_function, absolute_import
import sys

sys.path.append('../../')
import xml.etree.cElementTree as ET
import numpy as np
import tensorflow as tf
import glob
import cv2
from help_utils.tools import *
from libs.label_name_dict.label_dict import *
import os

VOC_dir = 'E:/DcmData/xlc/VisDrone2018/VisDrone2018-DET-train/'
txt_dir = 'annotations'
img_dir = 'images'
save_name = 'train'
save_dir = 'D:/Documents and Settings/Administrator/Desktop/ATP/FPN_Tensorflow-master/data/tfrecords/'
img_format = '.jpg'
dataset = 'car'


# FLAGS = tf.app.FLAGS


def _int64_feature(value):
    return tf.train.Feature(int64_list=tf.train.Int64List(value=[value]))


def _bytes_feature(value):
    return tf.train.Feature(bytes_list=tf.train.BytesList(value=[value]))


def convert_pascal_to_tfrecord():
    save_path = save_dir + dataset + '_' + save_name + '.tfrecord'
    mkdir(save_dir)

    label_dir = VOC_dir + txt_dir
    image_dir = VOC_dir + img_dir

    writer = tf.python_io.TFRecordWriter(path=save_path)

    for count, fn in enumerate(os.listdir(image_dir)):
        if ((count + 1) % 4) != 0:
            continue
        else:
            print(count+1)
            image_fp = os.path.join(image_dir, fn)
            image_fp = image_fp.replace('\\', '/')
            label_fp = os.path.join(label_dir, fn.replace('.jpg', '.txt'))
            # print('label_fp:',label_fp)

            img_name = str.encode(fn)

            if not os.path.exists(label_fp):
                print('{} is not exist!'.format(label_fp))
                continue

            # img = np.array(Image.open(img_path))
            img = cv2.imread(image_fp)
            sizeImg = img.shape
            img_height = sizeImg[0]
            img_width = sizeImg[1]

            boxes = []
            with open(label_fp, 'r') as f:
                for line in f.readlines():
                    line = line.strip().split(',') # strip() 方法用于移除字符串头尾指定的字符(默认为空格或换行符)或字符序列。
                    # print('line:',line)
                    if line[4] != '0':
                        # print(line)
                        try:
                            line = [int(i) for i in line]
                        except:
                            line.pop()#Python 字典 pop() 方法删除字典给定键 key 及对应的值,返回值为被删除的值。key 值必须给出。 否则,返回 default 值。
                            line = [round(float(i)) for i in line]# 这些操作只是为去掉引号,line[0]取到的是值。
                            #print('line',line)
                            # xmin, ymin, xmax, ymax, label
                            # 原始标注,xmin,ymin,box_width,box_height,score,category,truncation,occlusion
                        if line[4] == 1 and line[5] == 4:
                            boxes.append([line[0], line[1], line[0] + line[2], line[1] + line[3], 1])

            gtbox_label = np.array(boxes, dtype=np.int32)  # [x1, y1. x2, y2, label]
            if gtbox_label.shape[0]==0:
                continue
            xmin, ymin, xmax, ymax, label = gtbox_label[:, 0], gtbox_label[:, 1], gtbox_label[:, 2], gtbox_label[:,
                                                                                                     3], gtbox_label[:,
                                                                                                         4]
            gtbox_label = np.transpose(
                np.stack([ymin, xmin, ymax, xmax, label], axis=0))  # [ymin, xmin, ymax, xmax, label]

            feature = tf.train.Features(feature={
                # maybe do not need encode() in linux
                'img_name': _bytes_feature(img_name),
                'img_height': _int64_feature(img_height),
                'img_width': _int64_feature(img_width),
                'img': _bytes_feature(img.tostring()),
                'gtboxes_and_label': _bytes_feature(gtbox_label.tostring()),
                'num_objects': _int64_feature(gtbox_label.shape[0])
            })

            example = tf.train.Example(features=feature)

            writer.write(example.SerializeToString())

        #view_bar('Conversion progress', count + 1, len(glob.glob(image_dir + '/*.jpg')))

    print('\nConversion is complete!')


if __name__ == '__main__':
    # xml_path = '../data/dataset/VOCdevkit/VOC2007/Annotations/000005.xml'
    # read_xml_gtbox_and_label(xml_path)

    convert_pascal_to_tfrecord()
VOC_dir :数据集存放位置
txt_dir :VOC_dir目录下面的存放Annotation文件的文件夹名
img_dir :VOC_dir目录下面的存放图片的文件夹名
save_name :后缀设置,选择保存成car_train.tfrecord 还是 car_test.tfrecord
save_dir :转化成tfrecord格式之后,数据的保存位置
dataset :改成car
照着他的博客生成在ATP\FPN_Tensorflow-master\data\tfrecords下生成car_train_tfrecord和car_test_tfrecord。
3.FPN_Tensorflow-master\data\io\read_tfrecord.py 改成如下
def next_batch(dataset_name, batch_size, shortside_len, is_training):
    if dataset_name not in ['nwpu', 'airplane', 'SSDD', 'ship', 'pascal', 'coco', 'car']:
        raise ValueError('dataSet name must be in pascal or coco')

    if is_training:
        #pattern = os.path.join('../data/tfrecords', dataset_name + '_train*')
        pattern = 'D:/Documents and Settings/Administrator/Desktop/ATP/FPN_Tensorflow-master/data/tfrecords/car_train.tfrecord'
    else:
        #pattern = os.path.join('../data/tfrecords', dataset_name + '_test.tfrecord')
        pattern = 'D:/Documents and Settings/Administrator/Desktop/ATP/FPN_Tensorflow-master/data/tfrecords/car_test.tfrecord'
    print('tfrecord path is -->', os.path.abspath(pattern))
    filename_tensorlist = tf.train.match_filenames_once(pattern)
4.FPN_Tensorflow-master\libs\configs\cfgs.py 按照实际情况改成如下:
# -*- coding: utf-8 -*-
from __future__ import division, print_function, absolute_import
import os

# root path
ROOT_PATH = os.path.abspath(r'D:\Documents and Settings\Administrator\Desktop\ATP\FPN_Tensorflow-master')

# pretrain weights path
TEST_SAVE_PATH = ROOT_PATH + '/tools/test_result'
INFERENCE_IMAGE_PATH = ROOT_PATH + '/tools/inference_image'
INFERENCE_SAVE_PATH = ROOT_PATH + '/tools/inference_result'

NET_NAME = 'resnet_v1_101'
#VERSION = 'v2_airplane'
VERSION = 'v1_car'
CLASS_NUM = 1
BASE_ANCHOR_SIZE_LIST = [15, 25, 40, 60, 80]
LEVEL = ['P2', 'P3', 'P4', 'P5', "P6"]
STRIDE = [4, 8, 16, 32, 64]
ANCHOR_SCALES = [1.]
ANCHOR_RATIOS = [1, 0.5, 2, 1 / 3., 3., 1.5, 1 / 1.5]
SCALE_FACTORS = [10., 10., 5., 5.]
OUTPUT_STRIDE = 16
SHORT_SIDE_LEN = 600
#DATASET_NAME = 'airplane'
DATASET_NAME = 'car'
BATCH_SIZE = 1
5.打开https://github.com/yangxue0827/FPN_Tensorflow 下载预先训练模型
Train里面
第2点、download pretrain weight(resnet_v1_101_2016_08_28.tar.gz or resnet_v1_50_2016_08_28.tar.gz) from here, then extract to folder $FPN_ROOT/data/pretrained_weights
点击下载resnet_v1_101_2016_08_28.tar.gz 解压并放到FPN_Tensorflow-master\data\pretrained_weights\resnet_v1_101.ckpt。
6.运行FPN_Tensorflow-master\tools\train.py,训练模型。(当然相关参数可在cfgs.py更改)
7.运行FPN_Tensorflow-master\tools\test.py,他一直报错说Exception: test() missing 1 required positional argument: 'img_num',但img_num=548(下载的验证数据集是548张)已经写那里了啊。没办法改成
1.if __name__ == '__main__':
#img_num = 548
#test(img_num)
test()
2.将def test(img_num):改成def test():
3.img_num=548 ,放入test函数中
with tf.Session(config=config) as sess:
sess.run(init_op)
if not restorer is None:
restorer.restore(sess, restore_ckpt)
print('restore model')
coord = tf.train.Coordinator()
threads = tf.train.start_queue_runners(sess, coord)
img_num=548#加入行代码
for i in range(img_num):
start = time.time()
4.再次运行ok。
结果在test_result文件夹里面。
8.如果要测试现有图片,将图片放入FPN_Tensorflow-master\tools\inference_image文件夹,运行inference.py就可以在得到inference_result文件夹下得到。

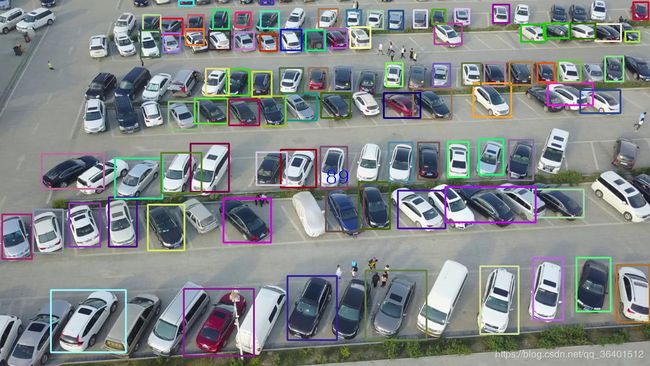
由于训练数据太少只用了1/4(总共6400多张),训练也才训练了38000次(批次大小为1,共24遍左右)出来效果不太好。不过证明其可以用。
而且github开源作者更新了改进后的FPN网络。所以准备换代码。
ps 这次尝试居然花了1天多点,中间各种很蠢的问题。最蠢是gpu被其他程序占用了内存,而鲁大师显示gpu=0%,运行程序一直显示内存不足。恰好又爆出slim.get_or_create_global_step()函数UserWarning: Converting sparse IndexedSlices to a dense Tensor of unknown shape的警告,我还以为是这个函数引起的,查了各种资料,只说原因tf.gather(…)函数。最后我 在C:\Program Files\NVIDIA Corporation\NVSMI里找到文件nvidia-smi.exe,拖到cmd中点击回车才发现已经占用了百分之90多了。我只想说鲁大师靠谱点行么。