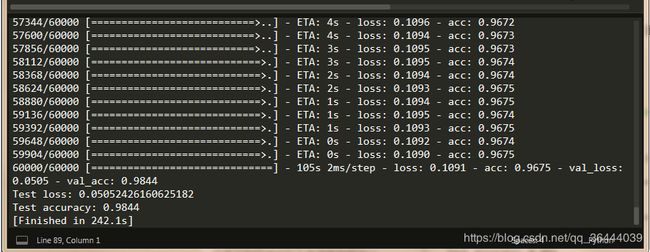
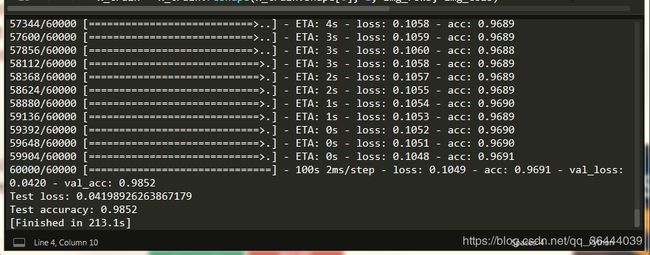
windows7简单的卷积神经网络 cpu和gpu训练时间对比
我的电脑配置:
cpu:i5-4210H
gpu:gtx 950M
之前一个博主的代码,我拿来在自己的win7上进行分别的CPU和GPU卷积神经网络的速度测验。
由于电脑默认的是CPU
如果你想用GPU跑卷积神经网络,那么你需要在代码前段,加上几句
import os os.environ["CUDA_VISIBLE_DEVICS"] = "0,2,3"
当然了,首先你得有CUDA,安装如下:
1、先安装tensorflow-gpu,需要查看对应的版本,通过pycharm运行程序时会报错,提示需要安装CUDA,且会指明需要版本号
>> pip install tensorflow-gpu
2、下载安装CUDA软件,选择相应的版本及操作系统,下载并安装;
CUDA下载地址: https://developer.nvidia.com/cuda-downloads
3、下载cuDNN库,开始需要注册等基本信息,下载并解压,将解压后的bin, include, lib三个文件夹拷贝到CUDA目录下,
我的安装目录为:C:\Program Files\NVIDIA GPU Computing Toolkit\CUDA\v9.0
cuDNN下载地址: https://developer.nvidia.com/cudnn
然后再使用pycharm跑程序,再第一次时很慢,后面就快了
查看:
1、在cmd中使用命令 nvcc -V可查看cuda版本
2、在cmd命令中nvidia-smi可查看gpu使用情况,如果不能识别命令,需要设置Path变量,我的目录为: C:\Program Files\NVIDIA Corporation\NVSMI
下图是跑程序时的截图,对比cpu跑,速度快多了,因为我的笔记本是游戏型的,cpu差一点,显卡好一些。

import os os.environ["CUDA_VISIBLE_DEVICS"] = "0,2,3"
这样,你才能用图中观察到的GPU编号,使用GPU运行Python程序
from __future__ import print_function
import tensorflow as tf
import keras
from keras.datasets import mnist
from keras.models import Sequential
from keras.layers import Dense, Dropout, Flatten
from keras.layers import Conv2D, MaxPooling2D
from keras import backend as K
with tf.device('/cpu:0'):   #选择使用的设备,设备编号之前已经得到

    batch_size = 256
    num_classes = 10
    epochs = 2

    # input image dimensions
    img_rows, img_cols = 28, 28

    # 国内好像不能直接导入数据集,我们试了几次都不行,后来将数据集下载到本地'~/.keras/datasets/',也就是当前目录(我的是用户文件夹下)下的.keras文件夹中。
    #下载的地址为:https://s3.amazonaws.com/img-datasets/mnist.npz
    (x_train, y_train), (x_test, y_test) = mnist.load_data()

    #iamge_data_format选择"channels_last"或"channels_first",该选项指定了Keras将要使用的维度顺序。
    #"channels_first"假定2D数据的维度顺序为(channels, rows, cols),3D数据的维度顺序为(channels, conv_dim1, conv_dim2, conv_dim3)
    if K.image_data_format() == 'channels_first':
        x_train = x_train.reshape(x_train.shape[0], 1, img_rows, img_cols)
        x_test = x_test.reshape(x_test.shape[0], 1, img_rows, img_cols)
        input_shape = (1, img_rows, img_cols)

    #"channels_last"假定2D数据维度顺序为(rows,cols,channels),3D数据维度顺序为(conv_dim1, conv_dim2, conv_dim3, channels)
    else:
        x_train = x_train.reshape(x_train.shape[0], img_rows, img_cols, 1)
        x_test = x_test.reshape(x_test.shape[0], img_rows, img_cols, 1)
        input_shape = (img_rows, img_cols, 1)

    #字段类型的转换
    x_train = x_train.astype('float32')
    x_test = x_test.astype('float32')

    #数据中每个像素值取值转换为0到1之间
    x_train /= 255
    x_test /= 255
    print('x_train shape:', x_train.shape)
    print(x_train.shape[0], 'train samples')
    print(x_test.shape[0], 'test samples')

    # 将标注的0-9数值转换为一个长度为10的one-hot 编码。注意从tensorflow.examples.tutorials.mnist导入的MNIST数据集标注已经是one-hot编码,
    #所以从tutorials中导入MNIST数据集不需要下面两步。
    y_train = keras.utils.to_categorical(y_train, num_classes)
    y_test = keras.utils.to_categorical(y_test, num_classes)

    #下面开始搭建模型的架构,首先导入序贯模型(sequential),即多个网络层的线性堆叠
    model = Sequential()

    #第一层添加一个2维卷积层,卷积核大小为3×3,激活函数为ReLU,输入shape在‘channels_first’模式下为(samples,channels,rows,cols)
    #在‘channels_last’模式下为(samples,rows,cols,channels)
    model.add(Conv2D(32, kernel_size=(3, 3),
                 activation='relu',
                 input_shape=input_shape))
    model.add(Conv2D(64, (3, 3), activation='relu'))

    #为空域信号施加最大值池化,pool_size取(2,2)代表使图片在两个维度上均变为原长的一半
    model.add(MaxPooling2D(pool_size=(2, 2)))

    #Dropout将在训练过程中每次更新参数时按一定概率(rate)随机断开输入神经元,Dropout层用于防止过拟合。
    model.add(Dropout(0.25))

    #Flatten层把多维输入一维化,常用在从卷积层到全连接层的过渡。
    model.add(Flatten())

    #Dense层即全连接层
    model.add(Dense(128, activation='relu'))
    model.add(Dropout(0.5))
    model.add(Dense(num_classes, activation='softmax'))

    #编译用来配置模型的学习过程,下面包括交叉熵损失函数、Adadelta优化器。指标列表metrics在分类问题一般设置为metrics=['accuracy']。
    model.compile(loss=keras.losses.categorical_crossentropy,
              optimizer=keras.optimizers.Adadelta(),
              metrics=['accuracy'])

    #fit函数指定模型训练的epoch数
    model.fit(x_train, y_train,
          batch_size=batch_size,
          epochs=epochs,
          verbose=1,
          validation_data=(x_test, y_test))
    score = model.evaluate(x_test, y_test, verbose=0)
    print('Test loss:', score[0])
    print('Test accuracy:', score[1])

