springCloud技术总结分享-sleuth + zipkin 链路分析
文章目录
- 1.简介
- 2 项目搭建
- 2.1 Commons
- 2.1.1 pojo
- 2.1.2 service
- 2.1.3 util
- 2.2 item service 商品服务
- 2.3 user service 用户服务
- 2.4 order service 订单服务
- 2.5 测试
- 3. eureka 注册与发现
- 3.1 实例操作
- 3.1.1 eureka 注册与发现
- 3.1.2 service provider 服务提供者
- 4.ribbon
- 4.1 项目搭建
- 4.2 eureka 和 “服务提供者”的高可用
- 4.3 ribbon 负载均衡
- 4.4 ribbon 重试
- 5 hystrix 断路器
- 5.1 原理简介
- 5.2 实例操作
- 5.3 hystrix dashboard 断路器仪表盘
- 6.feign
- feign + ribbon 负载均衡和重试
- feign + hystrix 降级
- feign + hystrix 监控和熔断测试
- order service 调用商品库存服务和用户服务
- hystrix + turbine 集群聚合监控
- 7. zuul API网关
- zuul 路由
- 实例操作
- zuul 过滤
- 实例操作
- 8. config 配置中心
- config创建
- 项目应用
- 9. Spring Cloud Bus
- config bus + rabbitmq 消息总线配置刷新
- config 本地文系统
- 10.sleuth 链路跟踪
- 11.sleuth + zipkin 链路分析
- 总结
- github地址:[https://github.com/lmy1965673628/sp-demo.git](https://github.com/lmy1965673628/sp-demo.git)
- cenos7镜像,链接:[https://pan.baidu.com/s/1ioduPYTecZXH143S_5wUzA](https://pan.baidu.com/s/1ioduPYTecZXH143S_5wUzA) 提取码:qhhd
本节教程开始学习springcloud的相关技术知识。在前几篇文章中我们讲解了目前主流技术的相关知识和案例实践,如redis缓存框架,Dubbo服务框架,nginx服务器框架,docker容器等系列知识。很期待各位能与本人进行技术交流。
开始!
1.简介
spring cloud 是一系列框架的集合。它利用 spring boot 的开发便利性巧妙地简化了分布式系统基础设施的开发,如服务发现注册、配置中心、消息总线、负载均衡、断路器、数据监控等,都可以用 spring boot 的开发风格做到一键启动和部署。spring cloud 并没有重复制造轮子,它只是将目前各家公司开发的比较成熟、经得起实际考验的服务框架组合起来,通过 spring boot 风格进行再封装屏蔽掉了复杂的配置和实现原理,最终给开发者留出了一套简单易懂、易部署和易维护的分布式系统开发工具包。
spring cloud 对于中小型互联网公司来说是一种福音,因为这类公司往往没有实力或者没有足够的资金投入去开发自己的分布式系统基础设施,使用 spring cloud 一站式解决方案能在从容应对业务发展的同时大大减少开发成本。同时,随着近几年微服务架构和 docker 容器概念的火爆,也会让 spring cloud 在未来越来越“云”化的软件开发风格中立有一席之地,尤其是在目前五花八门的分布式解决方案中提供了标准化的、一站式的技术方案,意义可能会堪比当年 servlet 规范的诞生,有效推进服务端软件系统技术水平的进步。
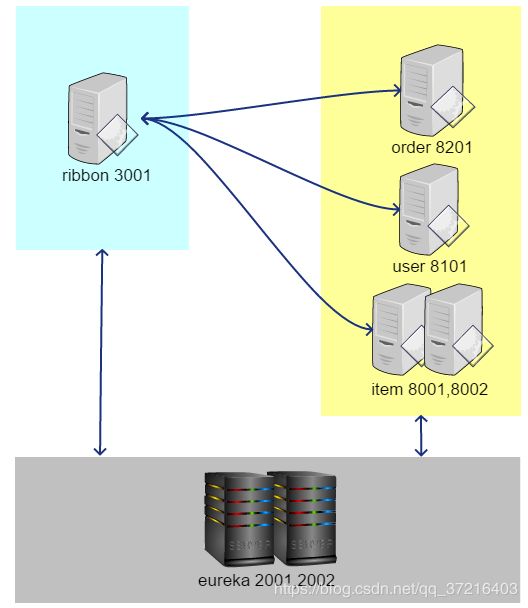
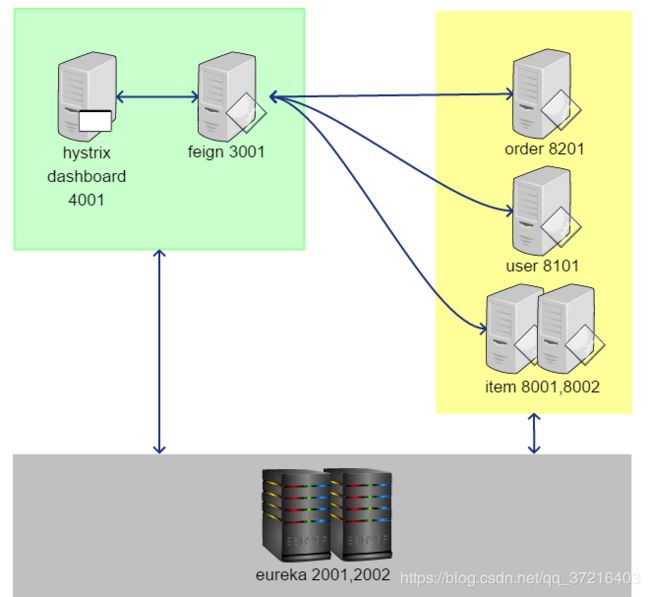
看下面的图,这是一套简洁版的架构设计图。我们依次进行讲解!
 首先说一下它的技术组成
eureka
微服务治理,服务注册和发现
ribbon
负载均衡、请求重试
hystrix
断路器,服务降级、熔断
feign
ribbon + hystrix 集成,并提供生命式客户端
hystrix dashboard 和 turbine
hystrix 微服务监控
zuul
API 网关,提供微服务的统一入口,并提供统一的权限验证
config
配置中心
bus
消息总线, 配置刷新
sleuth+zipkin
链路跟踪
Spring Cloud 对比 Dubbo
Dubbo
Dubbo只是一个远程调用(RPC)框架
默认基于长连接,支持多种序列化格式
Spring Cloud
框架集
提供了一整套微服务解决方案(全家桶)

2 项目搭建
先将项目搭起来,结合实例讲解,比较容易下手
本项目共分为三个服务:

- 商品服务 item service,端口 8001
- 用户服务 user service,端口 8101
- 订单服务 order service,端口 8201
创建一个空的maven的项目,作为父级,删掉里面的src文件
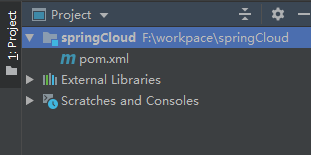
在pom.xml添加依赖
        org.springframework.boot</groupId>
        spring-boot-starter-parent</artifactId>
        2.1.2.RELEASE</version>
 </parent>


            org.springframework.boot</groupId>
            spring-boot-starter</artifactId>
        </dependency>

            org.springframework.boot</groupId>
            spring-boot-starter-test</artifactId>
            test</scope>


                    org.junit.vintage</groupId>
                    junit-vintage-engine</artifactId>
                </exclusion>
            </exclusions>
        </dependency>

            com.fasterxml.jackson.module</groupId>
            jackson-module-parameter-names</artifactId>
            2.9.8</version>
        </dependency>

            com.fasterxml.jackson.datatype</groupId>
            jackson-datatype-jdk8</artifactId>
            2.9.8</version>
        </dependency>

            com.fasterxml.jackson.datatype</groupId>
            jackson-datatype-jsr310</artifactId>
            2.9.8</version>
        </dependency>

            com.fasterxml.jackson.datatype</groupId>
            jackson-datatype-guava</artifactId>
            2.9.8</version>
        </dependency>


            org.projectlombok</groupId>
            lombok</artifactId>
            1.18.6</version>
        </dependency>

            javax.servlet</groupId>
            javax.servlet-api</artifactId>
            3.1.0</version>
        </dependency>

            org.slf4j</groupId>
            slf4j-api</artifactId>
            1.7.26</version>
        </dependency>

            org.apache.commons</groupId>
            commons-lang3</artifactId>
            3.9</version>
        </dependency>

            org.projectlombok</groupId>
            lombok</artifactId>
            true</optional>
        </dependency>
    </dependencies>


                org.apache.maven.plugins</groupId>
                maven-compiler-plugin</artifactId>
                3.8.0</version>

                    1.8</source>
                    1.8</target>
                </configuration>
            </plugin>
        </plugins>
    </build>
2.1 Commons
2.1.1 pojo
@Data
@NoArgsConstructor
@AllArgsConstructor
public class Item {
	private Integer id;
	private String name;
	private Integer number;
}
@Data
@NoArgsConstructor
@AllArgsConstructor
public class Order {
	private String id;
	private User user;
	private List<Item> items;
}
@Data
@NoArgsConstructor
@AllArgsConstructor
public class User {
	private Integer id;
	private String username;
	private String password;
}
2.1.2 service
public interface ItemService {
	//根据订单的id,获取订单中的商品列表
	List<Item> getItems(String orderId);

	//用户保存订单时,购买的所有商品,要减少商品库存
	void decreaseNumbers(List<Item> items);
}
public interface OrderService {
	//根据订单id,获取订单信息
	Order getOrder(String orderId);

	//保存订单
	void addOrder(Order order);
}
public interface UserService {
	//根据用户id,获取用户的信息
	User getUser(Integer id);

	//用户保存一个订单时,增加用户的积分
	void addScore(Integer id, Integer score);
}
2.1.3 util
CookieUtil
public class CookieUtil {

	public static void setCookie(HttpServletResponse response, String name, String value, String domain, String path, int maxAge) {
		Cookie cookie = new Cookie(name, value);
		if(domain != null) {
			cookie.setDomain(domain);
		}
		cookie.setPath(path);
		cookie.setMaxAge(maxAge);
		response.addCookie(cookie);
	}
	public static void setCookie(HttpServletResponse response, String name, String value, int maxAge) {
		setCookie(response, name, value, null, "/", maxAge);
	}
	public static void setCookie(HttpServletResponse response, String name, String value) {
		setCookie(response, name, value, null, "/", 3600);
	}
	public static void setCookie(HttpServletResponse response, String name) {
		setCookie(response, name, "", null, "/", 3600);
	}

	public static String getCookie(HttpServletRequest request, String name) {
		String value = null;
		Cookie[] cookies = request.getCookies();
		if (null != cookies) {
			for (Cookie cookie : cookies) {
				if (cookie.getName().equals(name)) {
					value = cookie.getValue();
				}
			}
		}
		return value;
	}

	public static void removeCookie(HttpServletResponse response, String name, String domain, String path) {
		setCookie(response, name, "", domain, path, 0);
	}
}
JsonUtil 包含了对json操作的各种形式,满足开发几乎所有操作,建议收藏
@Slf4j
public class JsonUtil {

    private static ObjectMapper mapper;
    private static JsonInclude.Include DEFAULT_PROPERTY_INCLUSION = JsonInclude.Include.NON_DEFAULT;
    private static boolean IS_ENABLE_INDENT_OUTPUT = false;
    private static String CSV_DEFAULT_COLUMN_SEPARATOR = ",";
    static {
        try {
            initMapper();
            configPropertyInclusion();
            configIndentOutput();
            configCommon();
        } catch (Exception e) {
            log.error("jackson config error", e);
        }
    }

    private static void initMapper() {
        mapper = new ObjectMapper();
    }

    private static void configCommon() {
        config(mapper);
    }

    private static void configPropertyInclusion() {
        mapper.setSerializationInclusion(DEFAULT_PROPERTY_INCLUSION);
    }

    private static void configIndentOutput() {
        mapper.configure(SerializationFeature.INDENT_OUTPUT, IS_ENABLE_INDENT_OUTPUT);
    }

    private static void config(ObjectMapper objectMapper) {
        objectMapper.enable(JsonGenerator.Feature.WRITE_BIGDECIMAL_AS_PLAIN);
        objectMapper.enable(DeserializationFeature.ACCEPT_EMPTY_STRING_AS_NULL_OBJECT);
        objectMapper.enable(DeserializationFeature.ACCEPT_SINGLE_VALUE_AS_ARRAY);
        objectMapper.enable(DeserializationFeature.FAIL_ON_READING_DUP_TREE_KEY);
        objectMapper.enable(DeserializationFeature.FAIL_ON_NUMBERS_FOR_ENUMS);
        objectMapper.disable(DeserializationFeature.FAIL_ON_UNKNOWN_PROPERTIES);
        objectMapper.disable(DeserializationFeature.FAIL_ON_NULL_FOR_PRIMITIVES);
        objectMapper.disable(SerializationFeature.FAIL_ON_EMPTY_BEANS);
        objectMapper.enable(JsonParser.Feature.ALLOW_COMMENTS);
        objectMapper.disable(JsonGenerator.Feature.ESCAPE_NON_ASCII);
        objectMapper.enable(JsonGenerator.Feature.IGNORE_UNKNOWN);
        objectMapper.enable(JsonParser.Feature.ALLOW_UNQUOTED_FIELD_NAMES);
        objectMapper.disable(SerializationFeature.WRITE_DATES_AS_TIMESTAMPS);
        objectMapper.setDateFormat(new SimpleDateFormat("yyyy-MM-dd HH:mm:ss"));
        objectMapper.enable(JsonParser.Feature.ALLOW_SINGLE_QUOTES);
        objectMapper.registerModule(new ParameterNamesModule());
        objectMapper.registerModule(new Jdk8Module());
        objectMapper.registerModule(new JavaTimeModule());
        objectMapper.registerModule(new GuavaModule());
    }
    public static void setSerializationInclusion(JsonInclude.Include inclusion) {
        DEFAULT_PROPERTY_INCLUSION = inclusion;
        configPropertyInclusion();
    }

    public static void setIndentOutput(boolean isEnable) {
        IS_ENABLE_INDENT_OUTPUT = isEnable;
        configIndentOutput();
    }

    public static <V> V from(URL url, Class<V> c) {
        try {
            return mapper.readValue(url, c);
        } catch (IOException e) {
            log.error("jackson from error, url: {}, type: {}", url.getPath(), c, e);
            return null;
        }
    }

    public static <V> V from(InputStream inputStream, Class<V> c) {
        try {
            return mapper.readValue(inputStream, c);
        } catch (IOException e) {
            log.error("jackson from error, type: {}", c, e);
            return null;
        }
    }

    public static <V> V from(File file, Class<V> c) {
        try {
            return mapper.readValue(file, c);
        } catch (IOException e) {
            log.error("jackson from error, file path: {}, type: {}", file.getPath(), c, e);
            return null;
        }
    }

    public static <V> V from(Object jsonObj, Class<V> c) {
        try {
            return mapper.readValue(jsonObj.toString(), c);
        } catch (IOException e) {
            log.error("jackson from error, json: {}, type: {}", jsonObj.toString(), c, e);
            return null;
        }
    }

    public static <V> V from(String json, Class<V> c) {
        try {
            return mapper.readValue(json, c);
        } catch (IOException e) {
            log.error("jackson from error, json: {}, type: {}", json, c, e);
            return null;
        }
    }

    public static <V> V from(URL url, TypeReference<V> type) {
        try {
            return mapper.readValue(url, type);
        } catch (IOException e) {
            log.error("jackson from error, url: {}, type: {}", url.getPath(), type, e);
            return null;
        }
    }

    public static <V> V from(InputStream inputStream, TypeReference<V> type) {
        try {
            return mapper.readValue(inputStream, type);
        } catch (IOException e) {
            log.error("jackson from error, type: {}", type, e);
            return null;
        }
    }

    public static <V> V from(File file, TypeReference<V> type) {
        try {
            return mapper.readValue(file, type);
        } catch (IOException e) {
            log.error("jackson from error, file path: {}, type: {}", file.getPath(), type, e);
            return null;
        }
    }

    public static <V> V from(Object jsonObj, TypeReference<V> type) {
        try {
            return mapper.readValue(jsonObj.toString(), type);
        } catch (IOException e) {
            log.error("jackson from error, json: {}, type: {}", jsonObj.toString(), type, e);
            return null;
        }
    }

    public static <V> V from(String json, TypeReference<V> type) {
        try {
            return mapper.readValue(json, type);
        } catch (IOException e) {
            log.error("jackson from error, json: {}, type: {}", json, type, e);
            return null;
        }
    }

    public static <V> String to(List<V> list) {
        try {
            return mapper.writeValueAsString(list);
        } catch (JsonProcessingException e) {
            log.error("jackson to error, obj: {}", list, e);
            return null;
        }
    }

    public static <V> String to(V v) {
        try {
            return mapper.writeValueAsString(v);
        } catch (JsonProcessingException e) {
            log.error("jackson to error, obj: {}", v, e);
            return null;
        }
    }

    public static <V> void toFile(String path, List<V> list) {
        try (Writer writer = new FileWriter(new File(path), true)) {
            mapper.writer().writeValues(writer).writeAll(list);
            writer.flush();
        } catch (Exception e) {
            log.error("jackson to file error, path: {}, list: {}", path, list, e);
        }
    }

    public static <V> void toFile(String path, V v) {
        try (Writer writer = new FileWriter(new File(path), true)) {
            mapper.writer().writeValues(writer).write(v);
            writer.flush();
        } catch (Exception e) {
            log.error("jackson to file error, path: {}, obj: {}", path, v, e);
        }
    }

    public static String getString(String json, String key) {
        if (StringUtils.isEmpty(json)) {
            return null;
        }
        try {
            JsonNode node = mapper.readTree(json);
            if (null != node) {
                return node.get(key).toString();
            } else {
                return null;
            }
        } catch (IOException e) {
            log.error("jackson get string error, json: {}, key: {}", json, key, e);
            return null;
        }
    }

    public static Integer getInt(String json, String key) {
        if (StringUtils.isEmpty(json)) {
            return null;
        }
        try {
            JsonNode node = mapper.readTree(json);
            if (null != node) {
                return node.get(key).intValue();
            } else {
                return null;
            }
        } catch (IOException e) {
            log.error("jackson get int error, json: {}, key: {}", json, key, e);
            return null;
        }
    }

    public static Long getLong(String json, String key) {
        if (StringUtils.isEmpty(json)) {
            return null;
        }
        try {
            JsonNode node = mapper.readTree(json);
            if (null != node) {
                return node.get(key).longValue();
            } else {
                return null;
            }
        } catch (IOException e) {
            log.error("jackson get long error, json: {}, key: {}", json, key, e);
            return null;
        }
    }

    public static Double getDouble(String json, String key) {
        if (StringUtils.isEmpty(json)) {
            return null;
        }
        try {
            JsonNode node = mapper.readTree(json);
            if (null != node) {
                return node.get(key).doubleValue();
            } else {
                return null;
            }
        } catch (IOException e) {
            log.error("jackson get double error, json: {}, key: {}", json, key, e);
            return null;
        }
    }

    public static BigInteger getBigInteger(String json, String key) {
        if (StringUtils.isEmpty(json)) {
            return new BigInteger(String.valueOf(0.00));
        }
        try {
            JsonNode node = mapper.readTree(json);
            if (null != node) {
                return node.get(key).bigIntegerValue();
            } else {
                return null;
            }
        } catch (IOException e) {
            log.error("jackson get biginteger error, json: {}, key: {}", json, key, e);
            return null;
        }
    }

    public static BigDecimal getBigDecimal(String json, String key) {
        if (StringUtils.isEmpty(json)) {
            return null;
        }
        try {
            JsonNode node = mapper.readTree(json);
            if (null != node) {
                return node.get(key).decimalValue();
            } else {
                return null;
            }
        } catch (IOException e) {
            log.error("jackson get bigdecimal error, json: {}, key: {}", json, key, e);
            return null;
        }
    }

    public static boolean getBoolean(String json, String key) {
        if (StringUtils.isEmpty(json)) {
            return false;
        }
        try {
            JsonNode node = mapper.readTree(json);
            if (null != node) {
                return node.get(key).booleanValue();
            } else {
                return false;
            }
        } catch (IOException e) {
            log.error("jackson get boolean error, json: {}, key: {}", json, key, e);
            return false;
        }
    }

    public static byte[] getByte(String json, String key) {
        if (StringUtils.isEmpty(json)) {
            return null;
        }
        try {
            JsonNode node = mapper.readTree(json);
            if (null != node) {
                return node.get(key).binaryValue();
            } else {
                return null;
            }
        } catch (IOException e) {
            log.error("jackson get byte error, json: {}, key: {}", json, key, e);
            return null;
        }
    }

    public static <T> ArrayList<T> getList(String json, String key) {
        if (StringUtils.isEmpty(json)) {
            return null;
        }
        String string = getString(json, key);
        return from(string, new TypeReference<ArrayList<T>>() {});
    }

    public static <T> String add(String json, String key, T value) {
        try {
            JsonNode node = mapper.readTree(json);
            add(node, key, value);
            return node.toString();
        } catch (IOException e) {
            log.error("jackson add error, json: {}, key: {}, value: {}", json, key, value, e);
            return json;
        }
    }

    private static <T> void add(JsonNode jsonNode, String key, T value) {
        if (value instanceof String) {
            ((ObjectNode) jsonNode).put(key, (String) value);
        } else if (value instanceof Short) {
            ((ObjectNode) jsonNode).put(key, (Short) value);
        } else if (value instanceof Integer) {
            ((ObjectNode) jsonNode).put(key, (Integer) value);
        } else if (value instanceof Long) {
            ((ObjectNode) jsonNode).put(key, (Long) value);
        } else if (value instanceof Float) {
            ((ObjectNode) jsonNode).put(key, (Float) value);
        } else if (value instanceof Double) {
            ((ObjectNode) jsonNode).put(key, (Double) value);
        } else if (value instanceof BigDecimal) {
            ((ObjectNode) jsonNode).put(key, (BigDecimal) value);
        } else if (value instanceof BigInteger) {
            ((ObjectNode) jsonNode).put(key, (BigInteger) value);
        } else if (value instanceof Boolean) {
            ((ObjectNode) jsonNode).put(key, (Boolean) value);
        } else if (value instanceof byte[]) {
            ((ObjectNode) jsonNode).put(key, (byte[]) value);
        } else {
            ((ObjectNode) jsonNode).put(key, to(value));
        }
    }

    public static String remove(String json, String key) {
        try {
            JsonNode node = mapper.readTree(json);
            ((ObjectNode) node).remove(key);
            return node.toString();
        } catch (IOException e) {
            log.error("jackson remove error, json: {}, key: {}", json, key, e);
            return json;
        }
    }

    public static <T> String update(String json, String key, T value) {
        try {
            JsonNode node = mapper.readTree(json);
            ((ObjectNode) node).remove(key);
            add(node, key, value);
            return node.toString();
        } catch (IOException e) {
            log.error("jackson update error, json: {}, key: {}, value: {}", json, key, value, e);
            return json;
        }
    }

    public static String format(String json) {
        try {
            JsonNode node = mapper.readTree(json);
            return mapper.writerWithDefaultPrettyPrinter().writeValueAsString(node);
        } catch (IOException e) {
            log.error("jackson format json error, json: {}", json, e);
            return json;
        }
    }

    public static boolean isJson(String json) {
        try {
            mapper.readTree(json);
            return true;
        } catch (Exception e) {
            log.error("jackson check json error, json: {}", json, e);
            return false;
        }
    }

    private static InputStream getResourceStream(String name) {
        return JsonUtil.class.getClassLoader().getResourceAsStream(name);
    }

    private static InputStreamReader getResourceReader(InputStream inputStream) {
        if (null == inputStream) {
            return null;
        }
        return new InputStreamReader(inputStream, StandardCharsets.UTF_8);
    }
}
JsonResult,此工具类也提供了多种响应形式,建议收藏
@Getter
@Setter
public class JsonResult<T> {
    /**
     * 成功
     */
    public static final int SUCCESS = 200;

    /**
     * 没有登录
     */
    public static final int NOT_LOGIN = 400;

    /**
     * 发生异常
     */
    public static final int EXCEPTION = 401;

    /**
     * 系统错误
     */
    public static final int SYS_ERROR = 402;

    /**
     * 参数错误
     */
    public static final int PARAMS_ERROR = 403;

    /**
     * 不支持或已经废弃
     */
    public static final int NOT_SUPPORTED = 410;

    /**
     * AuthCode错误
     */
    public static final int INVALID_AUTHCODE = 444;

    /**
     * 太频繁的调用
     */
    public static final int TOO_FREQUENT = 445;

    /**
     * 未知的错误
     */
    public static final int UNKNOWN_ERROR = 499;
    private int code;
    private String msg;
    private T data;


    public static JsonResult build() {
        return new JsonResult();
    }

    public static JsonResult build(int code) {
        return new JsonResult().code(code);
    }

    public static JsonResult build(int code, String msg) {
        return new JsonResult<String>().code(code).msg(msg);
    }

    public static <T> JsonResult<T> build(int code, T data) {
        return new JsonResult<T>().code(code).data(data);
    }

    public static <T> JsonResult<T> build(int code, String msg, T data) {
        return new JsonResult<T>().code(code).msg(msg).data(data);
    }

    public JsonResult<T> code(int code) {
        this.code = code;
        return this;
    }

    public JsonResult<T> msg(String msg) {
        this.msg = msg;
        return this;
    }

    public JsonResult<T> data(T data) {
        this.data = data;
        return this;
    }


    public static JsonResult ok() {
        return build(SUCCESS);
    }

    public static JsonResult ok(String msg) {
        return build(SUCCESS, msg);
    }

    public static <T> JsonResult<T> ok(T data) {
        return build(SUCCESS, data);
    }

    public static JsonResult err() {
        return build(EXCEPTION);
    }

    public static JsonResult err(String msg) {
        return build(EXCEPTION, msg);
    }

    @Override
    public String toString() {
        return JsonUtil.to(this);
    }
}
2.2 item service 商品服务
创建一个module项目,选择springboot
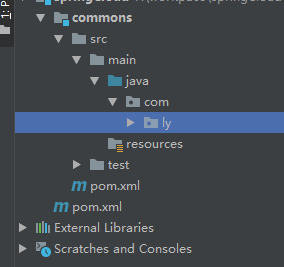
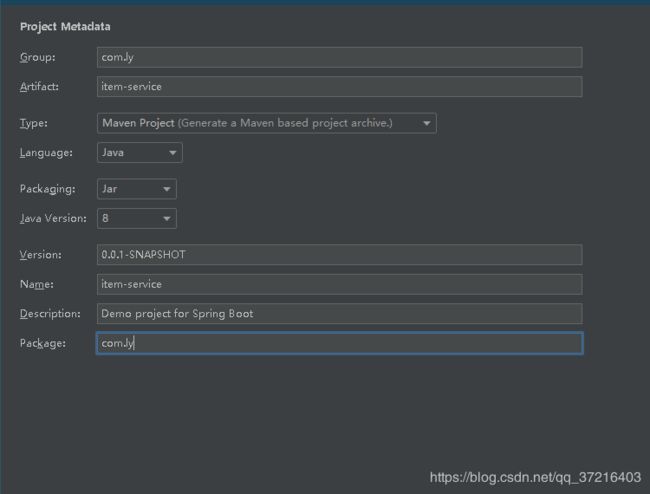 看一下结构,创建图所示的controller,service包。
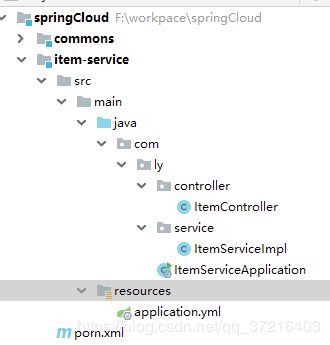
ItemServiceImpl
@Slf4j
@Service
public class ItemServiceImpl implements ItemService {

    @Override
    public List<Item> getItems(String orderId) {
        ArrayList<Item> list = new ArrayList<Item>();
        list.add(new Item(1, "商品 1",1));
        list.add(new Item(2, "商品 2",2));
        list.add(new Item(3, "商品 3",3));
        list.add(new Item(4, "商品 4",4));
        list.add(new Item(5, "商品 5",5));
        return list;
    }

    @Override
    public void decreaseNumbers(List<Item> list) {
        if (log.isInfoEnabled()) {
            for(Item item : list) {
                log.info("减少库存 - "+item);
            }
        }
    }
}
@Slf4j
@RestController
public class ItemController {
    @Autowired
    private ItemService itemService;

    @Value("${server.port}")
    private int port;

    @GetMapping("/{orderId}")
    public JsonResult<List<Item>> getItems(@PathVariable String orderId) {
        log.info("server.port="+port+", orderId="+orderId);

        List<Item> items = itemService.getItems(orderId);
        return JsonResult.ok(items).msg("port="+port);
    }

    @PostMapping("/decreaseNumber")
    public JsonResult decreaseNumber(@RequestBody List<Item> items) {
        itemService.decreaseNumbers(items);
        return JsonResult.ok();
    }
}
application.yml

修改pom.xml,引入Commons,并依赖父级
 在父级的pom.xml中添加module

运行看一下是否成功。若启动失败,请查看具体原因进行分析,若需帮助,请留言。
2.3 user service 用户服务
过程跟上面一样,创建一个module项目,选择spring boot
请自行创建吧!,目录结构如下
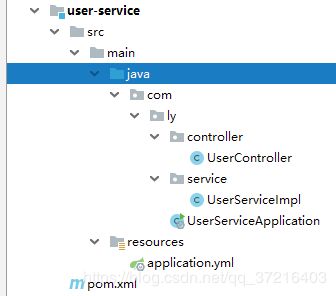
UserServiceImpl
@Slf4j
@Service
public class UserServiceImpl implements UserService {
    @Value("${sp.user-service.users}")
    private String userJson;

    @Override
    public User getUser(Integer id) {
        log.info("users json string : "+userJson);
        List<User> list = JsonUtil.from(userJson, new TypeReference<List<User>>() {});
        for (User u : list) {
            if (u.getId().equals(id)) {
                return u;
            }
        }

        return new User(id, "name-"+id, "pwd-"+id);
    }

    @Override
    public void addScore(Integer id, Integer score) {
        //TODO 这里增加积分
        log.info("user "+id+" - 增加积分 "+score);
    }

}
UserController
@Slf4j
@RestController
public class UserController {

    @Autowired
    private UserService userService;

    @GetMapping("/{userId}")
    public JsonResult<User> getUser(@PathVariable Integer userId) {
        log.info("get user, userId="+userId);
        User u = userService.getUser(userId);
        return JsonResult.ok(u);
    }

    @GetMapping("/{userId}/score")
    public JsonResult addScore(
            @PathVariable Integer userId, Integer score) {
        userService.addScore(userId, score);
        return JsonResult.ok();
    }
}
application.yml
sp:
  user-service:
    users: "[{\"id\":7, \"username\":\"abc\",\"password\":\"123\"},{\"id\":8, \"username\":\"def\",\"password\":\"456\"},{\"id\":9, \"username\":\"ghi\",\"password\":\"789\"}]"

spring:
  application:
    name: user-service

server:
  port: 8101
pom.xml的配置跟item-service一样
启动程序,检验是否成功运行
2.4 order service 订单服务
一样的套路,创建一个子module,名字为order-service

OrderServiceImpl
@Slf4j
@Service
public class OrderServiceImpl implements OrderService {
    @Override
    public Order getOrder(String orderId) {
        //TODO: 调用user-service获取用户信息
        //TODO: 调用item-service获取商品信息
        Order order = new Order();
        order.setId(orderId);
        return order;
    }
    @Override
    public void addOrder(Order order) {
        //TODO: 调用item-service减少商品库存
        //TODO: 调用user-service增加用户积分
        log.info("保存订单:"+order);
    }
}
OrderController
@Slf4j
@RestController
public class OrderController {
    @Autowired
    private OrderService orderService;

    @GetMapping("/{orderId}")
    public JsonResult<Order> getOrder(@PathVariable String orderId) {
        log.info("get order, id="+orderId);

        Order order = orderService.getOrder(orderId);
        return JsonResult.ok(order);
    }

    @GetMapping("/")
    public JsonResult addOrder() {
        //模拟post提交的数据
        Order order = new Order();
        order.setId("123abc");
        order.setUser(new User(7,null,null));
        order.setItems(Arrays.asList(new Item[] {
                new Item(1,"aaa",2),
                new Item(2,"bbb",1),
                new Item(3,"ccc",3),
                new Item(4,"ddd",1),
                new Item(5,"eee",5),
        }));
        orderService.addOrder(order);
        return JsonResult.ok();
    }
}
application.yml
spring:
  application:
    name: order-service

server:
  port: 8201
pom.xml的配置跟item-service一样
2.5 测试
-
item-service
根据orderid,查询商品 http://localhost:8001/35。查看结果
 减少商品库存
http://localhost:8001/decreaseNumber
使用postman,POST发送以下格式数据:
[{“id”:1, “name”:“abc”, “number”:23},{“id”:2, “name”:“def”, “number”:11}]

-
user-service
根据userid查询用户信息
http://localhost:8101/7
根据userid,为用户增加积分
http://localhost:8101/7/score?score=100 -
order-service
根据orderid,获取订单
http://localhost:8201/123abc
保存订单,观察控制台日志输出
http://localhost:8201/
3. eureka 注册与发现
看一下官网解释:
Eureka是基于REST(代表性状态转移)的服务,主要在AWS云中用于定位服务,以实现负载均衡和中间层服务器的故障转移。我们称此服务为Eureka服务器。Eureka还带有一个基于Java的客户端组件Eureka Client,它使与服务的交互变得更加容易。客户端还具有一个内置的负载平衡器,可以执行基本的循环负载平衡。在Netflix,更复杂的负载均衡器将Eureka包装起来,以基于流量,资源使用,错误条件等多种因素提供加权负载均衡,以提供出色的弹性。
总结一下,它就是一个服务发现框架,服务?发现?是不是有点懵呢?OK,举个例子,拿租房子的案例说说。
若没有中介的情况下,用户找房子租住,需要一个一个的寻找有房源的房东,费时费力,终究个人有限,找不到很多的房源。用户就相当于微服务的customer,房东相当于微服务的provider。消费者Consumer需要调用提供者Provider提供的一些服务,就像我们现在需要租他们的房子一样。
若只是租客和房东之间直接进行寻找,效率是很低的,房东找不到租客赚不到钱,租客找不到房东住不了房。所以,房东需要将自己房源信息广播出去,如贴小广告,但是又有问题就出现了。
1 不是租客的也能收到这种租房消息,这在现实世界没什么,但是在计算机的世界中就会出现资源消耗的问题。第二、租客这样还是很难找到你,试想一下我需要租房,我还需要东一个西一个地去找小广告吗,麻不麻烦?
找中介就不一样了,它是为我们提供了统一房源的地方,我们消费者只需要跑到它那里去找就行了。而对于房东来说,他们也只需要把房源在中介那里发布就行了。
看一下关系图:
 但是,又有问题出现了:
房东登记房源信息之后如果不想卖房子了怎么办?我们是不是需要让房东定期续约?如果房东不进行续约是不是要将他们从中介那里的注册列表中移除。
租客是不是也要进行注册呢?不然合同乙方怎么来呢?
中介可不可以做连锁店呢?如果这一个店因为某些不可抗力因素而无法使用,那么我们是否可以换一个连锁店呢?
再看一下设计图:
 OK,接下来我们再看一下Eureka的相关概念
服务注册 Register:
当 Eureka 客户端向[Eureka] Server注册时,它将提供自身的元数据,比如IP地址、端口,运行状况指示符URL,主页等。
服务续约 Renew:
Eureka 客户会每隔30秒(默认情况下)发送一次心跳来续约。通过续约来告知[Eureka] Server该 Eureka 客户仍然存在,没有出现问题。正常情况下,如果[Eureka] Server在90秒没有收到 Eureka 客户的续约,它会将实例从其注册表中删除。
获取注册列表信息 Fetch Registries:
Eureka 客户端从服务器获取注册表信息,并将其缓存在本地。客户端会使用该信息查找其他服务,从而进行远程调用。该注册列表信息定期(每30秒钟)更新一次。每次返回注册列表信息可能与 Eureka 客户端的缓存信息不同, Eureka 客户端自动处理。如果由于某种原因导致注册列表信息不能及时匹配,Eureka 客户端则会重新获取整个注册表信息。
Eureka 服务器缓存注册列表信息,整个注册表以及每个应用程序的信息进行了压缩,压缩内容和没有压缩的内容完全相同。Eureka 客户端和 Eureka 服务器可以使用JSON / XML格式进行通讯。在默认的情况下 Eureka 客户端使用压缩JSON格式来获取注册列表的信息。
服务下线 Cancel:
Eureka客户端在程序关闭时向Eureka服务器发送取消请求。发送请求后,该客户端实例信息将从服务器的实例注册表中删除。该下线请求不会自动完成,它需要调用以下内容:DiscoveryManager.getInstance().shutdownComponent();
服务剔除 Eviction:
在默认的情况下,当Eureka客户端连续90秒(3个续约周期)没有向Eureka服务器发送服务续约,即心跳,Eureka服务器会将该服务实例从服务注册列表删除,即服务剔除。
3.1 实例操作
3.1.1 eureka 注册与发现
讲了这么多概念,那如何使用呢?
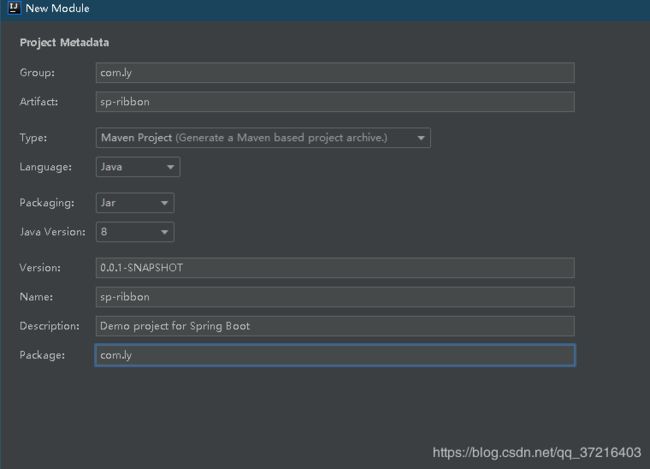
创建一个子module项目,名为sp-eureka。
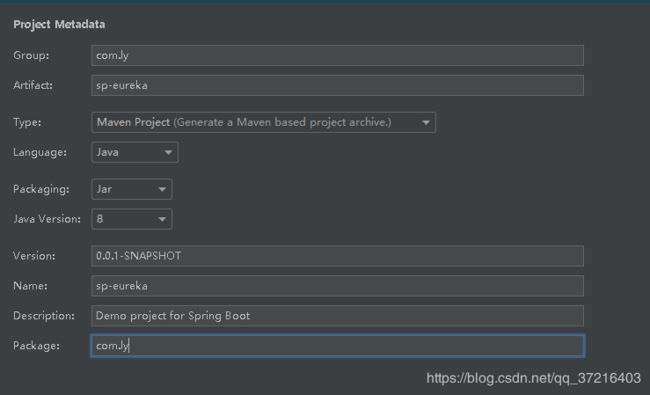 修改pom.xml.我们需要引入父级的项目id相关信息,请结合自己的项目进行修改。
"1.0" encoding="UTF-8"?>
"http://maven.apache.org/POM/4.0.0" xmlns:xsi="http://www.w3.org/2001/XMLSchema-instance"
         xsi:schemaLocation="http://maven.apache.org/POM/4.0.0 https://maven.apache.org/xsd/maven-4.0.0.xsd">
    4.0.0</modelVersion>

        com.ly</groupId>
        springCloud</artifactId>
        1.0-SNAPSHOT</version>
    </parent>

    sp-eureka</artifactId>
    0.0.1-SNAPSHOT</version>
    sp-eureka</name>
    Demo project for Spring Boot</description>


        .version>1.8</java.version>
        -cloud.version>Greenwich.SR1</spring-cloud.version>
    </properties>


            org.springframework.cloud</groupId>
            spring-cloud-starter-netflix-eureka-server</artifactId>
        </dependency>
    </dependencies>


                org.springframework.cloud</groupId>
                spring-cloud-dependencies</artifactId>
                ${spring-cloud.version}</version>
                <type>pom</type>
                import</scope>
            </dependency>
        </dependencies>
    </dependencyManagement>


                org.springframework.boot</groupId>
                spring-boot-maven-plugin</artifactId>
            </plugin>
        </plugins>
    </build>
</project>
别忘了在父级的pom.xml中添加module
application.yml
spring:
  application:
    name: eureka-server

server:
  port: 2001

eureka:
  server:
    enable-self-preservation: false
  instance:
    hostname: eureka1
  client:
    register-with-eureka: false
    fetch-registry: false
    service-url:
      defaultZone: http://eureka1:2001/eureka
参数讲解:
- eureka 集群服务器之间,通过 hostname 来区分
- eureka.server.enable-self-preservation
eureka 的自我保护状态:心跳失败的比例,在15分钟内是否低于85%,如果出现了低于的情况,Eureka Server会将当前的实例注册信息保护起来,同时提示一个警告,一旦进入保护模式,Eureka Server将会尝试保护其服务注册表中的信息,不再删除服务注册表中的数据。也就是不会注销任何微服务 - eureka.client.register-with-eureka=false
不向自身注册 - eureka.client.fetch-registry=false
不从自身拉取注册信息 - eureka.instance.lease-expiration-duration-in-seconds
最后一次心跳后,间隔多久认定微服务不可用,默认90
主程序添加 @EnableEurekaServer
@EnableEurekaServer
@SpringBootApplication
public class SpEurekaApplication {
    public static void main(String[] args) {
        SpringApplication.run(SpEurekaApplication.class, args);
    }
}
修改 hosts 文件,添加 eureka 域名映射
C:\Windows\System32\drivers\etc\hosts
添加内容:
127.0.0.1       eureka1
127.0.0.1       eureka2
启动服务,并访问测试 http://eureka1:2001.,下面是一个可视化界面,下面的教程会详细介绍

3.1.2 service provider 服务提供者
修改 item-service、user-service、order-service,把微服务注册到 eureka 服务器
父级的pom.xml 添加 eureka 客户端依赖
<dependency>
   <groupId>org.springframework.cloud</groupId>
   <artifactId>
       spring-cloud-starter-netflix-eureka-client
    </artifactId>
   <version>2.1.1.RELEASE</version>
</dependency>
application.yml 添加 eureka注册配置,三个服务的都要添加
eureka:
  client:
    service-url:
      defaultZone: http://eureka1:2001/eureka
参数讲解:
-
eureka.instance.lease-renewal-interval-in-seconds
心跳间隔时间,默认 30 秒 -
defaultZone,默认位置,可以修改为具体地理位置,比如:beiJing, shangHai, shenZhen 等,表示 eureka 服务器的部署位置
-
eureka.client.registry-fetch-interval-seconds
拉取注册信息间隔时间,默认 30 秒
主程序启用服务注册发现客户端,三个服务都加上
修改 item-service、user-service 和 order-service, 主程序添加 @EnableDiscoveryClient 注解
4.ribbon
Ribbon是一个基于HTTP和TCP的客户端负载均衡工具,它可有助于控制http和tcp的客户端行为,在ribbon中配置好服务提供者地址后,即可基于负载均衡算法自动为服务消费者提供服务。下面会介绍feign,此框架是在ribbon的基础上进行改进的,具体稍后会介绍。
RestTemplate是Spring提供的一个访问Http服务的客户端类,就是微服务之间的调用是使用的RestTemplate。比如这个时候我们 消费者B 需要调用 提供者A 所提供的服务我们就需要这么写
看一下伪代码:
@Autowired
private RestTemplate restTemplate;
// 这里是提供者A的ip地址,但是如果使用了 Eureka 那么就应该是提供者A的名称
private static final String SERVICE_PROVIDER_A = "http://localhost:8081";

@PostMapping("/judge")
public boolean judge(@RequestBody Request request) {
    String url = SERVICE_PROVIDER_A + "/service1";
    return restTemplate.postForObject(url, request, Boolean.class);
}
刚上面提到了负载均衡,那负载均衡的作用是啥呢?
概念
是指单台服务器性能达到极限时通过服务器集群来横向增加系统的吞吐量和性能。负载均衡是我们处理高并发、缓解网络压力和进行服务端扩容的重要手段之一
服务端负载均衡
是不是联想到了nginx呢?它其实是作用于服务端的,是先发送请求,当到服务端的时候,nginx会先通过负载均衡算法在服务器列表中选择一个合适的进行访问。简单的说就是在服务端进行均衡算法中选择一个合适的服务进行访问。
客户端负载均衡
它在发送请求之前,通过算法在服务器列表中选择一个合适的服务发起请求。当然前提是有多个服务。
这也许有些难以理解,我们看一下实例:
4.1 项目搭建
eureka-client 中已经包含 ribbon 依赖,需要添加 sp01-commons 依赖
"1.0" encoding="UTF-8"?>
"http://maven.apache.org/POM/4.0.0" xmlns:xsi="http://www.w3.org/2001/XMLSchema-instance"
         xsi:schemaLocation="http://maven.apache.org/POM/4.0.0 https://maven.apache.org/xsd/maven-4.0.0.xsd">
    4.0.0</modelVersion>

        com.ly</groupId>
        springCloud</artifactId>
        1.0-SNAPSHOT</version>
    </parent>
    sp-ribbon</artifactId>
    0.0.1-SNAPSHOT</version>
    sp-ribbon</name>
    Demo project for Spring Boot</description>

        .version>1.8</java.version>
        -cloud.version>Greenwich.SR1</spring-cloud.version>
    </properties>


            com.ly</groupId>
            commons</artifactId>
            1.0-SNAPSHOT</version>
        </dependency>
    </dependencies>


                org.springframework.cloud</groupId>
                spring-cloud-dependencies</artifactId>
                ${spring-cloud.version}</version>
                <type>pom</type>
                import</scope>
            </dependency>
        </dependencies>
    </dependencyManagement>


                org.springframework.boot</groupId>
                spring-boot-maven-plugin</artifactId>
            </plugin>
        </plugins>
    </build>
</project>
请根据自己项目的情况适当修改。

请自行在父级的pom中引入module
application.yml
spring:
  application:
    name: ribbon
server:
  port: 3001
eureka:
  client:
    service-url:
      defaultZone: http://eureka1:2001/eureka
主程序
在启动类中创建 RestTemplate 实例,并注入到spring中管理
RestTemplate 是用来调用其他微服务的工具类,封装了远程调用代码,提供了一组用于远程调用的模板方法,例如:getForObject()、postForObject() 等
@SpringBootApplication
public class SpRibbonApplication {
    @Bean
    public RestTemplate getRestTemplate() {
        return new RestTemplate();
    }
    public static void main(String[] args) {
        SpringApplication.run(SpRibbonApplication.class, args);
    }
}
- http://eureka1:2001
- http://localhost:3001/item-service/35
- http://localhost:3001/item-service/decreaseNumber
使用postman,POST发送以下格式数据:
[{“id”:1, “name”:“abc”, “number”:23},{“id”:2, “name”:“def”, “number”:11}] - http://localhost:3001/user-service/7
- http://localhost:3001/user-service/7/score?score=100
- http://localhost:3001/order-service/123abc
- http://localhost:3001/order-service/
OK,运行成功和测试成功
4.2 eureka 和 “服务提供者”的高可用
application.yml
 spring:
  application:
    name: eureka-server

#server:
#  port: 2001

eureka:
  server:
    enable-self-preservation: false
#  instance:
#    hostname: eureka1
#  client:
#    register-with-eureka: false
#    fetch-registry: false

---
spring:
  profiles: eureka1

server:
  port: 2001

# eureka1 向 eureka2 注册
eureka:
  instance:
    hostname: eureka1
  client:
    service-url:
      defaultZone: http://eureka2:2002/eureka

---
spring:
  profiles: eureka2

server:
  port: 2002

# eureka2 向 eureka1 注册
eureka:
  instance:
    hostname: eureka2
  client:
    service-url:
      defaultZone: http://eureka1:2001/eureka
配置启动参数 --spring.profiles.active

选择eureka的启动配置,修改name,名字随意
更改参数为:–spring.profiles.active=eureka1
保存
 复制一份:修改name,修改参数
 补充一下:
补充一下:
命令行运行时添加参数:
java -jar xxx.jar --spring.profiles.active=eureka1
访问 eureka 服务器,查看注册信息,http://eureka1:2001/
 http://eureka2:2002/
 eureka客户端注册时,向两个服务器注册
修改以下微服务
sp02-itemservice
sp03-userservice
sp04-orderservice
sp06-ribbon
eureka:
  client:
    service-url:
      defaultZone: http://eureka1:2001/eureka, http://eureka2:2002/eureka
当一个 eureka 服务宕机时,仍可以连接另一个 eureka 服务
item-service 高可用
修改item-serivice的yaml文件:
application.yml
spring:
  application:
    name: item-service

#server:
#  port: 8001

eureka:
  client:
    service-url:
      defaultZone: http://eureka1:2001/eureka, http://eureka2:2002/eureka

---
spring:
  profiles: item1

server:
  port: 8001
---
spring:
  profiles: item2

server:
  port: 8002
修改配置参数,过程跟上面一样

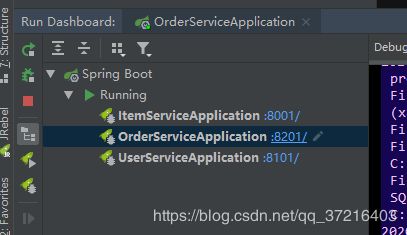
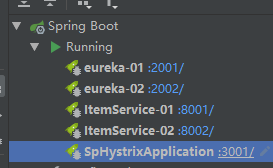
 配置好,看一下目前所有的服务

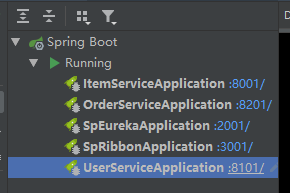
可以看到有2个eureka服务,2个itemService服务
启动测试
访问 eureka 查看 item-service 注册信息

访问两个端口测试
http://localhost:8001/35
http://localhost:8002/35
然后可以关掉一个eureka服务,再测试,看是否成功。
4.3 ribbon 负载均衡
RestTemplate 设置 @LoadBalanced
@LoadBalanced 负载均衡注解,会对 RestTemplate 实例进行封装,创建动态代理对象,并切入(AOP)负载均衡代码,把请求分散分发到集群中的服务器
@SpringBootApplication
public class SpRibbonApplication {

    @LoadBalanced //负载均衡注解
    @Bean
    public RestTemplate getRestTemplate() {
        return new RestTemplate();
    }
    public static void main(String[] args) {
        SpringApplication.run(SpRibbonApplication.class, args);
    }

}
访问路径设置为服务id
由于ribbon使用了负载均衡,那服务访问不能使用ip了,改用服务id
访问测试
访问测试,ribbon 会把请求分发到 8001 和 8002 两个服务端口上
http://localhost:3001/item-service/34

重复刷新

可以看到实现了消费者负载均衡
4.4 ribbon 重试
pom.xml 添加 spring-retry 依赖
	org.springframework.retry</groupId>
	spring-retry</artifactId>
</dependency>
application.yml 配置 ribbon 重试
spring:
  application:
    name: ribbon

server:
  port: 3001

eureka:
  client:
    service-url:
      defaultZone: http://eureka1:2001/eureka, http://eureka2:2002/eureka

ribbon:
  MaxAutoRetriesNextServer: 2
  MaxAutoRetries: 1
  OkToRetryOnAllOperations: true
参数讲解
1. OkToRetryOnAllOperations=true
对连接超时、读取超时都进行重试
2. MaxAutoRetriesNextServer
更换实例的次数
3. MaxAutoRetries
当前实例重试次数,尝试失败会更换下一个实例
主程序设置 RestTemplate 的请求工厂的超时属性
@SpringBootApplication
public class SpRibbonApplication {

    @LoadBalanced //负载均衡注解
    @Bean
    public RestTemplate getRestTemplate() {
        SimpleClientHttpRequestFactory f = new SimpleClientHttpRequestFactory();
        f.setConnectTimeout(1000);
        f.setReadTimeout(1000);
        return new RestTemplate(f);

        //RestTemplate 中默认的 Factory 实例中,两个超时属性默认是 -1,
        //未启用超时,也不会触发重试
        //return new RestTemplate();
    }
    public static void main(String[] args) {
        SpringApplication.run(SpRibbonApplication.class, args);
    }

}
item-service 的 ItemController 添加延迟代码,以便测试 ribbon 的重试机制
@Slf4j
@RestController
public class ItemController {
    @Autowired
    private ItemService itemService;

    @Value("${server.port}")
    private int port;

    @GetMapping("/{orderId}")
    public JsonResult<List<Item>> getItems(@PathVariable String orderId) throws Exception {
        log.info("server.port="+port+", orderId="+orderId);

        ///--设置随机延迟
        long t = new Random().nextInt(5000);
        if(Math.random()<0.6) {
            log.info("item-service-"+port+" - 暂停 "+t);
            Thread.sleep(t);
        }
        ///~~


        List<Item> items = itemService.getItems(orderId);
        return JsonResult.ok(items).msg("port="+port);
    }

    @PostMapping("/decreaseNumber")
    public JsonResult decreaseNumber(@RequestBody List<Item> items) {
        itemService.decreaseNumbers(items);
        return JsonResult.ok();
    }
}
访问,测试 ribbon 重试机制
通过 ribbon 访问 item-service,当超时,ribbon 会重试请求集群中其他服务器
http://localhost:3001/item-service/35.
不断重新刷请求,可以看到有时item-service的俩个服务会随机打印日志,
并且有时响应慢的时候会出现打印俩条,有时某一个服务打印俩条后,另一个也会打印
这也是模拟了现实的情况,也对应了配置的参数,请朋友耐心测试

5 hystrix 断路器
5.1 原理简介
在微服务架构体系中,我们会根据业务拆分不同的服务,服务之间通过RPC调用,但有时为了高可用,有的 服务需要做集群部署。但有时候会因为网络的原因,会导致服务不能高可用,一旦有请求就会造成线程阻塞,若大量的请求涌入的话,servlet容器的资源就会耗尽,最终服务崩溃。服务之间的依懒性的特点,会使得故障进行传播,最终整个服务系统崩掉。这也是我们常说的雪崩效应。
正是这种现象的出现,业界中借用电路的方式,设计了断路器模型。最终实现的目的就是在服务崩溃的时候,马上做出响应。
简介
Hystrix是一个库,可通过添加等待时间容限和容错逻辑来帮助您控制这些分布式服务之间的交互。Hystrix通过隔离服务之间的访问点,停止服务之间的级联故障并提供后备选项来实现此目的,所有这些都可以提高系统的整体弹性。
总体来说[Hystrix]就是一个能进行熔断和降级的库,通过使用它能提高整个系统的弹性。
我们借用一个小案例说明一下熔断和降级的原理
假如我们的服务一共有三个服务A,B,C。A调用B,B调用C。若服务C因为某些原因崩了。大量的请求就会导致C服务器阻塞。

当C服务阻塞了就会导致不能响应,那B因为一直没收到C响应,那B也会因此而阻塞最终崩溃,同理,A也会阻塞崩溃。
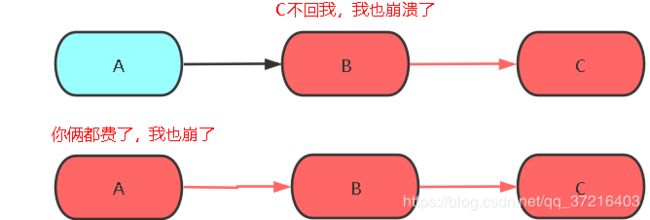
这种现象就是上面所说的服务雪崩。
那熔断就是解决服务雪崩的一种方案。具体的过程是:当指定时间段内的请求失败率达到设置阈值时,系统就会通过断路器直接将此请求链路断开。
结合上面例子,服务B调用服务C在指定时间段内,调用的失败率到达了一定的值,那Hystrix则会自动将 服务B与C 之间的请求都断了,以免导致服务雪崩现象。
降级则为了更好的用户体验,当一个方法调用异常时,通过执行另一种代码逻辑来给用户友好的回复。
所以熔断一个请求链路后,得给一个回应啊,降级就是干这活的。
这个在大型网站比较常见的,比如微博突然有个热点非常火热,点击量直接飙升,当达到一定量的时候,就会提示你类似当前人数太多请稍后查看等信息。
5.2 实例操作
为了更好的测试,复制 sp06-ribbon 项目,命名为sp07-hystrix。修改启动类的名称
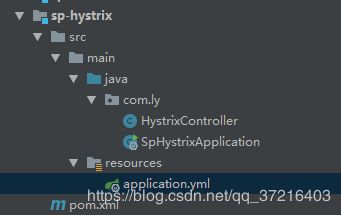
yaml文件配置:其实就是修改一个name。
spring:
  application:
    name: hystrix

server:
  port: 3001

eureka:
  client:
    service-url:
      defaultZone: http://eureka1:2001/eureka, http://eureka2:2002/eureka

ribbon:
  MaxAutoRetriesNextServer: 2
  MaxAutoRetries: 1
  OkToRetryOnAllOperations: true
我们添加hystrix 起步依赖
	org.springframework.cloud</groupId>
	spring-cloud-starter-netflix-hystrix</artifactId>
</dependency>
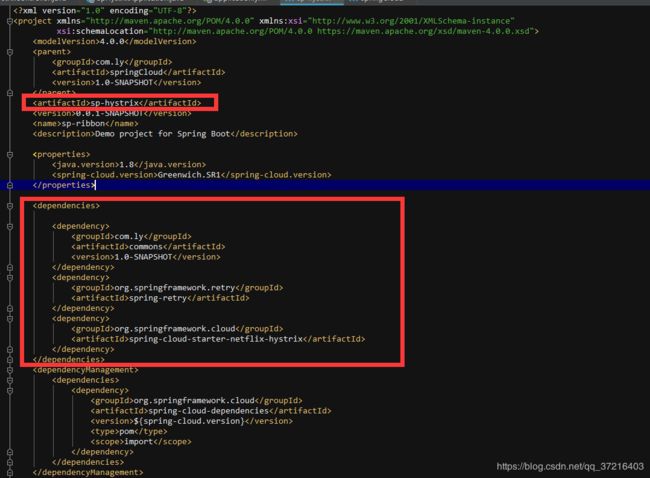 主程序添加 @EnableCircuitBreaker 启用 hystrix 断路器
启动断路器,断路器提供两个核心功能:
-
降级,超时、出错、不可到达时,对服务降级,返回错误信息或者是缓存数据
-
熔断,当服务压力过大,错误比例过多时,熔断所有请求,所有请求直接降级
-
可以使用 @SpringCloudApplication 注解代替三个注解
//@EnableCircuitBreaker
//@EnableDiscoveryClient
//@SpringBootApplication

@SpringCloudApplication
public class SpHystrixApplication {

    @LoadBalanced //负载均衡注解
    @Bean
    public RestTemplate getRestTemplate() {
        SimpleClientHttpRequestFactory f = new SimpleClientHttpRequestFactory();
        f.setConnectTimeout(1000);
        f.setReadTimeout(1000);
        return new RestTemplate(f);

        //RestTemplate 中默认的 Factory 实例中,两个超时属性默认是 -1,
        //未启用超时,也不会触发重试
        //return new RestTemplate();
    }
    public static void main(String[] args) {
        SpringApplication.run(SpHystrixApplication.class, args);
    }

}
RibbonController 中添加降级方法
为每个方法添加降级方法,例如 getItems() 添加降级方法 getItemsFB()
添加 @HystrixCommand 注解,指定降级方法名
@RestController
public class HystrixController {
    @Autowired
    private RestTemplate rt;
    @GetMapping("/item-service/{orderId}")
    @HystrixCommand(fallbackMethod = "getItemsFB") //指定降级方法的方法名
    public JsonResult<List<Item>> getItems(@PathVariable String orderId) {
        //向指定微服务地址发送 get 请求,并获得该服务的返回结果
        //{1} 占位符,用 orderId 填充
        return rt.getForObject("http://item-service/{1}", JsonResult.class, orderId);
    }
    @PostMapping("/item-service/decreaseNumber")
    @HystrixCommand(fallbackMethod = "decreaseNumberFB")
    public JsonResult decreaseNumber(@RequestBody List<Item> items) {
        //发送 post 请求
        return rt.postForObject("http://item-service/decreaseNumber", items, JsonResult.class);
    }
    @GetMapping("/user-service/{userId}")
    @HystrixCommand(fallbackMethod = "getUserFB")
    public JsonResult<User> getUser(@PathVariable Integer userId) {
        return rt.getForObject("http://user-service/{1}", JsonResult.class, userId);
    }

    @GetMapping("/user-service/{userId}/score")
    @HystrixCommand(fallbackMethod = "addScoreFB")
    public JsonResult addScore(
            @PathVariable Integer userId, Integer score) {
        return rt.getForObject("http://user-service/{1}/score?score={2}", JsonResult.class, userId, score);
    }

    @GetMapping("/order-service/{orderId}")
    @HystrixCommand(fallbackMethod = "getOrderFB")
    public JsonResult<Order> getOrder(@PathVariable String orderId) {
        return rt.getForObject("http://order-service/{1}", JsonResult.class, orderId);
    }

    @GetMapping("/order-service")
    @HystrixCommand(fallbackMethod = "addOrderFB")
    public JsonResult addOrder() {
        return rt.getForObject("http://order-service/", JsonResult.class);
    }

    //降级方法的参数和返回值,需要和原始方法一致,方法名任意
    public JsonResult<List<Item>> getItemsFB(String orderId) {
        return JsonResult.err("获取订单商品列表失败");
    }
    public JsonResult decreaseNumberFB(List<Item> items) {
        return JsonResult.err("更新商品库存失败");
    }
    public JsonResult<User> getUserFB(Integer userId) {
        return JsonResult.err("获取用户信息失败");
    }
    public JsonResult addScoreFB(Integer userId, Integer score) {
        return JsonResult.err("增加用户积分失败");
    }
    public JsonResult<Order> getOrderFB(String orderId) {
        return JsonResult.err("获取订单失败");
    }
    public JsonResult addOrderFB() {
        return JsonResult.err("添加订单失败");
    }
}
hystrix 短路超时设置
hystrix.command.default.execution.isolation.thread.timeoutInMilliseconds
为了测试 hystrix 短路功能,我们把 hystrix 等待超时设置得非常小(500毫秒)
此设置一般应大于 ribbon 的重试超时时长,例如 10 秒
spring:
  application:
    name: hystrix

server:
  port: 3001

eureka:
  client:
    service-url:
      defaultZone: http://eureka1:2001/eureka, http://eureka2:2002/eureka

ribbon:
  MaxAutoRetriesNextServer: 2
  MaxAutoRetries: 1
  OkToRetryOnAllOperations: true

hystrix:
  command:
    default:
      execution:
        isolation:
          thread:
            timeoutInMilliseconds: 500
启动项目进行测试
- 通过 hystrix 服务,访问可能超时失败的 item-service(我们在写ribbon的时候设置了线程的阻塞时间,而且是随机的)
http://localhost:3001/item-service/35
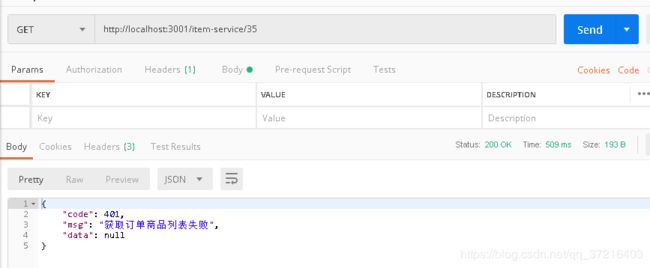 随机刷几次,会看到成功的结果

- 通过 hystrix 服务,访问未启动的 user-service
http://localhost:3001/user-service/7

可以看到,如果 item-service 请求超时,hystrix 会立即执行降级方法
访问 user-service,由于该服务未启动,hystrix也会立即执行降级方法
5.3 hystrix dashboard 断路器仪表盘
hystrix 对请求的熔断和断路处理,可以产生监控信息,hystrix dashboard可以实时的进行监控
sp-hystrix 项目添加 actuator,并暴露 hystrix 监控端点
actuator 是 spring boot 提供的服务监控工具,提供了各种监控信息的监控端点
management.endpoints.web.exposure.include 配置选项, 可以指定端点名,来暴露监控端点
如果要暴露所有端点,可以用 “*”
pom.xml 添加 actuator 依赖
	org.springframework.boot</groupId>
	spring-boot-starter-actuator</artifactId>
</dependency>
调整 application.yml 配置,并暴露 hystrix 监控端点
spring:
  application:
    name: hystrix

server:
  port: 3001

eureka:
  client:
    service-url:
      defaultZone: http://eureka1:2001/eureka, http://eureka2:2002/eureka

ribbon:
  MaxAutoRetriesNextServer: 1
  MaxAutoRetries: 1
  OkToRetryOnAllOperations: true

hystrix:
  command:
    default:
      execution:
        isolation:
          thread:
            timeoutInMilliseconds: 2000

management:
  endpoints:
    web:
      exposure:
        include: hystrix.stream
访问 actuator 路径,查看监控端点
http://localhost:3001/actuator

新建 sp-hystrix-dashboard 字module项目
修改pom文件,别忘了修改父级pom文件,添加module
"1.0" encoding="UTF-8"?>
"http://maven.apache.org/POM/4.0.0"
         xmlns:xsi="http://www.w3.org/2001/XMLSchema-instance"
         xsi:schemaLocation="http://maven.apache.org/POM/4.0.0 http://maven.apache.org/xsd/maven-4.0.0.xsd">

        springCloud</artifactId>
        com.ly</groupId>
        1.0-SNAPSHOT</version>
    </parent>
    4.0.0</modelVersion>
    0.0.1-SNAPSHOT</version>
    sp-hystrix-dashboard</name>
    Demo project for Spring Boot</description>
    sp-hystrix-dashboard</artifactId>


        .version>1.8</java.version>
        -cloud.version>Greenwich.SR1</spring-cloud.version>
    </properties>


            org.springframework.cloud</groupId>
            spring-cloud-starter-netflix-eureka-client</artifactId>
        </dependency>

            org.springframework.cloud</groupId>
            spring-cloud-starter-netflix-hystrix-dashboard</artifactId>
        </dependency>

    </dependencies>


                org.springframework.cloud</groupId>
                spring-cloud-dependencies</artifactId>
                ${spring-cloud.version}</version>
                <type>pom</type>
                import</scope>
            </dependency>
        </dependencies>
    </dependencyManagement>


                org.springframework.boot</groupId>
                spring-boot-maven-plugin</artifactId>
            </plugin>
        </plugins>
    </build>
</project>
application.yml
spring:
  application:
    name: hystrix-dashboard

server:
  port: 4001

eureka:
  client:
    service-url:
      defaultZone: http://eureka1:2001/eureka, http://eureka2:2002/eureka
主程序添加 @EnableHystrixDashboard 和 @EnableDiscoveryClient
@EnableDiscoveryClient
@EnableHystrixDashboard
@SpringBootApplication
public class SpHystrixDashboardApplication {
    public static void main(String[] args) {
        SpringApplication.run(SpHystrixDashboardApplication.class, args);
    }
}
启动,并访问测试
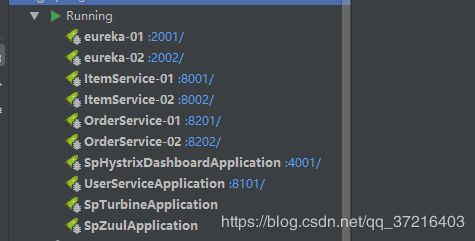
开启所有服务,除了ribbon项目。
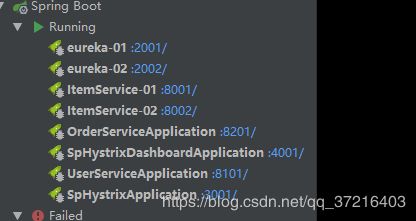
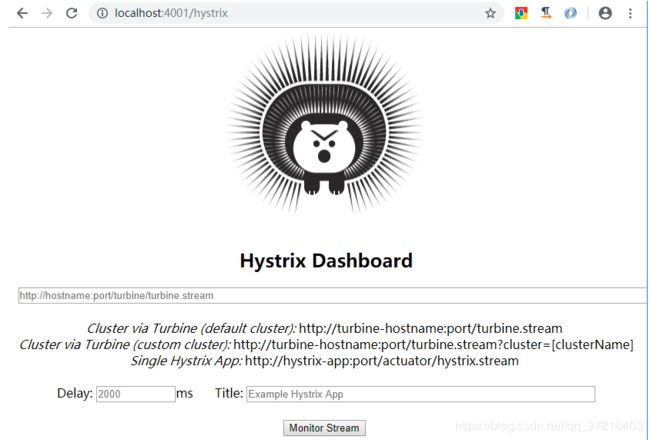
访问 hystrix dashboard
http://localhost:4001/hystrix
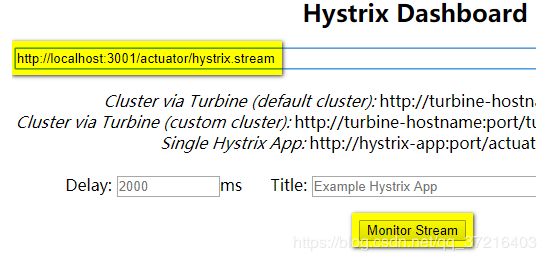
 填入 hystrix 的监控端点,开启监控
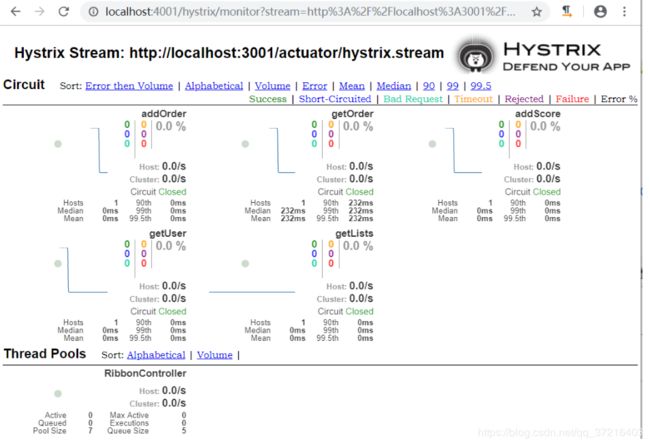
http://localhost:3001/actuator/hystrix.stream
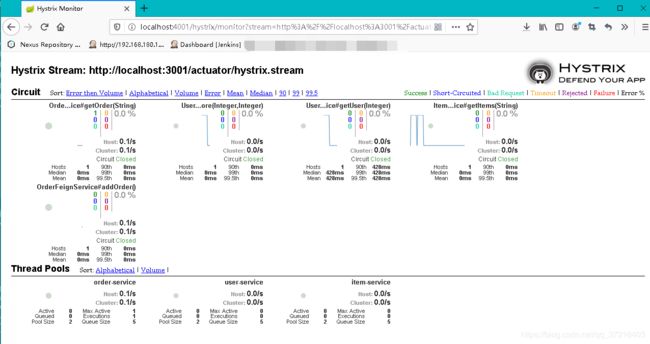
通过 hystrix 访问服务多次,观察监控信息
http://localhost:3001/item-service/35
http://localhost:3001/user-service/7
http://localhost:3001/user-service/7/score?score=100
http://localhost:3001/order-service/123abc
http://localhost:3001/order-service/
整个链路达到一定的阈值,默认情况下,10秒内产生超过20次请求,则符合第一个条件。 满足第一个条件的情况下,如果请求的错误百分比大于阈值,则会打开断路器,默认为50%。 Hystrix的逻辑,先判断是否满足第一个条件,再判断第二个条件,如果两个条件都满足,则会开启断路器
断路器打开 5 秒后,会处于半开状态,会尝试转发请求,如果仍然失败,保持打开状态,如果成功,则关闭断路器
使用 apache 的并发访问测试工具 ab
http://httpd.apache.org/docs/current/platform/windows.html#down


若由于网络不能访问,可从我网盘中下载:
链接:https://pan.baidu.com/s/173977Nrmdtkkqxd97cnjTA
提取码:7xy1
或者 微信扫一扫

或者从我的博客中直接下载
https://download.csdn.net/download/qq_37216403/12460257
用 ab 工具,以并发50次,来发送20000个请求
ab -n 20000 -c 50 http://localhost:3001/item-service/35
 断路器状态为 Open,所有请求会被短路,直接降级执行 fallback 方法
 hystrix 配置
官方GitHub地址:https://github.com/Netflix/Hystrix/wiki/Configuration
考研英语的时候到了
参数讲解
-
hystrix.command.default.execution.isolation.thread.timeoutInMilliseconds
请求超时时间,超时后触发失败降级 -
hystrix.command.default.circuitBreaker.requestVolumeThreshold
10秒内请求数量,默认20,如果没有达到该数量,即使请求全部失败,也不会触发断路器打开 -
hystrix.command.default.circuitBreaker.errorThresholdPercentage
失败请求百分比,达到该比例则触发断路器打开 -
hystrix.command.default.circuitBreaker.sleepWindowInMilliseconds
断路器打开多长时间后,再次允许尝试访问(半开),仍失败则继续保持打开状态,如成功访问则关闭断路器,默认 5000
6.feign
微服务应用中,ribbon 和 hystrix 总是同时出现,feign 整合了两者,并提供了声明式消费者客户端
用 feign 代替 hystrix+ribbon
创建子module项目sp-feign。项目结构如下:
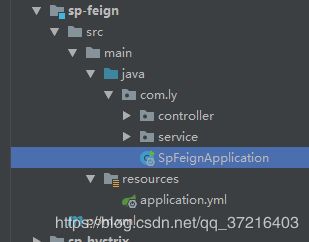
pom.xml
"1.0" encoding="UTF-8"?>
"http://maven.apache.org/POM/4.0.0" xmlns:xsi="http://www.w3.org/2001/XMLSchema-instance"
         xsi:schemaLocation="http://maven.apache.org/POM/4.0.0 https://maven.apache.org/xsd/maven-4.0.0.xsd">
    4.0.0</modelVersion>

        com.ly</groupId>
        springCloud</artifactId>
        1.0-SNAPSHOT</version>
    </parent>
    sp-feign</artifactId>
    0.0.1-SNAPSHOT</version>
    sp-feign</name>
    Demo project for Spring Boot</description>


        .version>1.8</java.version>
        -cloud.version>Greenwich.SR1</spring-cloud.version>
    </properties>


            org.springframework.boot</groupId>
            spring-boot-starter-actuator</artifactId>
        </dependency>


            org.springframework.cloud</groupId>
            spring-cloud-starter-netflix-eureka-client</artifactId>
        </dependency>

            org.springframework.cloud</groupId>
            spring-cloud-starter-openfeign</artifactId>
        </dependency>


            com.ly</groupId>
            commons</artifactId>
            1.0-SNAPSHOT</version>
        </dependency>
    </dependencies>


                org.springframework.cloud</groupId>
                spring-cloud-dependencies</artifactId>
                ${spring-cloud.version}</version>
                <type>pom</type>
                import</scope>
            </dependency>
        </dependencies>
    </dependencyManagement>


                org.springframework.boot</groupId>
                spring-boot-maven-plugin</artifactId>
            </plugin>
        </plugins>
    </build>

</project>
application.yml
spring:
  application:
    name: feign

server:
  port: 3001

eureka:
  client:
    service-url:
      defaultZone: http://eureka1:2001/eureka, http://eureka2:2002/eureka
主程序添加 @EnableDiscoveryClient 和 @EnableFeignClients
@EnableFeignClients
@EnableDiscoveryClient
@SpringBootApplication
public class SpFeignApplication {

    public static void main(String[] args) {
        SpringApplication.run(SpFeignApplication.class, args);
    }

}
feign 声明式客户端
feign 利用了我们熟悉的 spring mvc 注解来对接口方法进行设置,降低了我们的学习成本。
通过这些设置,feign可以拼接后台服务的访问路径和提交的参数
例如:
@GetMapping("/{userId}/score")
JsonResult addScore(@PathVariable Integer userId, @RequestParam Integer score);
当这样调用该方法:
service.addScore(7, 100);
那么 feign 会向服务器发送请求:
http://用户微服务/7/score?score=100
注意:如果 score 参数名与变量名不同,需要添加参数名设置:
@GetMapping("/{userId}/score")
JsonResult addScore(@PathVariable Integer userId, @RequestParam("score") Integer s);
ItemFeignService
package com.ly.service;

import com.ly.pojo.Item;
import com.ly.util.JsonResult;
import org.springframework.cloud.openfeign.FeignClient;
import org.springframework.web.bind.annotation.GetMapping;
import org.springframework.web.bind.annotation.PathVariable;
import org.springframework.web.bind.annotation.PostMapping;
import org.springframework.web.bind.annotation.RequestBody;

import java.util.List;

@FeignClient("item-service")
public interface ItemFeignService {
    @GetMapping("/{orderId}")
    JsonResult<List<Item>> getItems(@PathVariable String orderId);

    @PostMapping("/decreaseNumber")
    JsonResult decreaseNumber(@RequestBody List<Item> items);
}
UserFeignService
package com.ly.service;

import com.ly.pojo.User;
import com.ly.util.JsonResult;
import org.springframework.cloud.openfeign.FeignClient;
import org.springframework.web.bind.annotation.GetMapping;
import org.springframework.web.bind.annotation.PathVariable;
import org.springframework.web.bind.annotation.RequestParam;

@FeignClient("user-service")
public interface UserFeignService {
    @GetMapping("/{userId}")
    JsonResult<User> getUser(@PathVariable Integer userId);

    // 拼接路径 /{userId}/score?score=新增积分
    // 如果请求参数和方法参数同名,@RequestParam可省略
    @GetMapping("/{userId}/score")
    JsonResult addScore(@PathVariable Integer userId, @RequestParam Integer score);
}
OrderFeignService
package com.ly.service;

import com.ly.pojo.Order;
import com.ly.util.JsonResult;
import org.springframework.cloud.openfeign.FeignClient;
import org.springframework.web.bind.annotation.GetMapping;
import org.springframework.web.bind.annotation.PathVariable;

@FeignClient("order-service")
public interface OrderFeignService {
    @GetMapping("/{orderId}")
    JsonResult<Order> getOrder(@PathVariable String orderId);

    @GetMapping("/")
    JsonResult addOrder();

}
FeignController
package com.ly.controller;

import com.ly.pojo.Item;
import com.ly.pojo.Order;
import com.ly.pojo.User;
import com.ly.service.ItemFeignService;
import com.ly.service.OrderFeignService;
import com.ly.service.UserFeignService;
import com.ly.util.JsonResult;
import org.springframework.beans.factory.annotation.Autowired;
import org.springframework.web.bind.annotation.*;

import java.util.List;

@RestController
public class FeignController {
    @Autowired
    private ItemFeignService itemServcie;
    @Autowired
    private UserFeignService userServcie;
    @Autowired
    private OrderFeignService orderServcie;

    @GetMapping("/item-service/{orderId}")
    public JsonResult<List<Item>> getItems(@PathVariable String orderId) {
        return itemServcie.getItems(orderId);
    }
    @PostMapping("/item-service/decreaseNumber")
    public JsonResult decreaseNumber(@RequestBody List<Item> items) {
        return itemServcie.decreaseNumber(items);
    }
    @GetMapping("/user-service/{userId}")
    public JsonResult<User> getUser(@PathVariable Integer userId) {
        return userServcie.getUser(userId);
    }
    @GetMapping("/user-service/{userId}/score")
    public JsonResult addScore(@PathVariable Integer userId, Integer score) {
        return userServcie.addScore(userId, score);
    }
    @GetMapping("/order-service/{orderId}")
    public JsonResult<Order> getOrder(@PathVariable String orderId) {
        return orderServcie.getOrder(orderId);
    }
    @GetMapping("/order-service")
    public JsonResult addOrder() {
        return orderServcie.addOrder();
    }
}
启动服务,并访问测试
进行测试,看是否成功获取数据
- http://eureka1:2001
2.http://localhost:3001/item-service/35 - http://localhost:3001/item-service/decreaseNumber
使用postman,POST发送以下格式数据:
[{“id”:1, “name”:“abc”, “number”:23},{“id”:2, “name”:“def”, “number”:11}] - http://localhost:3001/user-service/7
- http://localhost:3001/user-service/7/score?score=100
- http://localhost:3001/order-service/123abc
- http://localhost:3001/order-service/
feign + ribbon 负载均衡和重试
无需额外配置,feign 默认已启用了 ribbon 负载均衡和重试机制。可以通过配置对参数进行调整
application.yml 配置 ribbon 超时和重试
ribbon.xxx : 全局配置
item-service.ribbon.xxx : 对特定服务实例的配置
spring:
  application:
    name: feign

server:
  port: 3001

eureka:
  client:
    service-url:
      defaultZone: http://eureka1:2001/eureka, http://eureka2:2002/eureka

ribbon:
  ConnectTimeout: 1000
  ReadTimeout: 1000

item-service:
  ribbon:
    ConnectTimeout: 500
    ReadTimeout: 1000
    MaxAutoRetriesNextServer: 2
    MaxAutoRetries: 1
启动服务,访问测试
http://localhost:3001/item-service/35
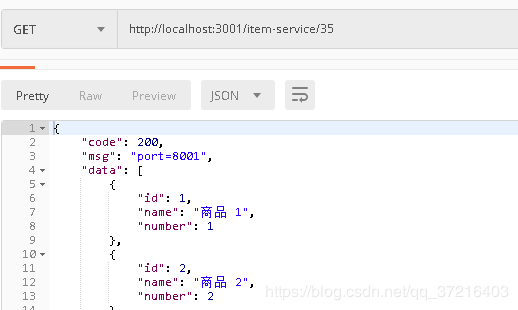
feign + hystrix 降级
feign 启用 hystrix
feign 默认没有启用 hystrix,添加配置,启用 hystrix
feign.hystrix.enabled=true
application.yml 添加配置
feign:
  hystrix:
    enabled: true
启用 hystrix 后,访问服务
http://localhost:3001/item-service/35
多刷几次
当线程阻塞时间为1秒的时候,会被快速捕抓到,
默认1秒会快速失败,没有降级方法时,会显示白板页
 可以添加配置,暂时减小降级超时时间,以便后续对降级进行测试
hystrix:
  command:
    default:
      execution:
        isolation:
          thread:
            timeoutInMilliseconds: 500
feign + hystrix 降级
降级类
ItemFeignServiceFB
@Component
public class ItemFeignServiceFB implements ItemFeignService {

    @Override
    public JsonResult<List<Item>> getItems(String orderId) {
        return JsonResult.err("无法获取订单商品列表");
    }

    @Override
    public JsonResult decreaseNumber(List<Item> items) {
        return JsonResult.err("无法修改商品库存");
    }

}
OrderFeignServiceFB
@Component
public class OrderFeignServiceFB implements OrderFeignService {

    @Override
    public JsonResult<Order> getOrder(String orderId) {
        return JsonResult.err("无法获取商品订单");
    }

    @Override
    public JsonResult addOrder() {
        return JsonResult.err("无法保存订单");
    }

}
UserFeignServiceFB
@Component
public class UserFeignServiceFB implements UserFeignService {

    @Override
    public JsonResult<User> getUser(Integer userId) {
        return JsonResult.err("无法获取用户信息");
    }

    @Override
    public JsonResult addScore(Integer userId, Integer score) {
        return JsonResult.err("无法增加用户积分");
    }

}
feign service 接口中指定降级类
ItemFeignService
...
@FeignClient(name="item-service", fallback = ItemFeignServiceFB.class)
public interface ItemFeignService {
...
UserFeignService
...
@FeignClient(name="user-service", fallback = UserFeignServiceFB.class)
public interface UserFeignService {
...
OrderFeignService
@FeignClient(name="order-service",fallback = OrderFeignServiceFB.class)
public interface OrderFeignService {
...
启动服务,访问测试
http://localhost:3001/item-service/35
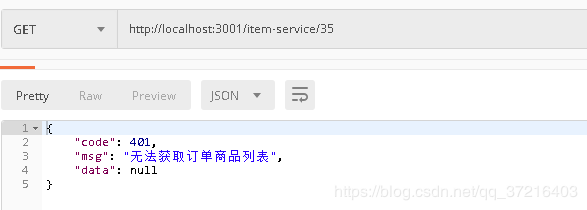
多刷几次,能看到成功的结果
此实验是模拟当某个服务器响应时间过长时并超过设置的时间段,将它降级,达到快速响应的结果,提高服务器的安全性,以及用户体验。
feign + hystrix 监控和熔断测试
修改sp-feign项目
pom.xml 添加 hystrix 起步依赖
feign 没有包含完整的 hystrix 依赖
	org.springframework.cloud</groupId>

		spring-cloud-starter-netflix-hystrix
	</artifactId>
</dependency>
主程序添加 @EnableCircuitBreaker
@EnableCircuitBreaker
@EnableFeignClients
@EnableDiscoveryClient
@SpringBootApplication
public class SpFeignApplication {
    public static void main(String[] args) {
        SpringApplication.run(SpFeignApplication.class, args);
    }
}
sp-feign 配置 actuator,暴露 hystrix.stream 监控端点
actuator 依赖
确认已经添加了 actuator 依赖
	org.springframework.boot</groupId>
	spring-boot-starter-actuator</artifactId>
</dependency>
application.yml 暴露 hystrix.stream 端点
management:
  endpoints:
    web:
      exposure:
        include: hystrix.stream
启动服务,查看监控端点
http://localhost:3001/actuator
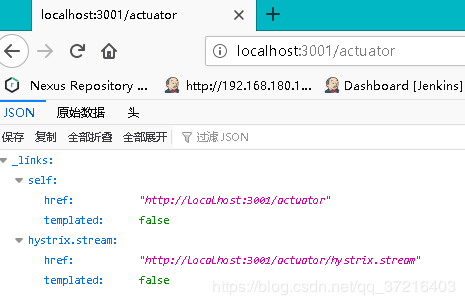
hystrix dashboard
启动 hystrix dashboard 服务,填入 feign 监控路径,开启监控

访问 http://localhost:4001/hystrix
- 填入 feign 监控路径
http://localhost:3001/actuator/hystrix.stream - 访问微服务,以产生监控数据
http://localhost:3001/item-service/35
http://localhost:3001/user-service/7
http://localhost:3001/user-service/7/score?score=100
http://localhost:3001/order-service/123abc
http://localhost:3001/order-service/
用 ab 工具,以并发50次,来发送20000个请求
ab -n 20000 -c 50 http://localhost:3001/item-service/35
order service 调用商品库存服务和用户服务
 修改 order-service 项目,添加 feign,调用 item service 和 user service
pom.xml
添加以下依赖:
- actuator
- feign
- hystrix
"1.0" encoding="UTF-8"?>
"http://maven.apache.org/POM/4.0.0" xmlns:xsi="http://www.w3.org/2001/XMLSchema-instance"
         xsi:schemaLocation="http://maven.apache.org/POM/4.0.0 https://maven.apache.org/xsd/maven-4.0.0.xsd">
    4.0.0</modelVersion>

        com.ly</groupId>
        springCloud</artifactId>
        1.0-SNAPSHOT</version>
    </parent>
    order-service</artifactId>
    0.0.1-SNAPSHOT</version>
    order-service</name>
    Demo project for Spring Boot</description>

        .version>1.8</java.version>
    </properties>


            com.ly</groupId>
            commons</artifactId>
            1.0-SNAPSHOT</version>
        </dependency>

            org.springframework.cloud</groupId>

                spring-cloud-starter-netflix-eureka-client
            </artifactId>
        </dependency>

            org.springframework.boot</groupId>
            spring-boot-starter-actuator</artifactId>
        </dependency>

            org.springframework.cloud</groupId>

                spring-cloud-starter-netflix-hystrix
            </artifactId>
        </dependency>

            org.springframework.cloud</groupId>
            spring-cloud-starter-openfeign</artifactId>
        </dependency>
    </dependencies>


                org.springframework.cloud</groupId>
                spring-cloud-dependencies</artifactId>
                Greenwich.SR1</version>
                <type>pom</type>
                import</scope>
            </dependency>
        </dependencies>
    </dependencyManagement>


                org.springframework.boot</groupId>
                spring-boot-maven-plugin</artifactId>
            </plugin>
        </plugins>
    </build>
</project>
application.yml
ribbon 重试和 hystrix 超时,这里没有设置,采用了默认值
spring:
  application:
    name: order-service

  # server:
  #  port: 8201


eureka:
  client:
    service-url:
      defaultZone: http://eureka1:2001/eureka, http://eureka2:2002/eureka

feign:
  hystrix:
    enabled: true

management:
  endpoints:
    web:
      exposure:
        include: hystrix.stream

---
spring:
  profiles: order1

server:
  port: 8201

---
spring:
  profiles: order2

server:
  port: 8202
主程序
@EnableFeignClients
@SpringCloudApplication
public class OrderServiceApplication {
    public static void main(String[] args) {
        SpringApplication.run(OrderServiceApplication.class, args);
    }
}
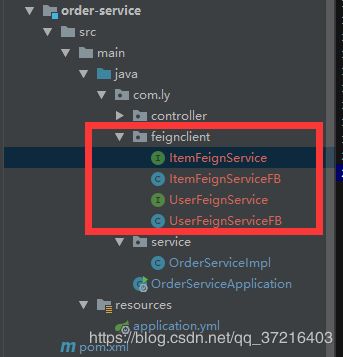
@FeignClient(name="item-service", fallback = ItemFeignServiceFB.class)
public interface ItemFeignService {
    @GetMapping("/{orderId}")
    JsonResult<List<Item>> getItems(@PathVariable String orderId);

    @PostMapping("/decreaseNumber")
    JsonResult decreaseNumber(@RequestBody List<Item> items);
}
@Component
public class ItemFeignServiceFB implements ItemFeignService {

    @Override
    public JsonResult<List<Item>> getItems(String orderId) {
        if(Math.random()<0.5) {
            return JsonResult.ok().data(

                    Arrays.asList(new Item[] {
                            new Item(1,"缓存aaa",2),
                            new Item(2,"缓存bbb",1),
                            new Item(3,"缓存ccc",3),
                            new Item(4,"缓存ddd",1),
                            new Item(5,"缓存eee",5)
                    })

            );
        }
        return JsonResult.err("无法获取订单商品列表");
    }

    @Override
    public JsonResult decreaseNumber(List<Item> items) {
        return JsonResult.err("无法修改商品库存");
    }

}
@FeignClient(name="user-service", fallback = UserFeignServiceFB.class)
public interface UserFeignService {
    @GetMapping("/{userId}")
    JsonResult<User> getUser(@PathVariable Integer userId);

    @GetMapping("/{userId}/score")
    JsonResult addScore(@PathVariable Integer userId, @RequestParam Integer score);
}
@Component
public class UserFeignServiceFB implements UserFeignService {

    @Override
    public JsonResult<User> getUser(Integer userId) {
        if(Math.random()<0.4) {
            return JsonResult.ok(new User(userId, "缓存name"+userId, "缓存pwd"+userId));
        }
        return JsonResult.err("无法获取用户信息");
    }

    @Override
    public JsonResult addScore(Integer userId, Integer score) {
        return JsonResult.err("无法增加用户积分");
    }

}
OrderServiceImpl
@Slf4j
@Service
public class OrderServiceImpl implements OrderService {
    @Autowired
    private ItemFeignService itemService;
    @Autowired
    private UserFeignService userService;

    @Override
    public Order getOrder(String orderId) {
        //调用user-service获取用户信息
        JsonResult<User> user = userService.getUser(7);

        //调用item-service获取商品信息
        JsonResult<List<Item>> items = itemService.getItems(orderId);


        Order order = new Order();
        order.setId(orderId);
        order.setUser(user.getData());
        order.setItems(items.getData());
        return order;
    }

    @Override
    public void addOrder(Order order) {
        //调用item-service减少商品库存
        itemService.decreaseNumber(order.getItems());

        //TODO: 调用user-service增加用户积分
        userService.addScore(7, 100);

        log.info("保存订单:"+order);
    }
}
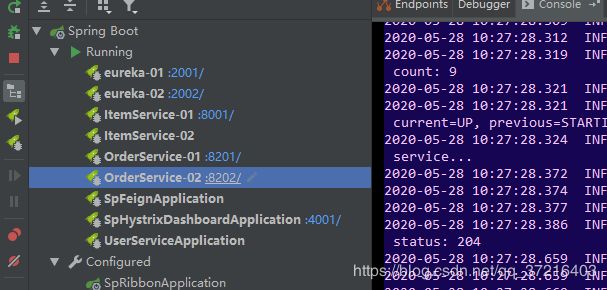
order-service 配置启动参数
–spring.profiles.active=order1
–spring.profiles.active=order2
进行测试
- 根据orderid,获取订单
http://localhost:8201/123abc - 保存订单
http://localhost:8201/ - 通过 feign 访问 order service
http://localhost:3001/order-service/123abc - http://localhost:3001/order-service/
hystrix dashboard 监控 order service 断路器
访问 http://localhost:4001/hystrix ,填入 order service 的断路器监控路径,启动监控
http://localhost:8201/actuator/hystrix.stream
或者
http://localhost:8202/actuator/hystrix.stream
进行测试访问,可以看到监控信息

可以看到有集群的话,目前只能看一个,因此需要一个集群聚合监控,那用谁呢?
hystrix + turbine 集群聚合监控
hystrix dashboard 一次只能监控一个服务实例,使用 turbine 可以汇集监控信息,将聚合后的信息提供给 hystrix dashboard 来集中展示和监控
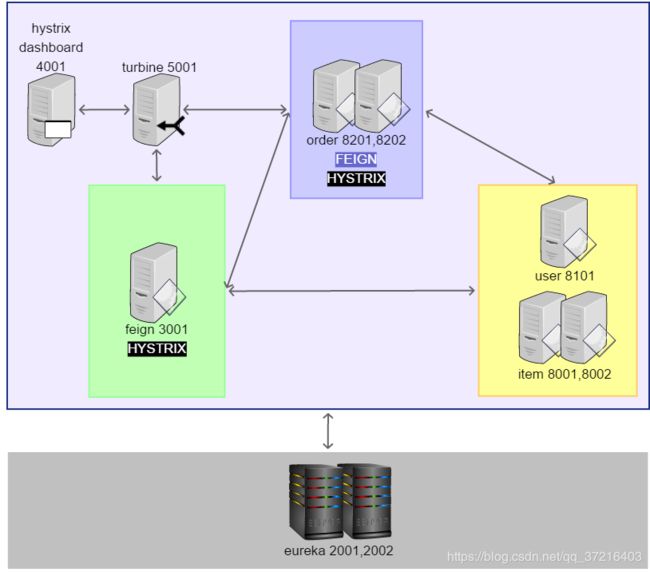 新建sp-turbine module项目,
"1.0" encoding="UTF-8"?>
"http://maven.apache.org/POM/4.0.0"
         xmlns:xsi="http://www.w3.org/2001/XMLSchema-instance"
         xsi:schemaLocation="http://maven.apache.org/POM/4.0.0 http://maven.apache.org/xsd/maven-4.0.0.xsd">

        springCloud</artifactId>
        com.ly</groupId>
        1.0-SNAPSHOT</version>
    </parent>
    4.0.0</modelVersion>
    0.0.1-SNAPSHOT</version>
    sp-feign</name>
    sp-turbine</artifactId>

        .version>1.8</java.version>
        -cloud.version>Greenwich.SR1</spring-cloud.version>
    </properties>


            org.springframework.cloud</groupId>
            spring-cloud-starter-netflix-eureka-client</artifactId>
        </dependency>

            org.springframework.cloud</groupId>
            spring-cloud-starter-netflix-turbine</artifactId>
        </dependency>

    </dependencies>


                org.springframework.cloud</groupId>
                spring-cloud-dependencies</artifactId>
                ${spring-cloud.version}</version>
                <type>pom</type>
                import</scope>
            </dependency>
        </dependencies>
    </dependencyManagement>


                org.springframework.boot</groupId>
                spring-boot-maven-plugin</artifactId>
            </plugin>
        </plugins>
    </build>

</project>
application.yml
spring:
  application:
    name: turbin

server:
  port: 5001

eureka:
  client:
    service-url:
      defaultZone: http://eureka1:2001/eureka, http://eureka2:2002/eureka

turbine:
  app-config: order-service, feign
  cluster-name-expression: new String("default")
主程序
@EnableTurbine
@EnableDiscoveryClient
@SpringBootApplication
public class SpTurbineApplication {

    public static void main(String[] args) {
        SpringApplication.run(SpTurbineApplication.class, args);
    }

}
启动进行测试,
- turbine 监控路径
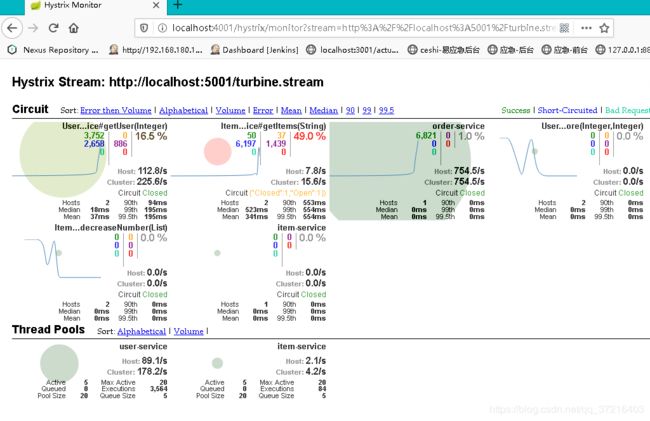
http://localhost:5001/turbine.stream - 在 hystrix dashboard 中填入turbine 监控路径,开启监控
http://localhost:4001/hystrix - turbine聚合了feign服务和order-service服务集群的hystrix监控信息
访问下面测试数据,查看监控信息
- 8201服务器产生监控数据:
http://localhost:8201/abc123
http://localhost:8201/ - 8202服务器产生监控数据:
http://localhost:8202/abc123
http://localhost:8202/ - 3001服务器产生监控数据:
http://localhost:3001/item-service/35
http://localhost:3001/item-service/decreaseNumber
使用postman,POST发送以下格式数据:
[{“id”:1, “name”:“abc”, “number”:23},{“id”:2, “name”:“def”, “number”:11}]
http://localhost:3001/user-service/7
http://localhost:3001/user-service/7/score?score=100
http://localhost:3001/order-service/123abc
http://localhost:3001/order-service/
7. zuul API网关
为什么需要服务网关?
在分布式系统系统中,有商品、订单、用户、广告、支付等等一大批的服务,前端怎么调用呢?和每个服务一个个打交道?
看一下用例图:
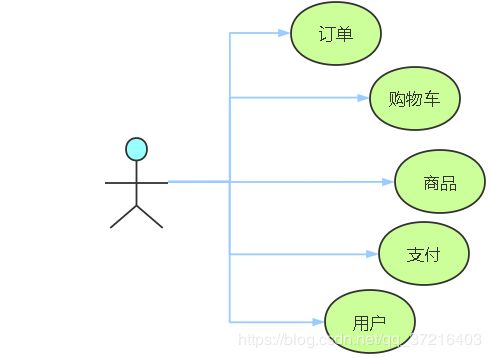
如果让客户端直接与各个微服务通信,会有以下问题:
- 客户端不止一次请求不同的微服务,增加了客户端的复杂性。
- 存在跨域请求,在一定的场景下处理相对复杂。
- 认证复杂,每个微服务都需要独立认证。
- 难以重构,随着项目的迭代,可能需要重新划分微服务。
- 某些微服务可能使用了防火墙/浏览器不友好的协议,直接访问会有一定困难。
这就需要有一个角色充当所有请求的入口,这个角色就是服务网关
微服务网关是介于客户端和服务端之间的中间层,所有的外部请求都会先经过微服务网关。使用微服务网关后的架构如下:

客户端只须跟网关交互,而无须直接调用特定微服务的接口。这样开发就可以得到简化。不仅如此,使用微服务网关还有以下优点:
- 易于监控。可在微服务网关收集监控数据并将其推送到外部系统进行分析。
- 易于认证。可在微服务网关上进行认证,然后再将请求转发到后端的微服务,而无须在每个微服务上进行认证。
- 减少了客户端与各个微服务之间的交互次数。
我们详细说说zuul
Zuul是Netflix开源的微服务网关,它可以和Eureka、Ribbon、hystrix等组件配合使用。
网关是系统对外的唯一入口,介于客户端和服务端之间,用于对请求进行身份验证,限流,路由,监控等操作。
所以zuul中最重要的是路由和过滤器
zuul 路由
简单配置
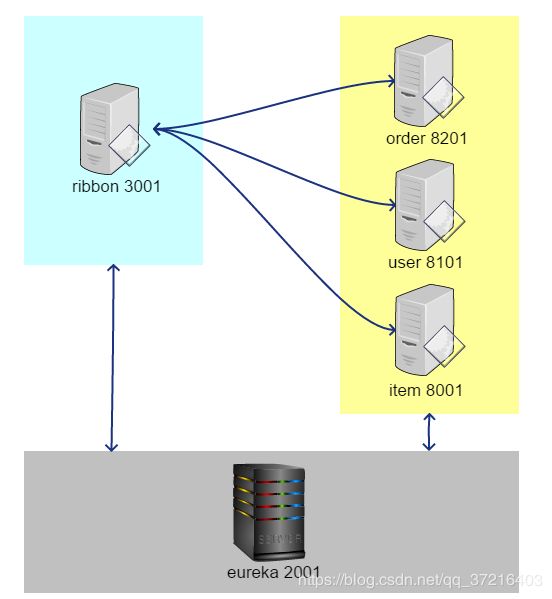
先看一下目前的架构,颜色有点不搭,凑合看吧
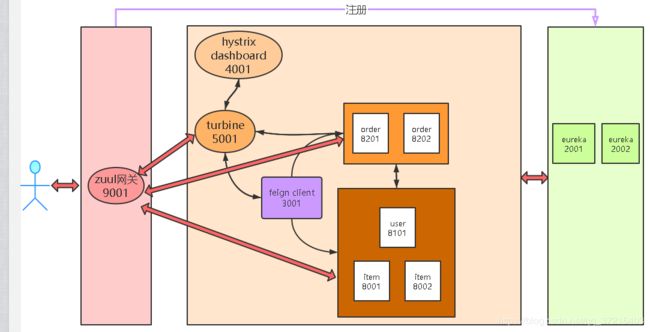 解释一下:
解释一下:
可以看到,zuul需要向eureka中注册。为啥呢?
思考一个问题,在上节试验中,order需要访问user,item服务的信息。那user,item是服务提供者,order是服务消费者。所以说作为消费者的服务都注册到了eureka中,那zuul也注册了,是不是就可以获取到消费者了?
那是不是就可以拿到所有消费者的数据(名称,ip,端口)?
那这样的话,是不是就可以做路由映射了呢?
比如 作为客户端,我们访问user服务的话,是这样的:http://localhost:8001/user-service/7。
那现在可不可这样呢?http://localhost:9001/user-service/7
这里可能会混淆上面我们试验feign的时候,用的是http://localhost:3001/user-service/7,那这里为啥不行呢?说明一下:
- zuul是用于客户端访问整个应用的流量入口,接收所有的请求,并将不同的请求转发至不同的微服务模块,其作用可类似于nginx。
- feign是将当前微服务项目的一些服务接口暴露,用于各个微服务之间的服务调用。两者的应用层次以及原理均不相同。
- zuul其实也含有hysstrix和ribbon,但是基于http,可 直接代理服务 。在它和服务间增加feign只会增加通讯消耗,没有其他意义。而feign的负载均衡是基于Eureka实现的
- feign主要做服务流控,feign的负载均衡是基于Eureka实现的,zuul主要做客户端流控,并且Zuul的负载均衡结合Eureka实现易用性较好,并且Zuul一般对第三方提供访问接口。
继续我们的话题,
统一前缀
这个 就是我们可以在请求前面加一个统一的前缀,比如我们刚刚调用的是http://localhost:9001/user-service/7,这个时候我们在yaml配置文件中添加如下。
zuul:
  prefix: /zuul
这样我们就需要通过http://localhost:9001/zuul/user-service/7来进行访问了。
路由策略配置
前面的访问方式(直接使用服务名),需要将微服务名称暴露给客户端,存在安全性问题。那我们可以自定义路径来替代微服务名称,即自定义路由策略。
zuul:
  routes:
    user-service: /user/**
那请求就变成了:http://localhost:9001/zuul/user/7
服务名屏蔽
其实配置完路由策略之后使用微服务名称还是可以访问的,这个时候你需要将服务名屏蔽。
zuul:
 ignore-services: "*"
路径屏蔽
Zuul还可以指定屏蔽掉的路径 URI,即只要用户请求中包含指定的 URI 路径,那么该请求将无法访问到指定的服务。通过该方式可以限制用户的权限。
zuul:
  ignore-patterns: **/item/**
这样关于 item的请求我们就可以过滤掉了。
- ** 代表匹配多级任意路径
- *代表匹配一级任意路径
敏感请求头屏蔽
默认情况下,像 Cookie、Set-Cookie 等敏感请求头信息会被 zuul 屏蔽掉,我们可以将这些默认屏蔽去掉,也可以添加要屏蔽的请求头。
实例操作开始,过于过滤稍后讲解
实例操作
"1.0" encoding="UTF-8"?>
"http://maven.apache.org/POM/4.0.0" xmlns:xsi="http://www.w3.org/2001/XMLSchema-instance"
         xsi:schemaLocation="http://maven.apache.org/POM/4.0.0 https://maven.apache.org/xsd/maven-4.0.0.xsd">
    4.0.0</modelVersion>

        com.ly</groupId>
        springCloud</artifactId>
        1.0-SNAPSHOT</version>
    </parent>
    sp-zuul</artifactId>
    0.0.1-SNAPSHOT</version>
    sp-zuul</name>
    Demo project for Spring Boot</description>


        .version>1.8</java.version>
        -cloud.version>Greenwich.SR1</spring-cloud.version>
    </properties>


            org.springframework.cloud</groupId>
            spring-cloud-starter-netflix-eureka-client</artifactId>
        </dependency>

            org.springframework.cloud</groupId>
            spring-cloud-starter-netflix-zuul</artifactId>
        </dependency>


            org.springframework.retry</groupId>
            spring-retry</artifactId>
        </dependency>

            com.ly</groupId>
            commons</artifactId>
            1.0-SNAPSHOT</version>
        </dependency>
    </dependencies>


                org.springframework.cloud</groupId>
                spring-cloud-dependencies</artifactId>
                ${spring-cloud.version}</version>
                <type>pom</type>
                import</scope>
            </dependency>
        </dependencies>
    </dependencyManagement>


                org.springframework.boot</groupId>
                spring-boot-maven-plugin</artifactId>
            </plugin>
        </plugins>
    </build>
</project>
application.yml
spring:
  application:
    name: zuul

server:
  port: 3001

eureka:
  client:
    service-url:
      defaultZone: http://eureka1:2001/eureka, http://eureka2:2002/eureka

zuul:
  routes:
    item-service: /item-service/**
    user-service: /user-service/**
    order-service: /order-service/**
启动类
@EnableZuulProxy
@EnableDiscoveryClient
@SpringBootApplication
public class SpZuulApplication {
    public static void main(String[] args) {
        SpringApplication.run(SpZuulApplication.class, args);
    }
}
启动服务,访问测试
http://eureka1:2001
http://localhost:3001/item-service/35
http://localhost:3001/item-service/decreaseNumber
使用postman,POST发送以下格式数据:
[{“id”:1, “name”:“abc”, “number”:23},{“id”:2, “name”:“def”, “number”:11}]
http://localhost:3001/user-service/7
http://localhost:3001/user-service/7/score?score=100
http://localhost:3001/order-service/123abc
http://localhost:3001/order-service/
zuul + ribbon 负载均衡
zuul 已经集成了 ribbon,默认已经实现了负载均衡
zuul + ribbon 重试
pom.xml 添加 spring-retry 依赖
配置 zuul 开启重试,并配置 ribbon 重试参数
需要开启重试,默认不开启
spring:
  application:
    name: zuul

server:
  port: 3001

eureka:
  client:
    service-url:
      defaultZone: http://eureka1:2001/eureka, http://eureka2:2002/eureka

zuul:
  retryable: true

#  routes:
#    item-service: /item-service/**
#    user-service: /user-service/**
#    order-service: /order-service/**

ribbon:
  ConnectTimeout: 1000
  ReadTimeout: 1000
  MaxAutoRetriesNextServer: 1
  MaxAutoRetries: 1
zuul + hystrix 降级
创建降级类
getRoute() 方法中指定应用此降级类的服务id,星号或null值可以通配所有服务
ItemServiceFallback
package com.ly.fallback;

import com.ly.util.JsonResult;
import lombok.extern.slf4j.Slf4j;
import org.springframework.cloud.netflix.zuul.filters.route.FallbackProvider;
import org.springframework.http.HttpHeaders;
import org.springframework.http.HttpStatus;
import org.springframework.http.MediaType;
import org.springframework.http.client.ClientHttpResponse;
import org.springframework.stereotype.Component;

import java.io.ByteArrayInputStream;
import java.io.IOException;
import java.io.InputStream;

@Slf4j
@Component
public class ItemServiceFallback implements FallbackProvider {
    @Override
    public String getRoute() {
        //当执行item-service失败,
        //应用当前这个降级类
        return "item-service";
        //星号和null都表示所有微服务失败都应用当前降级类
        //"*"; //null;
    }

    //该方法返回封装降级响应的对象
    //ClientHttpResponse中封装降级响应
    @Override
    public ClientHttpResponse fallbackResponse(String route, Throwable cause) {
        return response();
    }

    private ClientHttpResponse response() {
        return new ClientHttpResponse() {
            //下面三个方法都是协议号
            @Override
            public HttpStatus getStatusCode() throws IOException {
                return HttpStatus.OK;
            }
            @Override
            public int getRawStatusCode() throws IOException {
                return HttpStatus.OK.value();
            }
            @Override
            public String getStatusText() throws IOException {
                return HttpStatus.OK.getReasonPhrase();
            }

            @Override
            public void close() {
            }

            @Override
            public InputStream getBody() throws IOException {
                log.info("fallback body");
                String s = JsonResult.err().msg("后台服务错误").toString();
                return new ByteArrayInputStream(s.getBytes("UTF-8"));
            }

            @Override
            public HttpHeaders getHeaders() {
                HttpHeaders headers = new HttpHeaders();
                headers.setContentType(MediaType.APPLICATION_JSON);
                return headers;
            }
        };
    }
}
OrderServiceFallback
package com.ly.fallback;

import com.ly.util.JsonResult;
import lombok.extern.slf4j.Slf4j;
import org.springframework.cloud.netflix.zuul.filters.route.FallbackProvider;
import org.springframework.http.HttpHeaders;
import org.springframework.http.HttpStatus;
import org.springframework.http.MediaType;
import org.springframework.http.client.ClientHttpResponse;
import org.springframework.stereotype.Component;

import java.io.ByteArrayInputStream;
import java.io.IOException;
import java.io.InputStream;

@Slf4j
@Component
public class OrderServiceFallback implements FallbackProvider {
    @Override
    public String getRoute() {
        return "order-service"; //"*"; //null;
    }
    @Override
    public ClientHttpResponse fallbackResponse(String route, Throwable cause) {
        return response();
    }
    private ClientHttpResponse response() {
        return new ClientHttpResponse() {
            @Override
            public HttpStatus getStatusCode() throws IOException {
                return HttpStatus.OK;
            }
            @Override
            public int getRawStatusCode() throws IOException {
                return HttpStatus.OK.value();
            }
            @Override
            public String getStatusText() throws IOException {
                return HttpStatus.OK.getReasonPhrase();
            }

            @Override
            public void close() {
            }

            @Override
            public InputStream getBody() throws IOException {
                log.info("fallback body");
                String s = JsonResult.err().msg("后台服务错误").toString();
                return new ByteArrayInputStream(s.getBytes("UTF-8"));
            }

            @Override
            public HttpHeaders getHeaders() {
                HttpHeaders headers = new HttpHeaders();
                headers.setContentType(MediaType.APPLICATION_JSON);
                return headers;
            }
        };
    }
}
zuul + hystrix 熔断
降低 hystrix 超时时间,以便测试降级
spring:
  application:
    name: zuul

server:
  port: 3001

eureka:
  client:
    service-url:
      defaultZone: http://eureka1:2001/eureka, http://eureka2:2002/eureka

zuul:
  retryable: true

ribbon:
  ConnectTimeout: 1000
  ReadTimeout: 2000
  MaxAutoRetriesNextServer: 1
  MaxAutoRetries: 1

hystrix:
  command:
    default:
      execution:
        isolation:
          thread:
            timeoutInMilliseconds: 500
zuul + hystrix dashboard 监控
暴露 hystrix.stream 监控端点
zuul 已经包含 actuator 依赖
management:
  endpoints:
    web:
      exposure:
        include: hystrix.stream
查看暴露的监控端点
http://localhost:3001/actuator

http://localhost:3001/actuator/hystrix.stream
开启监控
启动 sp-hystrix-dashboard,填入 zuul 的监控端点路径,开启监控
http://localhost:4001/hystrix
填入监控端点:
http://localhost:3001/actuator/hystrix.stream

zuul + turbine 聚合监控
修改 turbine 项目,聚合 zuul 服务实例
spring:
  application:
    name: turbin

server:
  port: 5001

eureka:
  client:
    service-url:
      defaultZone: http://eureka1:2001/eureka, http://eureka2:2002/eureka

turbine:
  app-config: order-service, zuul
  cluster-name-expression: new String("default")
turbine 聚合监控端点
http://localhost:5001/turbine.stream
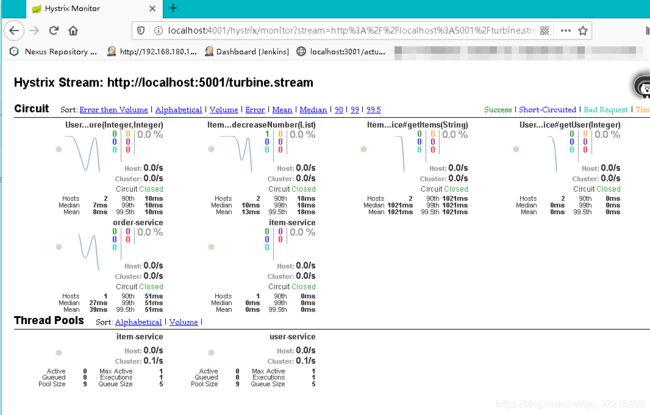 熔断测试
熔断测试
ab -n 20000 -c 50 http://localhost:3001/order-service/123abc
zuul 过滤
如果说,路由功能是Zuul的基操的话,那么过滤器就是Zuul的利器了。毕竟所有请求都经过网关(Zuul),那么我们可以进行各种过滤,这样我们就能实现限流,灰度发布,权限控制等等。
其作用可以类比Servlet框架的Filter,或者AOP。所以只要过滤器能干的,他都能干。
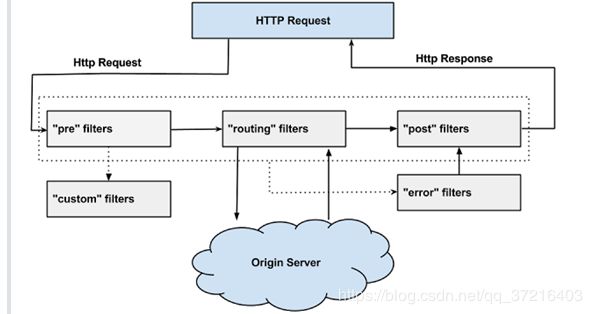
简单实现一个请求时间日志打印
要实现自己定义的Filter我们只需要继承ZuulFilter然后将这个过滤器类以@Component注解加入 Spring 容器中就行了。
而 Zuul 中的过滤器总共有 4 种类型,且每种类型都有对应的使用场景。
- pre
可以在请求被路由之前调用。适用于身份认证的场景,认证通过后再继续执行下面的流程。 - route
在路由请求时被调用。适用于灰度发布场景,在将要路由的时候可以做一些自定义的逻辑。 - post
在 route 和 error 过滤器之后被调用。这种过滤器将请求路由到达具体的服务之后执行。适用于需要添加响应头,记录响应日志等应用场景。 - error
处理请求时发生错误时被调用。在执行过程中发送错误时会进入 error 过滤器,可以用来统一记录错误信息。
请求时间日志打印源码:
// 加入Spring容器
@Component
public class PreRequestFilter extends ZuulFilter {
    // 返回过滤器类型 这里是前置过滤器
    @Override
    public String filterType() {
        return FilterConstants.PRE_TYPE;
    }
    // 指定过滤顺序 越小越先执行,这里第一个执行
    // 当然不是只真正第一个 在Zuul内置中有其他过滤器会先执行
    // 那是写死的 比如 SERVLET_DETECTION_FILTER_ORDER = -3
    @Override
    public int filterOrder() {
        return 0;
    }
    // 什么时候该进行过滤
    // 这里我们可以进行一些判断,这样我们就可以过滤掉一些不符合规定的请求等等
    @Override
    public boolean shouldFilter() {
        return true;
    }
    // 如果过滤器允许通过则怎么进行处理
    @Override
    public Object run() throws ZuulException {
        // 这里我设置了全局的RequestContext并记录了请求开始时间
        RequestContext ctx = RequestContext.getCurrentContext();
        ctx.set("startTime", System.currentTimeMillis());
        return null;
    }
}

// lombok的日志
@Slf4j
// 加入 Spring 容器
@Component
public class AccessLogFilter extends ZuulFilter {
    // 指定该过滤器的过滤类型
    // 此时是后置过滤器
    @Override
    public String filterType() {
        return FilterConstants.POST_TYPE;
    }
    // SEND_RESPONSE_FILTER_ORDER 是最后一个过滤器
    // 我们此过滤器在它之前执行
    @Override
    public int filterOrder() {
        return FilterConstants.SEND_RESPONSE_FILTER_ORDER - 1;
    }
    @Override
    public boolean shouldFilter() {
        return true;
    }
    // 过滤时执行的策略
    @Override
    public Object run() throws ZuulException {
        RequestContext context = RequestContext.getCurrentContext();
        HttpServletRequest request = context.getRequest();
        // 从RequestContext获取原先的开始时间 并通过它计算整个时间间隔
        Long startTime = (Long) context.get("startTime");
        // 这里我可以获取HttpServletRequest来获取URI并且打印出来
        String uri = request.getRequestURI();
        long duration = System.currentTimeMillis() - startTime;
        log.info("uri: " + uri + ", duration: " + duration / 100 + "ms");
        return null;
    }
}
上面就简单实现了请求时间日志打印功能
实例操作
在我们项目创建一个过滤器,指定service为item-service,当参数有token才可以允许访问,否则不允许访问
@Component
public class AccessFilter extends ZuulFilter{
	@Override
	public boolean shouldFilter() {
	    //对指定的serviceid过滤,如果要过滤所有服务,直接返回 true

		RequestContext ctx = RequestContext.getCurrentContext();
		String serviceId = (String) ctx.get(FilterConstants.SERVICE_ID_KEY);
		if(serviceId.equals("item-service")) {
			return true;
		}
		return false;
	}

	@Override
	public Object run() throws ZuulException {
		RequestContext ctx = RequestContext.getCurrentContext();
		HttpServletRequest req = ctx.getRequest();
		String at = req.getParameter("token");
		if (at == null) {
			//此设置会阻止请求被路由到后台微服务
			ctx.setSendZuulResponse(false);
			ctx.setResponseStatusCode(200);
			ctx.setResponseBody(JsonResult.err().code(JsonResult.NOT_LOGIN).toString());
		}
		//zuul过滤器返回的数据设计为以后扩展使用,
		//目前该返回值没有被使用
		return null;
	}

	@Override
	public String filterType() {
		return FilterConstants.PRE_TYPE;
	}

	@Override
	public int filterOrder() {
	    //该过滤器顺序要 > 5,才能得到 serviceid
		return FilterConstants.PRE_DECORATION_FILTER_ORDER+1;
	}
}
访问测试
- 没有token参数不允许访问
http://localhost:3001/item-service/35
返回结果是400

- 有token参数可以访问
http://localhost:3001/item-service/35?token=1234(由于我们前面模拟了服务响应时间过长出现降级的情况,所以会出现降级的返回结果,但也是说明过滤起作用了,不是吗)
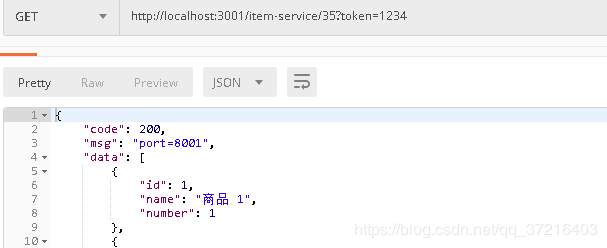 或者
或者
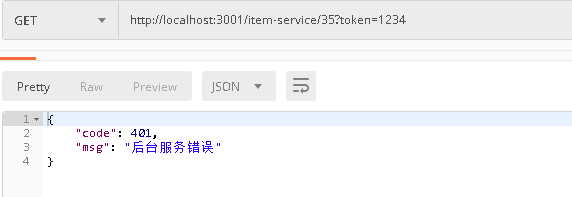
8. config 配置中心
当微服务系统逐渐庞大起来,那么多Consumer、Provider、Eureka Server、Zuul系统都会持有自己的配置,若出现了在项目运行的时候需要更改某些应用的配置的情况,如果我们不进行配置的统一管理,我们只能去每个应用下一个一个寻找配置文件然后修改配置文件再重启应用。
首先对于分布式系统而言我们就不应该去每个应用下去分别修改配置文件,再者对于重启应用来说,服务无法访问所以直接抛弃了可用性,这是我们更不愿见到的。
那么有没有一种方法既能对配置文件统一地进行管理,又能在项目运行时动态修改配置文件呢?
看一下官方解释:
Spring Cloud Config为分布式系统中的外部化配置提供服务器和客户端支持。使用Config服务器,可以在中心位置管理所有环境中应用程序的外部属性。
简单来说,Spring Cloud Config就是能将各个 应用/系统/模块 的配置文件存放到统一的地方然后进行管理(Git 或者 SVN)。
你想一下,我们的应用是不是只有启动的时候才会进行配置文件的加载,那么我们的Spring Cloud Config就暴露出一个接口给启动应用来获取它所想要的配置文件,应用获取到配置文件然后再进行它的初始化工作,如下图

那你肯定还会有一个疑问,如果我在应用运行时去更改远程配置仓库(Git)中的对应配置文件,那么依赖于这个配置文件的已启动的应用会不会进行其相应配置的更改呢?
答案是不会的。
那怎么进行动态修改配置文件呢?这不是出现了配置漂移吗?
别急,你可以使用Webhooks,这是 github提供的功能,它能确保远程库的配置文件更新后客户端中的配置信息也得到更新。
Webhooks虽然能解决,但是你了解一下会发现它根本不适合用于生产环境,所以基本不会使用它的。
一般我们会使用Bus消息总线 +Spring Cloud Config进行配置的动态刷新。
那消息总线下节再讲,我们先看config配置中心的具体应用
config创建
yml 配置文件保存到 git 服务器,例如 github.com 或 gitee.com
微服务启动时,从服务器获取配置文件
既然提到了git服务器,我们就需要先进行创建一个config项目专门存放配置,并将其上传到git服务器上
新建一个空的project,起名为config,删除src文件
将item,user,order,zuul四个项目的yml配置文件,复制到config项目,并改名
item-service-dev.yml
user-service-dev.yml
order-service-dev.yml
zuul-dev.yml
请先注册账户并登录
仓库命名
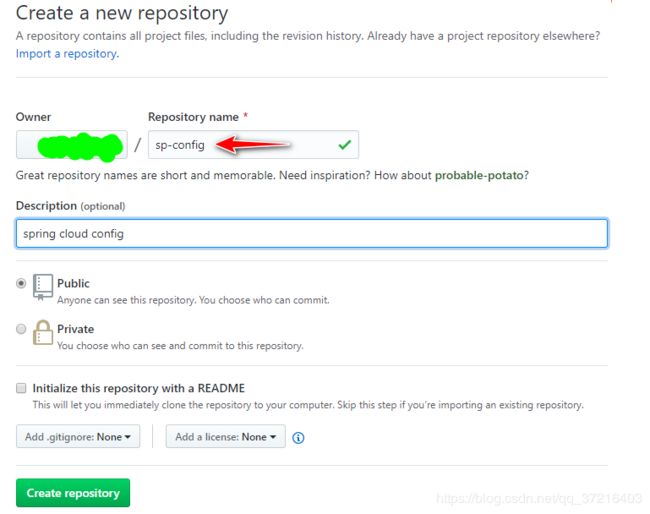 创建好,看首页,点击进去查看详情,

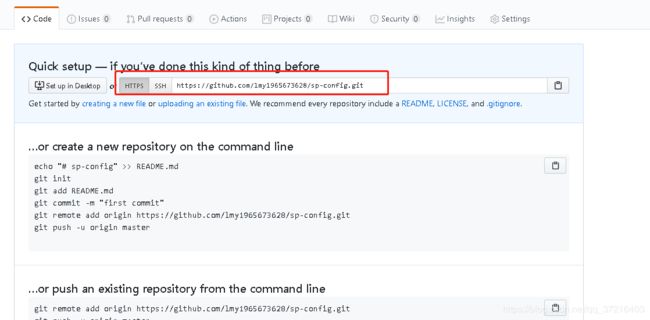 拿到这个地址,我们到idea进行同步一下(前提是你已配置好相关配置,若是第一次使用,请自行查阅资料进行相关配置,若有相关技术解答,可留言)
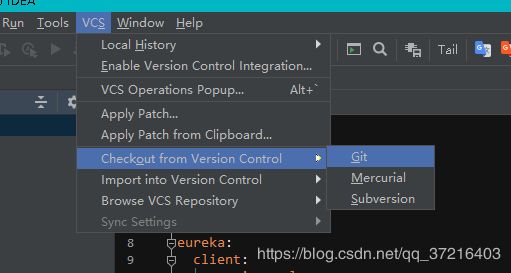
项目克隆好后,我们直接将上面的config文件夹挪进来,同时复制到

并上传到GitHub上,提交的时候可以看到有俩个选项。第二个可以同步到GitHub上的,只选择commit的话,只能提交到本地。

若不小心选择了commit的话,可以再次同步的
 使用GitHub的话要有个本地仓库,我们可以使用GitHub的客户端进行配置,具体详细教程可自行查阅资料,后期我也会专门针对GitHub分享相关教程

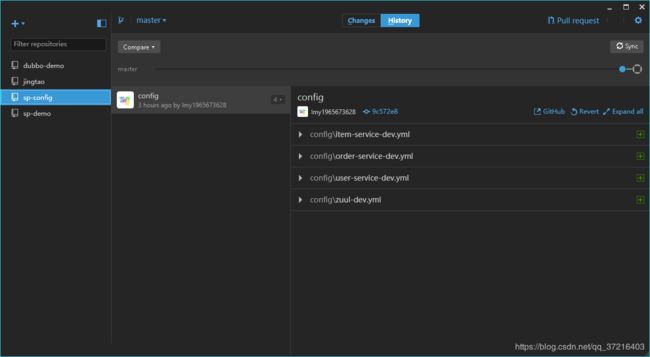
项目应用
在原项目中添加module项目sp-config。
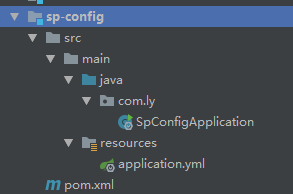
pom.xml
"1.0" encoding="UTF-8"?>
"http://maven.apache.org/POM/4.0.0" xmlns:xsi="http://www.w3.org/2001/XMLSchema-instance"
         xsi:schemaLocation="http://maven.apache.org/POM/4.0.0 https://maven.apache.org/xsd/maven-4.0.0.xsd">
    4.0.0</modelVersion>

        com.ly</groupId>
        springCloud</artifactId>
        1.0-SNAPSHOT</version>
    </parent>
    sp-config</artifactId>
    0.0.1-SNAPSHOT</version>
    sp-config</name>
    Demo project for Spring Boot</description>


        .version>1.8</java.version>
        -cloud.version>Greenwich.SR1</spring-cloud.version>
    </properties>


            org.springframework.cloud</groupId>
            spring-cloud-config-server</artifactId>
        </dependency>

            org.springframework.cloud</groupId>
            spring-cloud-starter-netflix-eureka-client</artifactId>
        </dependency>
    </dependencies>


                org.springframework.cloud</groupId>
                spring-cloud-dependencies</artifactId>
                ${spring-cloud.version}</version>
                <type>pom</type>
                import</scope>
            </dependency>
        </dependencies>
    </dependencyManagement>


                org.springframework.boot</groupId>
                spring-boot-maven-plugin</artifactId>
            </plugin>
        </plugins>
    </build>

</project>
application.yml
spring:
  application:
    name: config-server

  cloud:
    config:
      server:
        git:
          uri: https://github.com/你的个人路径/sp-config
          searchPaths: config
          username: your-username
          password: your-password

server:
  port: 6001

eureka:
  client:
    service-url:
      defaultZone: http://eureka1:2001/eureka, http://eureka2:2002/eureka
主程序添加 @EnableConfigServer 和 @EnableDiscoveryClient
@EnableConfigServer
@EnableDiscoveryClient
@SpringBootApplication
public class SpConfigApplication {
    public static void main(String[] args) {
        SpringApplication.run(SpConfigApplication.class, args);
    }
}
启动,访问测试

访问 item-service-dev.yml 可以使用以下形式:
- http://localhost:6001/item-service-dev.yml
- http://localhost:6001/item-service/dev

测试其他文件
http://localhost:6001/user-service/dev
http://localhost:6001/zuul/dev
…
config 客户端
修改以下项目,从配置中心获取配置信息
item-service
user-service
order-service
sp-zuul
在父级的pom.xml 添加 config 客户端依赖
	org.springframework.cloud</groupId>
	spring-cloud-starter-config</artifactId>
	2.1.1.RELEASE</version>
</dependency>
在四个项目中添加 bootstrap.yml
bootstrap.yml,引导配置文件,先于 application.yml 加载
内容如下:
item-service
spring:
  cloud:
    config:
      discovery:
        enabled: true
        service-id: config-server
      name: item-service
      profile: dev
    inetutils:
      ignored-interfaces: # 忽略的网卡
        - VM.*
      preferred-networks: # 要是用的网卡的网段
        - 172.16.2
eureka:
  client:
    service-url:
      defaultZone: http://eureka1:2001/eureka, http://eureka2:2002/eureka
user-service
spring:
  cloud:
    config:
      discovery:
        enabled: true
        service-id: config-server
      name: user-service
      profile: dev
    inetutils:
      ignored-interfaces: # 忽略的网卡
        - VM.*
      preferred-networks: # 要是用的网卡的网段
        - 172.16.2
eureka:
  client:
    service-url:
      defaultZone: http://eureka1:2001/eureka, http://eureka2:2002/eureka
order-service
spring:
  cloud:
    config:
      discovery:
        enabled: true
        service-id: config-server
      name: order-service
      profile: dev
    inetutils:
      ignored-interfaces: # 忽略的网卡
        - VM.*
      preferred-networks: # 要是用的网卡的网段
        - 172.16.2
eureka:
  client:
    service-url:
      defaultZone: http://eureka1:2001/eureka, http://eureka2:2002/eureka
zuul
spring:
  cloud:
    config:
      discovery:
        enabled: true
        service-id: config-server
      name: zuul
      profile: dev
    inetutils:
      ignored-interfaces: # 忽略的网卡
        - VM.*
      preferred-networks: # 要是用的网卡的网段
        - 172.16.2
eureka:
  client:
    service-url:
      defaultZone: http://eureka1:2001/eureka, http://eureka2:2002/eureka
启动服务,观察从配置中心获取配置信息的日志,先启动eureka,在启动config,然后在启动其他的服务
当看到启动的时候出现如图所示的日志时,说明服务启动的时候从GitHub服务上获取的配置

配置刷新
spring cloud 允许运行时动态刷新配置,可以重新加载本地配置文件 application.yml,或者从配置中心获取新的配置信息
以 user-service 为例演示配置刷新
pom.xml
user-service 的 pom.xml 中添加 actuator 依赖
>
>org.springframework.boot >
>spring-boot-starter-actuator >
>
yml 配置文件中暴露 refresh 端点
修改 github 仓库中的 user-service-dev.yml
sp:
  user-service:
    users: "[{\"id\":7, \"username\":\"abc\",\"password\":\"123\"},{\"id\":8, \"username\":\"def\",\"password\":\"456\"},{\"id\":9, \"username\":\"ghi\",\"password\":\"789\"}]"

spring:
  application:
    name: user-service

server:
  port: 8101

eureka:
  client:
    service-url:
      defaultZone: http://eureka1:2001/eureka, http://eureka1:2002/eureka

management:
  endpoints:
    web:
      exposure:
        include: refresh
重启服务,查看暴露的刷新端点
查看暴露的刷新端点
http://localhost:8101/actuator
 UserServiceImpl 添加 @RefreshScope 注解
只允许对添加了 @RefreshScope 或 @ConfigurationProperties 注解的 Bean 刷新配置,可以将更新的配置数据注入到 Bean 中
先启动 user-service,再修改 config项目的user-service-dev.yml文件并提交
在末尾新添加一个用户id为99 的数据
# 在末尾添加了一个新的用户数据
sp:
  user-service:
    users: "[{\"id\":7, \"username\":\"abc\",\"password\":\"123\"},{\"id\":8, \"username\":\"def\",\"password\":\"456\"},{\"id\":9, \"username\":\"ghi\",\"password\":\"789\"},{\"id\":99, \"username\":\"aaa\",\"password\":\"111\"}]"
改完了,别忘了提交和同步到GitHub上。或者直接在GitHub上修改。
访问刷新端点刷新配置
修改完配置文件,下一步就要刷新一下
刷新端点路径:
http://localhost:8101/actuator/refresh
使用 postman 向刷新端点发送 post 请求,可以看到它能检测到你修改的信息

那我们访问 user-service,查看动态更新的新用户数据
http://localhost:8101/99
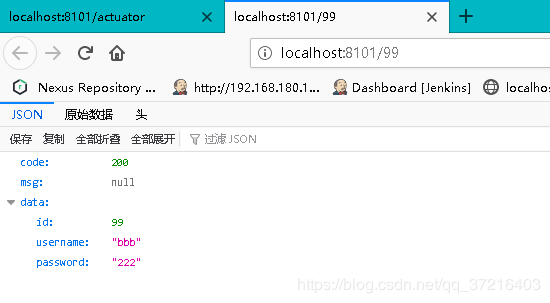
再次修改,我们吧密码改为333
重新刷新一下
再次访问这个用户,可以看到信息已经加载了。
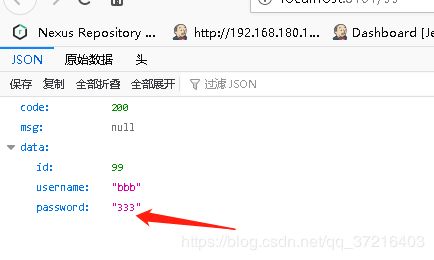
那这里会产生一个疑问 ,上面只改了user的配置文件,进行了手动刷新,那若所有的项目的配置文件都需要刷新呢?难道每个项目都得自己手动挨个去刷新吗?有没有一种方式,只需要一个命令就可以实现所有的服务自动刷新各自的配置呢?
既然这么问了,当然是有,下面的消息总线Bus就可以实现
9. Spring Cloud Bus
定义:用于将服务和服务实例与分布式消息系统链接在一起的事件总线。在集群中传播状态更改很有用(例如配置更改事件)。
简单理解为Spring Cloud Bus的作用就是管理和广播分布式系统中的消息,也就是消息引擎系统中的广播模式。当然作为消息总线的Spring Cloud Bus可以做很多事而不仅仅是客户端的配置刷新功能。
而拥有了Spring Cloud Bus之后,我们只需要创建一个简单的请求,并且加上@ResfreshScope注解就能进行配置的动态修改了,下面我画了张图供你理解。
- 提交配置文件触发post并给config server发送bus/refresh
- config server接收到请求从git端更新配置并且发送给 Bus
- bus接到消息并通知给其它客户端
- 其它客户端接收到通知,请求Server端获取最新配置
- 全部客户端均获取到最新的配置
config bus + rabbitmq 消息总线配置刷新
Spring Cloud Bus 的一个核心思想是通过分布式的启动器对 Spring Boot 应用进行扩展,也可以用来建立一个或多个应用之间的通信频道。目前唯一实现的方式是用 AMQP 消息代理作为通道,但是相同的基本功能集(还有一些取决于传输)在其他传输的路线图上
这里说一下消息代理的概念
消息代理(Message Broker)是一种消息验证、传输、路由的架构模式。消息代理是一个中间件产品,它的核心是一个消息的路由程序,用来实现接收和分发消息,并根据设定好的消息处理流来转发给正确的应用。它包括独立的通信和消息传递协议,能够实现组织内部和组织间的网络通信。设计代理的目的就是为了能够从应用程序中传入消息,并执行一些特别的操作。
现有的消息代理开源产品:
- ActiveMQ
- Kafka
- RabbitMQ
- RocketMQ
目前Spring Cloud Bus 支持 RabbitMQ 和 Kafka,spring-cloud-starter-bus-amqp 、spring-cloud-starter-bus-kafka
这里我用的是RabbitMQ
对于这个消息组件我们在另一篇文章详细讲解。
https://blog.csdn.net/qq_37216403/article/details/106472737
当你看完rabbitMQ的相关技术知识后,对其有利一定的认识,那我们就开始操作如何使用rabbitMQ+bus进行动态更配置
开始
需要动态更新配置的微服务,添加 spring cloud bus 依赖,并添加 rabbitmq 连接信息
修改以下微服务
- item-service
- user-service
- order-service
- zuul
pom.xml 添加 spring cloud bus 依赖
    org.springframework.cloud</groupId>
    spring-cloud-starter-bus-amqp</artifactId>
    2.1.0.RELEASE</version>
</dependency>
配置文件中添加 rabbitmq 连接信息
- 将GitHub上的config项目中每个配置文件进行修改修改,并提交到github
- 连接信息请修改成你的连接信息
spring:
  ......
  rabbitmq:
    host: 192.168.180.161
    port: 5672
    username: admin
    password: admin
sp-config项目配置rabbitmq连接信息,并暴露 bus-refresh 监控端点
application.yml
spring:
  application:
    name: config-server

  cloud:
    config:
      server:
        git:
          uri: https://github.com/lmy1965673628/sp-config
          searchPaths: config
          username: lmy1965673628
          password: yang1965673628
  rabbitmq:
    host: 192.168.180.161
    port: 5672
    username: admin
    password: admin
server:
  port: 6001

eureka:
  client:
    service-url:
      defaultZone: http://eureka1:2001/eureka, http://eureka2:2002/eureka

management:
  endpoints:
    web:
      exposure:
        include: bus-refresh
查看刷新端点
http://localhost:6001/actuator

启动服务,请求刷新端点发布刷新消息,测试一下看是否成功,每个服务启动一个就可以
再去修改GitHub的config项目,去改变用户id为99的值,然后提交并上传

我们使用postman,去发送一个消息
向 bus-refresh 刷新端点发送 post 请求
http://localhost:6001/actuator/bus-refresh
http://localhost:8101/99
config 本地文系统
有的伙伴不想用GitHub,觉得GitHub连接有延迟,那还有一种方式,就是本地配置
把配置文件保存到 sp12-config 项目的 resources/config 目录下
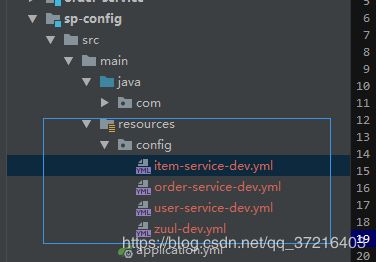
修改 application.yml 激活 native profile,并指定配置文件目录
- 必须配置
spring.profiles.active=native来激活本地文件系统 - 本地路径默认:[
classpath:/, classpath:/config, file:./, file:./config]
spring:
  application:
    name: config-server
  profiles:
    active: native

  cloud:
    config:
      server:
        native:
          search-locations: classpath:/config
#  cloud:
#    config:
#      server:
#        git:
#          uri: https://github.com/lmy1965673628/sp-config
#          searchPaths: config
#          username: lmy1965673628
#          password: yang1965673628
  rabbitmq:
    host: 192.168.180.161
    port: 5672
    username: admin
    password: admin
server:
  port: 6001

eureka:
  client:
    service-url:
      defaultZone: http://eureka1:2001/eureka, http://eureka2:2002/eureka

management:
  endpoints:
    web:
      exposure:
        include: bus-refresh
先重启sp-config服务,再重启user-service 服务。
去检验一下本地文系统是否好使
先看目前的user信息
http://localhost:8101/99

去修改一下密码为6666
10.sleuth 链路跟踪
随着系统规模越来越大,微服务之间调用关系变得错综复杂,一条调用链路中可能调用多个微服务,任何一个微服务不可用都可能造整个调用过程失败
spring cloud sleuth 可以跟踪调用链路,分析链路中每个节点的执行情况
微服务中添加 spring cloud sleuth 依赖
修改以下微服务的 pom.xml,添加 sleuth 依赖
- item-service
- user-service
- order-service
- zuul
	org.springframework.cloud</groupId>
	spring-cloud-starter-sleuth</artifactId>
	2.1.1.RELEASE</version>
</dependency>
在控制台查看链路跟踪日志
启动服务,config服务要先启动

通过 zuul 网关,访问 order-service
http://localhost:3001/order-service/112233
四个微服务的控制台日志中,可以看到以下信息:
[服务id,请求id,span id,是否发送到zipkin]
- 请求id:请求到达第一个微服务时生成一个请求id,该id在调用链路中会一直向后面的微服务传递
- span id:链路中每一步微服务调用,都生成一个新的id
11.sleuth + zipkin 链路分析
zipkin 可以收集链路跟踪数据,提供可视化的链路分析
链路数据抽样比例
默认 10% 的链路数据会被发送到 zipkin 服务。可以配置修改抽样比例
修改user-service,order-service,item-service的配置文件
spring:
  zipkin:
    base-url: http://localhost:9411/
    sender:
      type: web
# 可以指定监控数据的采样率
  sleuth:
    sampler:
      probability: 1
zipkin 服务下载
- GitHub : https://github.com/openzipkin/zipkin
- 直接下载jar包:https://dl.bintray.com/openzipkin/maven/io/zipkin/java/zipkin-server/
- docker :
docker run -d -p 9411:9411 openzipkin/zipkin
- linux :
curl -sSL https://zipkin.io/quickstart.sh | bash -s
我采用了第二种方式,直接在本地使用 ,直接使用java -jar 命令运行即可
 http://localhost:9411/zipkin
 微服务添加 zipkin 起步依赖
修改以下微服务
- item-service
- user-service
- order-service
- zuul
   org.springframework.cloud</groupId>
   spring-cloud-starter-zipkin</artifactId>
   2.1.1.RELEASE</version>
</dependency>
如果没有配置过 spring cloud bus,需要再添加 spring-cloud-starter-stream-rabbit 依赖和 rabbitmq 连接信息
启动并访问服务,访问 zipkin 查看链路分析
- http://localhost:3001/order-service/112233
刷新访问多次,链路跟踪数据中,默认只有 10% 会被收集到zipkin,但上面我修改了成100%
当访问成功的时候,看一下控制台,可以看到最后一个参数是true,则表示发送到zipkin
点击其中一个,查看详情
 可以看到每一个链路的整个过程都被记录,再点击其中一个还可以具体的详情内容,包含时间,接口的相关数据等信息
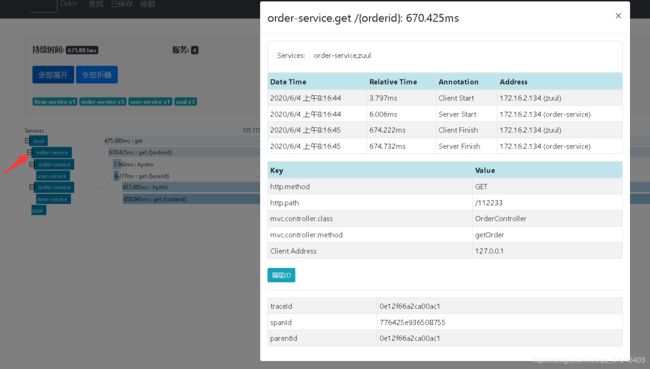 我们点击导航栏可以看到整个链路的依赖

说明一下:zipkin的数据存储有很多种方式,但我只是用于测试,所以没采用存储方式,一旦服务关闭,数据就会丢失。关于更多zipkin的相关信息可自行查阅相关资料。我后期也会逐渐加入相关案例
总结
至此,springcloud的10个组件已全部介绍完,相关demo也已上传我的GitHub仓库,各位可以进行下载进行参考
总结一下:
spring cloud 技术组成
-
eureka
微服务治理,服务注册和发现 -
ribbon
负载均衡、请求重试 -
hystrix
断路器,服务降级、熔断 -
feign
ribbon + hystrix 集成,并提供生命式客户端 -
hystrix dashboard 和 turbine
hystrix 微服务监控 -
zuul
API 网关,提供微服务的统一入口,并提供统一的权限验证 -
config
配置中心 -
bus
消息总线, 配置刷新 -
sleuth+zipkin
链路跟踪

