TestNG多线程安全吗?ThreadLocal:有我还能不安全?
目录
- 一、背景介绍
- 二、TestNG多线程详解
- 2.1 TestNG多线程实现
- 2.2 TestNG多线程效果演示
- 三、ThreadLocal
- 3.1 ThreadLocal概念
- 3.2 具体实现
一、背景介绍
在使用Selenium+TestNG做WebUI自动化过程中,为了能够加快WebUI自动化测试的速度,减少测试执行时间。
利用TestNG多线程并发测试的特性,设置了对应的线程数的并发。这样一来,测试过程中就会创建多个driver,如何保证多个driver之间不相互影响?保证对浏览器1的操作不会出现在浏览器2上?所以就使用到ThreadLocal这个类去保证线程安全。
二、TestNG多线程详解
说到TestNG,就一般会拿TestNG与Junit来比较。但是在数据驱动、多线程并发测试这方面,TestNG自带这方面的功能,更加便捷;而Junit却需要三方工具来实现。
2.1 TestNG多线程实现
-
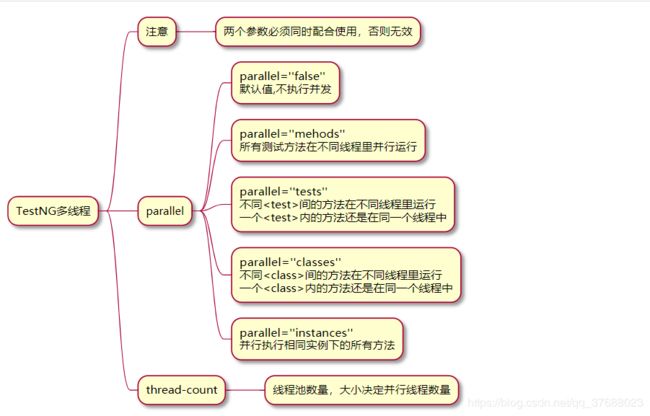
实现TestNG多线程最常见的一种方法为:testng.xml文件配置。我们可以在suite、test标签下设置parallel、thread-count属性的值。

-
实际案例:例如下面的suite有两个test,然后设置为parallel=“tests” thread-count=“2”,即为开启两个线程,并行执行,每个线程执行对应的下的所有方法。
2.2 TestNG多线程效果演示
- 创建Test1这个类
public class Test1 {
    @Test
    public void test1(){
        long id=Thread.currentThread().getId();
        System.out.println("test1.1 Thread id is:"+id);
    }

    @Test
    public void test2(){
        long id=Thread.currentThread().getId();
        System.out.println("test1.2 Thread id is:"+id);
    }

    @Test
    public void test3(){
        long id=Thread.currentThread().getId();
        System.out.println("test1.3 Thread id is:"+id);
    }
}
- 创建Test2这个类
public class Test2 {
    @Test
    public void test1(){
        long id=Thread.currentThread().getId();
        System.out.println("test2.1 Thread id is:"+id);
    }

    @Test
    public void test2(){
        long id=Thread.currentThread().getId();
        System.out.println("test2.2 Thread id is:"+id);
    }

    @Test
    public void test3(){
        long id=Thread.currentThread().getId();
        System.out.println("test2.3 Thread id is:"+id);
    }
}
- 创建testng.xml(不添加多线程并发参数)
运行testng.xml,输出结果如下。结论:每个测试方法输出的Thread id相同
test1.1 Thread id is:1
test1.2 Thread id is:1
test1.3 Thread id is:1
test2.1 Thread id is:1
test2.2 Thread id is:1
test2.3 Thread id is:1
- 修改testng.xml(添加多线程并发参数)
运行testng.xml,输出结果如下。
结论:每个test标签下的方法在同一个线程中执行。不同test标签下的方法所在线程不同。启动两个线程,一个线程负责执行test1这个中的方法,另一个线程负责执行test2这个中的方法,两个线程同时并行。
test1.1 Thread id is:11
test2.1 Thread id is:12
test2.2 Thread id is:12
test1.2 Thread id is:11
test2.3 Thread id is:12
test1.3 Thread id is:11
三、ThreadLocal
3.1 ThreadLocal概念
ThreadLocal类的相关概念可以参考:https://www.jianshu.com/p/6fc3bba12f38
Threadlocal是一个线程内部的存储类,可以在指定线程内存储数据,数据存储以后,只有指定线程可以得到存储数据。做个不恰当的比喻,从表面上看ThreadLocal相当于维护了一个map,key就是当前的线程,value就是需要存储的对象。
3.2 具体实现
具体实现可以参考我博客链接:https://blog.csdn.net/qq_37688023/article/details/105592464
- 封装ThreadLocalUtil类
public class ThreadLocalUtil {
    /**
     * 设置当前线程变量
     * @param threadLocal 线程名
     * @param value 线程的值
     */
    public void setThreadValue(ThreadLocal threadLocal, T value){
        if (threadLocal.get()==null ){
            threadLocal.set(value);
        }
    }

    /**
     * 获得当前线程变量的值
     * @param threadLocal 线程名
     * @return 返回当前线程的值
     */
    public T getThreadValue(ThreadLocal threadLocal){
        return threadLocal.get();
    }
}
- DriverBase类(封装产生driver,并提供相关方法)
@Slf4j
public class DriverBase {
	/*声明一个driver对象*/
	private WebDriver driver;
	/*创建一个ThreadLocalUtil对象*/
  private static ThreadLocalUtil driverThreadLocalUtil = new ThreadLocalUtil<>();
  /*创建一个ThreadLocal对象*/
  private static ThreadLocal threadDriver = new ThreadLocal<>();

  public void test1(){
  	/* 省略代码 */
    driverThreadLocalUtil.setThreadValue(threadDriver, new ChromeDriver(chromeOptions));
    /* 省略代码 */
  }

  /**
    * 获得driver
    * */
    public WebDriver getDriver(){
        return driverThreadLocalUtil.getThreadValue( threadDriver );
    }

     /**
     * 设置driver
     * */
    private void setDriver(WebDriver driver){
        this.driver = driver;
    }

    /**
     * 关闭driver
     * */
    public void stopDriver(){
        setDriver( getDriver() );
        setBrowseName( getBrowseName());
        if(driver != null){
            driver.quit();
            log.info("成功关闭"  + browseName + "浏览器");
            /*最后通过remove方法去掉对应的线程组*/
            threadDriver.remove();
            threadBrowseName.remove();
        }
    }

}
- BaseTest类(实际调用相关方法)
public class BaseTest {
	/*创建DriverBase对象*/
	public static DriverBase driverBase = new DriverBase();
  /*创建driver对象*/
  public WebDriver driver;
  /* 省略代码 */

  /**创建指定浏览器的driver对象/
  driverBase.randomOpenBrowse(browseNumber, remoteIP, browserVersion);

  /* 省略代码 */

  /*获取对应driver*/
  driver = driverBase.getDriver();

}