(自己编写函数)Python + Opencv 图像形态学处理(腐蚀、膨胀、开运算、闭运算)
原理:
形态学运算是结构元素与图像进行逻辑运算,产生新的图像的图像处理方法。二值图像B和结构元素S是定义在笛卡儿网格上的集合,网格中值为1的点是集合的元素。
-
腐蚀
定义:

算法:
a) 用3x3的结构元素,扫描图像的每一个像素。
b) 用结构元素与其覆盖的二值图像做“与”操作。
c) 如果都为1,结果图像的该像素为1,否则为0。 -
膨胀
定义:

算法:
a) 用3x3的结构元素,扫描图像的每一个像素。
b) 用结构元素与其覆盖的二值图像做“与”操作。
c) 如果都为0,结果图像的该像素为0,否则为1。 -
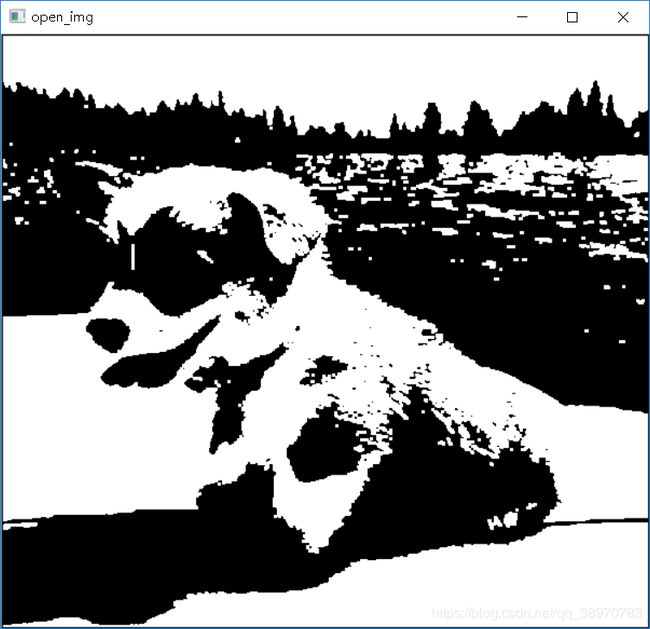
开运算

定义: 即先腐蚀,再膨胀。
算法:
a) 用3x3的结构元素,对图像做腐蚀操作。
b) 再用3x3的结构元素,对图像做膨胀操作。 -
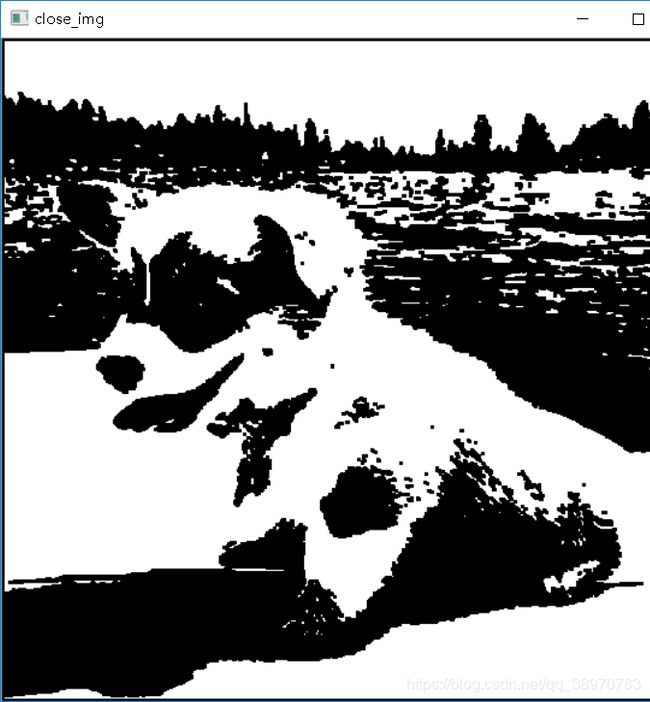
闭运算

定义: 即先膨胀,再腐蚀。
算法:
a) 用3x3的结构元素,对图像做膨胀操作。
b) 再用3x3的结构元素,对图像做腐蚀操作。
代码以及算法设计:
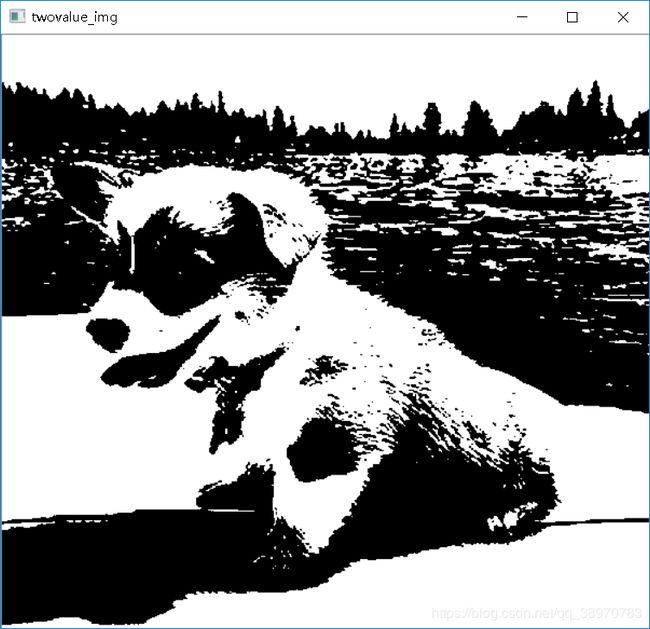
一、首先使用OSTU算法进行计算最适合的阈值,ostu算法的原理如下:
- 先计算图像的直方图,即将图像所有的像素点按照0~255共256个bin,统计落在每个bin的像素点数量
- 归一化直方图,也即将每个bin中像素点数量除以总的像素点
- i表示分类的阈值,也即一个灰度级,从0开始迭代
- 通过归一化的直方图,统计0~i 灰度级的像素(假设像素值在此范围的像素叫做前景像素) 所占整幅图像的比例w0,并统计前景像素的平均灰度u0;统计i~255灰度级的像素(假设像素值在此范围的像素叫做背景像素) 所占整幅图像的比例w1,并统计背景像素的平均灰度u1;
- 计算前景像素和背景像素的方差 g = w0w1(u0-u1) (u0-u1)
- i++;转到 4 ,直到i为256时结束迭代
- 将最大g相应的i值作为图像的全局阈值
#使用otsu算法思维求出阈值并对图像进行二值化处理
def myotsu(gray):
    countdown = 0
    countup = 0
    hist_new = []
    num = []
    hist_countresult = []
    hist_key = []
    hist_proresult = []
    #处理后最终输出矩阵将齐大小设置为与原图一样
    gray2=np.array([[0 for i in range(gray.shape[1])] for i in range(gray.shape[0])], dtype='float')
    #gray1 用于统计每哥灰度级所有的个数 ,因为是列表不是矩阵,
    #所以要先将gray的灰度级矩阵变成一维列表
    gray1 = list(gray.ravel())
    #以字典的形式保存,统计出来的灰度级及其个数
    obj = dict(collections.Counter(gray1))
    obj = sorted(obj.items(),key=lambda item:item[0])
    #将统计出来的灰度级的值与他的个数分开用列表保存
    for each in obj :
        key = list(each)[0]
        num =list(each)[1]
        hist_key.append(key)
        hist_new.append(num)
    #检查从0-255每个灰度级是否都有个数,没有的话添加并将值设为0
    for i in range (0,256) :
        if i in hist_key :
            num = hist_key.index(i)
            hist_countresult.append(hist_new[num])
        else :
            hist_countresult.append(0)
    if len(hist_countresult) < 256 :
        for i in range (0,256-len(hist_countresult)) :
            hist_new.append(0)
    #计算整幅图的像素数目
    hist_sum = gray.shape[0] * gray.shape[1]
    #计算每个灰度级的像素数目占整个数目的比重
    for each in hist_countresult :
        result = float(each / hist_sum)
        hist_proresult.append(result)
    #遍历灰度级[0,255],寻找合适的threshold
    w0 = w1 = u0tmp = u1tmp = u0 = u1 = deltaTmp = deltaMax = float(0)
    for i in range (256) :
        w0 = w1 = u0tmp = u1tmp = u0 = u1 = deltaTmp = float(0)
        for j in range (256) :
            if j <= i : #背景部分
                w0 = float(w0 + hist_proresult[j])
                u0tmp += j * hist_proresult[j]
            else :  #前景部分
                w1 += float(hist_proresult[j])
                u1tmp += j * hist_proresult[j]
        if w0 == 0.0 or w1 == 0.0:
            pass
        else :
            u0 = float(u0tmp / w0)
            u1 = float(u1tmp / w1)
            deltaTmp = (float)(w0 *w1* pow((u0 - u1), 2))
            if deltaTmp > deltaMax :
                deltaMax = deltaTmp
                threshold = i
    #用ostu大津算法得出最适当的阈值后,将图片进行二值化
    for i in range(gray.shape[0]) :
        for j in range(gray.shape[1]) :
             #对大于阈值的显示为255白色,小于阈值的显示为0黑色
            if gray[i][j] <= threshold :
                gray2[i][j] = 0
                countdown += 1
            else :
                gray2[i][j] = 255
                countup += 1
    return gray2
二、使用numpy模块的函数生成一个3 * 3 的矩阵
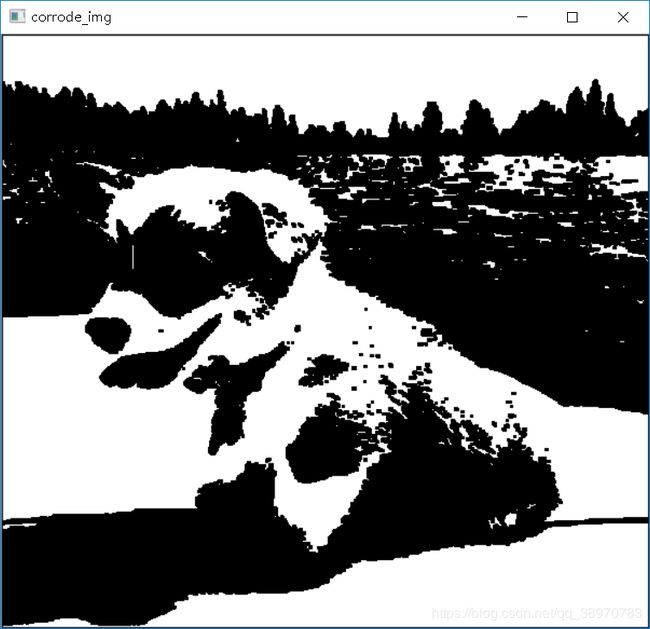
三、腐蚀:
- a) 用3x3的结构元素,扫描图像的每一个像素。
- b) 用结构元素与其覆盖的二值图像做“与”操作。
- c) 如果都为1,结果图像的该像素为1,否则为0。
#腐蚀
def corrode(twovalue_img) :
    #处理后最终输出矩阵将齐大小设置为与原图一样
    gray2=np.array([[0 for i in range(twovalue_img.shape[1])] for i in range(twovalue_img.shape[0])], dtype='float')
    #生成 3*3的结构元素
    structuralelement = np.array([[1 for i in range (3)]for i in range (3)],dtype='int')
    #使用结构元素去与原二值图像中为1的值进行与操作
    for i in range (1,twovalue_img.shape[0]-1) :
        for j in range (1,twovalue_img.shape[1]-1) :
            #添加每次处理后的元素到集合中
            list1 = []
            count1 = 0 #保存进行于操作后图中到底有几个1
            list1.append(twovalue_img[i-1][j-1] and structuralelement[0][0])
            list1.append(twovalue_img[i-1][j] and structuralelement[0][1])
            list1.append(twovalue_img[i-1][j+1] and structuralelement[0][2])
            list1.append(twovalue_img[i][j-1] and structuralelement[1][0])
            list1.append(twovalue_img[i][j] and structuralelement[1][1])
            list1.append(twovalue_img[i][j+1] and structuralelement[1][2])
            list1.append(twovalue_img[i+1][j-1] and structuralelement[2][0])
            list1.append(twovalue_img[i+1][j] and structuralelement[2][1])
            list1.append(twovalue_img[i+1][j+1] and structuralelement[2][2])
            #如果都为1,结果图像的该像素为1,否则为0。
            for each in list1 :
                if each == 1 :
                    count1 += 1
            if count1 == 9 :
                gray2[i][j] = 255
            else :
                gray2[i][j] = 0
    return gray2
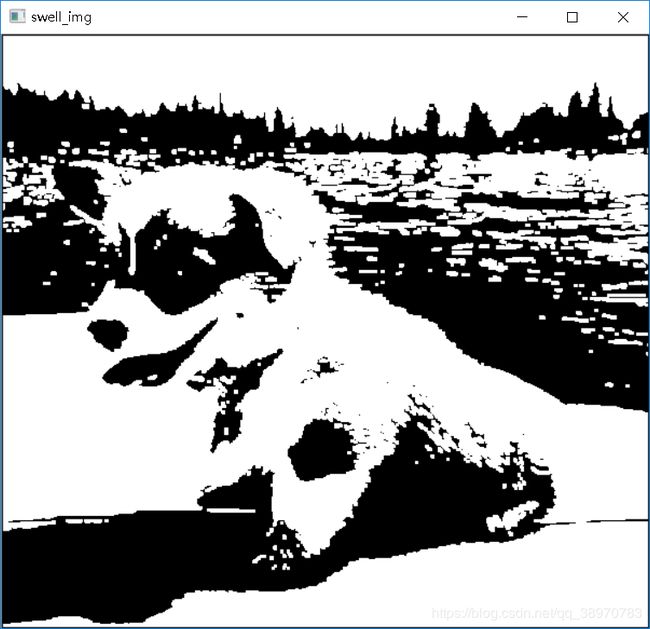
四、膨胀:
- a) 用3x3的结构元素,扫描图像的每一个像素。
- b) 用结构元素与其覆盖的二值图像做“与”操作。
- c) 如果都为0,结果图像的该像素为0,否则为1。
#膨胀
def swell(twovalue_img):
    #处理后最终输出矩阵将齐大小设置为与原图一样
    gray2=np.array([[0 for i in range(twovalue_img.shape[1])] for i in range(twovalue_img.shape[0])], dtype='float')
    #生成 3*3的结构元素
    structuralelement = np.array([[1 for i in range (3)]for i in range (3)],dtype='int')
    #使用结构元素去与原二值图像中为1的值进行与操作
    for i in range (1,twovalue_img.shape[0]-1) :
        for j in range (1,twovalue_img.shape[1]-1) :
            #添加每次处理后的元素到集合中
            list1 = []
            count1 = 0 #保存进行于操作后图中到底有几个1
            list1.append(twovalue_img[i-1][j-1] and structuralelement[0][0])
            list1.append(twovalue_img[i-1][j] and structuralelement[0][1])
            list1.append(twovalue_img[i-1][j+1] and structuralelement[0][2])
            list1.append(twovalue_img[i][j-1] and structuralelement[1][0])
            list1.append(twovalue_img[i][j] and structuralelement[1][1])
            list1.append(twovalue_img[i][j+1] and structuralelement[1][2])
            list1.append(twovalue_img[i+1][j-1] and structuralelement[2][0])
            list1.append(twovalue_img[i+1][j] and structuralelement[2][1])
            list1.append(twovalue_img[i+1][j+1] and structuralelement[2][2])
            #如果都为0,结果图像的该像素为0,否则为1。
            for each in list1 :
                if each == 1 :
                    count1 += 1
            if count1 > 0 :
                gray2[i][j] = 255
            else :
                gray2[i][j] = 0
    return gray2
五、开运算:先腐蚀,后膨胀(直接调用两次函数即可)
- a) 用3x3的结构元素,对图像做腐蚀操作。
- b) 再用3x3的结构元素,对图像做膨胀操作。
#开运算
def opencalc(twovalue_img) :
    #先腐蚀,再膨胀
    corrode_pic = corrode(twovalue_img)
    open_img = swell(corrode_pic)
    return open_img
六、闭运算:先膨胀,后腐蚀(直接调用两次函数即可)
- a) 用3x3的结构元素,对图像做膨胀操作。
- b) 再用3x3的结构元素,对图像做腐蚀操作。
#闭运算
def closecalc(twovalue_img) :
    #先膨胀,再腐蚀
    swell_pic = swell(twovalue_img)
    close_img = corrode(swell_pic)
    return close_img
完整代码:
import matplotlib.pyplot as plt
from scipy import signal
import numpy as np
import copy as cp
import random
import math
import cv2
import collections

#使用otsu算法思维求出阈值并对图像进行二值化处理
def myotsu(gray):
    countdown = 0
    countup = 0
    hist_new = []
    num = []
    hist_countresult = []
    hist_key = []
    hist_proresult = []
    #处理后最终输出矩阵将齐大小设置为与原图一样
    gray2=np.array([[0 for i in range(gray.shape[1])] for i in range(gray.shape[0])], dtype='float')
    #gray1 用于统计每哥灰度级所有的个数 ,因为是列表不是矩阵,
    #所以要先将gray的灰度级矩阵变成一维列表
    gray1 = list(gray.ravel())
    #以字典的形式保存,统计出来的灰度级及其个数
    obj = dict(collections.Counter(gray1))
    obj = sorted(obj.items(),key=lambda item:item[0])
    #将统计出来的灰度级的值与他的个数分开用列表保存
    for each in obj :
        key = list(each)[0]
        num =list(each)[1]
        hist_key.append(key)
        hist_new.append(num)
    #检查从0-255每个灰度级是否都有个数,没有的话添加并将值设为0
    for i in range (0,256) :
        if i in hist_key :
            num = hist_key.index(i)
            hist_countresult.append(hist_new[num])
        else :
            hist_countresult.append(0)
    if len(hist_countresult) < 256 :
        for i in range (0,256-len(hist_countresult)) :
            hist_new.append(0)
    #计算整幅图的像素数目
    hist_sum = gray.shape[0] * gray.shape[1]
    #计算每个灰度级的像素数目占整个数目的比重
    for each in hist_countresult :
        result = float(each / hist_sum)
        hist_proresult.append(result)
    #遍历灰度级[0,255],寻找合适的threshold
    w0 = w1 = u0tmp = u1tmp = u0 = u1 = deltaTmp = deltaMax = float(0)
    for i in range (256) :
        w0 = w1 = u0tmp = u1tmp = u0 = u1 = deltaTmp = float(0)
        for j in range (256) :
            if j <= i : #背景部分
                w0 = float(w0 + hist_proresult[j])
                u0tmp += j * hist_proresult[j]
            else :  #前景部分
                w1 += float(hist_proresult[j])
                u1tmp += j * hist_proresult[j]
        if w0 == 0.0 or w1 == 0.0:
            pass
        else :
            u0 = float(u0tmp / w0)
            u1 = float(u1tmp / w1)
            deltaTmp = (float)(w0 *w1* pow((u0 - u1), 2))
            if deltaTmp > deltaMax :
                deltaMax = deltaTmp
                threshold = i
    #用ostu大津算法得出最适当的阈值后,将图片进行二值化
    for i in range(gray.shape[0]) :
        for j in range(gray.shape[1]) :
             #对大于阈值的显示为255白色,小于阈值的显示为0黑色
            if gray[i][j] <= threshold :
                gray2[i][j] = 0
                countdown += 1
            else :
                gray2[i][j] = 255
                countup += 1
    return gray2

#腐蚀
def corrode(twovalue_img) :
    #处理后最终输出矩阵将齐大小设置为与原图一样
    gray2=np.array([[0 for i in range(twovalue_img.shape[1])] for i in range(twovalue_img.shape[0])], dtype='float')
    #生成 3*3的结构元素
    structuralelement = np.array([[1 for i in range (3)]for i in range (3)],dtype='int')
    #使用结构元素去与原二值图像中为1的值进行与操作
    for i in range (1,twovalue_img.shape[0]-1) :
        for j in range (1,twovalue_img.shape[1]-1) :
            #添加每次处理后的元素到集合中
            list1 = []
            count1 = 0 #保存进行于操作后图中到底有几个1
            list1.append(twovalue_img[i-1][j-1] and structuralelement[0][0])
            list1.append(twovalue_img[i-1][j] and structuralelement[0][1])
            list1.append(twovalue_img[i-1][j+1] and structuralelement[0][2])
            list1.append(twovalue_img[i][j-1] and structuralelement[1][0])
            list1.append(twovalue_img[i][j] and structuralelement[1][1])
            list1.append(twovalue_img[i][j+1] and structuralelement[1][2])
            list1.append(twovalue_img[i+1][j-1] and structuralelement[2][0])
            list1.append(twovalue_img[i+1][j] and structuralelement[2][1])
            list1.append(twovalue_img[i+1][j+1] and structuralelement[2][2])
            #如果都为1,结果图像的该像素为1,否则为0。
            for each in list1 :
                if each == 1 :
                    count1 += 1
            if count1 == 9 :
                gray2[i][j] = 255
            else :
                gray2[i][j] = 0
    return gray2

#膨胀
def swell(twovalue_img):
    #处理后最终输出矩阵将齐大小设置为与原图一样
    gray2=np.array([[0 for i in range(twovalue_img.shape[1])] for i in range(twovalue_img.shape[0])], dtype='float')
    #生成 3*3的结构元素
    structuralelement = np.array([[1 for i in range (3)]for i in range (3)],dtype='int')
    #使用结构元素去与原二值图像中为1的值进行与操作
    for i in range (1,twovalue_img.shape[0]-1) :
        for j in range (1,twovalue_img.shape[1]-1) :
            #添加每次处理后的元素到集合中
            list1 = []
            count1 = 0 #保存进行于操作后图中到底有几个1
            list1.append(twovalue_img[i-1][j-1] and structuralelement[0][0])
            list1.append(twovalue_img[i-1][j] and structuralelement[0][1])
            list1.append(twovalue_img[i-1][j+1] and structuralelement[0][2])
            list1.append(twovalue_img[i][j-1] and structuralelement[1][0])
            list1.append(twovalue_img[i][j] and structuralelement[1][1])
            list1.append(twovalue_img[i][j+1] and structuralelement[1][2])
            list1.append(twovalue_img[i+1][j-1] and structuralelement[2][0])
            list1.append(twovalue_img[i+1][j] and structuralelement[2][1])
            list1.append(twovalue_img[i+1][j+1] and structuralelement[2][2])
            #如果都为0,结果图像的该像素为0,否则为1。
            for each in list1 :
                if each == 1 :
                    count1 += 1
            if count1 > 0 :
                gray2[i][j] = 255
            else :
                gray2[i][j] = 0
    return gray2

#开运算
def opencalc(twovalue_img) :
    #先腐蚀,再膨胀
    corrode_pic = corrode(twovalue_img)
    open_img = swell(corrode_pic)
    return open_img

#闭运算
def closecalc(twovalue_img) :
    #先膨胀,再腐蚀
    swell_pic = swell(twovalue_img)
    close_img = corrode(swell_pic)
    return close_img

def MAIN():
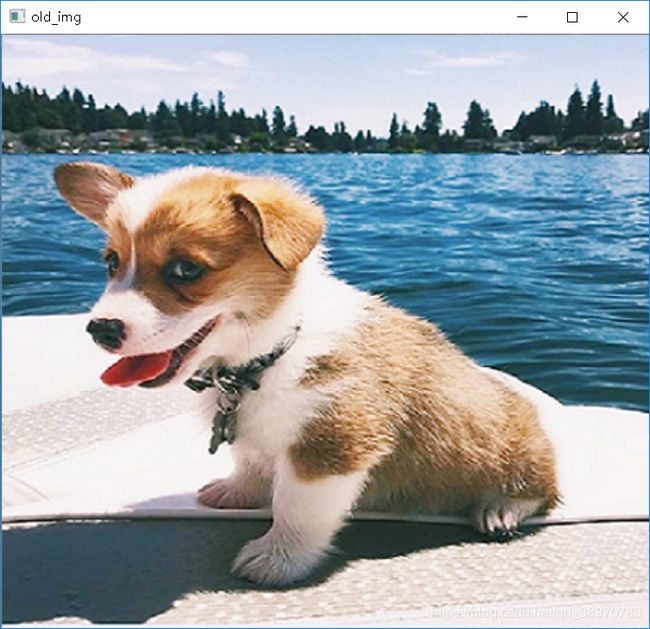
    image = cv2.imread(r"D:/Code/Python/2.png")
    cv2.imshow("old_img",image)
    gray = cv2.cvtColor(image,cv2.COLOR_BGR2GRAY)
    #调用自己写的otsu算法,并将处理后的二值化图像输出
    twovalue_img = myotsu(gray)
    cv2.imshow("twovalue_img",twovalue_img)
    #腐蚀操作
    corrode_img = corrode(twovalue_img)
    cv2.imshow("corrode_img",corrode_img)
    #膨胀操作
    swell_img = swell(twovalue_img)
    cv2.imshow("swell_img",swell_img)
    #开运算
    open_img = opencalc(twovalue_img)
    cv2.imshow("open_img",open_img)
    #闭运算
    close_img = closecalc(twovalue_img)
    cv2.imshow("close_img",close_img)
    cv2.waitKey(0)


if __name__ == "__main__":
    MAIN()
