RHCE考试题及讲解(一)
RHCE 考试
此次考试汇总你将使用多个操作系统,一台是您面前的物理机桌面系统,其他系统时运行在桌面系统上的已经预装好了的虚拟机。除非特别指出,所有考试要求都是在虚拟机上完成。你没有 root 权限访问物理机。但是你可以用物理机来测试虚拟机上要求完成的配置。请注意。因为考试系统时虚拟机,所以你需要使用桌面上的vm console 图标来访问虚拟机。您也可以通过 ssh 从桌面系统来访问虚拟机。 但是您还没有完成相关考试要求前,是不能通过 ssh 访问虚拟机的。请注意。在考试期间 不允许和其他考生交流。也不允许尝试连接其他考生的主机。测试系统和网络都在监控之中,上述两种情况的发生可能导致您考试成绩为零。 其他配置信息您在考试中将使用两个系统的信息如下:
Serverx.example.com 是一个主要的服务器
Dekstopx.example.com 主要用作客户端
两个系统的 root 密码为 redhat
系统的 ip 有 dhcp 提供,您可以视其为正常。
或者您可以按照以下信息重新配置静态 IP
Serverx.example.com 172.25.x.11
Desktopx.example.com 172.25.x.10
子网掩码为 255.255.255.0
您的系统时 dns 域 example.com 的成员,所有 dns 域 example 中的系
统都在子网172.25.x.0/24 中,同样在这个子网中的系统都在example.com DNS域中除非特别声明
所有要求配置的网络服务必须能被 example.com 域中的系统访问
Classroom.example.com 提供了集中认证的服务域 EXAMPLE.COM.
两个系统 server1 和 desktop1 已经预先配置成次域的客户端。此域提供了下列账号
Varuna 密码:cetterde
Carlo 密码 cetterde
Kenji 密码 cetterde
防火墙默认时打开的,在您认为适当的时候可以关闭,其他火墙的设定可能
在单独的要求中。
在评分中签您的系统会被从启。
题目
首先reset两台主机,之后开启

注意:
1.server是服务端,desktop是客户端
2.root密码为redhat
3.不用做ip的设定(练习时是需要自己设定ip的,因为没有服务器)
4.一般情况下是172.25.考试号.10或172.25.考试号.11
前提:
首先配置两个主机的yum源

 1.配置 selinux
Selinux 必须在两个系统 serverx 和 desktop 中运行 Enforcing 模式
[root@server0 ~]# vim /etc/sysconfig/selinux
7 SELINUX=enforcing
[root@server0 ~]# reboot
[root@desktop0 ~]# vim /etc/sysconfig/selinux
7 SELINUX=enfircing
[root@desktop0 ~]# reboot
最后的结果为:


2.配置 ssh 访问
用户能从域 example.com 内的客户端通过 ssh 远程访问您的两个虚拟系统
在域 my133.org 内的客户端不能访问您的两个虚拟机
使用host-l + 域名查看域的信息(可以看到一系列的ip)
server主机:
[root@server0 ~]# systemctl stop firewalld
[root@server0 ~]# systemctl disable firewalld
[root@server0 ~]# systemctl mask firewalld
[root@server0 ~]# yum search iptables
[root@server0 ~]#yum install iptables -service -y
[root@server0 ~]# systemctl start iptables
[root@server0 ~]# systemctl enable iptables
[root@server0 ~]# iptables –F
[root@server0 ~]# iptables –nL ##查看刷掉后是否有内容
[root@server0 ~]# iptables A INPUT s 172.25.111.0/24 j REJECT ##这个网站的所有链接都拒绝,172.25.111.0/24网段是通过host –l my133.org中的域名查看出的
[root@server0 ~]# service iptables save ##一定要做
[root@desktop0 ~]# iptables F
[root@desktop0 ~]# systemctl stop firewalld
[root@desktop0~]# systemctl disable firewalld
[root@desktop0 ~]# systemctl mask firewalld
[root@desktop0 ~]# systemctl start iptables
[root@desktop0~]# systemctl enable iptables
[root@desktop0 ~]# iptables A INPUT s 172.25.111.0/24 j REJECT
[root@desktop0 ~]# service iptables save
3.自定义用户环境
在系统 serverx 和 desktopx 上写入自定义命令 qstat 此命令将执行一下命令/bin/ps -Ao pid,tt,user,fname,rsz此命令对系统中所有用户有效
server主机:
[root@server0 ~]# echo "alias qstat='/bin/ps Ao pid,tt,user,fname,rsz'" >>
/etc/bashrc
[root@server0 ~]# source /etc/bashrc
[root@server0 ~]#qstat ##测试,如果有内容输出,说明正确
[root@desktop0 ~]# echo "alias qstat='/bin/ps Ao pid,tt,user,fname,rsz'" >>
/etc/bashrc
[root@desktop0 ~]# source /etc/bashrc
4.配置端口转发,在系统 serverx 中配置端口转发,在 172.25.x.0/24 网络中的系统,访问 server1 的本地端口 5432 将被转发到 80,此设定时永久生效(当访问5432端口时访问的是80端口,目的地端口转发)
<1>server主机:
[root@server0 ~]# iptables t nat F ##刷掉
[root@server0 ~]# iptables t nat nL ##检查是否为空
[root@server0 ~]# iptables t nat A PREROUTING s 172.25.0.0/24 p tcp dport
5432 j DNAT todest :80 ##路由之前,-s表示哪个地址网段, -p表示tcp协议,-dport表示目的地端口,为5432,-j表示DNAT,--to-dest是转发到的80
[root@server0 ~]# service iptables save
[root@server0 ~]# yum install httpd –y
[root@server0 ~]#systemctl start httpd
[root@server0 ~]# firefox
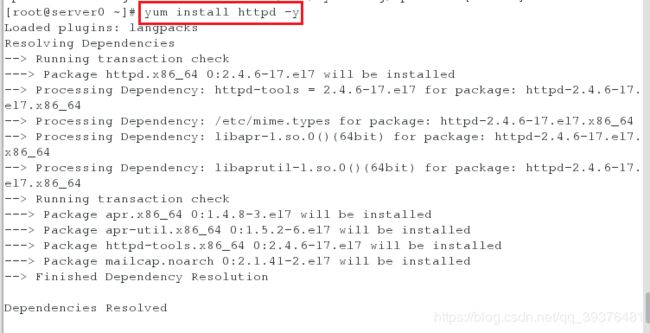

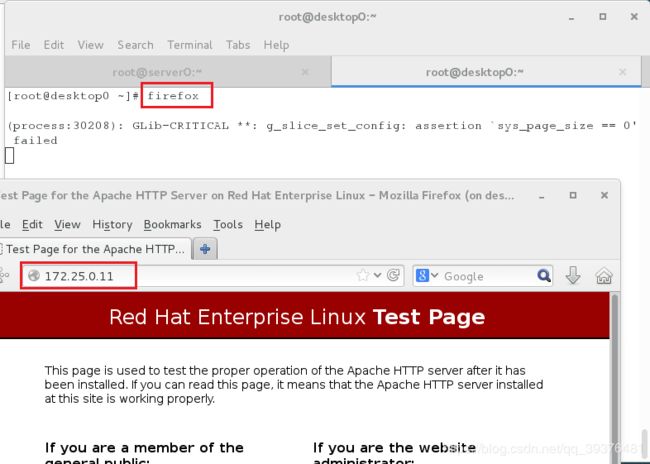

分析:输入server主机的ip查看,可以访问到阿帕奇的页面,再输入server的主机ip:5432,发现依旧可以看到阿帕奇的页面(访问5432端口的时候转换到了80端口),说明目的地地址转换成功
5 配置链路聚合
在 server1.example.com 和 desktopx.example.com 之间按以下要求配置一个链接:
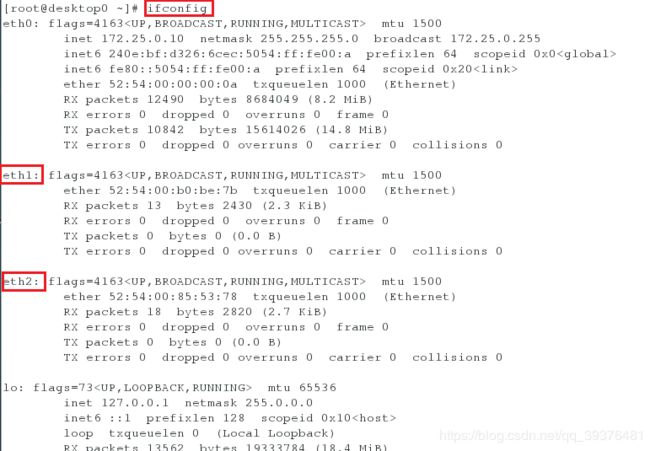
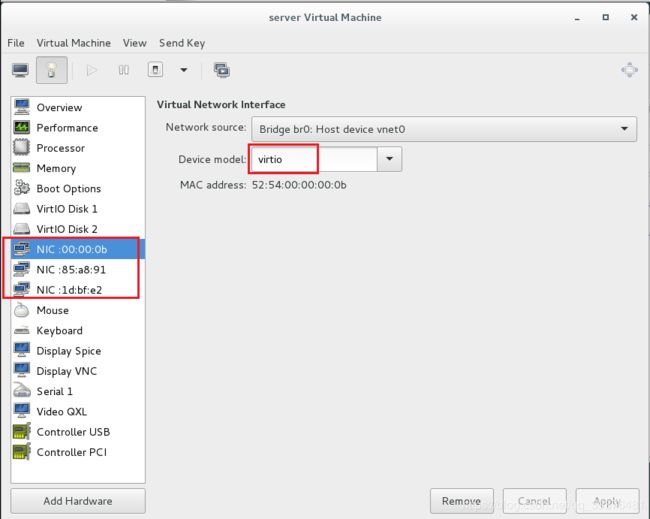
此链路使用 eth1 和 eth2 ##说明考试时有3块物理网卡(考试时候看是否需要加网卡,练习时候需要加,利用ifconfig查看)
此链路在一个接口失效时扔能正常工作
此链路 serverx 使用地址 172.16.x.65/24
此链路 desktopx 使用的地址 172.16.x75/24
此链路在系统重启之后仍然保持正常状态
<1>首先打开虚拟机的物理管理设备添加两个网卡,在两台虚拟机上(练习时需要,考试时输出ifconfig查看是否有两个网卡)

<2>配置:
server主机:
[root@server0 ~]# nmcli connection add conname team0 ifname team0 type team
config '{"runner":{"name":"activebackup"}}' ip4 172.16.0.65/24 ##一块失效另外一块仍能正常工作,说明是主备=activebackup
[root@server0 ~]# ifconfg ##查看是否成功创建
[root@server0 ~]# nmcli connection add conname eth1 ifname eth1 type team
slave master team0
[root@server0 ~]# nmcli connection add conname eth2 ifname eth2 type team
slave master team0
[root@dekstop0 ~]# nmcli connection add conname team0 ifname team0 type
team config '{"runner":{"name":"activebackup"}}' ip4 172.16.0.75/24
[root@desktop0 ~]# nmcli connection add conname eth2 ifname eth2 type team
slave master team0
[root@desktop0 ~]# nmcli connection add conname eth1 ifname eth1 type team
slave master team0
[root@desktop0 ~]#ping 设置的链路 serverx 使用地址 172.16.x.65,同时在server中将eth1 down掉(即ifconfig eth1 down),发现依旧通着,再在server中将eth1 up(ifconfig eth1 up),发现依旧通着,同样的测试反着测试一下。(主要思想是将eth1 down掉或up之后,依旧可以启动)


-------------------------------------------------------------------


注意:可以使用watch –n1 teamdctl team0 stat查看其主备模式的实时变化情况
6.配置 ipv6 地址
在您的考试系统上配置接口 eth0 使用下列 ipv6 地址Serverx 上的地址 2014:ac18::10a/64
Desktopx 上的地址 2014:ac18::11b/64,两个地址可以通信,并且在重新启动后依然生效,两块网卡的 ipv4 地址依然生效
<1>server主机:
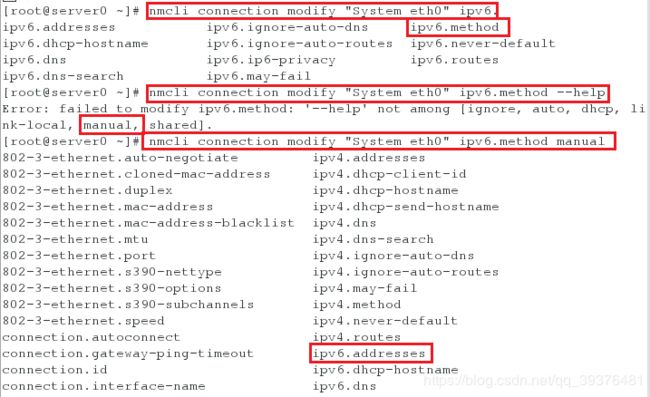
[root@server0   ~]#   nmcli   connection   modify   "System   eth0"   ipv6.method   manual 	ipv6.addresses 2014:ac18::10a/64		##ipv6 method 工作方式,如果无法使用tab键补齐查看,可以使用—help查看
[root@server0 ~]# nmcli connection reload		##如果不生效,重启一下网络即可
[root@desktop0 ~]# nmcli connection modify "System eth0" ipv6.method manual
ipv6.addresses 2014:ac18::11b/64

<2>测试:ping6 2014:ac18::11b(desktop主机中)


**7.配置本地邮件服务
在系统 serverx 和 desktopx 上配置邮件服务 ##空壳服务
这些系统不接收外部发送来的邮件
这些系统上发送的任何邮件都会自动路由到 classroom.example.com
这些系统上发送的邮件显示来自 example.com
您可以通过用户 hal 来测试您的配置,访问:
http://classroom.example.com/exam_mail/hal(考试中在classroom这台主机中输入网址是可以查看到的)
(1)配置:
server主机:
[root@server0 ~]# vim /etc/postfix/main.cf		##配置文件
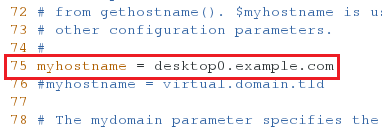
75 myhostname = server0.example.com	##设定本机的主机名
83 mydomain = example.com		##域名
99 myorigin = $mydomain	##发现邮件的结尾是 [email protected](root用户发送的邮箱,这些系统上发送的邮件显示来自 example.com),如果要求的邮件显示来自@sever0.example.com,则是myorigin = $mylocalhost)
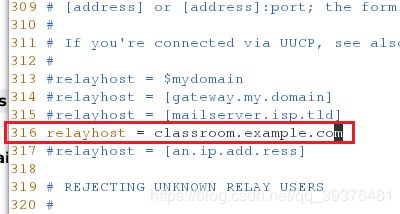
316 relayhost = classroom.example.com	##别人发送到你主机的邮件,你发送到哪里(相当于你的主机充当了邮件路由器)
[root@server0 ~]# systemctl restart postfix.service
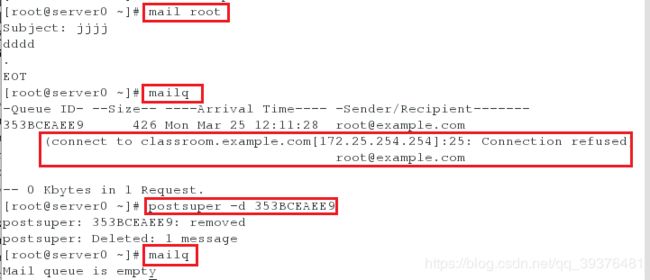
[root@server0 ~]#mail root
[root@server0 ~]#mailq	##查看其是否收,看到报错就是收了
[root@server0 ~]#mailq
##scp /etc/postfix/main.cf [email protected]:/etc/postfix/
[root@server0 ~]#postsuper –d 邮件序列号
[root@server0 ~]#mailq		##再次查看,无队列
[root@desktop0 ~]# vim /etc/postfix/main.cf		##配置文件
75 myhostname = desktop0.example.com
[root@desktop0 ~]#systemctl restart network
8.通过 smb 共享目录
在 serverx 上配置 smb 服务
您的 smb 服务必须时 STAFF 工作组的一个成员
共享/groupdir 目录共享名必须时 common
只有 example.com 域的客户可以访问 common 共享
Common 必须时可以浏览的
用户 barney 必须能够都取共享的内容,如果需要的话验证密码是 westos
<1>配置:
server主机:
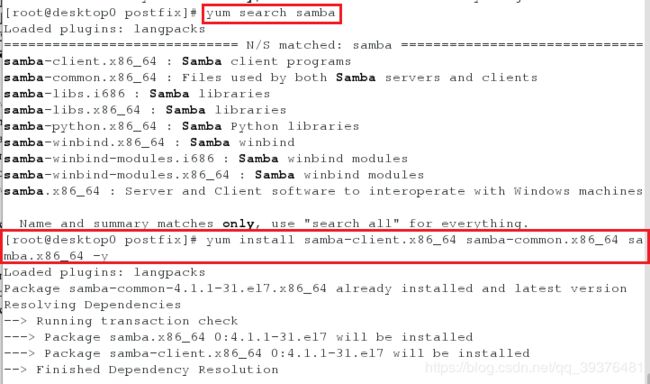
yum search samba
yum install samba.x86_64 sambaclient.x86_64 sambacommon.x86_64 y ##服务端和客户端都要装
mkdir /groupdir
此时getenforce一定是enforcing
semanage fcontext a t samba_share_t '/data(/.*)?'
restorecon RvvF /groupdir
vim /etc/samba/smb.conf
89 workgroup = STAFF
321 [common]
322 path = /groupdir
323 browseable = yes
324 hosts allow = 172.25.0. #( 在客户端host –l example.com查看域的信息,即在哪一个网段中,配置文件中用的是这种方式)
systemctl start smb
systemctl enable smb
id barney ##查看其是否有barney用户
useradd –s /sbin/nologin barney ##没有则创建一个
smbpasswd –a barney ##输入密码
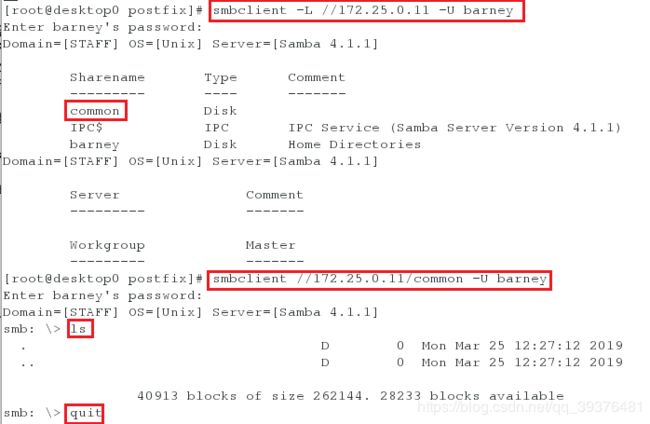
smbclient –L //172.25.0.11 –U barney
smbclient //172.25.0.11/common –U barney
如果都能够访问说明说明配置成功
9.Smb 多用户挂载配置
在 serverx 共享通过 smb 目录/data
共享名称 data
共享目录 data 只能被 example.com 域中的客户使用
共享目录 data 必须可以被浏览
用户 manager 必须能一读的方式访问此共享,访问密码时 westos
用户 wolferyne 必须能够一读写的方式访问此共享,访问密码时 westos
此 共 享 永 久 挂 在 到 desktopx 主 机 的 /mnt/westos 目 录 , 并 使 用 用 户
manager 作为认证,任何用户通过用户 wolferyne 来临时获取写的权限
<1>server主机:
在 server0 上:
useradd -s /sbin/nologin manager
useradd -s /sbin/nologin wolferyne
smbpasswd -a manager
smbpasswd -a wolferynepdbedit  -L
mkdir /data
chmod o+w /data/
semanage fcontext -a -t smb_share_t '/data(/.*)?'
semanage fcontext -a -t samba_share_t '/data(/.*)?'
restorecon -RvvF /data/
vim /etc/samba/smb.conf
[data]
path = /data
writable = no
write list = wolferyne
hosts allow = 172.25.0.
Systemctl restart smb nmb
在 destkop0 上:
vim /root/smbuser
Username=manager
Password=westos
chmod 600 /root/smbuser
mkdir /mnt/westos
vim /etc/fstab
 //172.25.0.11/data /mnt/westos cifs
defaults,credentials=/root/smbuser,multiuser,sec=ntlmssp 0 0
mount -a
su - student
ls /mnt/westos
cifscreds add -u wolferyne server0.example.com
touch  /mnt/westos/file
vim /root/smbpasswd
username=manager
password=westos
yum install cifs-utils –y
mkdir /mnt/westos
vim /etc/fstab ##记不住参数的话(man mount.cifs 找永久挂载文件的配置credential=filename ->count + z 打入后台->在永久挂载文件下写—>fg 1 查看认证方式 sec,因为smb版本是超过3.8,所以使用sec=ntlmssp ctrl+z –>fg 2 ctrl +z –> multiuser)
//172.25.0.11/data /mnt/westos cifs
defaults,credentials=/root/smbpasswd,multiuser,sec=ntlmssp 0 0
mount –a
df
su – student ##切换到普通用户下
cd /mnt/westos(可以进去但是无法查看(ls))
ls /mnt/westos
cifscreds add u wolferyne server0.example.com(练习中cifscreds add –u wolferyne 172.25.0.11) ##认证
ls ##可以查看
touch /mnt/westos/file ##可以创建用户
ll 查看一下用户和用户组(如果是id号的话,可以在server主机中查看)


