【Spring Boot】从入门到放弃【基础篇】
要想学习Spring Boot你需要拥有相应的Spring框架使用经验和Maven的使用:Spring教程
文章目录
- 基础篇
- 一、Spring Boot 入门
- 简介:
- 特点:
- 微服务简介
- maven配置(在maven安装目录conf文件夹下配置setting.xml)
- HelloWorld入门程序
- 细节:HelloWorld探究
- 二、Spring Boot 配置
- 配置文件
- YAML语法
- @PropertySource & @ImportResource
- 配置文件占位符
- Profile多环境支持
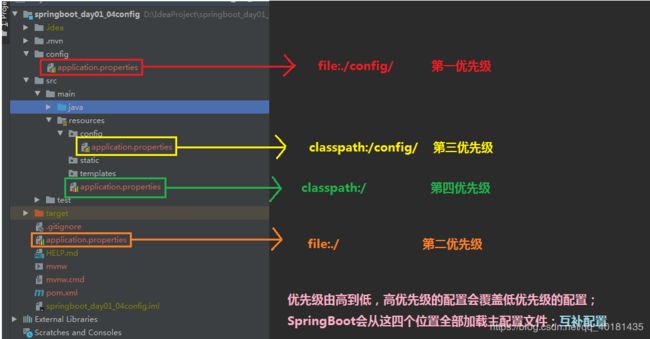
- 配置文件的加载位置
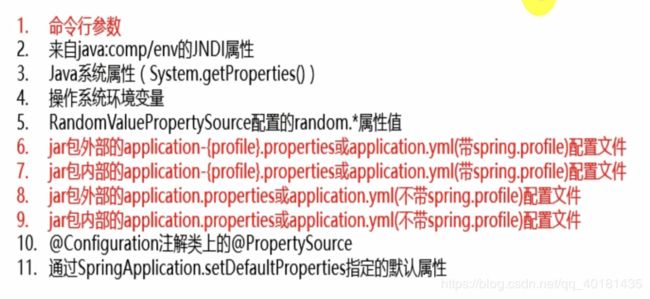
- 外部配置的加载顺序
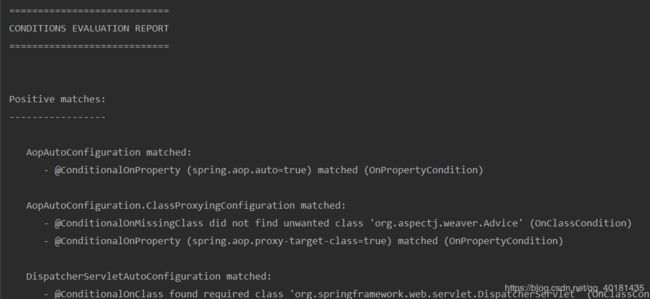
- 自动配置
- 三、Spring Boot 与日志
- 日志框架
- 日志框架的分类和选择
- SLF4j使用
- 遗留问题
- SpringBoot日志关系
- SpringBoot默认配置
- 指定日志文件和日志Profile功能
- 四、Spring Boot 与Web开发
- 直接创建SpringBoot工程,选中我们需要的模块,SpringBoot会帮我们自动配置好
- SpringBoot对静态资源的映射原则
- thymeleaf模板引擎
- SpringMVC自动配置
- 如何修改SpringMVC的默认配置
- SpringBoot-Web开发
- 五、Spring Boot 与Docker
- Docker简介
- Docker核心概念
- 使用Docker的步骤
- 六、Spring Boot 与数据访问
- 整合基本JDBC与数据源
- 整合Druid&配置数据源监控
- 整合Mybatis
- 整合SpringDat
- 高级篇
- 九、Spring Boot 与缓存
- 十、Spring Boot 与消息
- 十一、Spring Boot 与检索
- 十二、Spring Boot 与任务
- 十三、Spring Boot 与安全
- 十四、Spring Boot 与分布式
- 十五、Spring Boot 与开发热部署
- 十六、Spring Boot 与监控管理
基础篇
-
一、Spring Boot 入门
-
简介:
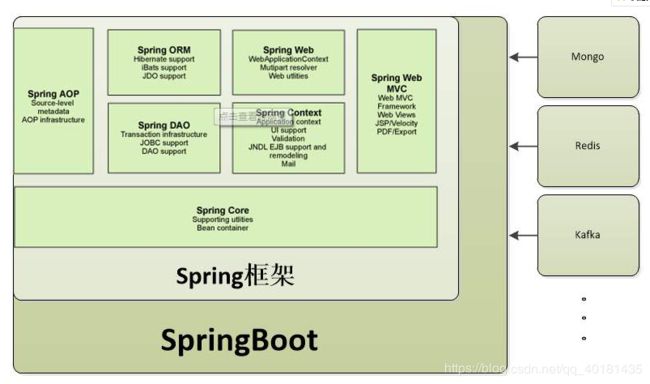
SpringBoot是由Pivotal团队在2013年开始研发、2014年4月发布第一个版本的全新开源的轻量级框架。它基于Spring4.0设计,不仅继承了Spring框架原有的优秀特性,而且还通过简化配置来进一步简化了Spring应用的整个搭建和开发过程。另外SpringBoot通过集成大量的框架使得依赖包的版本冲突,以及引用的不稳定性等问题得到了很好的解决。
-
特点:
(1)可以创建独立的Spring应用程序,并且基于其Maven或Gradle插件,可以创建可执行的JARs和WARs;
(2)内嵌Tomcat或Jetty等Servlet容器;
(3)提供自动配置的“starter”项目对象模型(POMS)以简化Maven配置;
(4)尽可能自动配置Spring容器;
(5)提供准备好的特性,如指标、健康检查和外部化配置;
(6)绝对没有代码生成,不需要XML配置。 -
微服务简介
-
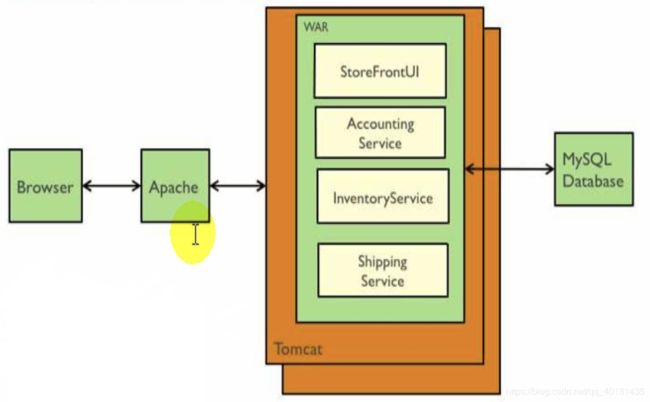
提到微服务首先需要提一下单体应用。单体应用就是我们平时一般在做练习时会使用的,将所有的东西都写在一起打成一个war包部署到Tomcat中。
- 优点:
- 开发测试简单
- 部署简单
- 扩展比较简单
但是随着软件需求的日益增长,单体应用因为其“牵一发而动全身”的问题也越来越显著。为维护与分工合作造成了极大地困扰
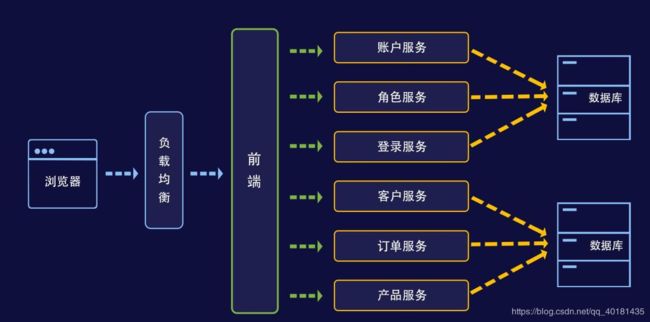
- 微服务:架构风格。一个应用应该是一组小型服务;可以通过HTTP的方式进行互通,它将每个元素功能放进一个独立的服务中,并且通过跨服务器分发这些服务进行扩展,只在需要时才复制。每一个功能元素最终都是一个可独立替换和独立升级的软件单元
-
maven配置(在maven安装目录conf文件夹下配置setting.xml)
在profiles标签中添加 <profile> <id>jdk-1.8</id> <activation> <activeByDefault>true</activeByDefault> <jdk>1.8</jdk> </activation> <properties> <maven.compiler.source>1.8</maven.compiler.source> <maven.compiler.target>1.8</maven.compiler.target> <maven.compliler.compilerVersion>1.8</maven.compliler.compilerVersion> </properties> </profile> -
HelloWorld入门程序
-
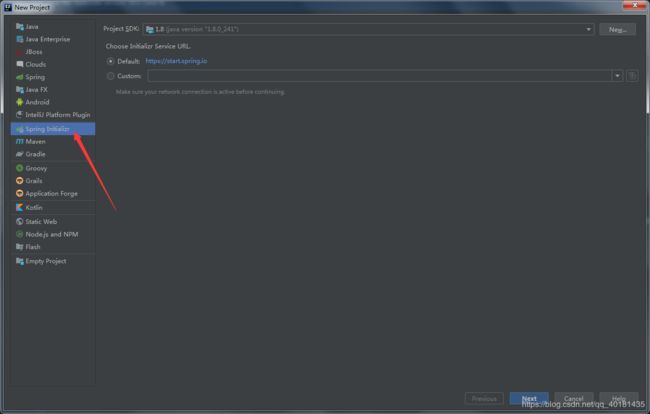
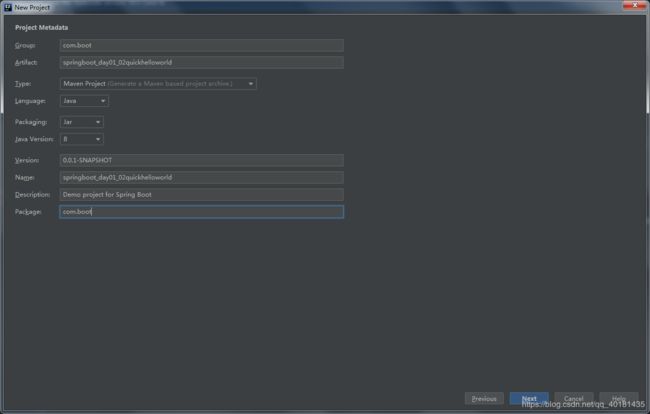
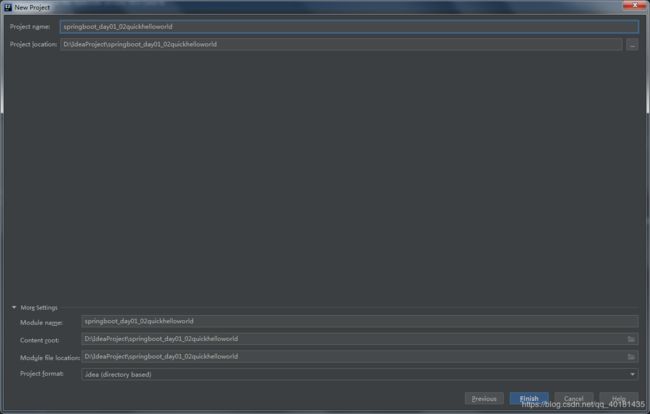
创建一个Maven工程(无需骨架)
-
导jar包
<parent> <artifactId>spring-boot-starter-parent</artifactId> <groupId>org.springframework.boot</groupId> <version>1.5.9.RELEASE</version> </parent> <dependencies> <dependency> <groupId>org.springframework.boot</groupId> <artifactId>spring-boot-starter-web</artifactId> </dependency> </dependencies> -
编写一个主程序,启动SpringBoot应用
package com.boot.main; import org.springframework.boot.SpringApplication; import org.springframework.boot.autoconfigure.SpringBootApplication; /** * @Author: 东方老赢 * @Date: 2020/4/25 14:34 * * @SpringBootApplication:来标注一个主程序类,说明这是一个SpringBoot应用 */ @SpringBootApplication public class HelloWorld { public static void main(String[] args) { //spring应用启动起来 SpringApplication.run(HelloWorld.class,args); } } -
编写controller
package com.boot.controller;

import org.springframework.stereotype.Controller;
import org.springframework.web.bind.annotation.RequestMapping;
import org.springframework.web.bind.annotation.ResponseBody;

/**
 * @Author: 东方老赢
 * @Date: 2020/4/25 14:46
 */
@Controller
@RequestMapping("/controller")
public class HelloController {
    @ResponseBody
    @RequestMapping("/hello")
    public String hello(){
        return "Hello World";
    }
}
-
-
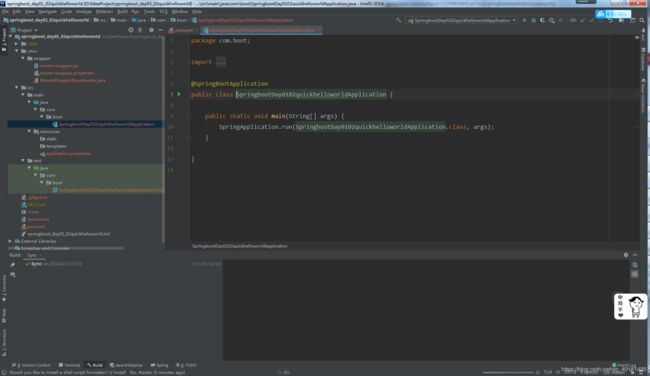
然后直接运行main方法:当出现下面界面时,说明启动成功
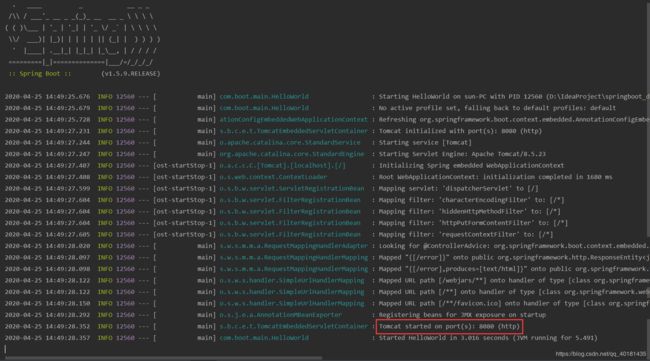
然后在网页测试

这便是运行成功啦!是不是非常方便呢,不用引入繁琐的jar包,不用配置Tomcat,甚至不必写配置文件,你就可以轻松运行起一个简单的web项目,SpringBoot入门就开始啦!-
简化部署
-
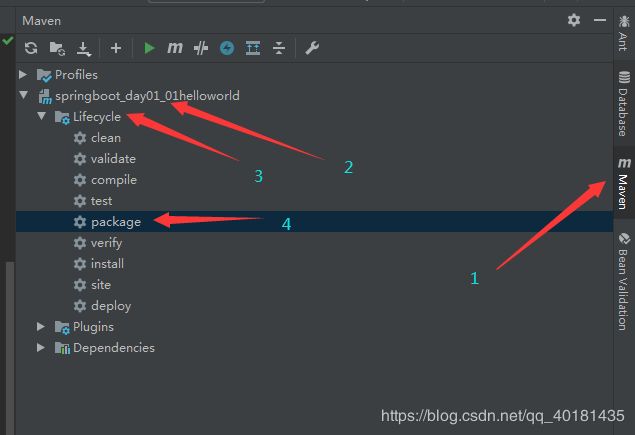
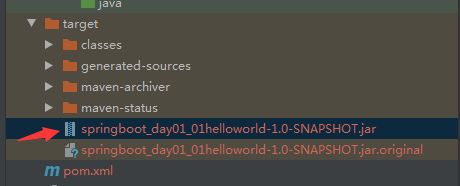
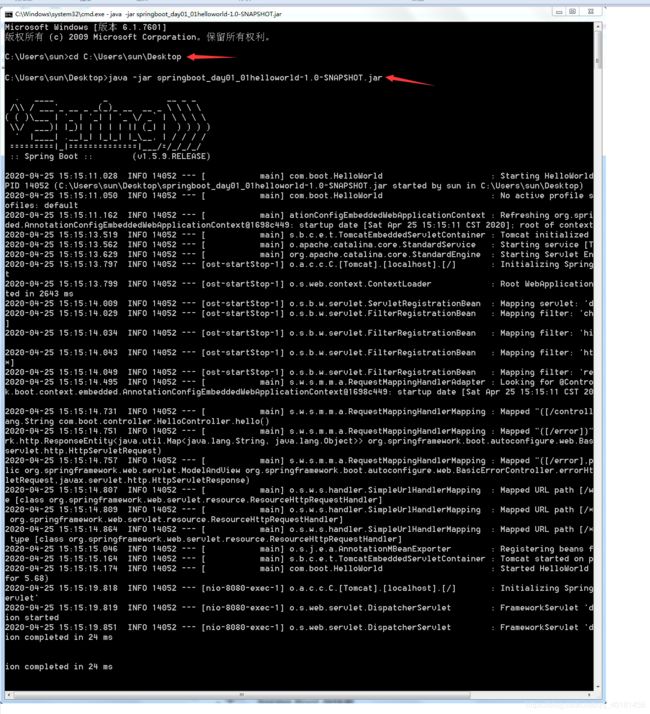
首先在pom.xml导入插件
<!-- 这个插件,可以将应用打成一个可执行的jar包--> <build> <plugins> <plugin> <groupId>org.springframework.boot</groupId> <artifactId>spring-boot-maven-plugin</artifactId> </plugin> </plugins> </build> -
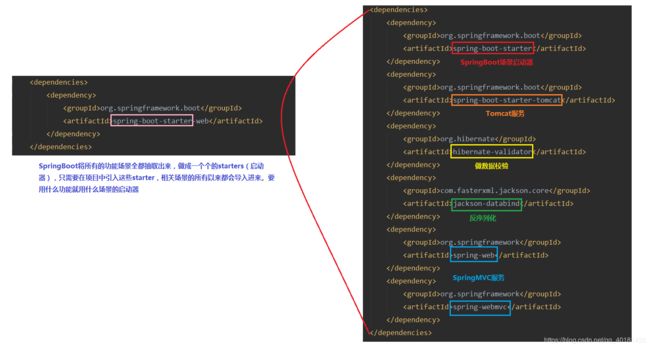
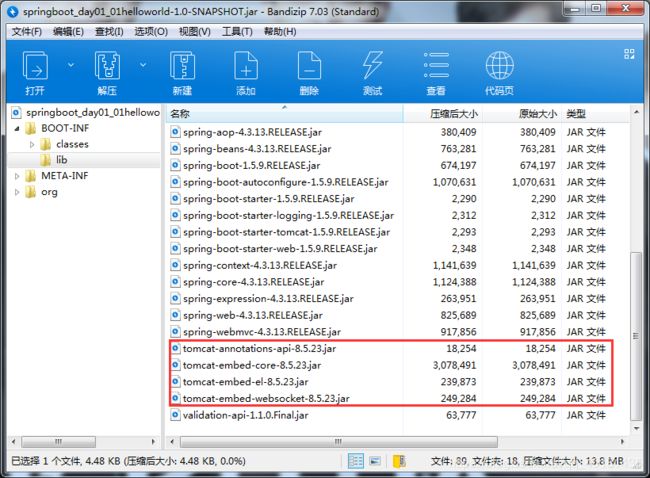
细节,为什么没有tomcat也可以部署jar包呢?这是因为你导入SpringBoot的jar包后,他自动给你导入了一系列的jar包,其中就包含了tomcat的jar包,现在我们可以更加了解到SpringBoot是有多方便了吧
-
-
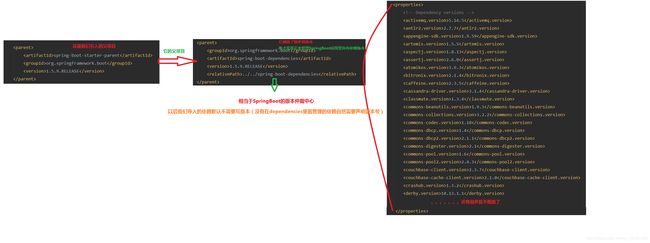
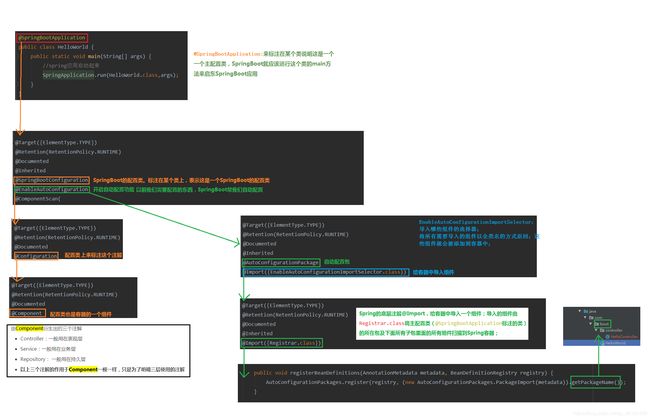
细节:HelloWorld探究
-
-
二、Spring Boot 配置
-
配置文件
-
YAML语法
-
基本语法:
- k:(空格)v:表示一对键值对(冒号与值之间必须有空格,如果没有字体颜色会变白)
- 以空格的缩进来控制层级关系;只要是左对齐的一列数据,都是同一个层级的
- 属性值的大小写也敏感;
-
值的写法
-
字面量:普通的值(数字,字符串,布尔)
-
对象、Map(属性和值)(键值对)
- k: v:在下一行来写对象的属性和值;注意缩进
对象还是k: v的方式
# k: v方式 people: name: Lisa age: 22 #行内写法 people: {name: Lisa,age: 22} - k: v:在下一行来写对象的属性和值;注意缩进
-
数组(List、Set)
- 用 - 值表示数组中的一个元素
#使用-值
pets:
	- cat
	- dag
	- pig
# 行内写法
pets: [cat,dog,pig]
-
-
配置文件注入
-
配置文件
person: name: Lisa age: 22 boss: false bir: 2008/7/8 map: {k1: v1,k2: 14} list: - a - b dog: name: 小狗 age: 2 -
JavaBean
package com.boot.bean;

import org.springframework.boot.context.properties.ConfigurationProperties;
import org.springframework.stereotype.Component;

import java.io.Serializable;
import java.util.Date;
import java.util.List;
import java.util.Map;

/**
 * @Author: 东方老赢
 * @Date: 2020/4/26 15:25
 *
 *
 * @Component: 将其注入到容器中
 * @ConfigurationProperties: 告诉SpringBoot将本类中所有的属性和配置文件中相关的配置进行绑定
 *  prefix = "person":配置文件中那个下面的所有属性进行一一映射
 */

@Component
@ConfigurationProperties(prefix = "person")
public class Person implements Serializable {
    private String name;
    private Integer age;
    private Boolean boss;
    private Date bir;

    private Map<String,Object> map;
    private List<Object> list;
    private Dog dog;

    public String getName() {
        return name;
    }

    public void setName(String name) {
        this.name = name;
    }

    public Integer getAge() {
        return age;
    }

    public void setAge(Integer age) {
        this.age = age;
    }

    public Boolean getBoss() {
        return boss;
    }

    public void setBoss(Boolean boss) {
        this.boss = boss;
    }

    public Date getBir() {
        return bir;
    }

    public void setBir(Date bir) {
        this.bir = bir;
    }

    public Map<String, Object> getMap() {
        return map;
    }

    public void setMap(Map<String, Object> map) {
        this.map = map;
    }

    public List<Object> getList() {
        return list;
    }

    public void setList(List<Object> list) {
        this.list = list;
    }

    public Dog getDog() {
        return dog;
    }

    public void setDog(Dog dog) {
        this.dog = dog;
    }

    @Override
    public String toString() {
        return "Person{" +
                "name='" + name + '\'' +
                ", age=" + age +
                ", boss=" + boss +
                ", bir=" + bir +
                ", map=" + map +
                ", list=" + list +
                ", dog=" + dog +
                '}';
    }
}
package com.boot.bean; import java.io.Serializable; /** * @Author: 东方老赢 * @Date: 2020/4/26 15:27 */ public class Dog implements Serializable { private String name; private Integer age; public String getName() { return name; } public void setName(String name) { this.name = name; } public Integer getAge() { return age; } public void setAge(Integer age) { this.age = age; } @Override public String toString() { return "Dog{" + "name='" + name + '\'' + ", age=" + age + '}'; } } -
我们可以导入配置文件处理器,以后编写配置就有提示了
<!-- 导入配置文件处理器,配置文件进行绑定就会有提示--> <dependency> <groupId>org.springframework.boot</groupId> <artifactId>spring-boot-configuration-processor</artifactId> <optional>true</optional> </dependency> -
测试类
package com.boot.springboot_day01_03yaml; import com.boot.bean.Person; import org.junit.jupiter.api.Test; import org.junit.runner.RunWith; import org.springframework.beans.factory.annotation.Autowired; import org.springframework.boot.test.context.SpringBootTest; import org.springframework.test.context.junit4.SpringRunner; /** * SpringBoot的单元测试 * * 可以在测试期间很方便的类似编码一样进行自动注入等容器的功能 */ @RunWith(SpringRunner.class) @SpringBootTest class SpringbootDay0103yamlApplicationTests { @Autowired Person person; @Test void contextLoads() { System.out.println(person); } } -
细节
@ConfigurationProperties报错问题
@RunWith(SpringRunner.class)出错或没有提示问题
-
使用properties配置文件
#配置person的值
person.name=Mary
person.age=32
person.boss=true
person.bir=2012/9/3
person.map.k1=a
person.map..k2=12
person.list=q,w,e
person.dog.name=小狗
person.dog.age=1
运行结果:

我们发现出现了中文乱码,那么怎么解决呢?只需要进行一下设置
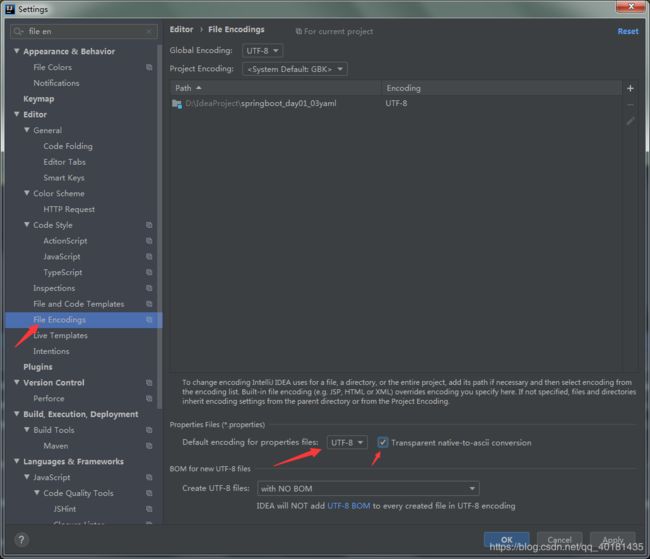
在修改一下application.properties配置文件中的乱码中文,然后在运行即可

-
-
@Value与@ConfigurationProperties获取值比较
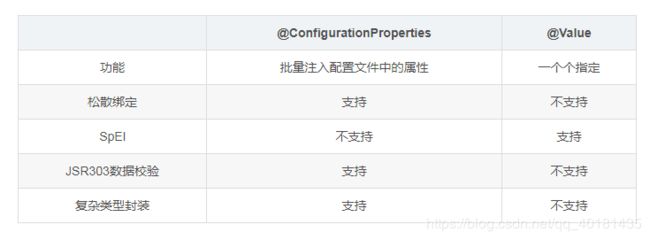
配置文件yml个properties他们都能获取到值 如果说,我们只是在某个业务逻辑中需要获取一下配置文件中的某项值,使用@Value; 如果说,我们专门编写了一个JavaBean来和配置文件进行映射,我们就直接使用@ConfigurationProperties -
-
@PropertySource & @ImportResource
-
@PropertySource:加载指定的配置文件(默认从全局配置文件中获取值)
新建properties文件

person.name=Mary person.age=32 person.boss=true person.bir=2012/9/3 person.map.k1=a person.map.k2=12 person.list=q,w,e person.dog.name=小狗 person.dog.age=1 -
@ImportResource:导入Spring的配置文件,让配置文件里面的内容生效
SpringBoot里没有Spring的配置文件,哪怕是我们自己编写的配置文件,也不能自动识别。若想要Spring的配置文件生效,加载进来。就可以使用此注解,标注在一个配置类上

-
@Bean
SpringBoot推荐给容器中添加组件的方式:推荐使用全注解的方式,即将Spring配置文件改成配置类,在配置类中就需要用到@Bean给容器中添加组件-
创建配置文件
package com.boot.config; import com.boot.service.HelloService; import org.springframework.context.annotation.Bean; import org.springframework.context.annotation.Configuration; /** * @Author: 东方老赢 * @Date: 2020/4/26 17:35 * * @Configuration: 指明当前类是一个配置类,就是来代替之前的Spring配置文件 * * @Bean: 讲方法的返回值添加到容器中,容器中这个组件默认的id就是方法名 */ @Configuration public class HelloBeanConfig { @Bean public HelloService helloService(){ System.out.println("@Bean注解执行成功"); return new HelloService(); } } -
直接测试即可
   @Autowired
    ApplicationContext ioc;

    @Test
    public void testHelloService(){
        boolean helloService = ioc.containsBean("helloService");
        System.out.println(helloService);
    }
-
-
配置文件占位符
-
占位符获取之前配置的值,uguomeiyou可以使用:(冒号)指定默认值
	person.name=Mary
	person.age=32
	person.boss=true
	person.bir=2012/9/3
	person.map.k1=a
	person.map.k2=${person.hello:hello}12
	person.list=q,w,e
	person.dog.name=${person.name}小狗
	person.dog.age=1
运行结果:

-
-
三、Spring Boot 与日志
-
日志框架
-
日志框架的分类和选择
市场上存在许多日志框架,比较主流的:
- 日志门面(日志的抽象层):
JCL、SLF4j、jboss.logging - 日志实现:Log4j、JUL、Log4j2、Logback(Log4j升级版)
SpringBoot:底层是spring框架,spring框架默认使用JCL
SpringBoot选用 SLF4 和 Logback
- 日志门面(日志的抽象层):
-
SLF4j使用
以后开发的时候,日志记录方法的调用,不应该来直接调用日志的实现类,而是调用日志抽象层里的方法
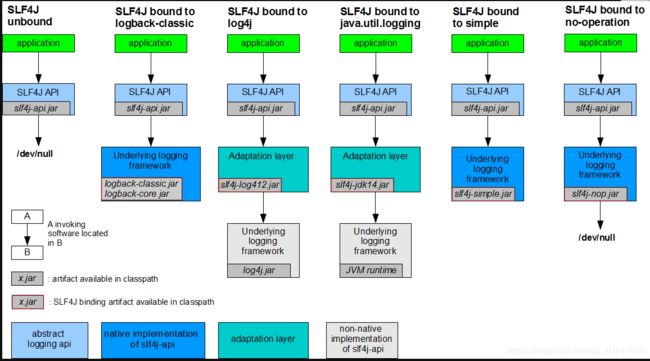
每一个日志的实现框架都有自己的配置文件。使用SLF4j之后,配置文件还是做成日志实现框架的配置文件- 给系统里导入SLF4j的jar和Logback的实现jar
- 然后写代码
import org.slf4j.Logger;
import org.slf4j.LoggerFactory;

public class HelloWorld {
  public static void main(String[] args) {
    Logger logger = LoggerFactory.getLogger(HelloWorld.class);
    logger.info("Hello World");
  }
}
-
遗留问题
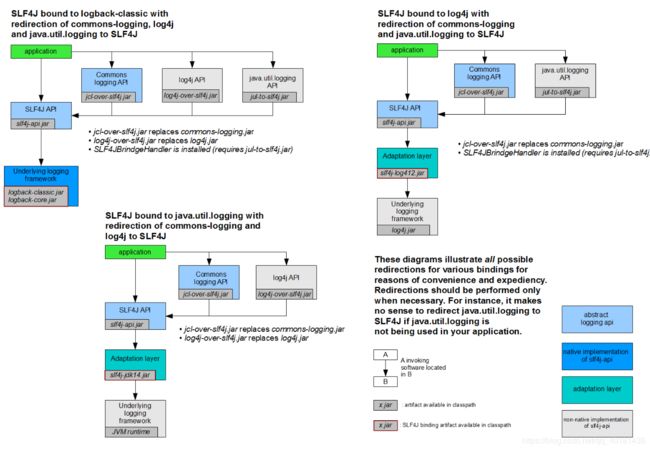
如何让系统中所有日志都统一到SLF4j:- 将系统中其他日志框架先排除出去
- 用中间包来替换原有的日志框架
- 我们导入SLF4j其他实现
-
SpringBoot日志关系
SpringBoot 用
spring-boot-starter-logging来做日志功能
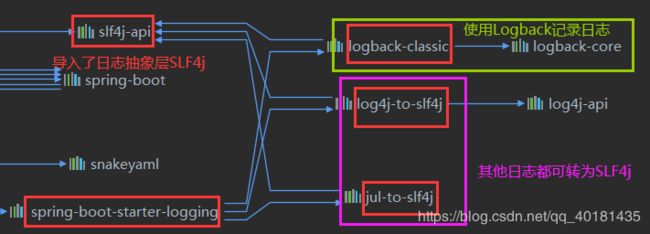
总结:SpringBoot能适配所有的日志,而且底层使用SLF4j+Logback的方式记录日志,引入其他框架的时候,只需要把这个框架的日志框架排除掉 -
SpringBoot默认配置
- 日志打印
package com.boot; import org.junit.jupiter.api.Test; import org.junit.runner.RunWith; import org.slf4j.Logger; import org.slf4j.LoggerFactory; import org.springframework.boot.test.context.SpringBootTest; import org.springframework.test.context.junit4.SpringRunner; @RunWith(SpringRunner.class) @SpringBootTest class SpringbootDay0104configApplicationTests { //记录器 Logger logger = LoggerFactory.getLogger(getClass()); @Test void contextLoads() { /** * 日志的级别; * 由低到高:trace < debug < info < warn < error * 可以调整输出的日志级别,日志就只会在这个级别及以后的高级别生效 */ logger.trace("这是trace日志"); logger.debug("这是debug日志"); logger.info("这是info日志"); //SpringBoot 默认给我们使用的是info级别 logger.warn("这是warn日志"); logger.error("这是error日志"); } }- 修改默认配置
#修改默认的输出级别 logging.level.com.boot=trace #当前项目下生成springboot.log日志 #logging.file.name=G:/springboot.log #在当前磁盘的根路径下创建spring文件夹和里面的log文件;使用spring.log作为默认文件 logging.file.path=/spring/log #在控制台指定输出日志的格式 logging.pattern.console= #在文件中指定输出日志输出的格式 logging.pattern.file= -
指定日志文件和日志Profile功能
给类路径下放上每个日志框架自己的配置文件杰克;SpringBoot就不使用他默认配置的了
-
细节
- logback.xml:直接就被日志框架识别了
- logback-spring.xml(推荐):日志框架就不直接加载日志的配置项,有SpringBoot解析日志配置,可以使用SpringBoot的高级Profile功能
<springProfile name="staging">
	<!-- configuration to be enabled when the "staging" profile is active -->
	可以指定某段配置只在某个环境下生效
</springProfile>
-
-
-
四、Spring Boot 与Web开发
-
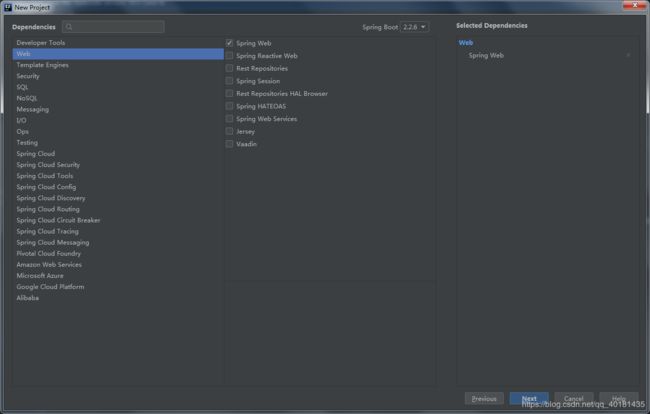
直接创建SpringBoot工程,选中我们需要的模块,SpringBoot会帮我们自动配置好
xxxxAutoConfiguration:帮我们给容器中自动配置组件
xxxxProperties:配置类来封装配置文件的内容 -
SpringBoot对静态资源的映射原则
	//可以设置和静态资源有关的参数,缓存时间等

@ConfigurationProperties(
    prefix = "spring.resources",
    ignoreUnknownFields = false
)
public class ResourceProperties {
    private static final String[] CLASSPATH_RESOURCE_LOCATIONS = new String[]{"classpath:/META-INF/resources/", "classpath:/resources/", "classpath:/static/", "classpath:/public/"};
//WebMvcAutoConfiguration类下的添加资源映射方法 public void addResourceHandlers(ResourceHandlerRegistry registry) { if (!this.resourceProperties.isAddMappings()) { logger.debug("Default resource handling disabled"); } else { Duration cachePeriod = this.resourceProperties.getCache().getPeriod(); CacheControl cacheControl = this.resourceProperties.getCache().getCachecontrol().toHttpCacheControl(); if (!registry.hasMappingForPattern("/webjars/**")) { this.customizeResourceHandlerRegistration(registry.addResourceHandler(new String[]{"/webjars/**"}).addResourceLocations(new String[]{"classpath:/META-INF/resources/webjars/"}).setCachePeriod(this.getSeconds(cachePeriod)).setCacheControl(cacheControl)); } String staticPathPattern = this.mvcProperties.getStaticPathPattern(); if (!registry.hasMappingForPattern(staticPathPattern)) { this.customizeResourceHandlerRegistration(registry.addResourceHandler(new String[]{staticPathPattern}).addResourceLocations(WebMvcAutoConfiguration.getResourceLocations(this.resourceProperties.getStaticLocations())).setCachePeriod(this.getSeconds(cachePeriod)).setCacheControl(cacheControl)); } } } //欢迎页配置 @Bean public WelcomePageHandlerMapping welcomePageHandlerMapping(ApplicationContext applicationContext, FormattingConversionService mvcConversionService, ResourceUrlProvider mvcResourceUrlProvider) { WelcomePageHandlerMapping welcomePageHandlerMapping = new WelcomePageHandlerMapping(new TemplateAvailabilityProviders(applicationContext), applicationContext, this.getWelcomePage(), this.mvcProperties.getStaticPathPattern()); welcomePageHandlerMapping.setInterceptors(this.getInterceptors(mvcConversionService, mvcResourceUrlProvider)); return welcomePageHandlerMapping; }
-
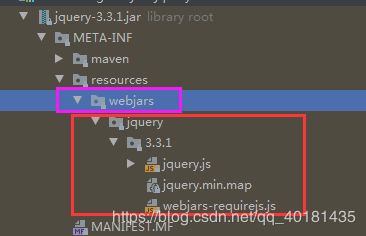
所有/webjars/**,都去classpath:/META-INF/resources/webjars/找资源
webjars:以jar包的方式引入静态资源 -
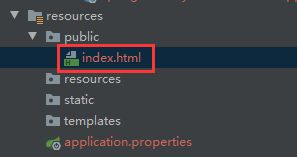
/** 访问当前项目的任何资源(静态资源的文件夹)
classpath:/META-INF/resources/
classpath:/resources/
classpath:/static/
classpath:/public/
/:当前项目的路径
-
thymeleaf模板引擎
-
引入
<dependency> <groupId>org.springframework.boot</groupId> <artifactId>spring-boot-starter-thymeleaf</artifactId> </dependency> 切换thymeleaf版本 <thymeleaf.version></thymeleaf.version> 布局功能的支持程序 thymeleaf3主程序 layout2以上版本 <thymeleaf-layout-dialect.version></thymeleaf-layout-dialect.version> -
使用&语法
@ConfigurationProperties(
    prefix = "spring.thymeleaf"
)
public class ThymeleafProperties {
    private static final Charset DEFAULT_ENCODING;
    //前缀
    public static final String DEFAULT_PREFIX = "classpath:/templates/";
    //后缀
    public static final String DEFAULT_SUFFIX = ".html";
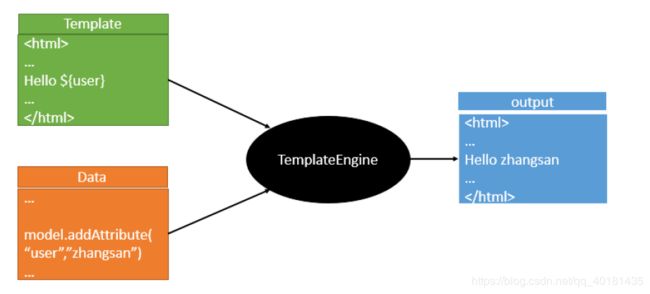
//只要我们把html页面放在 classpath:/templates/ 下,thymeleaf就能自动渲染
语法使用
-
导入thymeleaf的名称空间
xmlns:th="http://www.thymeleaf.org" -
使用thymeleaf语法
<!DOCTYPE html>
<html lang="en" xmlns:th="http://www.thymeleaf.org">
<head>
    <meta charset="UTF-8">
    <title>Title</title>
</head>
<body>
    成功!

<!--    th:text:将div里的文本内容设置为-->
    <div th:text="${test}"></div>
</body>
</html>
//查出一些数据,在页面展示 @RequestMapping("/thymeleaf") public String testthymeleaf(Map<String,Object> map){ map.put("test","thymeleaf"); return "success"; } -
语法规则
th:任意html属性:来替换原生属性的值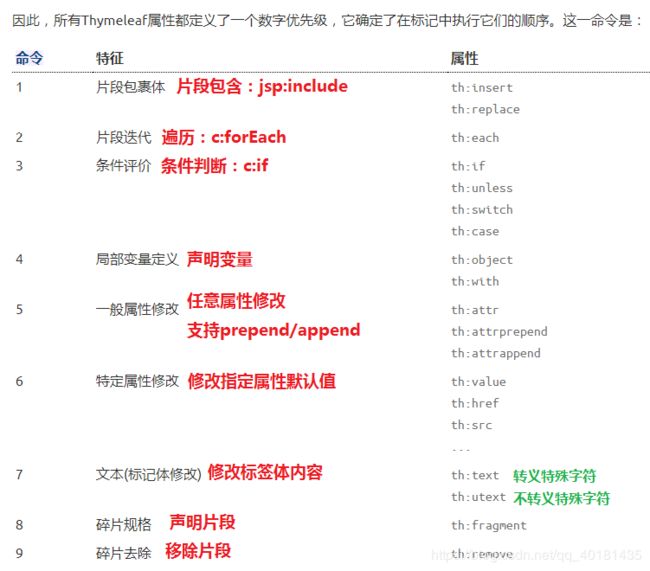
表达式:
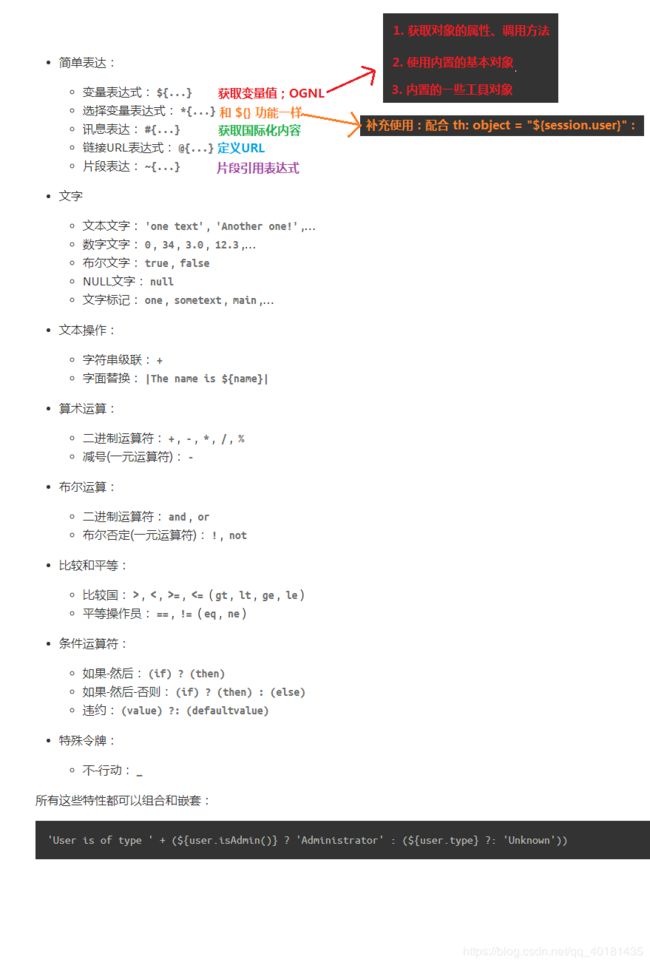
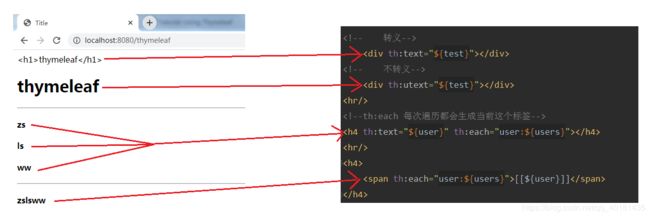
演示:@RequestMapping("/thymeleaf") public String testthymeleaf(Map<String,Object> map){ map.put("test","thymeleaf
"); map.put("users", Arrays.asList("zs","ls","ww")); return "success"; }<!-- 转义--> <div th:text="${test}"></div> <!-- 不转义--> <div th:utext="${test}"></div> <hr/> <!--th:each 每次遍历都会生成当前这个标签--> <h4 th:text="${user}" th:each="user:${users}"></h4> <hr/> <h4> <span th:each="user:${users}">[[${user}]]</span> </h4>
-
-
-
SpringMVC自动配置
Spring Boot为Spring MVC提供了自动配置,适用于大多数应用程序。
  自动配置在Spring的默认值之上添加了以下功能:

  * 包含ContentNegotiatingViewResolver和BeanNameViewResolver beans。
  		1.自动配置了 ViewResolver(视图解析器:根据方法的返回值得到视图对象(View),视图决定如何渲染(转发?重定向?))
  		2.ContentNegotiatingViewResolver:组合所有的视图解析器
  		3.如何定制:我们可以自己给容器中添加一个视图解析器;自动的将其组合进来
  * 支持提供静态资源,包括对WebJars的支持。
  * 自动注册Converter,GenericConverter和Formatter beans。
  		1. Converter:转换器;类型转换使用Converter
  		2. Formatter :格式化器;2020.02.01-->Date
  * 支持HttpMessageConverters。
  		1.HttpMessageConverters:SpringMVC用来转换Http请求和应的
  * 自动注册MessageCodesResolver。
  * 静态index.html支持。
  * 自定义Favicon支持。
  * 自动使用ConfigurableWebBindingInitializer bean。
  如果你想保留Spring Boot MVC功能,并且你想添加额外的 MVC配置(拦截器,格式化程序,视图控制器和其他功能),你可以添加自己的@Configuration类WebMvcConfigurer类但没有 @EnableWebMvc。如果您希望提供RequestMappingHandlerMapping,RequestMappingHandlerAdapter或ExceptionHandlerExceptionResolver的自定义实例,则可以声明WebMvcRegistrationsAdapter实例以提供此类组件。
如果您想完全控制Spring MVC,可以添加自己的@Configuration注释@EnableWebMvc。
-
如何修改SpringMVC的默认配置
- 模式:
- SpringBoot在配置很多组件的时候,先看容器中有没有自己配置的(@Bean、@Component)如果有,就用用户配置的,如果没有,才自动配置;如果有些组件可以有多个(ViewResolver)将用户配置的和自己哦人的组合起来;
- 在SpringBoot中会有非常多的xxxConfigurer帮助我们进行扩展配置
- 扩展SpringMVC
-
编写一个配置类(@Configuration),是WebMvcConfigurer类型;不能标注@EnableWebMvc
@Configuration
public class MyMVCConfig implements WebMvcConfigurer {
    @Override
    public void addViewControllers(ViewControllerRegistry registry) {
        //浏览器发送 /aaa 请求来自success
        registry.addViewController("/aaa").setViewName("success");
    }
}
-
- 全面接管SpringMVC(@EnableWebMvc)
SpringBoot对SpringMVC的自动配置不需要了,所有都是我们自己配
-
SpringBoot-Web开发
- 引入资源:链接:https://pan.baidu.com/s/1GWeK-xGU8QJjsLNWwxky8A 提取码:seg3
- 笔记源码:链接:https://pan.baidu.com/s/1hoKk0yf08WsD4qsikZKCcg
提取码:ycoe
-
-
五、Spring Boot 与Docker
-
六、Spring Boot 与数据访问
-
整合基本JDBC与数据源
-
创建一个新工程并引入Web、MySQL与JDBC
<dependency> <groupId>org.springframework.boot</groupId> <artifactId>spring-boot-starter-jdbc</artifactId> </dependency> <dependency> <groupId>org.springframework.boot</groupId> <artifactId>spring-boot-starter-web</artifactId> </dependency> <dependency> <groupId>mysql</groupId> <artifactId>mysql-connector-java</artifactId> <scope>runtime</scope> </dependency> -
配置文件(这里数据库组件默认导入的是8.0.19)
spring:
  datasource:
    username: root
    password: 123456
    url: jdbc:mysql://localhost:3306/spring?useSSL=false&serverTimezone=UTC
    driver-class-name: com.mysql.cj.jdbc.Driver
测试:
@SpringBootTest
class SpringbootDay0301webjspApplicationTests {

    @Autowired
    DataSource dataSource;
    @Test
    void contextLoads() throws SQLException {
        System.out.println(dataSource.getClass());
        Connection connection = dataSource.getConnection();
        System.out.println(connection);
        connection.close();
    }

}
默认是class com.zaxxer.hikari.HikariDataSource作为数据源
数据源的所有配置都在DataSourceProperties中参考 -
controller测试
/**
 * @Author: 东方老赢
 * @Date: 2020/4/30 12:02
 */
@Controller
public class HelloController {

    @Autowired
    JdbcTemplate jdbcTemplate;

    @ResponseBody
    @GetMapping("/query")
    public Map<String,Object> Hello(){
        List<Map<String,Object>> list = jdbcTemplate.queryForList("select * from ssm");
        System.out.println(list.toString());
        return list.get(0);
    }
}
-
-
整合Druid&配置数据源监控
-
引入配置
<dependency> <groupId>com.alibaba</groupId> <artifactId>druid</artifactId> <version>1.1.8</version> </dependency> -
修改配置文件中的spring: datasource:type值(默认为JDBC)
type: com.alibaba.druid.pool.DruidDataSource -
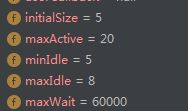
其他配置
  #   数据源其他配置
      initialSize: 5
      minIdle: 5
      maxActive: 20
      maxWait: 60000
      timeBetweenEvictionRunsMillis: 60000
      minEvictableIdleTimeMillis: 300000
      validationQuery: SELECT 1 FROM DUAL
      testWhileIdle: true
      testOnBorrow: false
      testOnReturn: false
      poolPreparedStatements: true
      #   配置监控统计拦截的filters,去掉后监控界面sql无法统计,'wall'用于防火墙
      filters: stat,wall,slf4j
      maxPoolPreparedStatementPerConnectionSize: 20
      useGlobalDataSourceStat: true
      connectionProperties: druid.stat.mergeSql=true;druid.stat.slowSqlMillis=500
由于在SpringBoot自带的数据源
DataSourceProperties中没有相关的配置,因此默认是不起作用的,需要我们自己给他建一个数据源/** * @Author: 东方老赢 * @Date: 2020/4/30 16:38 */ @Configuration public class DruidConfig { @ConfigurationProperties(prefix = "spring.datasource") @Bean public DataSource druid(){ return new DruidDataSource(); } } -
数据源监控
/**
 * @Author: 东方老赢
 * @Date: 2020/4/30 16:38
 */
@Configuration
public class DruidConfig {

    @ConfigurationProperties(prefix = "spring.datasource")
    @Bean
    public DataSource druid(){
        return new DruidDataSource();
    }

    //配置Druid的监控
    //1.配置一个管理后台的Servlet
    @Bean
    public ServletRegistrationBean statViewServlet(){
        ServletRegistrationBean bean = new ServletRegistrationBean(new StatViewServlet(),"/druid/*");
        Map<String,String> init = new HashMap<>();
        init.put("loginUsername","admin");
        init.put("loginPassword","123456");
        init.put("allow","");//默认允许所有访问
        init.put("deny","192.168.1.1");//不允许访问
        bean.setInitParameters(init);
        return bean;
    }
    //2.配置一个web监控的filter
    @Bean
    public FilterRegistrationBean webStatFilter(){
        FilterRegistrationBean bean = new FilterRegistrationBean();
        bean.setFilter(new WebStatFilter());

        Map<String,String> init = new HashMap<>();
        //exclusions:那些可以不拦截
        init.put("exclusions","*.js,*.css,/druid/*");

        bean.setInitParameters(init);

        bean.setUrlPatterns(Arrays.asList("/*"));
        return bean;
    }
}
-
整合Mybatis
-
基础环境搭建
新建工程,导入(Web、JDBC、Mysql、Mybatis、Druid)依赖<dependency> <groupId>org.springframework.boot</groupId> <artifactId>spring-boot-starter-jdbc</artifactId> </dependency> <dependency> <groupId>org.springframework.boot</groupId> <artifactId>spring-boot-starter-web</artifactId> </dependency> <dependency> <groupId>org.mybatis.spring.boot</groupId> <artifactId>mybatis-spring-boot-starter</artifactId> <version>2.1.2</version> </dependency> <dependency> <groupId>com.alibaba</groupId> <artifactId>druid</artifactId> <version>1.1.8</version> </dependency> <dependency> <groupId>mysql</groupId> <artifactId>mysql-connector-java</artifactId> <scope>runtime</scope> </dependency>配置文件
application.ymlspring: datasource: # 数据源基本配置 username: root password: 123456 driver-class-name: com.mysql.jdbc.Driver url: jdbc:mysql://localhost:3306/spring type: com.alibaba.druid.pool.DruidDataSource # 数据源其他配置 initialSize: 5 minIdle: 5 maxActive: 20 maxWait: 60000 timeBetweenEvictionRunsMillis: 60000 minEvictableIdleTimeMillis: 300000 validationQuery: SELECT 1 FROM DUAL testWhileIdle: true testOnBorrow: false testOnReturn: false poolPreparedStatements: true # 配置监控统计拦截的filters,去掉后监控界面sql无法统计,'wall'用于防火墙 filters: stat,wall,log4j maxPoolPreparedStatementPerConnectionSize: 20 useGlobalDataSourceStat: true connectionProperties: druid.stat.mergeSql=true;druid.stat.slowSqlMillis=500创建数据源相关属性
/**
 * @Author: 东方老赢
 * @Date: 2020/4/30 17:26
 */
@Configuration
public class DruidConfig {

    @ConfigurationProperties(prefix = "spring.datasource")
    @Bean
    public DataSource druid(){
        return new DruidDataSource();
    }

    //配置Druid的监控
    //1.配置一个管理后台的Servlet
    @Bean
    public ServletRegistrationBean statViewServlet(){
        ServletRegistrationBean bean = new ServletRegistrationBean(new StatViewServlet(),"/druid/*");
        Map<String,String> init = new HashMap<>();
        init.put("loginUsername","admin");
        init.put("loginPassword","123456");
        init.put("allow","");//默认允许所有访问
        init.put("deny","192.168.1.1");//不允许访问
        bean.setInitParameters(init);
        return bean;
    }
    //2.配置一个web监控的filter
    @Bean
    public FilterRegistrationBean webStatFilter(){
        FilterRegistrationBean bean = new FilterRegistrationBean();
        bean.setFilter(new WebStatFilter());

        Map<String,String> init = new HashMap<>();
        //exclusions:那些可以不拦截
        init.put("exclusions","*.js,*.css,/druid/*");

        bean.setInitParameters(init);

        bean.setUrlPatterns(Arrays.asList("/*"));
        return bean;
    }
}
数据库建表
DROP TABLE IF EXISTS `department`;
CREATE TABLE `department` (
  `id` int(11) NOT NULL AUTO_INCREMENT,
  `departmentName` varchar(255) DEFAULT NULL,
  PRIMARY KEY (`id`)
) ENGINE=InnoDB AUTO_INCREMENT=1 DEFAULT CHARSET=utf8;
DROP TABLE IF EXISTS `employee`; CREATE TABLE `employee` ( `id` int(11) NOT NULL AUTO_INCREMENT, `lastName` varchar(255) DEFAULT NULL, `email` varchar(255) DEFAULT NULL, `gender` int(2) DEFAULT NULL, `d_id` int(11) DEFAULT NULL, PRIMARY KEY (`id`) ) ENGINE=InnoDB AUTO_INCREMENT=1 DEFAULT CHARSET=utf8;然后创建相应的实体类
/**
 * @Author: 东方老赢
 * @Date: 2020/4/30 17:41
 */
public class Department {
    private Integer id;
    private String departmentName;

    public Integer getId() {
        return id;
    }

    public void setId(Integer id) {
        this.id = id;
    }

    public String getDepartmentName() {
        return departmentName;
    }

    public void setDepartmentName(String departmentName) {
        this.departmentName = departmentName;
    }

    @Override
    public String toString() {
        return "Department{" +
                "id=" + id +
                ", departmentName='" + departmentName + '\'' +
                '}';
    }
}
/** * @Author: 东方老赢 * @Date: 2020/4/30 17:38 */ public class Employee { private Integer id; private String lastName; private Integer gender; private String email; private Integer did; public Integer getId() { return id; } public void setId(Integer id) { this.id = id; } public String getLastName() { return lastName; } public void setLastName(String lastName) { this.lastName = lastName; } public Integer getGender() { return gender; } public void setGender(Integer gender) { this.gender = gender; } public String getEmail() { return email; } public void setEmail(String email) { this.email = email; } public Integer getDid() { return did; } public void setDid(Integer did) { this.did = did; } @Override public String toString() { return "Employee{" + "id=" + id + ", lastName='" + lastName + '\'' + ", gender=" + gender + ", email='" + email + '\'' + ", did=" + did + '}'; } } -
注解版Mybatis
/**
 * @Author: 东方老赢
 * @Date: 2020/4/30 18:28
 */

//指定这是一个操作数据库的mapper
@Mapper
public interface DepartmentMapper {
    @Select("select * from department where id = #{id}")
    public Department getDeptById(Integer id);
    @Delete("delete from department where id = #{id} ")
    public int deleteDeptById(Integer id);
    @Options(useGeneratedKeys = true,keyProperty = "id")
    @Insert("insert into department(departmentName) values(#{departmentName})")
    public int insertDeptById(Department department);
    @Update("update department set departmentName=#{departmentName} where id=#{id}")
    public int updateDept(Department department);
}
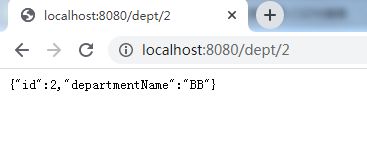
/** * @Author: 东方老赢 * @Date: 2020/4/30 18:35 */ @RestController public class DeptController { @Autowired DepartmentMapper departmentMapper; @GetMapping("/dept/{id}") public Department getDepartment(@PathVariable("id") Integer id){ return departmentMapper.getDeptById(id); } @GetMapping("/dept") public Department insertDept(Department department){ departmentMapper.insertDeptById(department); return department; } } -
配置版Mybatis
首先创建Mybatis的全局配置文件和映射文件
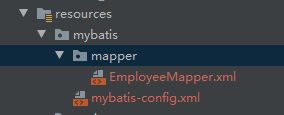
然后再application.yml中进行配置mybatis: config-location: classpath:mybatis/mybatis-config.xml #指定全局配置文件的位置 mapper-locations: classpath:mybatis/mapper/*.xml #指定sql映射文件的位置创建接口
/**
 * @Author: 东方老赢
 * @Date: 2020/5/1 8:50
 */
public interface IEmployeeMapper {
    public Employee getEmpById(Integer id);
    public void insertEmp(Employee e);
}
全局配置文件
<?xml version="1.0" encoding="UTF-8" ?>
<!DOCTYPE configuration
        PUBLIC "-//mybatis.org//DTD Config 3.0//EN"
        "http://mybatis.org/dtd/mybatis-3-config.dtd">
<configuration>
    <settings>
        <setting name="mapUnderscoreToCamelCase" value="true"/>
    </settings>
</configuration>
sql映射文件
<?xml version="1.0" encoding="UTF-8" ?>
<!DOCTYPE mapper
        PUBLIC "-//mybatis.org//DTD Mapper 3.0//EN"
        "http://mybatis.org/dtd/mybatis-3-mapper.dtd">
<mapper namespace="com.boot.mapper.IEmployeeMapper">
    <select id="getEmpById" resultType="com.boot.domain.Employee">
        select * from employee where id = #{id}
    </select>

    <insert id="insertEmp">
        insert into employee(lastName,email,gender,d_id) values (#(lastName),#(email),#(gender),#(did))
    </insert>
</mapper>
-
整合SpringDat
首先编写一个实体类
/**
 * @Author: 东方老赢
 * @Date: 2020/4/30 17:38
 */
//使用JPA注解配置映射关系
@JsonIgnoreProperties({"hibernateLazyInitializer"}) //作用是json序列化时将java bean中的一些属性忽略掉,序列化和反序列化都受影响
@Entity  //告诉JPA这是一个实体类(和数据表映射的类)
@Table(name = "tb1_user") //指定和那个数据表对应,如果省略,表名默认就是类名小写user
public class User {
    @Id //这是一个主键
    @GeneratedValue(strategy = GenerationType.IDENTITY) //自增主键
    private Integer id;

    @Column(name = "last_name",length = 50) //这是和数据表对应的一个列;name:自定义属性名称   length:自定义数据长度
    private String lastName;
    @Column //默认列名就是属性名
    private String email;

    public Integer getId() {
        return id;
    }

    public void setId(Integer id) {
        this.id = id;
    }

    public String getLastName() {
        return lastName;
    }

    public void setLastName(String lastName) {
        this.lastName = lastName;
    }

    public String getEmail() {
        return email;
    }

    public void setEmail(String email) {
        this.email = email;
    }

    @Override
    public String toString() {
        return "Employee{" +
                "id=" + id +
                ", lastName='" + lastName + '\'' +
                ", email='" + email + '\'' +
                '}';
    }
}
编写一个Dao接口来操作实体类对应的数据表
/**
 * @Author: 东方老赢
 * @Date: 2020/5/1 10:26
 */
//集成JpaRepository来完成对数据库的操作
public interface IUserDao extends JpaRepository<User,Integer> {

}
配置application.yml配置文件
spring:
  jpa:
    hibernate:
      ddl-auto: update #更新或创建数据表结构(运行后若数据库中没有相应表即自动创建一个,若相应表发生改变则更新表)
    show-sql: true #控制台显示sql
然后直接运行即可,运行成功后你会发现tb1_user表已经被自动创建出来了
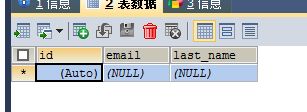
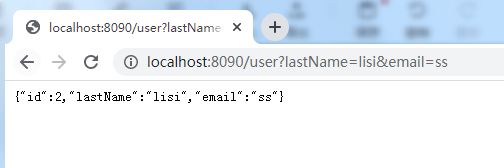
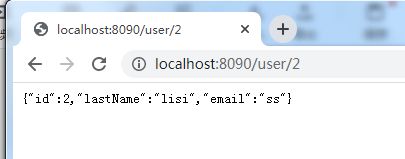
接下来实现CRUD操作,编写Controller/** * @Author: 东方老赢 * @Date: 2020/5/1 10:38 */ @RestController public class UserController { @Autowired IUserDao userDao; @GetMapping("/user/{id}") public User getUserById(@PathVariable("id") Integer id){ User one = userDao.getOne(id); return one; } @GetMapping("/user") public User insertUser(User user){ User save = userDao.save(user); return save; } }
-
高级篇
-
九、Spring Boot 与缓存
-
十、Spring Boot 与消息
-
十一、Spring Boot 与检索
-
十二、Spring Boot 与任务
-
十三、Spring Boot 与安全
-
十四、Spring Boot 与分布式
-
十五、Spring Boot 与开发热部署
-
十六、Spring Boot 与监控管理
