cocos2d-x源码剖析-1-主框架解析
自动生成项目
在vs2017环境下新建项目后,可以在解决资源管理器看到四个文件夹,如下图所示。我们主要关注第一个和第二个文件夹。第一个文件夹展开后是cocs2d为我们自动生成的项目文件,第二个文件夹是cocs2d-x的源码目录,当然这些都是源码路径的链接。现在来看看第一个自动生成的项目文件。
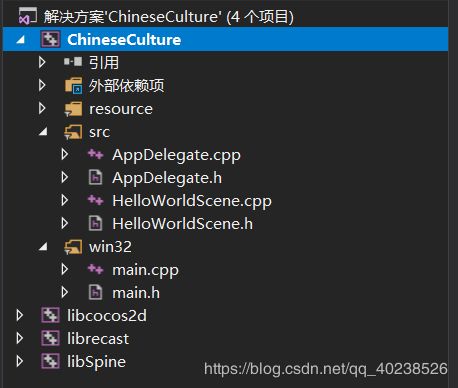
src目录下存储的是头文件以及其实现,在win32文件里面放着项目的主函数。
AppDelegate类
AppDelegate.h
#ifndef  _APP_DELEGATE_H_
#define  _APP_DELEGATE_H_

#include "cocos2d.h"

class  AppDelegate : private cocos2d::Application
{
public:
    AppDelegate();
    virtual ~AppDelegate();

    virtual void initGLContextAttrs();

    virtual bool applicationDidFinishLaunching();

    virtual void applicationDidEnterBackground();

    virtual void applicationWillEnterForeground();
};

#endif
首先可以看出AppDelegate类私有继承了cocos2d::Application类,先不管cocos2d::Application类是干什么的,私有继承的意思是其基类的公有方法将成为派生类的私有方法,派生类不继承基类的接口。
AppDelegate类实现了四个私有成员函数:
- virtual void initGLContextAttrs();
- virtual bool applicationDidFinishLaunching();
- virtual void applicationDidEnterBackground();
- virtual void applicationWillEnterForeground();
initGLContextAttrs()
initGLContextAttrs函数主要用来初始化OpenGL的上下文属性,OpenGL本身就是一个状态机,其状态通常被称为OpenGL上下文(Context)。它里面保存了一系列的变量用来描述OpenGL此刻需要如何运行,比如当前窗口的大小,缓冲色彩等等。
void AppDelegate::initGLContextAttrs()
{
    // set OpenGL context attributes: red,green,blue,alpha,depth,stencil,multisamplesCount
    GLContextAttrs glContextAttrs = {8, 8, 8, 8, 24, 8, 0};

    GLView::setGLContextAttrs(glContextAttrs);
}
函数实现中对Opengl上下文进行了设置:红色,绿色,蓝色,alpha,深度,模板,以及采样计数。
applicationDidFinishLaunching()
applicationDidFinishLaunching函数主要实现导演和场景初始化代码。导演是cocos2d重要的类,它指导着整个cocos2d引擎的运行,并且一个项目有且只有一个导演。
bool AppDelegate::applicationDidFinishLaunching() {
    // initialize director
    auto director = Director::getInstance();
    auto glview = director->getOpenGLView();
    if(!glview) {
#if (CC_TARGET_PLATFORM == CC_PLATFORM_WIN32) || (CC_TARGET_PLATFORM == CC_PLATFORM_MAC) || (CC_TARGET_PLATFORM == CC_PLATFORM_LINUX)
        glview = GLViewImpl::createWithRect("ChineseCulture", cocos2d::Rect(0, 0, designResolutionSize.width, designResolutionSize.height));
#else
        glview = GLViewImpl::create("ChineseCulture");
#endif
        director->setOpenGLView(glview);
    }

    // turn on display FPS
    director->setDisplayStats(true);

    // set FPS. the default value is 1.0/60 if you don't call this
    director->setAnimationInterval(1.0f / 60);

    // Set the design resolution
    glview->setDesignResolutionSize(designResolutionSize.width, designResolutionSize.height, ResolutionPolicy::NO_BORDER);
    auto frameSize = glview->getFrameSize();
    // if the frame's height is larger than the height of medium size.
    if (frameSize.height > mediumResolutionSize.height)
    {
        director->setContentScaleFactor(MIN(largeResolutionSize.height/designResolutionSize.height, largeResolutionSize.width/designResolutionSize.width));
    }
    // if the frame's height is larger than the height of small size.
    else if (frameSize.height > smallResolutionSize.height)
    {
        director->setContentScaleFactor(MIN(mediumResolutionSize.height/designResolutionSize.height, mediumResolutionSize.width/designResolutionSize.width));
    }
    // if the frame's height is smaller than the height of medium size.
    else
    {
        director->setContentScaleFactor(MIN(smallResolutionSize.height/designResolutionSize.height, smallResolutionSize.width/designResolutionSize.width));
    }

    register_all_packages();

    // create a scene. it's an autorelease object
    auto scene = HelloWorld::createScene();

    // run
    director->runWithScene(scene);

    return true;
}
可以在这段代码里看到很多信息,首先导演的获得使用了auto director = Director::getInstance() 可以看出导演类是一个单例模式,接着auto glview = director->getOpenGLView()获得了项目的opengl视图的权限,然后是一个if语句,来判断视图是否存在,如果存在的话就执行glview = GLViewImpl::createWithRect("ChineseCulture", cocos2d::Rect(0, 0, designResolutionSize.width, designResolutionSize.height)),这段代码就是初始化主窗口,指定了窗口的名称以及大小,如下图所示。

接着director->setDisplayStats(true)与director->setAnimationInterval(1.0f / 60)分别是设置帧率的显示与帧率的大小,上图左下角60.0/0.017部分就是帧率的显示,如果将setDisplayStats函数设置为false,那么它将不再显示。
接下来一直到register_all_packages()之前的代码,是在根据屏幕的大小来调节分辨率的缩放因子。如果您想使用包管理器来安装更多的包,你可以将其引用在register_all_packages()函数中。
最后auto scene = HelloWorld::createScene()与director->runWithScene(scene)分别创建了自定义的HelloWorld场景以及使用导演启动了该场景。
applicationDidEnterBackground()
当应用程序移动到后台时调用applicationDidEnterBackground函数
void AppDelegate::applicationDidEnterBackground() {
    Director::getInstance()->stopAnimation();

#if USE_AUDIO_ENGINE
    AudioEngine::pauseAll();
#elif USE_SIMPLE_AUDIO_ENGINE
    SimpleAudioEngine::getInstance()->pauseBackgroundMusic();
    SimpleAudioEngine::getInstance()->pauseAllEffects();
#endif
}
可以看出当程序移动到后台时会暂停所有的动画帧以及多媒体。
applicationWillEnterForeground()
当应用程序重新移动到前台台时调用applicationWillEnterForeground函数。
void AppDelegate::applicationWillEnterForeground() {
    Director::getInstance()->startAnimation();

#if USE_AUDIO_ENGINE
    AudioEngine::resumeAll();
#elif USE_SIMPLE_AUDIO_ENGINE
    SimpleAudioEngine::getInstance()->resumeBackgroundMusic();
    SimpleAudioEngine::getInstance()->resumeAllEffects();
#endif
}
它将重启动画帧的渲染以及多媒体。
HelloWorld类-最基础的游戏场景
#ifndef __HELLOWORLD_SCENE_H__
#define __HELLOWORLD_SCENE_H__

#include "cocos2d.h"

class HelloWorld : public cocos2d::Scene
{
public:
    static cocos2d::Scene* createScene();

    virtual bool init();

    void menuCloseCallback(cocos2d::Ref* pSender);

    CREATE_FUNC(HelloWorld);
};

#endif // __HELLOWORLD_SCENE_H__
HelloWorld类主要继承了cocos2d::Scene(场景)类,主要实现了三个函数
- static cocos2d::Scene* createScene()
- virtual bool init()
- void menuCloseCallback(cocos2d::Ref* pSender)
createScene()
createScene函数主要是使得对象间接实例化,起到了很好的解耦效果,内部调用了HelloWorld::create(),你可能会奇怪于代码里面并没有声明此函数,别急,慢慢看。
Scene* HelloWorld::createScene()
{
    return HelloWorld::create();
}
virtual bool init()
继承Cocos2d的scene函数必须得实现他的init接口,场景中的资源都在这里初始化。
bool HelloWorld::init()
{
    if ( !Scene::init() )
    {
        return false;
    }

/*...一些资源的初始化*/
    return true;
}
在子类的init函数里要调用一次父类的Init函数。
CREATE_FUNC(HelloWorld)
CREATE_FUNC其实是一个宏,它用来定义类的create函数,定义如下,内部还使用了cocos2d的资源管理器
#define CREATE_FUNC(__TYPE__) \
static __TYPE__* create() \
{ \
    __TYPE__ *pRet = new(std::nothrow) __TYPE__(); \
    if (pRet && pRet->init()) \
    { \
        pRet->autorelease(); \
        return pRet; \
    } \
    else \
    { \
        delete pRet; \
        pRet = nullptr; \
        return nullptr; \
    } \
}
main
#include "main.h"
#include "AppDelegate.h"
#include "cocos2d.h"

USING_NS_CC;

int WINAPI _tWinMain(HINSTANCE hInstance,
                       HINSTANCE hPrevInstance,
                       LPTSTR    lpCmdLine,
                       int       nCmdShow)
{
    UNREFERENCED_PARAMETER(hPrevInstance);
    UNREFERENCED_PARAMETER(lpCmdLine);

    // create the application instance
    AppDelegate app;
    return Application::getInstance()->run();
}
这里使用了WIN api,因为是在windows环境下,在main函数里实例化了AppDelegate类,以及开始了程序的循环Application::getInstance()->run()。