filebeat+kafka+logstash+es日志系统的搭建以及性能专题
一、环境及组件版本
Windows10. filebeat6.8.1 kafka2.11 logstash同681 es7.1.1,Linux下部分配置通用
二、各组件配置
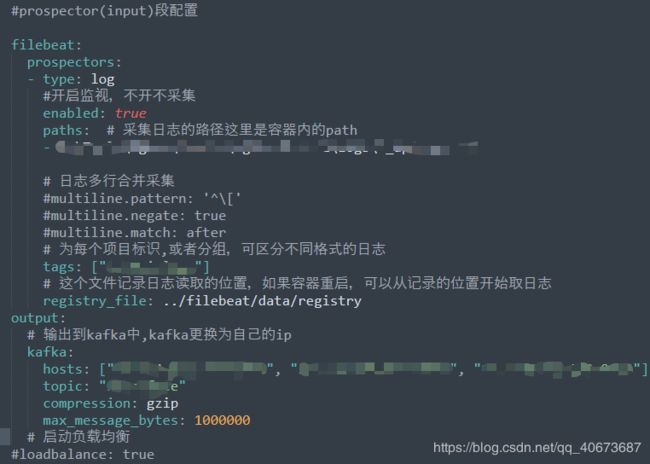
filebeat,可配置多种输出方式,logstash的filter通常是整个系统的性能薄弱环节,一般会使用削峰手段避免过大数据涌入 logstash,导致性能下降甚至宕机
kafka,除IP外基本不需要关心,通常搞个集群玩,broker0,1,2 端口看自己心情 - -
logstash,只写个最简单的,有特别需要的同学移步--->官网
elasticsearch,仅配置最基本的节点,根据业务量以及压力点可适当增加节点。
# ======================== Elasticsearch Configuration =========================
#
# ---------------------------------- Cluster -----------------------------------
# Use a descriptive name for your cluster:
#
cluster.name: my-elastic
# ------------------------------------ Node ------------------------------------
# Use a descriptive name for the node:
#
node.name: master_node
node.master: true
#node.voting_only: false
node.data: false
node.ingest: false
#node.ml: false
#xpack.ml.enabled: true
cluster.remote.connect: true
#
# Add custom attributes to the node:
#node.attr.rack: r1
#
# ----------------------------------- Paths ------------------------------------
# Path to directory where to store the data (separate multiple locations by comma):
#
path.data: /elasticsearch-7/data
#
# Path to log files:
#
#path.logs: /path/to/logs
# ----------------------------------- Memory -----------------------------------
#
# Lock the memory on startup:
bootstrap.memory_lock: true
# es调优参数
#配置fieldData的Cache大小,可以配百分比也可以配一个准确的数值。cache到达约定的内存大小时会自动清理,
#驱逐一部分FieldData数据以便容纳新数据。默认值为unbounded,无限
indices.fielddata.cache.size: 70%
#断路器 breaker. 用来控制cache加载,它预估当前查询申请使用内存的量,并加以限制
#估算完成查询的其他部分要求的结构的大小,默认情况下限制它们到堆大小的40%
indices.breaker.request.limit: 20%
#限制fielddata的大小,默认情况下为堆大小的60%
indices.breaker.fielddata.limit: 50%
#确保默认情况下这2个部分使用的总内存不超过堆大小的70%
indices.breaker.total.limit: 70%
# Elasticsearch performs poorly when the system is swapping the memory.
#
# ---------------------------------- Network -----------------------------------
# Set the bind address to a specific IP (IPv4 or IPv6):
#
network.host: 127.0.0.1
# Set a custom port for HTTP:
#
http.port: 9201
# For more information, consult the network module documentation.
# --------------------------------- Discovery ----------------------------------
#集群节点
discovery.seed_hosts: ["127.0.0.1:9301","127.0.0.1:9302","127.0.0.1:9303"]
#
#集群最小主节点数(大于节点个数的一半,如果节点为3,则此处最小为2)
discovery.zen.minimum_master_nodes: 2
#
#用于各节点间内部通信的TCP端口
transport.tcp.port: 9301
#
bootstrap.system_call_filter: false
# Bootstrap the cluster using an initial set of master-eligible nodes:
cluster.initial_master_nodes: ["master_node"]
#http请求是否允许跨域访问,如果配置为false,则只有相同域名或IP+端口的Web应用才能通过http访问elasticsearch
http.cors.enabled: true
#
# For more information, consult the discovery and cluster formation module documentation.
# ---------------------------------- Gateway -----------------------------------
#
# Block initial recovery after a full cluster restart until N nodes are started:
#控制集群在达到多少个节点之后才会开始数据恢复,通过这个设置可以避免集群自动相互发现的初期,shard分片不全的问题,
#假如es集群内一共有5个节点,就可以设置为5,那么这个集群必须有5个节点启动后才会开始数据分片,
#如果设置为3,就有可能另外两个节点没存储数据分片
gateway.recover_after_nodes: 1
#
# For more information, consult the gateway module documentation.
# ---------------------------------- Various -----------------------------------
#
# Require explicit names when deleting indices:
#
#action.destructive_requires_name: true
至此,配置项完毕,Nginx的拦截口暂不赘述.
三、性能优化点
此处暂不讨论kafka,关注瓶颈点logstash,以及es的处理效率。
1.jvm.options文件,给logstash分配合适自己业务压力的jvm内存空间,建议最大最小值设为一致,避免频繁的内存再分配
2.pipelines.yml,logstash使用多管道方式分别配置各任务的执行环境。详细配置请移步----》pipeline配置
· pipeline.id 管道id,即任务引用
· queue.type 队列类型,有"persisted","memory",内部队列模型,“memory”用于基于内存的传统队列;"persisted"基于磁盘的异步队列。此配置建议结合自己的需求和机器性能来选择,默认值是 "memory".
· path.config 工作管道配置文件,即logstash启动文件
· pipeline.workers 决定核心处理组件filter的线程数,根据情况而定,logstash处理耗时最大的点通常就是filter插件的各种清洗处理,混用集群建议不大于主机CPU核数;非混用集群建议不小于CPU核数
· pipeline.putput.workers 决定output的线程数,官方建议大于等于CPU核数
· pipeline.batch.size 决定logstash每次发送的events数,该值越小es事件处理队列压力越大,但是并非越大越好.
· pipeline.batch.delay 事件发送批次传输间隔.
3.es的优化方式众多,各有特点,大致说下我的看法,首先es集群最好按官方的说明指定各节点的性质,区分出主节点(master),数据(data)节点,摄取(ingest)节点,协调(coordinate)节点等,再根据输入或者查询压力点的分布按需对集群进行针对性拓展。其次,集群内部各配置项以及索引分片数的优化。详如下:
· 断路器breaker,参考es配置图
· 模板分片设置
index.number_of_shards: x 索引分片数,提升写入性能
index.number_of_replicas:1 索引分片副本数量
index.refresh_interval:10s 新建索引查询延时,有助于写性能的提升
index.translog.durability:async 持久化方式,request 或 async
index.translog.sync_interval:60s 异步刷盘间隔
client: bulk write 提升写入性能,大小建议大于5MB
参考篇:https://www.jianshu.com/p/2db649af2640
四、总结
性能调优之路是永无止境,再合适的配置也是随着业务以及项目规模而不断衍进的,运行环境-->集群容器-->详细配置,按照这个思维模式一步一步的调整测试。总归还是要有高效的方法,能精准定位问题,问题就离解决不远了.


