angular6 懒加载 修改默认路由
先放个官网教程地址(angular中文网 -路由)
https://www.angular.cn/tutorial/toh-pt5
懒加载(惰性加载的特性模块)
https://www.angular.cn/guide/lazy-loading-ngmodules
首先 你带有个ng项目
ng new customer-app --routing
如果已经有了就不需要执行这一步
直接走下面这行
ng generate module customers --routing ( customers 是该模块的名字 , 新手建议跟着教程上的名字来 自己整个文件名整着整着就混了,比如说我就是)
向特性模块中添加组件 (我感觉官方给这个的意图就是让你看看咋懒加载的)customers/customer-list是自定义文件名
ng generate component customers/customer-list为了提供另一个可路由到的地点,再创建第二个带路由的特性模块:
ng generate module orders --routingng generate component orders/order-list然后 打开 app.component.html 文件
{{title}}
配置路由
打开src/app/app-routing.module.ts
const routes: Routes = [
  {
    path: 'customers',
    loadChildren: 'app/customers/customers.module#CustomersModule'
  },
  {
    path: 'orders',
    loadChildren: 'app/orders/orders.module#OrdersModule'
  },
  {
    path: '',
    redirectTo: '',
    pathMatch: 'full'
  }
];
打开src/app/customers/customers.module.ts
import { NgModule } from '@angular/core';
import { CommonModule } from '@angular/common';
import { CustomersRoutingModule } from './customers-routing.module';
import { CustomerListComponent } from './customer-list/customer-list.component';

@NgModule({
  imports: [
    CommonModule,
    CustomersRoutingModule
  ],
  declarations: [CustomerListComponent]
})
export class CustomersModule { }
官方对这段话的解释是
customers.module.ts 文件导入了 CustomersRoutingModule 和 CustomerListComponent,所以 CustomersModule 类可以访问它们。 接着 CustomersRoutingModule 出现在了 @NgModule 的 imports 数组中,这让 CustomersModule 可以访问它的路由模块。而 CustomerListComponent 出现在了 declarations 数组中,这表示 CustomerListComponent 属于 CustomersModule。
接着
打开 src/app/customers/customers-routing.module.ts
import { NgModule } from '@angular/core';
import { Routes, RouterModule } from '@angular/router';

import { CustomerListComponent } from './customer-list/customer-list.component';


const routes: Routes = [
  {
    path: '',
    component: CustomerListComponent
  }
];

@NgModule({
  imports: [RouterModule.forChild(routes)],
  exports: [RouterModule]
})
export class CustomersRoutingModule { }
注意,path 被设置成了空字符串。这是因为 AppRoutingModule 中的路径已经设置为了 customers,所以 CustomersRoutingModule 中的这个路由定义已经位于 customers 这个上下文中了。也就是说这个路由模块中的每个路由其实都是子路由。
重复这个步骤以导入 OrdersListComponent,并为 orders-routing.module.ts 配置路由树组:
import { OrderListComponent } from './order-list/order-list.component';

const routes: Routes = [
  {
    path: '',
    component: OrderListComponent
  }
];
运行
ng serve官方还给了一个查看是否懒加载的步骤
就打开network 看你跳页的时候是否加载了chunk文件
默认路由
官方的是默认打开http://localhost:4200
但是呢 我偏偏想让他默认打开 http://localhost:4200/app-login-list
那就改呗
打开src/app/app-routing.module.ts
import { NgModule } from '@angular/core';
import { Routes, RouterModule } from '@angular/router';
import { LoginListComponent } from './login/login-list/login-list.component';

const routes: Routes = [
  { path: 'app-login-list', component: LoginListComponent },
  {
    path: 'login',
    loadChildren: 'app/login/login-routing.module#LoginRoutingModule'
  },
  {
    path: 'index',
    loadChildren: 'app/index/index-routing.module#IndexRoutingModule'
  },
  { path: '',
    redirectTo: '/app-login-list',
    pathMatch: 'full'
  },
  {
    path: '',
    children: []
  }
];

@NgModule({
  imports: [RouterModule.forRoot(routes)],
  exports: [RouterModule]
})
export class AppRoutingModule { }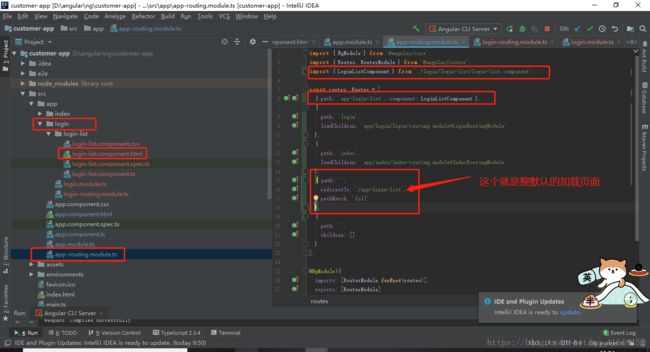
import { LoginListComponent } from './login-list/login-list.component';LoginListComponent 这个是在新建文件夹的时候系统帮你生成好的,小可爱们不要自己随便改 就找到对应文件夹的 module.ts里面 里面有 然后在app-routing.module.ts直接粘过去改一下路径行了
然后 在app.module.ts里面也加入
import { LoginListComponent } from './login/login-list/login-list.component';
配置一下
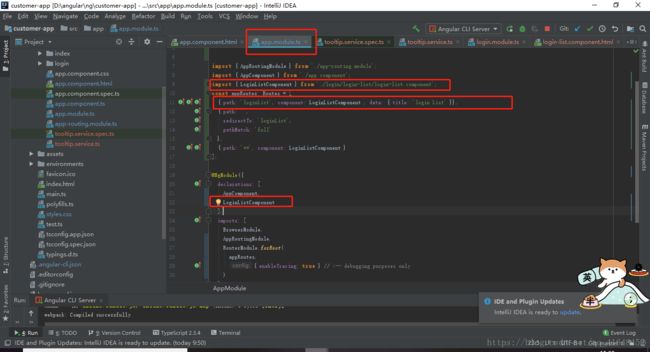
注:
app.module.ts 里面不配置 会报错
app-routing.module.ts 里面不配置不会报错 但是也不会生效 默认路由不会改变
默认路由完成
打开浏览器

输入http://localhost:4200
你会发现他会自己跳到http://localhost:4200/app-login-list 里
这样就表示成功了。