自动化运维——ansible(部署httpd,zabbix)
一、知识剖析
- ansible简介:
- ansible是新出现的自动化运维工具,基于Python开发,集合了众多运维工具(puppet、cfengine、chef、func、fabric)的优点,实现了批量系统配置、批量程序部署、批量运行命令等功能。
ansible是基于模块工作的,本身没有批量部署的能力。真正具有批量部署的是ansible所运行的模块,ansible只是提供一种框架。
- ansible特性:
- 模块化:调用特定的模块,完成特定任务
有Paramiko,PyYAML,Jinja2(模板语言)三个关键模块 - 支持自定义模块
- 基于Python语言实现
- 部署简单,基于python和SSH(默认已安装),agentless
- 安全,基于OpenSSH
- 支持playbook编排任务
- 幂等性:一个任务执行1遍和执行n遍效果一样,不因重复执行带来意外情况
- 无需代理不依赖PKI(无需ssl)
- 可使用任何编程语言写模块
- YAML格式,编排任务,支持丰富的数据结构
- 较强大的多层解决方案
- Ansible的架构
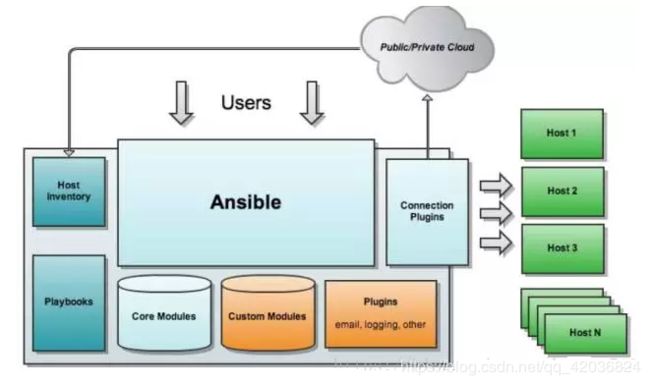
由以下几个核心组件构成:
- ansible(主体):ansible的核心程序,提供一个命令行接口给用户对ansible进行管理操作;
- Host Inventory(主机清单):为Ansible定义了管理主机的策略。一般小型环境下我们只需要在host文件中写入主机的IP地址即可,但是到了中大型环境我们有可能需要使用静态inventory或者动态主机清单来生成我们所需要执行的目标主机。
- Core Modules(核心模块):Ansible执行命令的功能模块,多数为内置的核心模块。
- Custom Modules(拓展模块):如何ansible自带的模块无法满足我么你的需求,用户可自定义相应的模块来满足自己的需求。
- Connection Plugins(连接插件):模块功能的补充,如连接类型插件、循环插件、变量插件、过滤插件等,该功能不常用
- Playbook(任务剧本):编排定义ansible任务集的配置文件,由ansible顺序依次执行,通常是JSON格式的* YML文件
- API:供第三方程序调用的应用程序编程接口
- Ansible工作原理:
- 管理端支持local 、ssh、zeromq 三种方式连接被管理端,默认使用基于ssh的连接---这部分对应基本架构图中的连接模块;
- 可以按应用类型等方式进行Host Inventory(主机群)分类,管理节点通过各类模块实现相应的操作---单个模块,单条命令的批量执行,我们可以称之为ad-hoc;
- 管理节点可以通过playbooks 实现多个task的集合实现一类功能,如web服务的安装部署、数据库服务器的批量备份等。playbooks我们可以简单的理解为,系统通过组合多条ad-hoc操作的配置文件 。
二、ansible的安装
- 实验环境
server1 172.25.19.1
server2 172.24.19.2 - ansible的配置文件:
/etc/ansible/ansible.cfg 主配置文件,配置ansible工作特性
/etc/ansible/hosts 主机清单
/etc/ansible/roles/ 存放角色的目录
- 安装软件
[root@server1 ~]# cd ansible/
[root@server1 ansible]# ls
ansible-2.7.8-1.el7.noarch.rpm
ansible-tower-setup-bundle-3.4.2-1.el7.tar.gz
libtomcrypt-1.17-25.el7.x86_64.rpm
libtommath-0.42.0-5.el7.x86_64.rpm
python2-crypto-2.6.1-13.el7.x86_64.rpm
python2-jmespath-0.9.0-1.el7.noarch.rpm
python-httplib2-0.9.2-0.1.el7.noarch.rpm
python-keyczar-0.71c-2.el7.noarch.rpm
python-paramiko-2.1.1-0.9.el7.noarch.rpm
sshpass-1.06-1.el7.x86_64.rpm
[root@server1 ansible]# yum install -y *.rpm
- 配置主机清单
[root@server1 ansible]# cd /etc/ansible/
[root@server1 ansible]# ls
ansible.cfg  hosts  roles
[root@server1 ansible]# vim hosts   ##最后添加
[web]     #定义一个主机组
server1   #将主机名加进去

[db]
server2
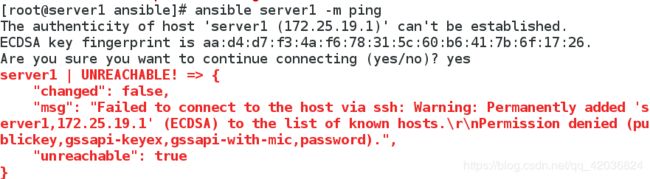
- 测试ping模块:先ping——>输入yes,再加-k参数
[root@server1 ansible]# ansible server1 -m ping    ##-m 调用模块
[root@server1 ansible]# ansible server1 -m ping -k

- 以下是错误顺序示例
[root@server1 ansible]# ansible server2 -m ping -k   ##直接加-k,则报错

应该先ping——>输入yes,再加-k参数
[root@server1 ansible]# ansible server2 -m ping    ##先允许连接
[root@server1 ansible]# ansible server2 -m ping -k   ##再加-k参数输入密码连接

- 制作免密连接
[root@server1 ansible]# ssh-keygen   ##一路回车即可
Generating public/private rsa key pair.
Enter file in which to save the key (/root/.ssh/id_rsa):
Enter passphrase (empty for no passphrase):
Enter same passphrase again:
Your identification has been saved in /root/.ssh/id_rsa.
Your public key has been saved in /root/.ssh/id_rsa.pub.
The key fingerprint is:
fb:77:6b:fa:07:30:e3:64:72:e0:5e:23:4e:d0:31:7c root@server1
The key's randomart image is:
+--[ RSA 2048]----+
|         oo.     |
|        . +.E    |
|         o o     |
|          = X    |
|        S+ O =   |
|         .o . .  |
|        .      . |
|         .  . o .|
|          ...=oo |
+-----------------+
[root@server1 ansible]#
[root@server1 ansible]# ssh-copy-id server1
root@server1's password:
[root@server1 ansible]# ssh-copy-id server2
root@server2's password:
- 免密连接测试
[root@server1 ansible]# ansible server1 -m ping
[root@server1 ansible]# ansible server2 -m ping
[root@server1 ansible]# ansible all -m ping
[root@server1 ansible]# ansible web -m ping
[root@server1 ansible]# ansible db -m ping

- ansible-doc -l ##列出所有模块
- ansible-doc user ##查看user模块的使用方法
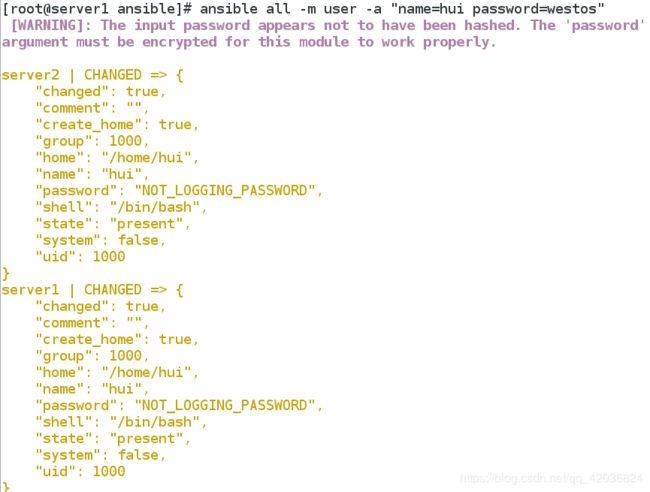
- 测试user模块:给所有主机添加用户
[root@server1 ansible]# ansible all -m user -a "name=hui password=westos"
[root@server2 ~]# id hui
uid=1000(hui) gid=1000(hui) groups=1000(hui)
[root@server2 ~]# cat /etc/shadow ##密码会以明文显示
hui:westos:17979:0:99999:7:::
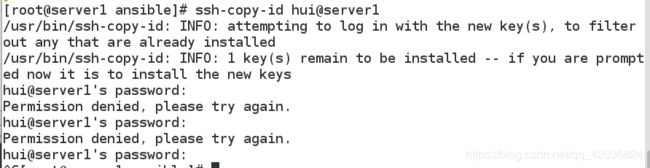
##明文的密码导致不能做免密认证
[root@server1 ansible]# ssh-copy-id hui@server1
Permission denied, please try again.
##给server1和server2手动更改密码,再做免密
[root@server1 ansible]# passwd hui
[root@server2 ~]# passwd hui
[root@server1 ansible]# ssh-copy-id hui@server1
hui@server1's password:
[root@server1 ansible]# ssh-copy-id hui@server2
hui@server2's password:
##测试免密登陆
[root@server1 ansible]# ssh hui@server1
[hui@server1 ~]$ logout
Connection to server1 closed.
[root@server1 ansible]# ssh hui@server2
[hui@server2 ~]$ logout
Connection to server2 closed.
##添加用户授权
[root@server1 ansible]# vim /etc/sudoers
92 hui ALL=(ALL) NOPASSWD: ALL
[root@server2 ansible]# vim /etc/sudoers
92 hui ALL=(ALL) NOPASSWD: ALL
#此时以hui这个用户登陆,并切换成root用户成功
[root@server1 ansible]# ansible all -m ping -u hui -b ##-b切换成root用户


- 测试其他模块
- 查看主机
[root@server1 ansible]# ansible all -u hui -b -a "hostname"

2. 安装服务
[root@server1 ansible]# ansible server2 -u hui -b -m yum -a "name=httpd state=present"
[root@server2 ~]# rpm -q httpd    ##查看已经安装上
httpd-2.4.6-45.el7.x86_64
- 开启服务
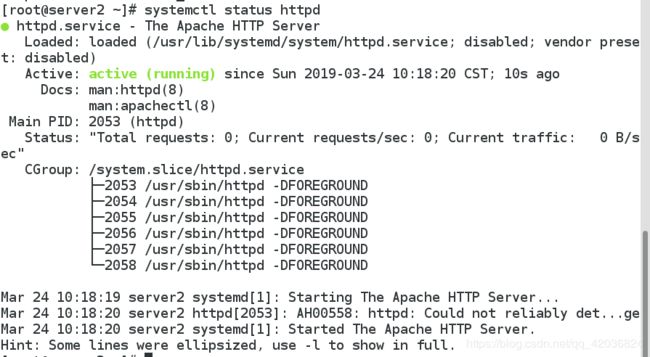
[root@server1 ansible]# ansible server2 -u hui -b -m service -a "name=httpd state=started"
[root@server2 ~]# systemctl status httpd
- 拷贝文件
[root@server1 ansible]# vim index.html
[root@server1 ansible]# cat index.html
www.westos.org
[root@server1 ansible]# ansible server2 -u hui -b -m copy -a "src=index.html dest=/var/www/html/index.html"

[root@server2 ~]# curl 172.25.19.2
www.westos.org
- 创建软连接
[root@server1 ansible]# ansible server2 -u hui -b -m file -a "src=/etc/fstab dest=/tmp/fstab state=link"
[root@server2 ~]# ll /tmp/fstab
lrwxrwxrwx 1 root root 10 Mar 24 10:45 /tmp/fstab -> /etc/fstab

##删除链接
[root@server1 ansible]# ansible server2 -u hui -b -m file -a "dest=/tmp/fstab state=absent"
[root@server2 ~]# ll /tmp/fstab
ls: cannot access /tmp/fstab: No such file or directory
- 创建目录(递归创建)
[root@server1 ansible]# ansible server2 -u hui -b -m file -a "dest=/tmp/dir1/dir2 state=directory mode=755"

[root@server2 ~]# cd /tmp/
[root@server2 tmp]# ls
dir1  systemd-private-e04e5b99a713433d887e04c35a247c48-httpd.service-c4W0KH
[root@server2 tmp]# cd dir1/
[root@server2 dir1]# ls
dir2

##删除目录
[root@server1 ansible]# ansible server2 -u hui -b -m file -a "dest=/tmp/dir1/dir2 state=absent"     ##后面可以加-f参数,指定多少个线程
[root@server2 ~]# cd /tmp
[root@server2 tmp]# cd dir1/
[root@server2 dir1]# ls
[root@server2 dir1]#
- 给server2安装mysql服务
##安装MySQL-python和mariadb-server
[root@server1 ~]# ansible server2 -m yum -a "name=MySQL-python state=present"
[root@server1 ~]# ansible server2 -m yum -a "name=mariadb-server state=present"
[root@server1 ~]# ansible server2 -m service -a "name=mariadb state=started"

##添加mysql用户并授权
[root@server1 ~]# ansible server2 -m mysql_user -a "name=hyg password=westos priv=test.*:ALL state=present"
server2 | CHANGED => {
    "changed": true,
    "user": "hyg"
}

##测试,可以登录
[root@server2 ~]# mysql -uhyg -pwestos test
MariaDB [test]> quit
Bye
三、 自动化部署httpd服务
- 编写playbooks
[root@server1 ~]# cd /etc/ansible/
[root@server1 ansible]# mkdir playbooks
[root@server1 ansible]# cd playbooks/
[root@server1 playbooks]# mkdir httpd
[root@server1 playbooks]# cd httpd/
[root@server1 httpd]# vim httpd.yml
---
# httpd部署
- hosts: server2
  remote_user: root
  tasks:
    - name: install httpd
      yum: name=httpd state=present
    - name: config httpd
      copy: src=httpd.conf dest=/etc/httpd/conf/httpd.conf
      notify: restart httpd

    - name: start httpd
      service: name=httpd state=started
  handlers:
    - name: restart httpd
      service: name=httpd state=restarted
- 传一个httpd.conf文件(没有的话安装一个httpd服务)
[root@server2 conf]# scp /etc/httpd/conf/httpd.conf 172.25.19.1:/etc/ansible/playbooks/httpd
- 进行相关检测
[root@server1 httpd]# pwd
/etc/ansible/playbooks/httpd
 ##检测语法错误
[root@server1 httpd]# ansible-playbook httpd.yml --syntax-check

##查看主机
playbook: httpd.yml
[root@server1 httpd]# ansible-playbook httpd.yml --list-host

playbook: httpd.yml

  play #1 (server2): server2	TAGS: []
    pattern: [u'server2']
    hosts (1):
      server2
## 查看任务
[root@server1 httpd]# ansible-playbook httpd.yml --list-task

playbook: httpd.yml

  play #1 (server2): server2	TAGS: []
    tasks:
      install httpd	TAGS: []
      config httpd	TAGS: []
      start httpd	TAGS: []
- 执行
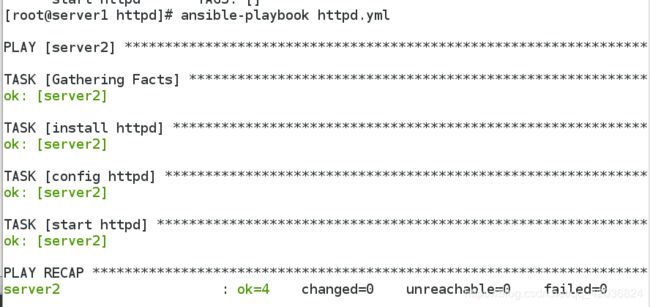
[root@server1 httpd]# ansible-playbook httpd.yml
- 以某一个任务开始执行
[root@server1 httpd]# ansible-playbook httpd.yml --start-at-task="start httpd"

5. 修改端口(改为8080)
此时两端文件的加密串一样
[root@server1 httpd]# md5sum httpd.conf
f5e7449c0f17bc856e86011cb5d152ba  httpd.conf

[root@server2 conf]# pwd
/etc/httpd/conf
[root@server2 conf]# ls
httpd.conf  magic
[root@server2 conf]#  md5sum httpd.conf
f5e7449c0f17bc856e86011cb5d152ba  httpd.conf

 对文件进行修改
[root@server1 httpd]# pwd
/etc/ansible/playbooks/httpd
[root@server1 httpd]# ls
httpd.conf  httpd.yml
[root@server1 httpd]# vim httpd.conf
 42 Listen 8080     #

测试server1端加密串改变了
[root@server1 httpd]# md5sum httpd.conf
04e9239e7bd5d5b9b85864226d60eee5  httpd.conf

再次执行,就会引发触发
[root@server1 httpd]# ansible-playbook httpd.yml

server2端口改变了
[root@server2 conf]# netstat -antlp
tcp6       0      0 :::8080                 :::*                    LISTEN      13719/httpd


-
server1再次执行,就不会再做任何改变了

-
添加变量,修改端口
[root@server1 httpd]# mv httpd.conf httpd.conf.j2
[root@server1 httpd]# vim httpd.conf.j2
 42 Listen  {{ http_port }}
[root@server1 httpd]# vim httpd.yml
---
# httpd部署
- hosts: server2
  vars:    ##添加变量
    http_port: 80
  remote_user: root
  tasks:
    - name: install httpd
      yum: name=httpd state=present
    - name: config httpd
      template: src=httpd.conf.j2 dest=/etc/httpd/conf/httpd.conf   ##添加模板
      notify: restart httpd

    - name: start httpd
      service: name=httpd state=started
  handlers:
    - name: restart httpd
      service: name=httpd state=restarted

[root@server1 httpd]# ansible-playbook httpd.yml
[root@server2 ~]# netstat -antlp
tcp6       0      0 :::80                   :::*                    LISTEN      15455/httpd
- 直接在/etc/ansible/hosts文件修改
[root@server1 httpd]# vim /etc/ansible/hosts
[web]
server1 http_port=80

[db]
server2 http_port=8080


[root@server1 httpd]# vim httpd.yml  ##删除vars,修改hosts: all
---
# httpd部署
- hosts: all
  remote_user: root
  tasks:
    - name: install httpd
      yum: name=httpd state=present
    - name: config httpd
      template: src=httpd.conf.j2 dest=/etc/httpd/conf/httpd.conf
      notify: restart httpd

    - name: start httpd
      service: name=httpd state=started
  handlers:
    - name: restart httpd
      service: name=httpd state=restarted
[root@server1 httpd]# ansible-playbook httpd.yml
##server2端口变为8080,server1端口变成80
- 设置监听主机
- 第一种
[root@server1 httpd]# vim /etc/ansible/hosts
[web]
server1 http_host=172.25.19.1
[db]
server2 http_host=172.25.19.2
[webserver:children]
web
db
[webserver:vars]
http_port=80

[root@server1 httpd]# ansible-playbook httpd.yml
- 第二种
[root@server1 httpd]# vim /etc/ansible/hosts
[web]
server1

[db]
server2

[root@server1 httpd]# vim httpd.conf.j2
Listen  {{  ansible_all_ipv4_addresses[0] }}:{{ http_port }}
##或者Listen  {{ ansible_eth0['ipv4']['address'] }}:{{ http_port }}

[root@server1 httpd]# vim httpd.yml
---
# httpd部署
- hosts: all
  vars:
    host_port: 80
  remote_user: root

[root@server1 httpd]# ansible-playbook httpd.yml
- 第三种:
[root@server1 httpd]# vim httpd.conf.j2
Listen  {{ http_host }}:{{ http_port }}

[root@server1 httpd]# vim /etc/ansible/hosts
[web]
server1
[db]
server2
[all:vars]
http_host={{ ansible_all_ipv4_addresses[0] }}

[root@server1 httpd]# ansible-playbook httpd.yml
如果各节点的系统版本不一样,又该如何自动化部署服务呢?
- 这里我们以rhel7.3和rhel6.5两个版本的主机自动化部署httpd服务为例
- 首先安装一个rhel6.5的虚拟机server3,做免密
[root@server1 httpd]# ssh-copy-id server3 - 添加server3主机到清单中,测试能否ping通
[root@server1 httpd]# vim /etc/ansible/hosts
[web]
server1
server3
[db]
server2

[all:vars]
http_host={{ ansible_all_ipv4_addresses[0] }}

[root@server1 httpd]# ansible all -m ping
server2 | SUCCESS => {
    "changed": false,
    "ping": "pong"
}
server1 | SUCCESS => {
    "changed": false,
    "ping": "pong"
}
server3 | SUCCESS => {
    "changed": false,
    "ping": "pong"
}
- 给server3安装httpd服务
[root@server1 httpd]# vim httpd.yml
---
# httpd部署
- hosts: all
  vars:
    http_port: 80
  remote_user: root
  tasks:
    - name: install httpd
      yum: name=httpd state=present
      tags: install

    - name: config httpd
      template: src=httpd.conf.j2 dest=/etc/httpd/conf/httpd.conf
      notify: restart httpd
      tags: config
    - name: start httpd
      service: name=httpd state=started
      tags: start
  handlers:
    - name: restart httpd
      service: name=httpd state=restarted
yml

[root@server1 httpd]# ansible-playbook httpd.yml -t install
- 将server3(rhel6.5)的httpd服务配置文件发给server1,修改对应文件名
[root@server3 ~]# scp /etc/httpd/conf/httpd.conf server1:/etc/ansible/playbooks/httpd
[root@server1 httpd]# mv httpd.conf httpd.conf6.j2
[root@server1 httpd]# mv httpd.conf.j2 httpd.conf7.j2
- 修改文件,运行
[root@server1 httpd]# vim httpd.conf6.j2
Listen {{ http_host }}:{{ http_port }}


[root@server1 httpd]# vim httpd.yml
---
# httpd部署
- hosts: all
  vars:
    http_port: 80
  remote_user: root
  tasks:
    - name: install httpd
      yum: name=httpd state=present
      tags: install

    - name: config httpd
      template: src=httpd.conf6.j2 dest=/etc/httpd/conf/httpd.conf
      notify: restart httpd
      when: ansible_distribution_major_version == "6"
      tags: config

    - name: config httpd
      template: src=httpd.conf7.j2 dest=/etc/httpd/conf/httpd.conf
      notify: restart httpd
      when: ansible_distribution_major_version == "7"
      tags: config

    - name: start httpd
      service: name=httpd state=started
      tags: start
  handlers:
    - name: restart httpd
      service: name=httpd state=restarted

[root@server1 httpd]# ansible-playbook httpd.yml -C
- httpd.yml的第二种写法
---
# httpd部署
- hosts: all
  vars:
    http_port: 80
  remote_user: root
  tasks:
    - name: install httpd
      yum: name=httpd state=present
      tags: install

    - name: config httpd
      template: src=httpd.conf{{ ansible_distribution_major_version }}.j2 dest=/etc/httpd/conf/httpd.conf
      notify: restart httpd
      tags: config

    - name: start httpd
      service: name=httpd state=started
      tags: start
  handlers:
    - name: restart httpd
      service: name=httpd state=restarted
四、用ansible自动化部署zabbix
- 创建mariadb, zabbix-server角色
[root@server1 roles]# pwd
/etc/ansible/roles
[root@server1 roles]# mkdir mariadb
[root@server1 roles]# cd mariadb/
[root@server1 mariadb]# mkdir files tasks handlers vars templates meta defaults
[root@server1 mariadb]# cd ..
[root@server1 roles]# mkdir zabbix-server/{files,tasks,templates,vars} -p
- 编写相应的文件
[root@localhost19 zabbix4.0]# ls
zabbix-server-mysql-4.0.5-1.el7.x86_64.rpm
zabbix-web-mysql-4.0.5-1.el7.noarch.rpm
zabbix-web-4.0.5-1.el7.noarch.rpm
zabbix-agent-4.0.5-1.el7.x86_64.rpm php-bcmath-5.4.16-42.el7.x86_64.rpm
php-mbstring-5.4.16-42.el7.x86_64.rpm
fping-3.10-1.el7.x86_64.rpm
iksemel-1.4-2.el7.centos.x86_64.rpm

[root@server1 files]# pwd
/etc/ansible/roles/zabbix-server/files
[root@server1 files]# vim zabbix.repo
[zabbix]
name=zabbix4.0
baseurl=http://172.25.19.250/zabbix4.0
gpgcheck=0

[root@server1 files]# vim my.cnf
[mysqld]
datadir=/var/lib/mysql
socket=/var/lib/mysql/mysql.sock
# Disabling symbolic-links is recommended to prevent assorted security risks
symbolic-links=0
# Settings user and group are ignored when systemd is used.
# If you need to run mysqld under a different user or group,
# customize your systemd unit file for mariadb according to the
# instructions in http://fedoraproject.org/wiki/Systemd
#
#
character-set-server=utf8

[mysqld_safe]
log-error=/var/log/mariadb/mariadb.log
pid-file=/var/run/mariadb/mariadb.pid

#
# include all files from the config directory
#
!includedir /etc/my.cnf.d

[root@server1 tasks]# pwd
/etc/ansible/roles/mariadb/tasks
[root@server1 tasks]# vim main.yml
- name: install mariadb server
  yum: name=mariadb-server,MySQL-python state=present

- name: config mariadb
  copy: src=my.cnf dest=/etc/my.cnf
  notify: restart mariadb

- name: start mariadb server
  service: name=mariadb state=started


[root@server1 handlers]# pwd
/etc/ansible/roles/mariadb/handlers
[root@server1 handlers]# vim main.yml
- name: restart mariadb
  service: name=mariadb state=restarted

##server2安装zabbix-server为了获取配置文件
[root@server2 ~]# yum install -y zabbix-server

[root@server2 ~]# scp  /etc/zabbix/zabbix_server.conf server1:/etc/ansible/roles/zabbix-server/files

/etc/ansible/roles/zabbix-server/files
[root@server1 files]# vim zabbix_server.conf
DBPassword=zabbix

[root@server1 zabbix-server]# pwd
/etc/ansible/roles/zabbix-server
[root@server1 zabbix-server]# mkdir handlers
[root@server1 zabbix-server]# cd handlers/
[root@server1 handlers]# pwd
/etc/ansible/roles/zabbix-server/handlers
[root@server1 handlers]# vim main.yml
- name: create datbase
  mysql_db: name=zabbix state=present
  listen: "init zabbix db"

- name: create zabbix user
  mysql_user: name=zabbix password=zabbix priv=zabbix.*:ALL state=present
  listen: "init zabbix db"

- name: import create.sql.gz
  mysql_db: name=zabbix state=import target=/usr/share/doc/zabbix-server-mysql-4.0.5/create.sql.gz
  listen: "init zabbix db"

- name: restart zabbix server
  service: name=zabbix-server state=restarted


[root@server1 zabbix-server]# cd tasks/
[root@server1 tasks]# ls
[root@server1 tasks]# vim main.yml
- name: copy zabbix.repo
  copy: src=zabbix.repo dest=/etc/yum.repos.d/zabbix.repo

- name: install zabbix-server
  yum: name=zabbix-server,zabbix-agent state=present
  notify: "init zabbix db"

- name: config zabbix server
  copy: src=zabbix_server.conf dest=/etc/zabbix/zabbix_server.conf
  notify: restart zabbix server

- name: start zabbix server
  service: name={{ item }} state=started
  with_items:
    - zabbix-server
    - zabbix-agent

[root@server1 zabbix-server]# cd /etc/ansible/
[root@server1 ansible]# ls
ansible.cfg  hosts  index.html  playbooks  roles
[root@server1 ansible]# vim zabbix-server.yml
---
#zabbix-server部署
- hosts: server2
  roles:
    - mariadb
    - zabbix-server

##执行
[root@server1 ansible]# ansible-playbook zabbix-server.yml
- 在server2端查看zabbix日志,显示enabling则自动化部署成功
[root@server2 ~]# cat /var/log/zabbix/zabbix_server.log
![]()