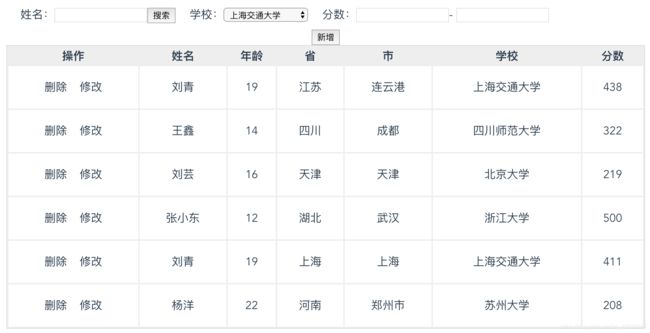
JAVA练习:前后端一起实现“增删改查”
"use strict";

import Vue from 'vue';
import qs from 'qs'//导入qs,用来对json数据进行解析
import axios from "axios";

// Full config:  https://github.com/axios/axios#request-config
// axios.defaults.baseURL = process.env.baseURL || process.env.apiUrl || '';
// axios.defaults.headers.common['Authorization'] = AUTH_TOKEN;
// axios.defaults.headers.post['Content-Type'] = 'application/x-www-form-urlencoded';

let config = {
  // baseURL: process.env.baseURL || process.env.apiUrl || ""
  // timeout: 60 * 1000, // Timeout
  // withCredentials: true, // Check cross-site Access-Control

  //对传过来的json进行解析
  transformRequest: data => {
    let d = qs.stringify(data);
    console.log(`req params:${d}`);
    return d;
  },
};
const _axios = axios.create(config);
_axios.interceptors.request.use(
  function(config) {
    // Do something before request is sent
    return config;
  },
  function(error) {
    // Do something with request error
    return Promise.reject(error);
  }
);

// Add a response interceptor
_axios.interceptors.response.use(
  function(response) {
    // Do something with response data
    return response;
  },
  function(error) {
    // Do something with response error
    return Promise.reject(error);
  }
);

//简化data
_axios.interceptors.response.use(
  function (response) {
    // Do something with response data
    return response.data;
  },
  function (error) {
    // Do something with response error
    console.log(`axios response error:${JSON.stringify(error)}`);
    if (error.code === 'ECONNABORTED' && error.message.indexOf('timeout') !== -1) {
      return Promise.reject({
        status: error.status || 504,
        description: "请求超时",
        data: error.message
      });
    }
    return Promise.reject(error);
  }
);

Plugin.install = function(Vue, options) {
  Vue.axios = _axios;
  window.axios = _axios;
  Object.defineProperties(Vue.prototype, {
    axios: {
      get() {
        return _axios;
      }
    },
    $axios: {
      get() {
        return _axios;
      }
    },
  });
};

Vue.use(Plugin)

export default Plugin;
vue页面代码如下:
<template>
  <div style="padding:20px;">
    <div class="search">
      <div>
        <span>姓名:span>
        <input type="text" v-model="searchName" />
        <button @click="searchNameButton">搜索button>
        <span>学校:span>
        <select style="width:120px;">
          <option v-for="item in schools">{{item}}option>
        select>
        <span>分数:span>
        <input type="text" />-
        <input type="text" />
      div>
    div>
    <button @click="addNews">新增button>
    <table>
      <thead>
        <tr>
          <th>操作th>
          <th>姓名th>
          <th>年龄th>
          <th>省th>
          <th>市th>
          <th>学校th>
          <th>分数th>
        tr>
      thead>
      <tbody>
        <tr v-for="(item,index) in allStudents" :keys="index">
          <td>
            <span @click="deletedUser(item.id)">删除span>
            <span @click="editUser(item.id)">修改span>
          td>
          <td>{{item.name}}td>
          <td>{{item.age}}td>
          <td>{{item.province}}td>
          <td>{{item.city}}td>
          <td>{{item.school}}td>
          <td>{{item.score}}td>
        tr>
      tbody>
    table>
    <div class="addnews" v-show="displayshow">
      <span @click="closed">关闭span>
      <div>
        姓名:
        <input type="text" v-model="addStudent.name" />
      div>
      <div>
        年龄
        <input type="text" v-model="addStudent.age" />
      div>
      <div>
        省:
        <input type="text" v-model="addStudent.province" />
      div>
      <div>
        市:
        <input type="text" v-model="addStudent.city" />
      div>
      <div>
        学校:
        <input type="text" v-model="addStudent.school" />
      div>
      <div>
        分数:
        <input type="text" v-model="addStudent.score" />
      div>
      <button @click="sureButton">确定button>
    div>
  div>
template>
<script>
import { truncate } from "fs";
export default {
  data() {
    return {
      operationType: 1, //由于新增和修改用的是同一个按钮,所以设置1,2来判断当前需要执行新增还是修改。1新增 2 修改
      allStudents: [],
      schools: [],
      searchName: "",
      displayshow: false,
      nowID: "",
      addStudent: {
        name: "",
        age: "",
        province: "",
        city: "",
        school: "",
        score: ""
      }
    };
  },
  methods: {
    //修改用户信息
    editUser(itemId) {
      this.operationType = 2;//设置operationType为2
      this.displayshow = true;//显示弹出层
      //从所有的学生中顾虑出id为当前选中的id的学生
      var pitchOn = this.allStudents.filter(item => {
        return item.id == itemId;
      });
      //把当前行的学生的信息赋值给弹出层中的修改文本框中
      this.addStudent.name = pitchOn[0].name;
      this.addStudent.age = pitchOn[0].age;
      this.addStudent.province = pitchOn[0].province;
      this.addStudent.city = pitchOn[0].city;
      this.addStudent.school = pitchOn[0].school;
      this.addStudent.score = pitchOn[0].score;
      //存储当前修改的用户的id
      this.nowID = itemId;
    },
    //确定按钮,提交用户信息
    sureButton() {
      //当operationType等于1的时候,执行新增操作
      if (this.operationType == 1) {
        this.axios
          .post("/api/public/lisa/add", this.addStudent)
          .then(res => {
            this.findAll();//刷新表,从数据库中再获取一次数据学生信息
            this.displayshow = false;
          })
          .catch(err => {
            this.findAll();
          });
      }
      //当operationType等于2的时候,执行修改操作
      else {
        this.axios
          .post("/api/public/lisa/editUser", {
            //把对应的信息属性字段传递给后台,告诉后台改后的信息
            id: this.nowID,
            ...this.addStudent
          })
          .then(res => {
            if (res.status == 200) {
              this.findAll();//刷新表
              this.displayshow = false;
            } else {
              console.log("失败",res);
            }
          });
      }
    },
    //关闭弹出框
    closed() {
      this.displayshow = false;
    },
    //新增学生
    addNews() {
      //将operationType转换为1,就是将确定按钮执行新增操作。
      this.operationType = 1;
      //显示弹出层
      this.displayshow = true;
      //将弹出层中的数据设置为空
      this.addStudent.name ="";
      this.addStudent.age = "";
      this.addStudent.province = "";
      this.addStudent.city = "";
      this.addStudent.school = "";
      this.addStudent.score = "";
    },
    //删除学生
    deletedUser(userid) {
      this.axios
        .post("/api/public/lisa/deletedUser", { id: userid })//输入请求后台的地址,要删除的学生的id
        .then(res => {
          if (res.status == 200) {
            this.findAll();
            console.log("删除成功!");
          } else {
            this.findAll();
            console.log(res);
          }
        });
    },
    //按姓名搜索学生
    searchNameButton() {
      this.axios
        .post("/api/public/lisa/findByName", { name: this.searchName })
        .then(res => {
          if (res.status == 200) {
            console.log(res.data);
            this.news = res.data;
          } else {
            console.log(res);
          }
        });
    },
    //查询所有学生信息
    findAll() {
      this.axios.post("/api/public/lisa/findAll").then(res => {
        this.allStudents = res.data;
      });
    },
    //搜索中,学校下拉框内容
    getSchoolOptions() {
      this.axios.post("/api/public/lisa/findAll").then(res => {
        this.schools = Array.from(
          new Set(
            res.data.map(item => {
              return item.school;
            })
          )
        );
      });
    }
  },
  mounted() {
    this.findAll();
    this.getSchoolOptions();
  }
};
script>
<style lang="scss">
.search {
  line-height: 40px;
  text-align: left;
  clear: both;
  overflow: hidden;

  span {
    margin-left: 20px;
  }
}
table {
  background-color: #eee;
  border: 1px solid #ddd;
  width: 100%;
  td {
    background-color: #fff;
    line-height: 40px;
    padding: 10px;
  }
}
.addnews {
  position: absolute;
  z-index: 100;
  background-color: #eee;
  border: 1px solid #ddd;
  top: 0px;
  left: 0px;
  width: 300px;
  height: 300px;
}
style>
后端代码如下:
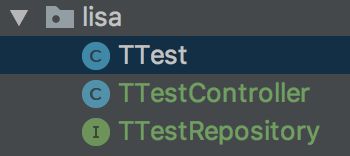
建立三个文件,两个类和一个接口,还有一个xml,通常查询会写到xml里面,其他的都直接可以写在class类的方法里面比较方便。

![]()
TTest类的内容:
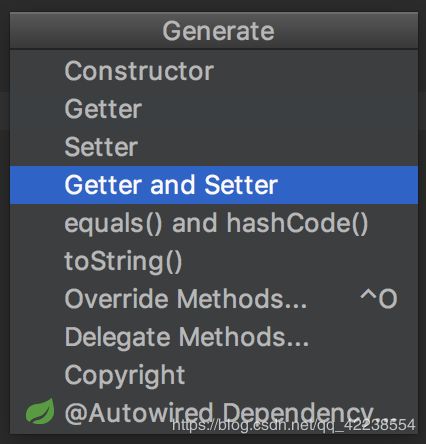
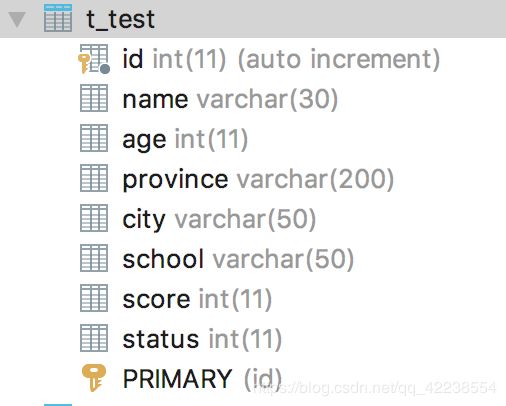
定义了数据库中的一些字段以及字段类型,然后通过Generate生成Getter和Setter

package com.gnmro.vmi.lisa;
import org.hibernate.annotations.Where;
import javax.persistence.*;
@Entity
@Table(name = "t_test")
@Where(clause = "status < 99")//隐藏状态为99的用户信息
public class TTest {
    @Id
    @GeneratedValue(strategy = GenerationType.IDENTITY)
    private Integer id;
    private String name;
    private Integer age;
    private String province;
    private String city;
    private String school;
    private Integer score;
    private Integer status;
    public Integer getId() {
        return id;
    }
    public void setId(Integer id) {
        this.id = id;
    }
    public String getName() {
        return name;
    }
    public void setName(String name) {
        this.name = name;
    }
    public Integer getAge() {
        return age;
    }
    public void setAge(Integer age) {
        this.age = age;
    }
    public String getProvince() {
        return province;
    }
    public void setProvince(String province) {
        this.province = province;
    }
    public String getCity() {
        return city;
    }
    public void setCity(String city) {
        this.city = city;
    }
    public String getSchool() {
        return school;
    }
    public void setSchool(String school) {
        this.school = school;
    }
    public Integer getScore() {
        return score;
    }
    public void setScore(Integer score) {
        this.score = score;
    }
    public Integer getStatus() {
        return status;
    }
    public void setStatus(Integer status) {
        this.status = status;
    }
}
TTestController类的内容:
package com.gnmro.vmi.lisa;
import com.gnmro.vmi.base.AjaxResponse;
import org.apache.ibatis.session.SqlSession;
import org.slf4j.Logger;
import org.slf4j.LoggerFactory;
import org.springframework.beans.factory.annotation.Autowired;
import org.springframework.web.bind.annotation.PostMapping;
import org.springframework.web.bind.annotation.RequestMapping;
import org.springframework.web.bind.annotation.RestController;
import java.util.HashMap;
import java.util.Map;
@RestController//控制器注解,表示提供rest请求
@RequestMapping("/public/lisa")//当前控制器的请求基地址
public class TTestController {
    /**
     * 日志记录
     */
    private Logger logger = LoggerFactory.getLogger(this.getClass());
    @Autowired//自动装载程序启动时初始化的对象
    private TTestRepository tTestRepository;
    @Autowired
    private SqlSession sqlSession;
    @RequestMapping("/findAll")
//    @GetMapping("/findAll")//只允许以get请求方式获取数据
//    @PostMapping("/findAll")//只允许以post请求方式获取数据
    public AjaxResponse findAllRows() {
        this.logger.info("接收到查询数据请求");
        this.logger.warn("接收到查询数据请求");
        this.logger.error("接收到查询数据请求");
        return AjaxResponse.success(this.tTestRepository.findAll());
    }
//通过姓名查询
    @RequestMapping("/findByName")
    public AjaxResponse findByName(String name) {
        Map<String, String> params = new HashMap<>();
        params.put("name", name);
        return AjaxResponse.success(this.sqlSession.selectList("lisa.find", params));
    }
//通过前端传过来的id进行删除操作
    @RequestMapping("/deletedUser")
    public AjaxResponse deletedUser(Integer id) {
        if (id == null) {
            return AjaxResponse.error("id kong");
        }
        this.tTestRepository.deleteById(id);
        return AjaxResponse.success();
    }
//修改用户信息,String name,Integer age,String province,String city,String school,Integer score这些字段表示必须从前端传过来,需要修改的内容,不能为空,Integer id表示修改哪一个用户,这是主键用户信息唯一标示。
    @RequestMapping("/editUser")
    public AjaxResponse editUser(Integer id,String name,Integer age,String province,String city,String school,Integer score) {
        if (id == null) {//如果id为空
            return AjaxResponse.error("id kong");//报错
        }
        TTest item = this.tTestRepository.findById(id).orElse(null);
        if (item == null) {
            AjaxResponse.error("数据不存在");
        }
        //更新传过来的用户信息使用set+字段名称
        item.setName(name);
        item.setAge(age);
        item.setProvince(province);
        item.setCity(city);
        item.setSchool(school);
        item.setScore(score);
        this.tTestRepository.save(item);//保存修改后的信息
        return AjaxResponse.success();//执行成功
    }
    新增用户信息
    @PostMapping("/add")
    public AjaxResponse add(TTest item) {
        this.tTestRepository.save(item);
        return AjaxResponse.success();
    }
TTestRepository接口内容如下
package com.gnmro.vmi.lisa;
import org.springframework.data.jpa.repository.JpaRepository;
import org.springframework.stereotype.Repository;
import java.util.List;
@Repository//自动注入,程序启动时,自动装载当前接口,实例化一个对象
public interface TTestRepository extends JpaRepository<TTest, Integer> {
    List<TTest> findAllByNameLike(String name);
}
xml如下:
<mapper namespace="lisa">
    <select id="find" resultType="java.util.Map">
        select *
        from t_test
        where 1=1
        <if test="name != null and name != ''">
            and name like "%"#{name}"%"
        if>
    select>
mapper>


