程序人生丨三种语言实现—用户登录界面随机验证码,源代码分享!
以前用手机登录不要验证码,现在登录老要验证码,把人烦死!那么为什么每次登录都有烦人的验证码?其实这里涉及到网络完全问题!
一、应用场景
很多伙伴应该都知道:
防止黑客通过接口调用攻击系统,每次登录系统要输入验证码就防止机器访问。
做限流处理,防止同一时间产生大量用户的涌入,防止系统崩溃。
验证码的种类
传统输入式验证码: 用户输入图片中的字母、数字、汉字等进行验证。简单易操作,人机交互性较好。但安全系数低,容易被攻击。
输入式的图形验证码: 有精美图案,识别文本也清晰可认,专注于广告。一种广告位的展现形式。
纯行为验证码: 照要求将备选碎片直线滑动到正确的位置。操作简单,体验好。单一维度,容易被逆向模拟,与移动端页面切换不兼容。
图标选择与行为辅助: 给出一组图片,按要求点击其中一张或者多张。借用万物识别的难度阻挡机器。安全性强。对于图片、图库、技术要求高。
点击式的图文验证与行为辅助: 通过文字提醒用户点击图中相同字的位置进行验证。操作简单,体验良好,单一图片区域较大,被攻击的难度大。
智能验证码: 通过行为特征、设备指纹、数据风控等技术,正常用户免验证,异常用户强制验证。简单便捷,区分人与机器、人与人、设备与设备。
二、不同实现
下面以三种不同的编程语言,通过代码生成验证码。
2.1 Java语言实现
先看下Java代码是如何生成验证码的。手动创建下面这个类,就可以生成验证码了。代码如下:
public class GenVerifyCodeUtils {

    private static char mapTable[] = {

            '0', '1', '2', '3', '4', '5',

            '6', '7', '8', '9', '0', '1',

            '2', '3', '4', '5', '6', '7',

            '8', '9'};

    public static void main(String[] args) {

        OutputStream outputStream = new BufferedOutputStream(new ByteArrayOutputStream());

        System.out.println(getImageCode(100,80,outputStream ));

    }

    public static Map getImageCode(int width, int height, OutputStream os) {

        Map returnMap = new HashMap();

        if (width <= 0) width = 60;

        if (height <= 0) height = 20;

        BufferedImage image = new BufferedImage(width, height, BufferedImage.TYPE_INT_RGB);

        // 获取图形上下文

        Graphics g = image.getGraphics();

        //生成随机类

        Random random = new Random();

        // 设定背景色

        g.setColor(getRandColor(200, 250));

        g.fillRect(0, 0, width, height);

        //设定字体

        g.setFont(new Font("Times New Roman", Font.PLAIN, 18));

        // 随机产生168条干扰线,使图像中的认证码不易被其它程序探测到

        g.setColor(getRandColor(160, 200));

        for (int i = 0; i < 168; i++) {

            int x = random.nextInt(width);

            int y = random.nextInt(height);

            int xl = random.nextInt(12);

            int yl = random.nextInt(12);

            g.drawLine(x, y, x + xl, y + yl);

        }

        //取随机产生的码

        String strEnsure = "";

        //4代表4位验证码,如果要生成更多位的认证码,则加大数值

        for (int i = 0; i < 4; ++i) {

            strEnsure += mapTable[(int) (mapTable.length * Math.random())];

            // 将认证码显示到图像中

            g.setColor(new Color(20 + random.nextInt(110), 20 + random.nextInt(110), 20 + random.nextInt(110)));

            // 直接生成

            String str = strEnsure.substring(i, i + 1);

            // 设置随便码在背景图图片上的位置

            g.drawString(str, 13 * i + 20, 25);

        }

        // 释放图形上下文

        g.dispose();

        returnMap.put("image",image);

        returnMap.put("strEnsure",strEnsure);

        return returnMap;

    }


    static Color getRandColor(int fc, int bc) {

        Random random = new Random();

        if (fc > 255) fc = 255;

        if (bc > 255) bc = 255;

        int r = fc + random.nextInt(bc - fc);

        int g = fc + random.nextInt(bc - fc);

        int b = fc + random.nextInt(bc - fc);

        return new Color(r, g, b);

    }

}
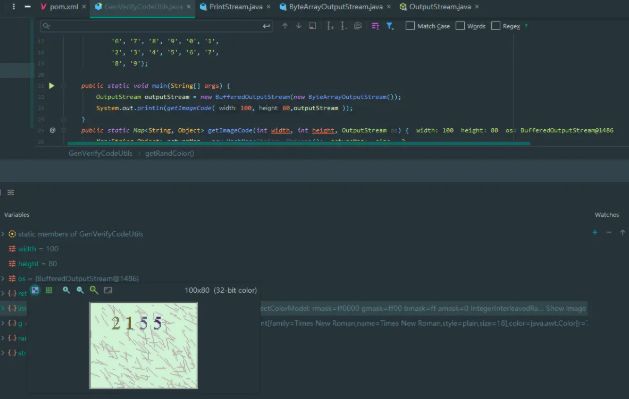
效果如下:
2.2 Javascript 实现
这里我也用原生Js写了一个生成验证码的工具,代码如下:
效果如下:
2.3 python实现
代码如下:
# -*- coding: utf-8 -*

from PIL import Image, ImageDraw, ImageFont, ImageFilter

import random

# 随机字母:

def rndChar():

    return chr(random.randint(65, 90))

# 随机颜色1:

def rndColor():

    return (random.randint(64, 255), random.randint(64, 255), random.randint(64, 255))

# 随机颜色2:

def rndColor2():

    return (random.randint(32, 127), random.randint(32, 127), random.randint(32, 127))

# 240 x 60:

width = 60 * 4

height = 60

image = Image.new('RGB', (width, height), (255, 255, 255))

# 创建Font对象:

font = ImageFont.truetype('C:\Windows\Fonts\Arial.ttf', 36)

# 创建Draw对象:

draw = ImageDraw.Draw(image)

# 填充每个像素:

for x in range(width):

    for y in range(height):

        draw.point((x, y), fill=rndColor())

# 输出文字:

for t in range(4):

    draw.text((60 * t + 10, 10), rndChar(), font=font, fill=rndColor2())

# 模糊:

image = image.filter(ImageFilter.BLUR)

image.save('code.jpg', 'jpeg')

image.show()
运行效果如下图:
三、最后
本篇讲了为什么会有验证码这个东东,和市面上现在验证码的种类,简单给大家做了一下科普,最后分别以不同的编程语言,展示了生成验证码的过程。现在网络安全尤为重要,验证码这个功能虽小,但是不可不做!
自学C/C++编程难度很大,不妨和一些志同道合的小伙伴一起学习成长!
C语言C++编程学习交流圈子,【点击进入】
有一些源码和资料分享,欢迎转行也学习编程的伙伴,和大家一起交流成长会比自己琢磨更快哦!
微信公众号:C语言编程学习基地


