docker跨主机通信-macvlan
macvlan网络通信
macvlan 本身是 linxu kernel 模块,其功能是允许在同一个物理网卡上配置多个 MAC 地址,即多个 interface(接口),每个 interface(接口) 可以配置自己的IP。macvlan 本质上是一种网卡虚拟化技术,Docker用macvlan 实现容器网络通信 macvlan 的最大优点是性能极好,相比其他实现,macvlan 不需要创建 Linux bridge,而是直接通过以太网interface 连接到物理网络。
缺点就是创建时需要手动指定网段
允许在同一个网卡下出现多个mac
用到子接口
实验环境
docker-server1
192.168.43.124
docker-server2
192.168.43.60
加载8021q模块(两台相同操作)
[root@localhost ~]# modinfo  8021q
filename:       /lib/modules/3.10.0-693.el7.x86_64/kernel/net/8021q/8021q.ko.xz
version:        1.8
license:        GPL
alias:          rtnl-link-vlan
rhelversion:    7.4
srcversion:     560BE7718270FE95AE220C6
depends:        mrp,garp
intree:         Y
vermagic:       3.10.0-693.el7.x86_64 SMP mod_unload modversions
signer:         CentOS Linux kernel signing key
sig_key:        DA:18:7D:CA:7D:BE:53:AB:05:BD:13:BD:0C:4E:21:F4:22:B6:A4:9C
sig_hashalgo:   sha256
导入8021q协议(多导入几遍)
[root@localhost ~]# modprobe  8021q
[root@localhost ~]# modprobe  8021q
[root@localhost ~]# modprobe  8021q
[root@localhost ~]# modprobe  8021q
[root@localhost ~]# modprobe  8021q
[root@localhost ~]# modprobe  8021q
表示导入成功(错误:无法插入’8021q’:模块已经在内核中)
[root@localhost ~]# modprobe --first-time 8021q
modprobe: ERROR: could not insert '8021q': Module already in kernel
server1操作
配置子接口:
[root@localhost ~]# cd  /etc/sysconfig/network-scripts/
[root@localhost network-scripts]# vim ifcfg-ens33
  BOOTPROTO=manual(修改)
[root@localhost network-scripts]# cp -p ifcfg-ens33  ifcfg-ens33.10
[root@localhost network-scripts]# vim ifcfg-ens33.10
BOOTPROTO=none
NAME=ens33.10
DEVICE=ens33.10
IPADDR=172.16.10.1
PREFIX=24
NETWORK=172.16.10.0
GATEWAY=172.16.10.1
ONBOOT=yes
VLAN=yes
开启子接口
[root@localhost network-scripts]# ifup ens33.10
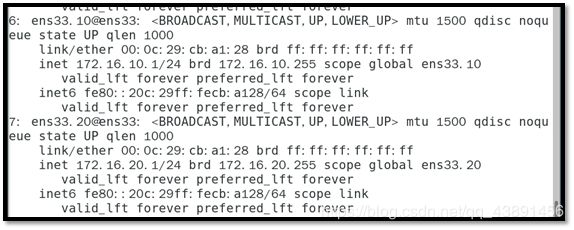
查看子接口
[root@localhost network-scripts]# ip a
server2操作
配置子接口
[root@localhost ~]# cd  /etc/sysconfig/network-scripts/
[root@localhost network-scripts]# vim ifcfg-ens33
BOOTPROTO=manual
[root@localhost network-scripts]# cp -p ifcfg-ens33  ifcfg-ens33.10
[root@localhost network-scripts]# vim ifcfg-ens33.10
BOOTPROTO=none
NAME=ens33.10
DEVICE=ens33.10
IPADDR=172.16.10.2
PREFIX=24
NETWORK=172.16.10.0
GATEWAY=172.16.10.1
ONBOOT=yes
VLAN=yes
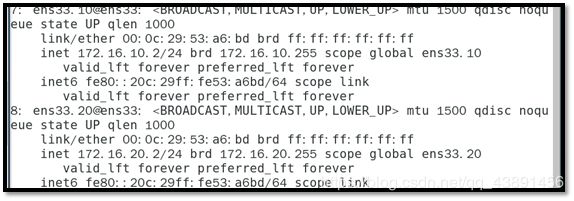
启动网络
[root@localhost network-scripts]# ifup ens33.10
[root@localhost network-scripts]# ip a
创建两个mavla类型的阿网卡(server1和server2相同操作)
[root@localhost network-scripts]# docker network   create  --driver  macvlan  --subnet  172.16.10.0/24 --gateway  172.16.10.1 -o parent=ens33.10 mac_net10
8bd4cc7acae081e60ab48cb33c677d156b9cb1639cf4ed69c5471203f666d24c
查看网卡

server1创建一个容器
[root@localhost network-scripts]# docker run -itd --name  bbox10 --ip=172.16.10.10 --network mac_net10 busybox
c057ff1728fcc9c493a3fa0483b2975522a42aa19d27626bf2acbbf838db4193
server2创建一个容器
[root@localhost network-scripts]# docker run -itd --name  bbox30 --ip=172.16.10.11 --network mac_net10 busybox
39969d7b3b24bf7a910a47db3072f3b611276e9292b585f60d6778778c9ee9c0
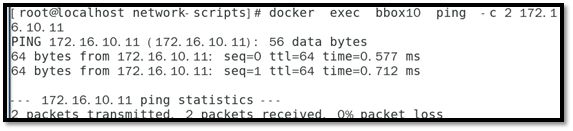
server1验证(表示ok)
[root@localhost network-scripts]# docker  exec  bbox10  ping  -c 2 172.16.10.11
PING 172.16.10.11 (172.16.10.11): 56 data bytes
64 bytes from 172.16.10.11: seq=0 ttl=64 time=0.521 ms
64 bytes from 172.16.10.11: seq=0 ttl=64 time=0.667 ms (DUP!)
64 bytes from 172.16.10.11: seq=1 ttl=64 time=0.523 ms