Flume
flume 总结
- 参数配置详解
- 概述
- Flume数据的传输过程
- Sources
- NetCat Source
- Avro Source
- Exec Source
- Spooling Directory Source
- Taildir Source
- Channels
- File Channel
- Sinks
- Logger Sink
- HDFS Sink
- Avro Sink
- Kafka Sink
- 案例
- 汇聚者 (collect.conf)
- 收集者(product1.conf)
- spark 与 flume 整合
- push
- pull
- kafka与 flume 整合
参数配置详解
概述
本篇文章是根据Flume官网对Flume组件(Source,Channel,Sink)的常用配置参数做一个主要介绍,如有表达意思错误希望不吝指出。
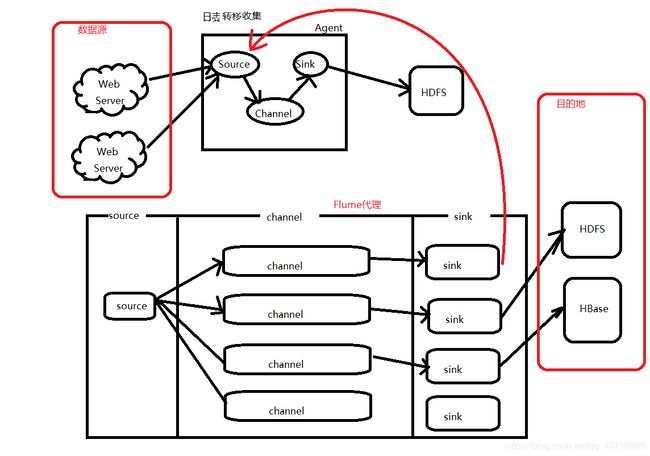
-
source
采集数据
采集日志数据,将采集到的日志数据传输给channel -
channel
一个队列,存储source传递过来的数据 -
sink
从channel中获取数据,将数据输出到目标位置(HDFS、HBase、Source) -
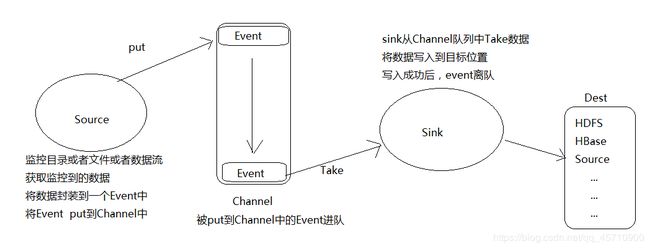
Event
传输数据的单元,Flume中采集数据并传输的最小单位
Flume数据的传输过程
Sources
Flume中常用的Source有NetCat,Avro,Exec,Spooling Directory,Taildir,也可以根据业务场景的需要自定义Source,具体介绍如下。
NetCat Source
NetCat Source可以使用TCP和UDP两种协议方式,使用方法基本相同,通过监听指定的IP和端口来传输数据,它会将监听到的每一行数据转化成一个Event写入到Channel中。(必须参数以@标示,下类同)
channels@ –
type@ – 类型指定为:netcat
bind@ – 绑定机器名或IP地址
port@ – 端口号
max-line-length
| Property Name | Default | Description |
|---|---|---|
| channels@ | – | |
| type@ | – | 类型指定为:netcat |
| bind@ | – | 绑定机器名或IP地址 |
| port@ | – | 端口号 |
| max-line-length | 512 | 一行的最大字节数 |
| ack-every-event | true | 对成功接受的Event返回OK |
| selector.type | replicating | 选择器类型replicating or multiplexing |
| selector.* | 选择器相关参数 | |
| interceptors | – | 拦截器列表,多个以空格分隔 |
| interceptors.* | 拦截器相关参数 |
Avro Source
不同主机上的Agent通过网络传输数据可使用的Source,一般是接受Avro client的数据,或和是上一级Agent的Avro Sink成对存在。
| Property Name | Default | Description |
|---|---|---|
| channels@ | – | |
| type@ | – | 类型指定为:avro |
| bind@ | – | 监听的主机名或IP地址 |
| port@ | – | 端口号 |
| threads | – | 传输可使用的最大线程数 |
| selector.type | ||
| selector.* | ||
| interceptors | – | 拦截器列表 |
| interceptors.* | ||
| compression-type | none | 可设置为“none” 或 “deflate”. 压缩类型需要和AvroSource匹配 |
Exec Source
Exec source通过执行给定的Unix命令的传输结果数据,如cat,tail -F等,实时性比较高,但是一旦Agent进程出现问题,可能会导致数据的丢失。
| Property Name | Default | Description |
|---|---|---|
| channels@ | – | |
| type@ | – | 类型指定为:exec |
| command@ | – | 需要去执行的命令 |
| shell | – | 运行命令的shell脚本文件 |
| restartThrottle | 10000 | 尝试重启的超时时间 |
| restart | false | 如果命令执行失败,是否重启 |
| logStdErr | false | 是否记录错误日志 |
| batchSize | 20 | 批次写入channel的最大日志数量 |
| batchTimeout | 3000 | 批次写入数据的最大等待时间(毫秒) |
| selector.type | replicating | 选择器类型replicating or multiplexing |
| selector.* | 选择器其他参数 | |
| interceptors | – | 拦截器列表,多个空格分隔 |
| interceptors.* |
Spooling Directory Source
通过监控一个文件夹将新增文件内容转换成Event传输数据,特点是不会丢失数据,使用Spooling Directory Source需要注意的两点是,1)不能对被监控的文件夹下的新增的文件做出任何更改,2)新增到监控文件夹的文件名称必须是唯一的。由于是对整个新增文件的监控,Spooling Directory Source的实时性相对较低,不过可以采用对文件高粒度分割达到近似实时。
| Property Name | Default | Description |
|---|---|---|
| channels@ | – | |
| type@ | – | 类型指定:spooldir. |
| spoolDir@ | – | 被监控的文件夹目录 |
| fileSuffix | .COMPLETED | 完成数据传输的文件后缀标志 |
| deletePolicy | never | 删除已经完成数据传输的文件时间:never or immediate |
| fileHeader | false | 是否在header中添加文件的完整路径信息 |
| fileHeaderKey | file | 如果header中添加文件的完整路径信息时key的名称 |
| basenameHeader | false | 是否在header中添加文件的基本名称信息 |
| basenameHeaderKey | basename | 如果header中添加文件的基本名称信息时key的名称 |
| includePattern | ^.*$ | 使用正则来匹配新增文件需要被传输数据的文件 |
| ignorePattern | ^$ | 使用正则来忽略新增的文件 |
| trackerDir | .flumespool | 存储元数据信息目录 |
| consumeOrder | oldest | 文件消费顺序:oldest, youngest and random. |
| maxBackoff | 4000 | 如果channel容量不足,尝试写入的超时时间,如果仍然不能写入,则会抛出ChannelException |
| batchSize | 100 | 批次处理粒度 |
| inputCharset | UTF-8 | 输入码表格式 |
| decodeErrorPolicy | FAIL | 遇到不可解码字符后的处理方式:FAIL,REPLACE,IGNORE |
| selector.type | replicating | 选择器类型:replicating or multiplexing |
| selector.* | 选择器其他参数 | |
| interceptors | – | 拦截器列表,空格分隔 |
| interceptors.* |
Taildir Source
可以实时的监控指定一个或多个文件中的新增内容,由于该方式将数据的偏移量保存在一个指定的json文件中,即使在Agent挂掉或被kill也不会有数据的丢失,需要注意的是,该Source不能在Windows上使用。
| Property Name | Default | Description |
|---|---|---|
| channels@ | – | |
| type@ | – | 指定类型:TAILDIR. |
| filegroups@ | – | 文件组的名称,多个空格分隔 |
| filegroups.@ | – | 被监控文件的绝对路径 |
| positionFile | ~/.flume/taildir_position.json | 存储数据偏移量路径 |
| headers.. | – | Header key的名称 |
| byteOffsetHeader | false | 是否添加字节偏移量到key为‘byteoffset’值中 |
| skipToEnd | false | 当偏移量不能写入到文件时是否跳到文件结尾 |
| idleTimeout | 120000 | 关闭没有新增内容的文件超时时间(毫秒) |
| writePosInterval | 3000 | 在positionfile 写入每一个文件lastposition的时间间隔 |
| batchSize | 100 | 批次处理行数 |
| fileHeader | false | 是否添加header存储文件绝对路径 |
| fileHeaderKey | file | fileHeader启用时,使用的key |
Channels
官网提供的Channel有多种类型可供选择,这里介绍Memory Channel和File Channel。
Memory Channel
Memory Channel是使用内存来存储Event,使用内存的意味着数据传输速率会很快,但是当Agent挂掉后,存储在Channel中的数据将会丢失。
| Property Name | Default | Description |
|---|---|---|
| type@ | – | 类型指定为:memory |
| capacity | 100 | 存储在channel中的最大容量 |
| transactionCapacity | 100 | 从一个source中去或者给一个sink,每个事务中最大的事件数 |
| keep-alive | 3 | 对于添加或者删除一个事件的超时的秒钟 |
| byteCapacityBufferPercentage | 20 | 定义缓存百分比 |
| byteCapacity | see description | Channel中允许存储的最大字节总数 |
File Channel
File Channel使用磁盘来存储Event,速率相对于Memory Channel较慢,但数据不会丢失。
| Property Name | Default | Description |
|---|---|---|
| type@ | – | 类型指定:file. |
| checkpointDir | ~/.flume/file-channel/checkpoint | checkpoint目录 |
| useDualCheckpoints | false | 备份checkpoint,为True,backupCheckpointDir必须设置 |
| backupCheckpointDir | – | 备份checkpoint目录 |
| dataDirs | ~/.flume/file-channel/data | 数据存储所在的目录设置 |
| transactionCapacity | 10000 | Event存储最大值 |
| checkpointInterval | 30000 | checkpoint间隔时间 |
| maxFileSize | 2146435071 | 单一日志最大设置字节数 |
| minimumRequiredSpace | 524288000 | 最小的请求闲置空间(以字节为单位) |
| capacity | 1000000 | Channel最大容量 |
| keep-alive | 3 | 一个存放操作的等待时间值(秒) |
| use-log-replay-v1 | false | Expert: 使用老的回复逻辑 |
| use-fast-replay | false | Expert: 回复不需要队列 |
| checkpointOnClose | true |
Sinks
Flume常用Sinks有Log Sink,HDFS Sink,Avro Sink,Kafka Sink,当然也可以自定义Sink。
Logger Sink
Logger Sink以INFO 级别的日志记录到log日志中,这种方式通常用于测试。
| Property Name | Default | Description |
|---|---|---|
| channel@ | – | |
| type@ | – | 类型指定:logger |
| maxBytesToLog | 16 | 能够记录的最大Event Body字节数 |
HDFS Sink
Sink数据到HDFS,目前支持text 和 sequence files两种文件格式,支持压缩,并可以对数据进行分区,分桶存储。
| Name | Default | Description |
|---|---|---|
| channel@ | – | |
| type@ | – | 指定类型:hdfs |
| hdfs.path@ | – | HDFS的路径 hdfs://namenode/flume/webdata/ |
| hdfs.filePrefix | FlumeData | 保存数据文件的前缀名 |
| hdfs.fileSuffix | – | 保存数据文件的后缀名 |
| hdfs.inUsePrefix | – | 临时写入的文件前缀名 |
| hdfs.inUseSuffix | .tmp | 临时写入的文件后缀名 |
| hdfs.rollInterval | 30 | 间隔多长将临时文件滚动成最终目标文件,单位:秒, 如果设置成0,则表示不根据时间来滚动文件 |
| hdfs.rollSize | 1024 | 当临时文件达到多少(单位:bytes)时,滚动成目标文件, 如果设置成0,则表示不根据临时文件大小来滚动文件 |
| hdfs.rollCount | 10 | 当 events 数据达到该数量时候,将临时文件滚动成目标文件,如果设置成0,则表示不根据events数据来滚动文件 |
| hdfs.idleTimeout | 0 | 当目前被打开的临时文件在该参数指定的时间(秒)内, 没有任何数据写入,则将该临时文件关闭并重命名成目标文件 |
| hdfs.batchSize | 100 | 每个批次刷新到 HDFS 上的 events 数量 |
| hdfs.codeC | – | 文件压缩格式,包括:gzip, bzip2, lzo, lzop, snappy |
| hdfs.fileType | SequenceFile | 文件格式,包括:SequenceFile, DataStream,CompressedStre, 当使用DataStream时候,文件不会被压缩,不需要设置hdfs.codeC; 当使用CompressedStream时候,必须设置一个正确的hdfs.codeC值; |
| hdfs.maxOpenFiles | 5000 | 最大允许打开的HDFS文件数,当打开的文件数达到该值,最早打开的文件将会被关闭 |
| hdfs.minBlockReplicas | – | HDFS副本数,写入 HDFS 文件块的最小副本数。 该参数会影响文件的滚动配置,一般将该参数配置成1,才可以按照配置正确滚动文件 |
| hdfs.writeFormat | Writable | 写 sequence 文件的格式。包含:Text, Writable(默认) |
| hdfs.callTimeout | 10000 | 执行HDFS操作的超时时间(单位:毫秒) |
| hdfs.threadsPoolSize | 10 | hdfs sink 启动的操作HDFS的线程数 |
| hdfs.rollTimerPoolSize | 1 | hdfs sink 启动的根据时间滚动文件的线程数 |
| hdfs.kerberosPrincipal | – | HDFS安全认证kerberos配置 |
| hdfs.kerberosKeytab | – | HDFS安全认证kerberos配置 |
| hdfs.proxyUser | 代理用户 | |
| hdfs.round | false | 是否启用时间上的”舍弃” |
| hdfs.roundValue | 1 | 时间上进行“舍弃”的值 |
| hdfs.roundUnit | second | 时间上进行”舍弃”的单位,包含:second,minute,hour |
| hdfs.timeZone | Local Time | 时区。 |
| hdfs.useLocalTimeStamp | false | 是否使用当地时间 |
| hdfs.closeTries 0 | Number | hdfs sink 关闭文件的尝试次数;如果设置为1,当一次关闭文件失败后,hdfs sink将不会再次尝试关闭文件, 这个未关闭的文件将会一直留在那,并且是打开状态; 设置为0,当一次关闭失败后,hdfs sink会继续尝试下一次关闭,直到成功 |
| hdfs.retryInterval | 180 | hdfs sink 尝试关闭文件的时间间隔, 如果设置为0,表示不尝试,相当于于将hdfs.closeTries设置成1 |
| serializer | TEXT | 序列化类型 |
| serializer.* |
Avro Sink
| Property Name | Default | Description |
|---|---|---|
| channel@ | – | |
| type@ | – | 指定类型:avro. |
| hostname@ | – | 主机名或IP |
| port@ | – | 端口号 |
| batch-size | 100 | 批次处理Event数 |
| connect-timeout 20000 | 连接超时时间 | |
| request-timeout | 20000 | 请求超时时间 |
| compression-type | none | 压缩类型,“none” or “deflate”. |
| compression-level | 6 | 压缩级别,0表示不压缩,1-9数字越大,压缩比越高 |
| ssl | false | 使用ssl加密 |
Kafka Sink
传输数据到Kafka中,需要注意的是Flume版本和Kafka版本的兼容性
| Property Name | Default | Description |
|---|---|---|
| type | – | 指定类型:org.apache.flume.sink.kafka.KafkaSink |
| kafka.bootstrap.servers | – | kafka服务地址 |
| kafka.topic | default-flume-topic | kafka Topic |
| flumeBatchSize | 100 | 批次写入kafka Event数 |
案例
汇聚者 (collect.conf)
collect.sources=cs1 //来源
collect.channels=cc1 //管道
collect.sinks=csi //传输
#sources
collect.sources.cs1.type=avro //类型
collect.sources.cs1.port=5140 //端口号
collect.sources.cs1.bind=master //节点名称
collect.sources.cs1.thread=15 //线程
collect.sources.cs1.channels=cc1
#channels
collect.channels.cc1.type=memory //存储地方
collect.channels.cc1.capacity=100000 //容量
collect.channels.cc1.transactionCapacity=200 // Event存储最大值
collect.channels.cc1.keep-alive = 30 //存放等待时间
#sinks
collect.sinks.csi.channel=cc1
collect.sinks.csi.type=hdfs
collect.sinks.csi.hdfs.path=hdfs://master:9000/flume/school/getData/
collect.sinks.csi.hdfs.filePrefix=infomation
collect.sinks.csi.hdfs.minBlockReplicas=1
collect.sinks.csi.hdfs.fileSuffix=.text
collect.sinks.csi.hdfs.writeFormat=Text
collect.sinks.csi.hdfs.rollInterval=300
collect.sinks.csi.hdfs.fileType=DataStream
collect.sinks.csi.hdfs.rollSize = 0
collect.sinks.csi.hdfs.rollCount = 0
collect.sinks.csi.hdfs.batchSize = 10
collect.sinks.csi.txnEventMax = 1000
collect.sinks.csi.hdfs.callTimeout = 60000
collect.sinks.csi.hdfs.appendTimeout=60000
执行
vim collect.sh
flume-ng agent -n collect
(agent名称)
-c conf
-f 路径/collect.conf
(执行文件路径)
-Dflume.root.logger=DEBUG,console > /flume/logs/school_collect.log 2>&1 &
(当有错误时日志存放路径
最后一个& :后台运行)
flume-ng agent -n collect -c conf -f /opt/programfile/flume/conf/conf/collect.conf -Dflume.root.logger=DEBUG,console > /flume/logs/school_collect.log 2>&1 &
bash collect.sh
收集者(product1.conf)
product1.sources=ps1
product1.channels=pc1
product1.sinks=pk1
#sources
product1.sources.ps1.type=syslogtcp //类型
product1.sources.ps1.port=5140 //绑定端口号
product1.sources.ps1.bind=slave1 //绑定节点名称
product1.sources.ps1.channels=pc1
#channels
product1.channels.pc1.type=memory
product1.channels.pc1.capacity=100000
product1.channels.pc1.transactionCapacity=100
product1.channels.pc1.keep-alive = 30
#sinks
product1.sinks.pk1.channel=pc1
product1.sinks.pk1.type=avro
product1.sinks.pk1.hostname=master
product1.sinks.pk1.port=5140
执行
vim product1.sh
flume-ng agent -n product1 -c conf -f /opt/programfile/flume/conf/conf/product1.conf -Dflume.root.logger=DEBUG,console > /flume/logs/school_slave1.log 2>&1 &
bash product1.sh
注意:
启动节点的顺序:先启动数据的汇聚节点,在启动数据的采集节点
spark 与 flume 整合
push
#flume-to-spark-push.conf: A single-node Flume configuration
#Name the components on this agent
a1.sources = r1
a1.sinks = k1
a1.channels = c1

#Describe/configure the source
#把Flume Source类别设置为netcat,绑定到node3的33333端口
#可以通过“telnet node3 33333”命令向Flume Source发送消息
a1.sources.r1.type = netcat
a1.sources.r1.bind = node3
a1.sources.r1.port = 33333

#Describe the sink
#Flume Sink类别设置为avro,绑定到node2的44444端口
#Flume Source把采集到的消息汇集到Flume Sink以后,Sink会把消息推送给node2的44444端口
#Spark Streaming程序一直在监听node2的44444端口,一旦有消息到达,就会被Spark Streaming应用程序取走进行处理
a1.sinks.k1.type = avro
a1.sinks.k1.hostname = slave
a1.sinks.k1.port = 44444
#Use a channel which buffers events in memory
a1.channels.c1.type = memory
a1.channels.c1.capacity = 1000000
a1.channels.c1.transactionCapacity = 1000000

a1.sources.r1.channels = c1
a1.sinks.k1.channel = c1
scala代码
import org.apache.spark.SparkConf
import org.apache.spark.storage.StorageLevel
import org.apache.spark.streaming._
import org.apache.spark.streaming.flume._

object FlumeEventCount {
  def main(args: Array[String]) {
	val host = “slave"
  val port = 44444
// Create the context and set the batch size
val conf = new SparkConf().setAppName("FlumeEventCount").setMaster("local[2]")
val ssc = new StreamingContext(conf, Seconds(10))
// 减少终端的输出信息。设置为ERROR时,由于flume没有启动,仍有大量的输出信息
ssc.sparkContext.setLogLevel("ERROR")

// Create a flume stream
val stream = FlumeUtils.createStream(ssc, host, port, StorageLevel.MEMORY_ONLY_SER_2)

// Print out the count of events received from this server in each batch
stream.count().map(cnt => "Received " + cnt + " flume events." ).print()
ssc.start()
ssc.awaitTermination()
  }
}// 备注:host (node1),必须是Spark集群中的一台节点,Spark会在这台机器上启动NettyServer
pull
注意
将spark-streaming-flume-sink_2.11-2.3.0.jar、scala-library-2.11.8.jar拷贝到$FLUME_HOME/lib中
备注 scala-library-2.10.5.jar 删除
启动flume:
flume-ng agent --conf-file $FLUME_HOME/conf/flume-to-spark-pull.conf --name a1 -Dflume.root.logger=INFO,console
定义配置文件 flume-to-spark-pull.conf

# agent名称,source、channel、sink的名称
a1.sources = r1
a1.channels = c1
a1.sinks = k1
# 定义具体的source
a1.sources.r1.type = netcat
a1.sources.r1.bind = node3
a1.sources.r1.port = 22222
a1.sources.r1.channels = c1
# 定义具体的channel
a1.channels.c1.type = memory
a1.channels.c1.capacity = 1000
a1.channels.c1.transactionCapacity = 100
# 定义具体的sink
a1.sinks.k1.type = org.apache.spark.streaming.flume.sink.SparkSink
a1.sinks.k1.hostname = node3
a1.sinks.k1.port = 11111
a1.sinks.k1.channel = c1
# 备注:node3是安装了flume的节点
scala
import org.apache.spark.SparkConf
import org.apache.spark.streaming._
import org.apache.spark.streaming.flume._
object FlumePullingEventCount {
  def main(args: Array[String]) {
    val host = "node3"
    val port = 11111

    val conf = new SparkConf().setAppName("FlumePullingEventCount").setMaster("local[*]")
    val ssc = new StreamingContext(conf, Seconds(5))
    ssc.sparkContext.setLogLevel("ERROR")

    val stream = FlumeUtils.createPollingStream(ssc, host, port)
    stream.count().map(cnt => "Received " + cnt + " flume events." ).print()

    ssc.start()
    ssc.awaitTermination()
  }
}
kafka与 flume 整合
-
将kafkaflume-plugin.jar导入到flume/lib下
-
编写配置文件conf
vi /opt/programfile/flume/conf/kflume.conf# config component producer.sources=s producer.channels=c producer.sinks=r # config sources producer.sources.s.type=exec producer.sources.s.command=tail -F /home/zhangsan/userEventlogs.log producer.sources.s.channels=c # config channel producer.channels.c.type=memory producer.channels.c.capacity=15000 producer.channels.c.transactionCapacity=150 # config sink4 (kafka中的producer : broker-list,topic) producer.sinks.r.type=org.apache.flume.plugins.KafkaSink producer.sinks.r.metadata.broker.list=master:9092,slave1:9092,slave2:9092 //9092是broker server的服务器端口,允许只写一个主机地址 producer.sinks.r.serializer.class=kafka.serializer.StringEncoder producer.sinks.r.request.required.acks= -1 producer.sinks.r.max.message.size=1000000 producer.sinks.r.producer.type=sync producer.sinks.r.custom.encoding=UTF-8 producer.sinks.r.custom.topic.name=flumetokafka2 producer.sinks.r.channel = c -
编写执行脚本
vi /opt/programfile/flume/kflume.bash
#!/bin/bash
bin/flume-ng agent -n producer -c conf -f conf/kflume.conf
-Dflume.root.logger=DEBUG,console>./kflume.log 2>&1 & -
启动脚本
bash kflume.sh -
向/home/zhangsan/userEventlogs.log 追加数据
echo “hello ,flume to kafka” >> userEventlogs.log -
启动kafka
创建主题:flumetokafka启动kafka消费者:
bin/kafka-console-consumer.sh --zookeeper master:2181 --topic flumetokafka --from-beginning -
实时的测试
不断向userEventlogs.log中写入新的信息


