mmdetection在重庆江小白上的训练--使用自定义coco数据集的测试和训练
mmdetection在重庆江小白上的训练--使用自定义coco数据集的测试和训练
- 1、配置mmdetection
- 1.1 环境要求
- 1.2安装mmdetection
- 2、测试
- 3、用自己的数据集训练
- 参考文献
本人目标检测小白一枚,未来可能会从事缺陷检测方向的研究与应用,因此提前了解一下目前检测的工具箱mmdetection,在使用mmdetection过程中,自我感觉踩了所有小白要踩得坑,特分享出来,希望对大家有帮助。
1、配置mmdetection
配置mmdetection,安装官方GitHub配置即可,即配即用,简单高效。官方更新了install,我在此给读着分享一下我的配置过程。
1.1 环境要求
转自官方:https://github.com/open-mmlab/mmdetection/blob/master/docs/INSTALL.md
Linux (Windows is not officially supported) 【据其他网友的分享,我在windows下成功配置了mmdetection】
Python 3.5+
PyTorch 1.1 or higher
CUDA 9.0 or higher
NCCL 2
GCC 4.9 or higher
mmcv
We have tested the following versions of OS and softwares:
OS: Ubuntu 16.04/18.04 and CentOS 7.2
CUDA: 9.0/9.2/10.0/10.1
NCCL: 2.1.15/2.2.13/2.3.7/2.4.2
GCC(G++): 4.9/5.3/5.4/7.3
1.2安装mmdetection
a.创建虚拟环境
conda create -n open-mmlab python=3.7 -y
source activate open-mmlab
安装后的conda list 结果如下:

b.安装Pytorch1.1
conda install pytorch=1.1 torchvision -c pytorch
安装好后,可以重启 一下环境,测试一下pytorch安装成功了没
python
import torch
c.安装mmdetection
我们先创建一个文件夹,并cd到这个文件夹下
mkdir chongqingDefectDetection
cd ./chongqingDefectDetection/
然后git mmdetection这个项目,没安装git的可以先安装一下
git clone https://github.com/open-mmlab/mmdetection.git
cd mmdetection
安装mmdetection需要的包,之前的官方教程将mmcv的安装列了出来,目前的mmcv在requirements.txt中
conda install  cython
pip install -r requirements.txt
pip install "git+https://github.com/cocodataset/cocoapi.git#subdirectory=PythonAPI"
pip install -v -e .  # or "python setup.py develop"
注意最后一行命令最后有个“ . ”
pip list 看到有mmdet就是安装成功了
2、测试
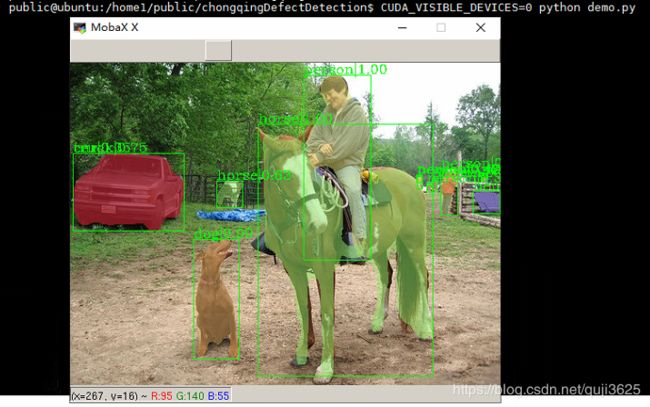
要完成测试,需要checkpoint,需要demo,需要一个.jpg。
先说checkpoint,推荐2个网址:
(1)https://mmdetection.readthedocs.io/en/latest/MODEL_ZOO.html
(2)http://aiuai.cn/aifarm1216.html
这两个网址都有model,都可以下载。如果一个不好用,可以换另一个。我们选择cascade_mask_rcnn_r101进行测试
from mmdet.apis import init_detector, inference_detector, show_result

config_file = 'configs/cascade_mask_rcnn_r101_fpn_1x.py'
checkpoint_file = 'checkpoints/cascade_mask_rcnn_r101_fpn_1x_20181129-64f00602.pth'

model = init_detector(config_file, checkpoint_file)

img = 'test.jpg'
result = inference_detector(model, img)
show_result(img, result, model.CLASSES)

#
# imgs = ['test1.jpg', 'test2.jpg']
# for i, result in enumerate(inference_detector(model, imgs, device='cuda:0')):
#     show_result(imgs[i], result, model.CLASSES, out_file='result_{}.jpg'.format(i))
看下服务器gpu的id=0空着运行命令:
CUDA_VISIBLE_DEVICES=0 python demo.py
3、用自己的数据集训练
以天池比赛,重庆江小白这个赛题为例,官网提供的标签是类似coco数据集的,但是没有segmentation,因此不能用mask_rcnn网络,当然可以自行添加segmentation,本节末附上参考添加segmentation的代码。以下是比赛信息
初赛针对瓶装酒的瓶盖、标贴、喷码三个部分的质检需求,提供图片数据以及训练集的标注信息。对上述三个部分的瑕疵类型评价质检效果。输入为拍摄的瓶盖/瓶身图像,输出为若干矩形框以及对应的类别、置信度。感兴趣目标如下表所示。
瓶盖部分 标贴部分 喷码部分
瓶盖破损 标贴歪斜 正常喷码
瓶盖变形 标贴起皱 异常喷码
瓶盖坏边 标贴气泡
瓶盖打旋
瓶盖断点
共10类。
注: 由于拍摄目标的不同,拍摄的图像可以分为两种,一种是单独针对瓶盖(瓶盖、喷码),另一种是单独针对瓶身(标贴),两类图像的宽高有较大差异。
示例图片:
enter image description here
数据说明
训练集提供训练图像(images文件夹),图像后缀为.jpg,以及标注文件(annotations.json)。注意图像有两大类(瓶盖、瓶身)。
标注文件格式为.json,采用类似MSCOCO数据集的标注格式(http://cocodataset.org),数据结构如下
{
“images”:
[
{“file_name”:“cat.jpg”, “id”:1, “height”:1000, “width”:1000},
{“file_name”:“dog.jpg”, “id”:2, “height”:1000, “width”:1000},
…
]
“annotations”:
[
{“image_id”:1, “bbox”:[100.00, 200.00, 10.00, 10.00], “category_id”: 1}
{“image_id”:2, “bbox”:[150.00, 250.00, 20.00, 20.00], “category_id”: 2}
…
]
“categories”:
[
{“id”:0, “name”:“bg”}
{“id”:1, “name”:“cat”}
{“id”:1, “name”:“dog”}
…
]
}
标注文件中,“images” 关键字对应图片信息,“annotations” 关键字对应标注信息,“categories” 对应类别信息:
“images”: 该关键字对应的数据中,每一项对应一张图片,"file_name"对应图片名称,"id"对应图片序号,"height"和"width"分别对应图像的高和宽。
“annotations”: 该关键字对应的数据中,每一项对应一条标注,"image_id"对应图片序号,"bbox"对应标注矩形框,顺序为[x, y, w, h],分别为该矩形框的起始点x坐标,起始点y坐标,宽、高。"category_id"对应类别序号。
“categories”: 该关键字对应的数据中,每一项对应一个类别,"id"对应类别序号,"name"对应类别名称。
关键字关联说明:
1.“annotations"中的元素通过"image_id"关联图像,比如"image_id”:2,该条标注信息对应"images"中"id"为2的图像。
2.“annotations"中的元素通过"category_id"关联类别,比如"category_id”:2,该条标注信息对应"categories"中"id"为2的类别。
例: 在上面列出的数据结构中
{“image_id”:1, “bbox”:[100.00, 200.00, 10.00, 10.00], “category_id”: 1}
这条标注信息通过"image_id"可以找到对应的图像为"cat.jpg",通过"category_id"可以找到对应的类别为"cat"
背景图片说明:
"annotations"中的元素,“category_id”:0对应的是背景。当且仅当一张图片对应的所有annotations中,"category_id"都为0,该图片为背景图片。
划重点划重点:本人小白刚踩坑的时候,官方提供了"category_id":0对应的是背景,但是自定义coco数据集是不需要背景类的,因此,需要把 “category_id”:0去掉
if ann['category_id'] == 0:
	continue
其次,注释掉segmentation(coco.py找下)
# gt_masks_ann.append(ann['segmentation'])
接下来是我个人的理解:人家官方coco从0开始打标,所有标签不含有背景,因此,源代码位置/mmdetection/mmdet/datasets/coco.py中的cat_id: i + 1需要修改,改成cat_id: i即把+1去掉。
def load_annotations(self, ann_file):
        self.coco = COCO(ann_file)
        self.cat_ids = self.coco.getCatIds()
        self.cat2label = {
            cat_id: i + 1
            for i, cat_id in enumerate(self.cat_ids)
        }
        self.img_ids = self.coco.getImgIds()
        img_infos = []
        for i in self.img_ids:
            info = self.coco.loadImgs([i])[0]
            info['filename'] = info['file_name']
            img_infos.append(info)
        return img_infos
当然还有顺便把coco.py的classes修改一下
CLASSES = ("\u74f6\u76d6\u7834\u635f", "\u74f6\u76d6\u53d8\u5f62", "\u74f6\u76d6\u574f\u8fb9",
               "\u74f6\u76d6\u6253\u65cb", "\u74f6\u76d6\u65ad\u70b9", "\u6807\u8d34\u6b6a\u659c",
               "\u6807\u8d34\u8d77\u76b1",
               "\u6807\u8d34\u6c14\u6ce1", "\u55b7\u7801\u6b63\u5e38", "\u55b7\u7801\u5f02\u5e38")
接下来修改class_names
位置:/mmdetection/mmdet/core/evaluation/
def coco_classes():
    return [
        "\u74f6\u76d6\u7834\u635f", "\u74f6\u76d6\u53d8\u5f62", "\u74f6\u76d6\u574f\u8fb9",
        "\u74f6\u76d6\u6253\u65cb", "\u74f6\u76d6\u65ad\u70b9", "\u6807\u8d34\u6b6a\u659c",
        "\u6807\u8d34\u8d77\u76b1", "\u6807\u8d34\u6c14\u6ce1", "\u55b7\u7801\u6b63\u5e38", "\u55b7\u7801\u5f02\u5e38"
    ]
再修改config,各路大神都是直接分享的config,我不再赘述,本文采用的是cascade_rcnn_r50,位置:/mmdetection/configs/
把config中的num_classes设置为11,同时设置checkpoints
load_from = '/home1/public/CQdefectDetection/mmdetection/checkpoints/cascade_rcnn_r50_fpn_1x_20190501-3b6211ab.pth'就可以运行了,当然要保证炼丹的质量,肯定要修改img_scale,当然还有其他参数。为什么这里点出来img_scale,因为官方提供的数据集中图像的尺寸小到几百,大到4000的都有,修改img_scale就很重要了。
ok,最后运行train,位置./tools/train.py,命令如下:
CUDA_VISIBLE_DEVICES=2 python ./tools/train.py configs/cascade_rcnn_r50_fpn_1x.py
运行成功!
分享几个我遇到的问题:1.程序默认有多卡的情况下使用id=0号卡,我尝试了其他的指定gpu的方法,就我上文这种方法是ok的;2.对于coco文件中的修改,少了一个都会报错,踩坑都踩在coco.py修改上了;3.资源有限,没能尝试mmdetection我觉得特别好的功能,分布式训练。官方给出了代码,很简答。
参考文献3是别人分享的添加segmentation字段。
本人来自西安理工大学大学 朱虹图像处理研究室,写这篇文章算是一个手册,由于肺炎疫情,响应国家号召,在家学习,几个小伙伴准备在斗鱼直播分享,有paper,有应用。欢迎围观。
微信公众号:朱虹图像处理研究室
斗鱼直播链接:www.douyu.com/8045559
参考文献
1: https://github.com/open-mmlab/mmdetection/blob/master/docs/INSTALL.md
2: https://www.dazhuanlan.com/2019/11/20/5dd4ae85e8732/
3: https://tianchi.aliyun.com/forum/postDetailspm=5176.12586969.1002.27.125b13e2KxvdDw&postId=86906
4: http://adrai.github.io/flowchart.js/
