SpringBoot+Mybatis+thymeleaf结合分页功能
在Idea中新建项目,选择maven,创建一个空项目,直接next。
pom.xml文件如下:其中主要就是springboot的核心包,mysql连接包,thymeleaf包,mybatis包,由于用到了分页,所以再加入一个分页的包。
<project xmlns="http://maven.apache.org/POM/4.0.0"
         xmlns:xsi="http://www.w3.org/2001/XMLSchema-instance"
         xsi:schemaLocation="http://maven.apache.org/POM/4.0.0 http://maven.apache.org/xsd/maven-4.0.0.xsd">
    <modelVersion>4.0.0modelVersion>

    <groupId>cn.edu.cqugroupId>
    <artifactId>qxcvartifactId>
    <version>1.0-SNAPSHOTversion>


    <parent>
        <groupId>org.springframework.bootgroupId>
        <artifactId>spring-boot-starter-parentartifactId>
        <version>1.5.1.RELEASEversion>
    parent>
    <dependencies>
        <dependency>
            <groupId>org.springframework.bootgroupId>
            <artifactId>spring-boot-starter-webartifactId>
        dependency>


        <dependency>
            <groupId>mysqlgroupId>
            <artifactId>mysql-connector-javaartifactId>
            <version>5.1.39version>
        dependency>


        <dependency>
            <groupId>org.springframework.bootgroupId>
            <artifactId>spring-boot-starter-thymeleafartifactId>
            <version>1.4.0.RELEASEversion>
        dependency>


        <dependency>
            <groupId>org.springframework.bootgroupId>
            <artifactId>spring-boot-starter-data-jpaartifactId>
            <version>1.5.1.RELEASEversion>
        dependency>


        <dependency>
            <groupId>com.alibabagroupId>
            <artifactId>druidartifactId>
            <version>1.0.9version>
        dependency>


        <dependency>
            <groupId>org.mybatis.spring.bootgroupId>
            <artifactId>mybatis-spring-boot-starterartifactId>
            <version>1.3.2version>
        dependency>


        <dependency>
            <groupId>com.github.pagehelpergroupId>
            <artifactId>pagehelperartifactId>
            <version>4.1.6version>
        dependency>


        <dependency>
            <groupId>com.alibabagroupId>
            <artifactId>fastjsonartifactId>
            <version>1.2.14version>
        dependency>

    dependencies>
project>application.properties文件的配置,主要是关于views和thymeleaf的配置,告诉我们视图文件位于什么地方,以及它的后缀,以及静态文件所处的位置。
server.port = 8080
server.tomcat.uri-encoding = utf-8

#views
spring.mvc.view.prefix = classpath:/templates/
spring.mvc.view.suffix = .html
spring.mvc.static-path-pattern = /static/**

#thymeleaf start
spring.thymeleaf.mode = HTML5
spring.thymeleaf.encoding = UTF-8
spring.thymeleaf.content-type = text/html
# 开发时关闭缓存,不然没法看到实时页面
spring.thymeleaf.cache=false
#thymeleaf end
在springboot中,不需要繁琐地配置xml文件,因此需要写一个java文件对mybatis进行配置。在传统的mybatis配置中,会有如下的配置:
<environments default="development">
  <environment id="development">
    <transactionManager type="JDBC">
      <property name="..." value="..."/>
    transactionManager>
    <dataSource type="POOLED">
      <property name="driver" value="${driver}"/>
      <property name="url" value="${url}"/>
      <property name="username" value="${username}"/>
      <property name="password" value="${password}"/>
    dataSource>
  environment>
environments>这里它指定了数据源为POOLED,官网上给出的文档是这样的:
这里我们也可以使用阿里的druid数据源。其配置如下:里面包括了数据库方面的基本配置。
package cn.edu.cqu.config;

import com.alibaba.druid.pool.DruidDataSource;
import com.alibaba.druid.support.http.StatViewServlet;
import com.alibaba.druid.support.http.WebStatFilter;
import org.springframework.boot.web.servlet.FilterRegistrationBean;
import org.springframework.boot.web.servlet.ServletRegistrationBean;
import org.springframework.context.annotation.Bean;
import org.springframework.context.annotation.Configuration;
import org.springframework.context.annotation.Primary;

import java.sql.SQLException;

@Configuration
public class DataSourceConfig {
  /**
   * druid初始化
   * @return
   * @throws SQLException
   */
  @Primary //默认数据源
  @Bean(name = "dataSource", destroyMethod = "close")
  public DruidDataSource Construction() throws SQLException {
    DruidDataSource dataSource = new DruidDataSource();
    dataSource.setUrl("jdbc:mysql://localhost:3306/springboottest");
    dataSource.setUsername("root");
    dataSource.setPassword("root");
    dataSource.setDriverClassName("com.mysql.jdbc.Driver");
    //配置最大连接
    dataSource.setMaxActive(20);
    //配置初始连接
    dataSource.setInitialSize(1);
    //配置最小连接
    dataSource.setMinIdle(1);
    //连接等待超时时间
    dataSource.setMaxWait(60000);
    //间隔多久进行检测,关闭空闲连接
    dataSource.setTimeBetweenEvictionRunsMillis(60000);
    //一个连接最小生存时间
    dataSource.setMinEvictableIdleTimeMillis(300000);
    //用来检测是否有效的sql
    dataSource.setValidationQuery("select 'x'");
    dataSource.setTestWhileIdle(true);
    dataSource.setTestOnBorrow(false);
    dataSource.setTestOnReturn(false);
    //打开PSCache,并指定每个连接的PSCache大小
    dataSource.setPoolPreparedStatements(true);
    dataSource.setMaxOpenPreparedStatements(20);
    //配置sql监控的filter
    dataSource.setFilters("stat, wall, log4j");
    try {
      dataSource.init();
    } catch (SQLException e) {
      throw new RuntimeException("druid datasource init fail");
    }
    return dataSource;
  }

  /**
   * druid监控
   * @return
   */
  @Bean
  public ServletRegistrationBean druidServlet() {
    ServletRegistrationBean reg = new ServletRegistrationBean();
    reg.setServlet(new StatViewServlet());
    reg.addUrlMappings("/druid/*");
    reg.addInitParameter("loginUsername", "qinxue");
    reg.addInitParameter("loginPassword", "111220");
    return reg;
  }

  /**
   * druid监控过滤
   * @return
   */
  @Bean
  public FilterRegistrationBean filterRegistrationBean() {
    FilterRegistrationBean filterRegistrationBean = new FilterRegistrationBean();
    filterRegistrationBean.setFilter(new WebStatFilter());
    filterRegistrationBean.addUrlPatterns("/*");
    filterRegistrationBean.addInitParameter("exclusions", "*.js,*.gif,*.jpg,*.png,*.css,*.ico,/druid/*");
    return filterRegistrationBean;
  }
}
接着就来配置mybatis,和之前的不同,使用的是java类来配置的。
bean.setTypeAliasesPackage("cn.edu.cqu.entity");这里设置了需要扫描的实体类的路径
bean.setMapperLocations(resolver.getResources("classpath:mapper/*.xml"));这句话设置了需要扫描的xml的文件,里面是写sql查询的。
package cn.edu.cqu.config;

import com.github.pagehelper.PageHelper;
import org.apache.ibatis.plugin.Interceptor;
import org.apache.ibatis.session.SqlSessionFactory;
import org.mybatis.spring.SqlSessionFactoryBean;
import org.mybatis.spring.SqlSessionTemplate;
import org.springframework.context.annotation.Bean;
import org.springframework.context.annotation.Configuration;
import org.springframework.core.io.support.PathMatchingResourcePatternResolver;
import org.springframework.core.io.support.ResourcePatternResolver;
import org.springframework.jdbc.datasource.DataSourceTransactionManager;
import org.springframework.transaction.PlatformTransactionManager;
import org.springframework.transaction.annotation.EnableTransactionManagement;
import org.springframework.transaction.annotation.TransactionManagementConfigurer;

import java.util.Properties;

import javax.annotation.Resource;
import javax.sql.DataSource;

@Configuration
@EnableTransactionManagement
public class MybatisConfig implements TransactionManagementConfigurer{
  @Resource(name = "dataSource")
  DataSource dataSource;

  /**
   * 可以通过这个类,详细配置mybatis
   * @return
   */
  @Bean
  public org.apache.ibatis.session.Configuration mybatisSetting() {
      org.apache.ibatis.session.Configuration configuration = new org.apache.ibatis.session.Configuration();
      return configuration;
  }

  @Bean(name = "sqlSessionFactory")
  public SqlSessionFactory sqlSessionFactoryBean() {

    SqlSessionFactoryBean bean = new SqlSessionFactoryBean();
    bean.setDataSource(dataSource);
    bean.setTypeAliasesPackage("cn.edu.cqu.entity");

    //分页插件,插件无非是设置mybatis的拦截器
    PageHelper pageHelper = new PageHelper();
    Properties properties = new Properties();
    properties.setProperty("reasonable", "true");
    properties.setProperty("supportMethodsArguments", "true");
    properties.setProperty("returnPageInfo", "check");
    properties.setProperty("params", "count=countSql");
    pageHelper.setProperties(properties);

    //添加插件 pageHelper版本要对,不然会报错
    bean.setPlugins(new Interceptor[]{pageHelper});

    //添加XML目录
    ResourcePatternResolver resolver = new PathMatchingResourcePatternResolver();
    try {
      bean.setMapperLocations(resolver.getResources("classpath:mapper/*.xml"));
      return bean.getObject();
    } catch (Exception e) {
      throw new RuntimeException("sqlSessionFactory init fail", e);
    }
  }

  /**
   * 用于实际查询的sql工具,传统dao开发形式可以使用这个,基于mapper代理则不需要注入
   * @param sqlSessionFactory
   * @return
   */
  @Bean(name = "sqlSessionTemplate")
  public SqlSessionTemplate sqlSessionTemplate(SqlSessionFactory sqlSessionFactory) {
    return new SqlSessionTemplate(sqlSessionFactory);
  }

  /**
   * 事务管理,具体使用在service层加入@Transactional注解
   */
  @Bean(name = "transactionManager")
  @Override
  public PlatformTransactionManager annotationDrivenTransactionManager() {
    return new DataSourceTransactionManager(dataSource);
  }
}
整个项目的目录结构如下:
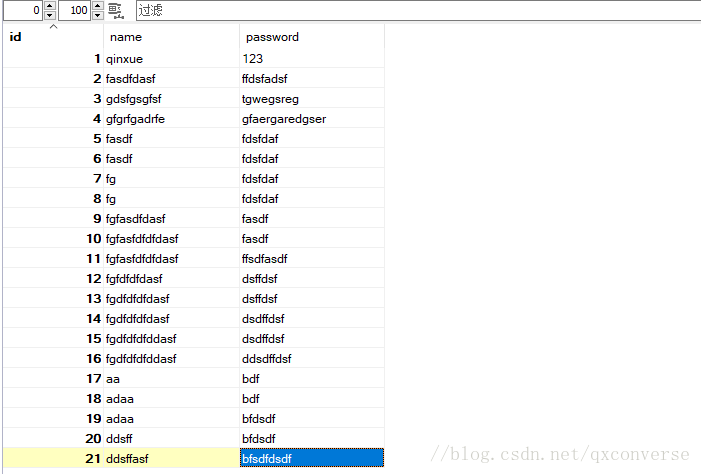
下面就来具体开发,一样的,数据库里面要有数据,作为一个简单的示例,我们在数据库springboottest数据库底下新建user表,表的结构和数据为:
新建实体类User.java:
package cn.edu.cqu.entity;

import java.io.Serializable;

public class User implements Serializable{
  private int id;
  private String name;
  private String password;

  public int getId() {
    return id;
  }

  public void setId(int id) {
    this.id = id;
  }

  public String getName() {
    return name;
  }

  public void setName(String name) {
    this.name = name;
  }

  public String getPassword() {
    return password;
  }

  public void setPassword(String password) {
    this.password = password;
  }
}
在UserMapper.xml中写有如下简单的查询。
<mapper namespace="cn.edu.cqu.mapper.UserMapper">

    <select id="findById" parameterType="int" resultType="User">
        SELECT * FROM user WHERE id = #{id}
    select>

    <select id="findByName" parameterType="String" resultType="User">
        SELECT * FROM user WHERE name = #{name}
    select>

    <select id="getAllUsers"  resultType="User">
        SELECT * FROM user
    select>
mapper>实现UserMapper接口。
package cn.edu.cqu.mapper;

import cn.edu.cqu.entity.User;

import java.util.List;

public interface UserMapper {
  /**
   * 根据id查询用户
   * @param id
   * @return
   */
  User findById(int id);

  User findByName(String name);

  List getAllUsers();
}
实现UserController.java如下:
package cn.edu.cqu.controller;

import cn.edu.cqu.entity.User;
import cn.edu.cqu.mapper.UserMapper;
import com.github.pagehelper.PageHelper;
import com.github.pagehelper.PageInfo;
import org.slf4j.Logger;
import org.slf4j.LoggerFactory;
import org.springframework.stereotype.Controller;
import org.springframework.ui.Model;
import org.springframework.web.bind.annotation.RequestMapping;
import org.springframework.web.bind.annotation.RequestMethod;
import org.springframework.web.bind.annotation.RequestParam;
import org.springframework.web.bind.annotation.ResponseBody;

import javax.annotation.Resource;
import java.util.List;

@Controller
@RequestMapping(value = "/user")
public class UserController {

  private Logger logger = LoggerFactory.getLogger(UserController.class);

  @Resource
  private UserMapper userMapper;

  @RequestMapping(value = "/index")
  public String index(Model model){
    model.addAttribute("name", "qxcv");
    return "user/index";
  }

  @RequestMapping(value = "/getUserByName", method = RequestMethod.GET)
  public @ResponseBody User getUserInfo(String name){
    User user = userMapper.findByName(name);
    logger.debug("this is debug info");
    logger.info("this is info info");
    logger.warn("this is warn info");
    logger.error("this is error info");
    return user;
  }

  @RequestMapping(value = "/allUsers")
  public String list(Model model, @RequestParam(defaultValue = "1") Integer pageNum, @RequestParam(defaultValue = "5") Integer pageSize) {

    //引入分页查询,使用PageHelper分页功能在查询之前传入当前页,然后多少记录
    PageHelper.startPage(pageNum, pageSize);
    //startPage后紧跟的这个查询就是分页查询
    List users = userMapper.getAllUsers();
    //使用PageInfo包装查询结果,只需要将pageInfo交给页面就可以
    PageInfo pageInfo = new PageInfo(users, 5);

    model.addAttribute("pageInfo", pageInfo);

    //获得当前页
    model.addAttribute("pageNum", pageInfo.getPageNum());
    //获得一页显示的条数
    model.addAttribute("pageSize", pageInfo.getPageSize());
    //是否是第一页
    model.addAttribute("isFirstPage", pageInfo.isIsFirstPage());
    //获得总页数
    model.addAttribute("totalPages", pageInfo.getPages());
    //是否是最后一页
    model.addAttribute("isLastPage", pageInfo.isIsLastPage());
    return "user/list";
  }
}
默认界面:index.html
<html xmlns:th="http://www.thymeleaf.org">
<head>
    <title>hellotitle>
    <meta http-equiv="Content-Type" content="text/html; charset=UTF-8" />
head>
<body>
<p th:text="'Hello!, ' + ${name} + '!'" >3333p>
body>
html>展示所有用户信息:list.html
<html xmlns:th="http://www.thymeleaf.org">
<head>
    <title>hellotitle>
    <link rel="stylesheet" th:href="@{../static/bootstrap/css/bootstrap.css}" />
    <script th:src="@{../static/js/jquery.js}">script>
    <script th:src="@{../static/bootstrap/js/bootstrap.js}">script>
    <meta http-equiv="Content-Type" content="text/html; charset=UTF-8" />
head>
<body>

<div class="container">
<table class="table table-striped">
    <tr>
        <th>idth>
        <th>nameth>
        <th>passwordth>
    tr>
    <tr th:each="user : ${pageInfo.list}">
        <td th:text="${user.id}">td>
        <td th:text="${user.name}">td>
        <td th:text="${user.password}">td>
    tr>
table>

<nav>
    <ul class="pagination">
        <li>
            <a th:if="${not isFirstPage}" th:href="@{${'allUsers'}(pageNum=${pageNum-1},pageSize=${pageSize})}" aria-label="Previous">
                <span aria-hidden="true">«span>
            a>
            <a th:if="${isFirstPage}" href="javascript:void(0);" aria-label="Previous">
                <span aria-hidden="true">«span>
            a>
        li>

        <li th:each="pageNo : ${#numbers.sequence(1, totalPages)}">
            <a th:if="${pageNum eq pageNo}" href="javascript:void(0);">
                <span th:text="${pageNo}">span>
            a>

            <a th:if="${not (pageNum eq pageNo)}" th:href="@{${'allUsers'}(pageNum=${pageNo},pageSize=${pageSize})}">
                <span th:text="${pageNo}">span>
            a>
        li>

        <li>
            <a th:if="${not isLastPage}" th:href="@{${'allUsers'}(pageNum=${pageNum+1},pageSize=${pageSize})}" aria-label="Next">
                <span aria-hidden="true">»span>
            a>
            <a th:if="${isLastPage}" href="javascript:void(0);" aria-label="Next">
                <span aria-hidden="true">»span>
            a>
        li>
    ul>
nav>
div>
body>
html>Entry.java,springboot的入口函数:
package cn.edu.cqu.config;

import org.mybatis.spring.annotation.MapperScan;
import org.springframework.boot.SpringApplication;
import org.springframework.boot.autoconfigure.SpringBootApplication;
import org.springframework.context.annotation.ComponentScan;

@SpringBootApplication
@ComponentScan(basePackages = "cn.edu.cqu")
@MapperScan("cn.edu.cqu.mapper")
public class Entry {
  public static void main(String[] args) throws Exception {
    SpringApplication.run(Entry.class, args);
  }
}
运行后的截图:


