用Visual Studio Code配合Linux子系统进行C/C++开发(调试篇)
在前一篇文章用Visual Studio Code配合Linux子系统进行C/C++开发(初级篇)里面,我们搭建了C/C++的开发环境,但是还不能调试,这怎么能行,下面,我们就把这个功能也配置起来。
关键的部分参考了文档:Windows 10’s Windows Subsystem for Linux
一、首先在Linux子系统安装调试工具,这里选用GDB。
sudo apt-get update
sudo apt-get install gdb
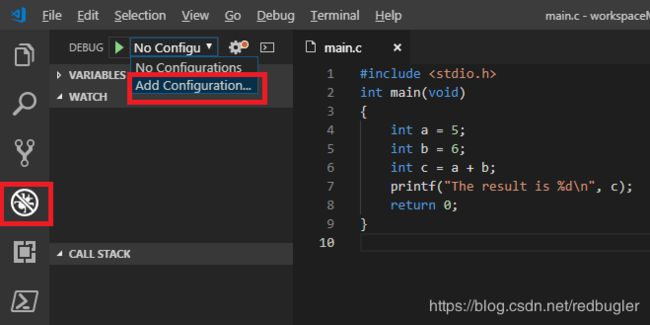
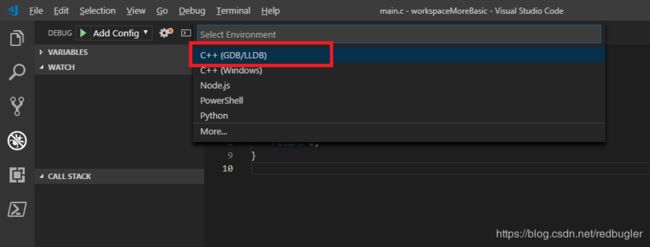
二、在Visual Studio Code中添加调试用的配置文件(参照下图)。


将自动生成的配置内容删除(可选)。
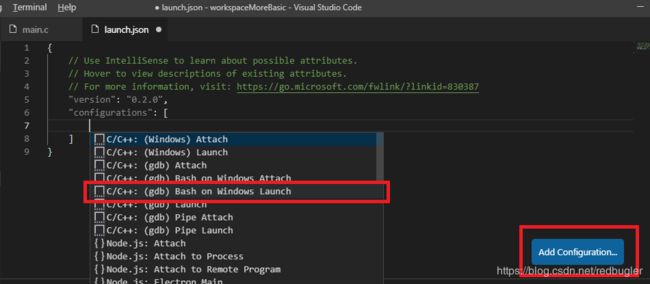
点击Add Configuration…,在弹出的项目中选择C/C++: (gdb) Bash on Windows Launch

下面是自动生成的配置,我们需要进行修改,使之适合Linux子系统。
{
    // Use IntelliSense to learn about possible attributes.
    // Hover to view descriptions of existing attributes.
    // For more information, visit: https://go.microsoft.com/fwlink/?linkid=830387
    "version": "0.2.0",
    "configurations": [
        {
            "name": "(gdb) Bash on Windows Launch",
            "type": "cppdbg",
            "request": "launch",
            "program": "enter program name, for example ${workspaceFolder}/a.exe",
            "args": [],
            "stopAtEntry": false,
            "cwd": "${workspaceFolder}",
            "environment": [],
            "externalConsole": true,
            "pipeTransport": {
                "debuggerPath": "/usr/bin/gdb",
                "pipeProgram": "${env:windir}\\system32\\bash.exe",
                "pipeArgs": ["-c"],
                "pipeCwd": ""
            },
            "setupCommands": [
                {
                    "description": "Enable pretty-printing for gdb",
                    "text": "-enable-pretty-printing",
                    "ignoreFailures": true
                }
            ]
        }
    ]
}
修改完成的配置文件如下:
{
    // Use IntelliSense to learn about possible attributes.
    // Hover to view descriptions of existing attributes.
    // For more information, visit: https://go.microsoft.com/fwlink/?linkid=830387
    "version": "0.2.0",
    "configurations": [
        {
            "name": "(gdb) Bash on Windows Launch",
            "type": "cppdbg",
            "request": "launch",
            "program": "/mnt/c/Users/hongjun.liu/devNewHope/workspaceMoreBasic/CStudyBasic/main",
            "args": ["-fThreading"],
            "stopAtEntry": false,
            "cwd": "/mnt/c/Users/hongjun.liu/devNewHope/workspaceMoreBasic/CStudyBasic/",
            "environment": [],
            "externalConsole": true,
            "windows": {
                "MIMode": "gdb",
                "setupCommands": [
                    {
                        "description": "Enable pretty-printing for gdb",
                        "text": "-enable-pretty-printing",
                        "ignoreFailures": true
                    }
                ]
            },
            "pipeTransport": {
                "debuggerPath": "/usr/bin/gdb",
                "pipeProgram": "${env:windir}\\system32\\bash.exe",
                "pipeArgs": ["-c"],
                "pipeCwd": ""
            },
            "sourceFileMap": {
                "/mnt/c": "C:\\"
            }
        }
    ]
}
为什么这样修改,参照之前文档也很容易理解,关键是由于文件系统的不同,所以要进行文件路径的转换,就像下面这样:
            "sourceFileMap": {
                "/mnt/c": "C:\\"
            }
明白了这个思想,之前的修改就不难理解了。
三、重新编译包含调试信息的可执行文件。
在Linux终端执行下面的命令:
gcc -g -Wall main.c -o main
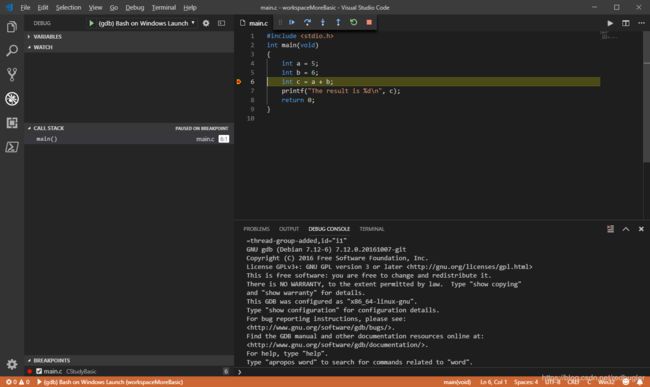
设置断点(鼠标左键或者F9),然后点击实行按钮或者F5开始调试:

我们可以看到,断点起效了,是不是很激动?

至此,我们就可以利用这个开发环境进行学习和研究了。后续我们会继续关注更高级的话题。