Nvidia JetsonTx2 使用中遇到的坑与填坑方法
1. Tx2 买回来后最好刷机,自带系统没有cuda等驱动,重新刷JetPack包。Tx2刷JetPack 3.3方法:
https://blog.csdn.net/long19960208/article/details/81538997?utm_source=blogxgwz1
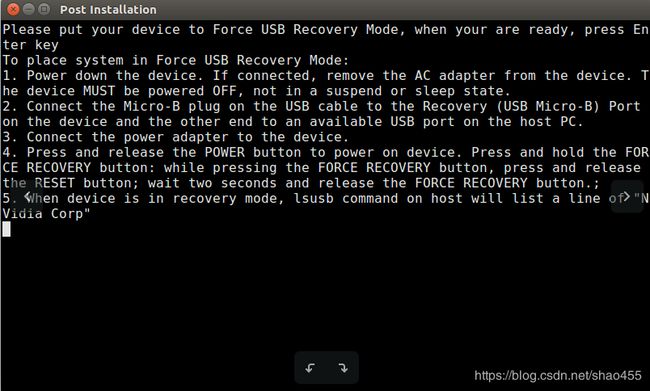
注意:主机PC安装过程中会弹出下面窗口,不要关闭,连接tx2刷机模式,连接上后在该窗口中enter

2. Tx2 安装ROS Kinetic
2.1 更换源
sudo cp /etc/apt/sources.list /etc/apt/sources.list.back
sudo gedit /etc/apt/sources.list
deb http://mirrors.tuna.tsinghua.edu.cn/ubuntu-ports/ xenial-updates main restricted universe multiverse
deb-src http://mirrors.tuna.tsinghua.edu.cn/ubuntu-ports/ xenial-updates main restricted universe multiverse
deb http://mirrors.tuna.tsinghua.edu.cn/ubuntu-ports/ xenial-security main restricted universe multiverse
deb-src http://mirrors.tuna.tsinghua.edu.cn/ubuntu-ports/ xenial-security main restricted universe multiverse
deb http://mirrors.tuna.tsinghua.edu.cn/ubuntu-ports/ xenial-backports main restricted universe multiverse
deb-src http://mirrors.tuna.tsinghua.edu.cn/ubuntu-ports/ xenial-backports main restricted universe multiverse
deb http://mirrors.tuna.tsinghua.edu.cn/ubuntu-ports/ xenial main universe restricted
deb-src http://mirrors.tuna.tsinghua.edu.cn/ubuntu-ports/ xenial main universe restricted
sudo apt-get update
git clone https://github.com/jetsonhacks/installROSTX2.git

./installROS.sh -p ros-kinetic-desktop-full
3. 使用OpenCV启动 Tx2 板载摄像头
3.1 命令方式启动
启动方法1:
gst-launch-1.0 nvcamerasrc fpsRange="30.0 30.0" ! 'video/x-raw(memory:NVMM), width=(int)1920, height=(int)1080, format=(string)I420, framerate=(fraction)30/1' ! nvtee ! nvvidconv flip-method=2 ! 'video/x-raw(memory:NVMM), format=(string)I420' ! nvoverlaysink -e
参数:flip-method指定图像旋转模式,可选0,1,2等,没有全部试验,0显示正常,1旋转90度,2上下镜像,该相机获取的图像偏暗。
启动方法2:
–prev_res 预览视屏的分辨率:
nvgstcapture-1.0 --prev-res=2
启动方法3,指定分辨率
nvgstcapture-1.0 --cus-prev-res=640x480
Tx2支持的分辨率有:
(2) : 640x480
(3) : 1280x720
(4) : 1920x1080
(5) : 2104x1560
(6) : 2592x1944
(7) : 2616x1472
(8) : 3840x2160
(9) : 3896x2192
(10): 4208x3120
(11): 5632x3168
(12): 5632x4224
3.2 OpenCV 启动
需要使用包含gsteramer的opencv
首先,卸载系统安装的OpenCV
sudo apt-get purge libopencv*
sudo apt-get update
如果源码安装了opencv,卸载源码安装的opencv
cd opencv/build
sudo make uninstall
cd ..
sudo rm -r build
sudo rm -r /usr/local/include/opencv2 /usr/local/include/opencv /usr/include/opencv /usr/include/opencv2 /usr/local/share/opencv /usr/local/share/OpenCV /usr/share/opencv /usr/share/OpenCV /usr/local/bin/opencv* /usr/local/lib/libopencv*
安装依赖包
sudo apt-get update
sudo apt-get install build-essential cmake git pkg-config
sudo apt-get install libjpeg8-dev libtiff4-dev libjasper-dev libpng12-dev
sudo apt-get install libgtk2.0-dev
sudo apt-get install libavcodec-dev libavformat-dev libswscale-dev libv4l-dev
sudo apt-get install libatlas-base-dev gfortran

sudo apt-get install -y libgstreamer1.0-0 \
            gstreamer1.0-plugins-base \
            gstreamer1.0-plugins-good \
            gstreamer1.0-plugins-bad \
            gstreamer1.0-plugins-ugly \
            gstreamer1.0-libav \
            gstreamer1.0-doc \
            gstreamer1.0-tools \
            libgstreamer1.0-dev \
            libgstreamer-plugins-base1.0-dev
下载opencv 3.3.1源码包
开启Tx2高性能模式加速编译
sudo nvpmodel -m 0
cd
sudo ./jetson_clocks.sh
编译opencv
cd $HOME/3rdLibrary/opencv-3.3.1
mkdir build
cd build
cmake \
    -DCMAKE_BUILD_TYPE=Release \
    -DCMAKE_INSTALL_PREFIX=/usr/local \
    -DBUILD_PNG=OFF \
    -DBUILD_TIFF=OFF \
    -DBUILD_TBB=OFF \
    -DBUILD_JPEG=OFF \
    -DBUILD_JASPER=OFF \
    -DBUILD_ZLIB=OFF \
    -DBUILD_EXAMPLES=ON \
    -DBUILD_opencv_java=OFF \
    -DBUILD_opencv_python2=ON \
    -DBUILD_opencv_python3=ON \
    -DENABLE_PRECOMPILED_HEADERS=OFF \
    -DWITH_OPENCL=OFF \
    -DWITH_OPENMP=OFF \
    -DWITH_FFMPEG=ON \
    -DWITH_GSTREAMER=ON \
    -DWITH_GSTREAMER_0_10=OFF \
    -DWITH_CUDA=ON \
    -DWITH_GTK=ON \
    -DWITH_VTK=OFF \
    -DWITH_TBB=ON \
    -DWITH_1394=OFF \
    -DWITH_OPENEXR=OFF \
    -DCUDA_TOOLKIT_ROOT_DIR=/usr/local/cuda-9.0 \
    -DCUDA_ARCH_BIN=6.2 \
    -DCUDA_ARCH_PTX="" \
    -DINSTALL_C_EXAMPLES=OFF \
    -DINSTALL_TESTS=OFF \
    ../

make -j6
sudo make install
sudo ldconfig
配置环境变量
1.sudo gedit /etc/ld.so.conf
末行加入:include /usr/local/lib
2.执行指令,使路径生效:
sudo ldconfig
3.修改bash.bashrc文件
sudo gedit /etc/bash.bashrc
末行加入:
PKG_CONFIG_PATH=$PKG_CONFIG_PATH:/usr/local/lib/pkgconfig
export PKG_CONFIG_PATH
4.最后source一下,让更改立即生效,终端输入:
source /etc/bash.bashrc
5.查看 OpenCV 安装版本
pkg-config --modversion opencv
4. Tx2 蓝牙连接 Xbox one手柄
Tx2的内核不支持蓝牙手柄连接,连接上后时断时连,无法连接成功,USB同样无法连接成功
ls /dev/input/ 不显示手柄 js*
需要重新编译内核,将 joystick 添加进内核.
可参考:https://www.ncnynl.com/archives/201706/1752.html
该方法本人试验失败,重新编译后仍然不能连接成功