Spring声明式事务管理(基于XML方式实现)
--------------------siwuxie095
Spring 声明式事务管理(基于 XML 方式实现)
以转账为例
1、基于XML 配置文件的方式实现声明式事务管理,其思想就是 AOP 思想
2、导入相关jar 包(共 13 个包)
(1)导入核心 jar 包和日志相关的 jar 包
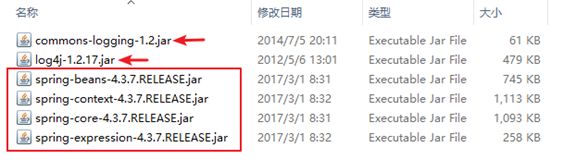
(2)导入JdbcTemplate 的 jar 包

(3)导入MySQL 的 JDBC 驱动包

mysql-connector-java下载链接:
https://dev.mysql.com/downloads/connector/j/
(4)导入 AOP 和AspectJ 的 jar 包

其中:
aopalliance下载链接:
http://mvnrepository.com/artifact/aopalliance/aopalliance
aspectjweaver下载链接:
http://mvnrepository.com/artifact/org.aspectj/aspectjweaver
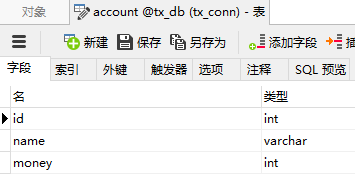
3、在MySQL 中手动创建数据库和表
数据库名:tx_db,表名:account,字段:id、name、money
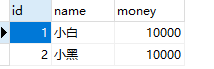
手动添加数据,用作测试
4、具体步骤
(1)配置事务管理器
|
class="org.springframework.jdbc.datasource.DataSourceTransactionManager">
|
(2)配置事务的通知(增强)
|
|
(3)配置AOP
|
|
5、具体实现
(1)编写一个Dao 类
AccountDao.java:
| package com.siwuxie095.dao;
import org.springframework.jdbc.core.JdbcTemplate;
public class AccountDao {
private JdbcTemplate jdbcTemplate;
publicvoid setJdbcTemplate(JdbcTemplate jdbcTemplate) { this.jdbcTemplate = jdbcTemplate; }
/** * 转出 */ publicvoid lessMoney(String from, int money) { String sql="update account set money=money-? where name=?"; jdbcTemplate.update(sql, money, from); }
/** * 转入 */ publicvoid moreMoney(String to, int money) { String sql="update account set money=money+? where name=?"; jdbcTemplate.update(sql, money, to); }
} |
(2)编写一个Service 类
AccountService.java:
| package com.siwuxie095.service;
import com.siwuxie095.dao.AccountDao;
public class AccountService {
private AccountDao accountDao;
publicvoid setAccountDao(AccountDao accountDao) { this.accountDao = accountDao; }
/** * 转账 */ publicvoid transfer(String from,String to,int money) {
accountDao.lessMoney(from, money);
// 即便中间出现了什么异常,也会进行回滚 // 如:int num=10/0;
accountDao.moreMoney(to, money);
}
} |
(3)在配置文件中进行配置
applicationContext.xml:
| version="1.0"encoding="UTF-8"?> xmlns:xsi="http://www.w3.org/2001/XMLSchema-instance" xmlns:aop="http://www.springframework.org/schema/aop" xmlns:context="http://www.springframework.org/schema/context" xmlns:tx="http://www.springframework.org/schema/tx" xsi:schemaLocation=" http://www.springframework.org/schema/beans http://www.springframework.org/schema/beans/spring-beans.xsd http://www.springframework.org/schema/aop http://www.springframework.org/schema/aop/spring-aop.xsd http://www.springframework.org/schema/context http://www.springframework.org/schema/context/spring-context.xsd http://www.springframework.org/schema/tx http://www.springframework.org/schema/tx/spring-tx.xsd">
class="org.springframework.jdbc.datasource.DataSourceTransactionManager">
|
(4)编写一个测试类
TestDemo.java:
| package com.siwuxie095.test;
import org.junit.Test; import org.springframework.context.ApplicationContext; import org.springframework.context.support.ClassPathXmlApplicationContext;
import com.siwuxie095.service.AccountService;
public class TestDmo {
/** * 手动加上 @Test 以进行单元测试(将自动导入 JUnit 4 的 jar 包) * * 选中方法名,右键->Run As->JUint Test */ @Test publicvoid testService() {
ApplicationContext context=new ClassPathXmlApplicationContext("applicationContext.xml");
AccountService accountService=(AccountService) context.getBean("accountService");
accountService.transfer("小白", "小黑", 1000); }
} |
【made by siwuxie095】